

I know many Data Scientists — in fact, I consider myself one of them — who work on machines with GPUs, either local or virtual, hosted in the cloud, using either Jupyter Notebook or some Python development environment. After working for 2 years as an AI/ML expert developer, I did exactly that, preparing data on a regular server or workstation while running training on a virtual machine with a GPU in Azure.
Of course, we've all heard of — a specialized cloud platform for machine learning. However, at first glance at , it seems that Azure ML will create more problems for you than it solves. For instance, in the aforementioned training example, the training on Azure ML is launched from Jupyter Notebook, and the training script is suggested to be created and edited as a text file in one of the cells — without utilizing autocompletion, syntax highlighting, or other advantages of a proper development environment. For this reason, we didn't seriously use Azure ML in our work for a long time.
However, recently I found a way to start using Azure ML effectively in my work! Interested in the details?
The main secret is the . It allows you to develop training scripts directly in VS Code, using all the advantages of the environment — plus, you can even run the script locally and then simply submit it for training in the Azure ML cluster with just a few clicks. Convenient, right?
In addition, you gain the following benefits from using Azure ML:
- You can work most of the time locally on your machine in a comfortable IDE, and only use the GPU for model training. Meanwhile, the resource pool can automatically adjust to the required load, and by setting the minimum number of nodes to 0, you can automatically launch a virtual machine "on demand" when there are training tasks.
- You can store all training results in one place, including achieved metrics and obtained models — there's no need to come up with a system or order for storing all results yourself.
- At this point, multiple people can work on a single project — they can use the same computing cluster, with all experiments queued, and they can see each other's experiment results. One such scenario is using Azure ML in teaching Deep Learning, where instead of providing each student with a GPU virtual machine, you can create one cluster that will be used by everyone centrally. Additionally, a shared results table with model accuracy can serve as a good competitive element.
- With Azure ML, you can easily conduct series of experiments, for example, for hyperparameter optimization — this can be done with just a few lines of code, and there is no need to conduct series of experiments manually.
I hope I have convinced you to try Azure ML! Here’s how to get started:
- Make sure you have installed , as well as the extensions and
- Clone the repository — it contains some demo code to train a handwritten digit recognition model on the MNIST dataset.
- Open the cloned repository in Visual Studio Code.
- Read on!
Azure ML Workspace and Azure ML Portal
Azure ML is organized around the concept of workspace — Workspace. In the workspace, data can be stored, experiments for training are sent there, and training results—achieved metrics and models—are stored there. You can view what is inside the workspace through — and from there, you can perform many operations, starting from uploading data and ending with monitoring experiments and deploying models.
You can create a workspace through the web interface (see ), or using the Azure CLI command line ():
az extension add -n azure-cli-ml
az group create -n myazml -l northeurope
az ml workspace create -w myworkspace -g myazml
Some compute resources (Compute). After creating a training script for the model, you can submit the experiment for execution in the workspace and specify compute target — the script will be packaged, run in the required computing environment, and then all the experiment results will be saved in the workspace for further analysis and use.
Training script for MNIST
Let’s consider the classic task of using the MNIST dataset. Similarly, you will be able to run any of your training scripts later.
In our repository, there is a script train_local.py, which trains a basic linear regression model using the SkLearn library. Of course, I understand that this is not the best way to solve the problem — we use it as an example, as the simplest one.
The script first downloads the MNIST data from OpenML, and then uses the class LogisticRegression to train the model, and then prints the resulting accuracy:
mnist = fetch_openml('mnist_784')
mnist['target'] = np.array([int(x) for x in mnist['target']])

shuffle_index = np.random.permutation(len(mnist['data']))
X, y = mnist['data'][shuffle_index], mnist['target'][shuffle_index]

X_train, X_test, y_train, y_test =
  train_test_split(X, y, test_size = 0.3, random_state = 42)

lr = LogisticRegression()
lr.fit(X_train, y_train)
y_hat = lr.predict(X_test)
acc = np.average(np.int32(y_hat == y_test))

print('Overall accuracy:', acc)
You can run the script on your own computer, and in a couple of seconds, you'll get the result.
Running the script in Azure ML
If we run the training script via Azure ML, we will have two main advantages:
- Running training on any computational resource that is typically more powerful than a local computer. Moreover, Azure ML will take care of packaging our script with all files from the current directory into a docker container, installing the required dependencies, and sending it for execution.
- Logging results to a single registry within the Azure ML workspace. To use this feature, we need to add a few lines of code to our script to log the resulting accuracy:
from azureml.core.run import Run
...
try:
    run = Run.get_submitted_run()
    run.log('accuracy', acc)
except:
    pass
The corresponding version of the script is called train_universal.py (it is slightly more sophisticated than described above, but not significantly). This script can be run both locally and on a remote computational resource.
To run it in Azure ML from VS Code, you need to do the following:
Make sure that the Azure Extension is connected to your subscription. Click on the Azure icon in the left menu. If you are not connected, a notification will appear in the bottom right corner (), clicking on which you can log in through your browser. You can also press Ctrl-Shift-P to call the VS Code command line, and type Azure Sign In.
After that, in the Azure section (the icon on the left), find the section MACHINE LEARNING:
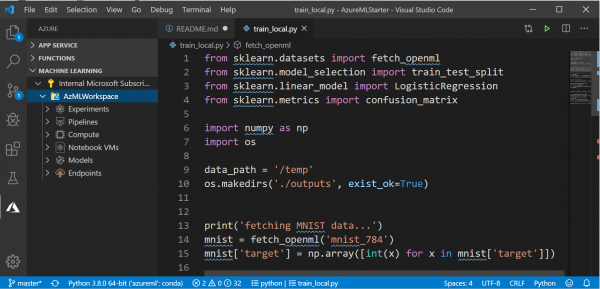
Here you should see different groups of objects within the workspace: compute resources, experiments, etc.
- Go to the file list, right-click on the script
train_universal.pyand select Azure ML: Run as an experiment in Azure.
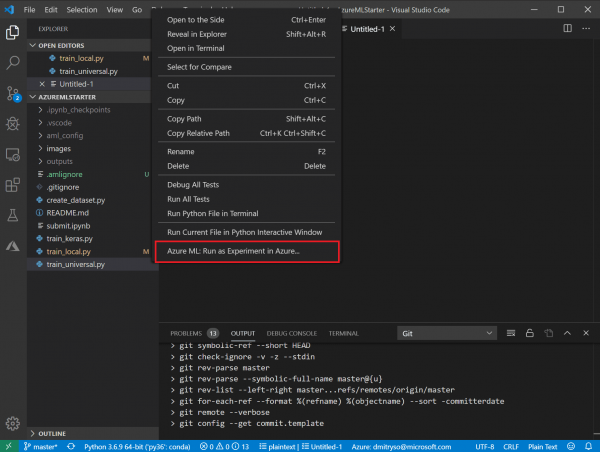
- This will be followed by a series of dialogs in the VS Code command area: confirm the subscription and Azure ML workspace being used, and select Create new experiment:



Select to create a new compute resource Create New Compute:
- Compute defines the compute resource on which training will occur. You can choose a local machine or an AmlCompute cloud cluster. I recommend creating a scalable machine cluster.
STANDARD_DS3_v2, with a minimum number of machines set to 0 (but the maximum can be 1 or more, depending on your needs). This can be done through the VS Code interface or beforehand via .

- Compute defines the compute resource on which training will occur. You can choose a local machine or an AmlCompute cloud cluster. I recommend creating a scalable machine cluster.
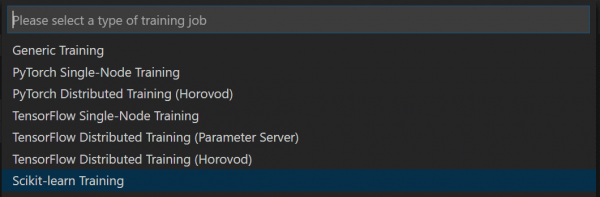
Next, you need to select the configuration Compute Configuration, which defines the parameters for the training container being created, particularly all required libraries. In our case, since we use Scikit Learn, we select SkLearn, and then simply confirm the suggested list of libraries by pressing Enter. If you are using any additional libraries, you need to specify them here.


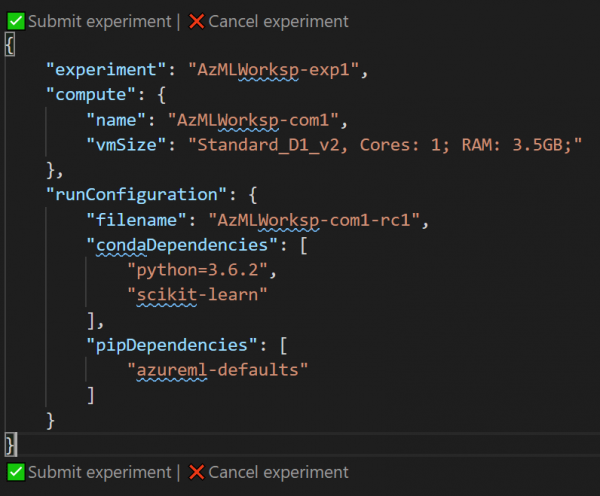
After that, a window with a JSON file describing the experiment will open. You can modify some parameters in it — for example, the name of the experiment. Then click on the link Submit Experiment directly within this file:


- After successfully submitting the experiment via VS Code, you will see a link to , where you can monitor the status and results of the experiment.
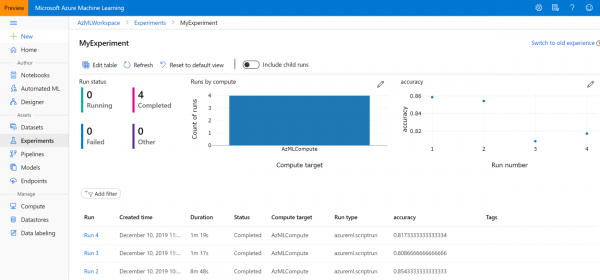
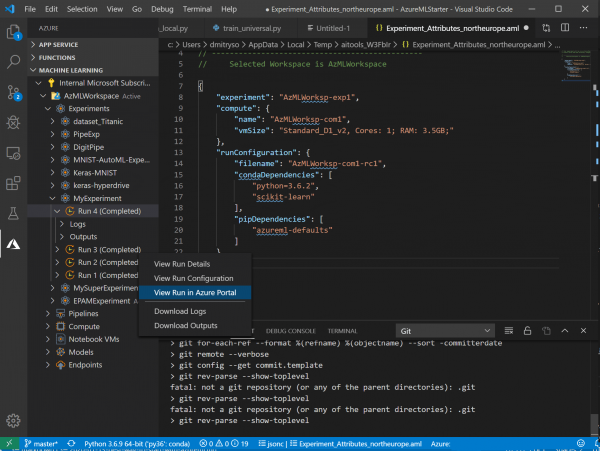
Subsequently, you will always be able to find it in the Experiments , or in the section Azure Machine Learning in the list of experiments:
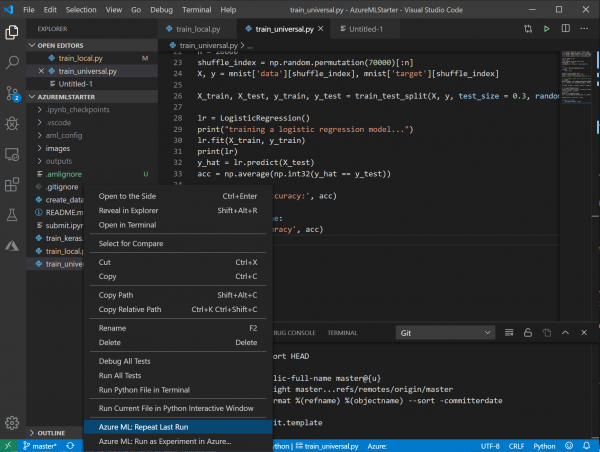
- If you have made any corrections to the code or changed the parameters afterward — rerunning the experiment will be much faster and easier. By right-clicking on the file, you will see a new menu item Repeat last run — just select it, and the experiment will start immediately:
The metric results from all runs can always be found on Azure ML Portal, there is no need to record them.
Now you know that running experiments using Azure ML is simple and painless, and you gain a number of nice advantages.
However, you may have also noticed some drawbacks. For example, it took significantly longer to run the script. Of course, it takes time to package the script into a container and deploy it on the server. If, in doing so, the cluster was scaled down to 0 nodes, it will take even longer to start the virtual machine, and all of this is very noticeable when we experiment with simple tasks like MNIST, which are resolved in a few seconds. However, in real life, when training lasts several hours, or even days or weeks, this extra time becomes insignificant, especially against the backdrop of the significantly higher performance that a computing cluster can provide.
What's next?
I hope that after reading this article, you will be able to use Azure ML in your work for script execution, managing computing resources, and centralized storage of results. However, Azure ML can offer you even more advantages!
Within the workspace, you can store data, thereby creating a centralized repository for all your tasks that is easy to access. Additionally, you can run experiments not from Visual Studio Code, but using the API — this can be particularly useful if you need to perform hyperparameter optimization and run the script multiple times with different parameters. Moreover, Azure ML has a special technology built-in, , which allows for more sophisticated search and optimization of hyperparameters. I will discuss these capabilities in my next note.
Useful Resources
For a more in-depth study of Azure ML, you may find the following Microsoft Learn courses useful:
Source: habr.com
