

Background
As a retro hardware enthusiast, I once bought a ZX Spectrum+ from a seller in the UK. Along with the computer itself, I received several audio cassettes with games (in original packaging with instructions), as well as programs recorded on cassettes without any particular markings. Surprisingly, the data from the 40-year-old cassettes read well, and I managed to load almost all the games and programs from them.
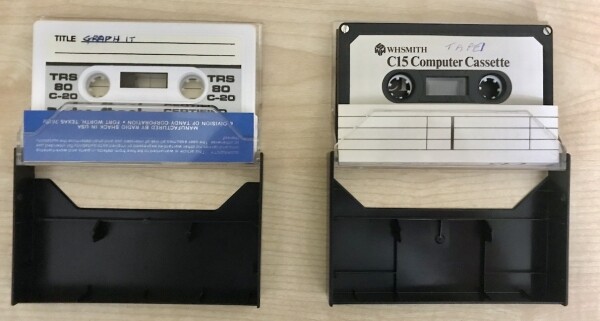
However, on some cassettes, I found recordings that were clearly not from a ZX Spectrum computer. They sounded completely different and, unlike the recordings from the mentioned computer, did not start with the short BASIC loader that is usually present in the recordings of all programs and games.
For some time, this troubled me — I really wanted to know what was hidden on them. If I could read the audio signal as a sequence of bytes, I could look for characters or something that indicates the origin of the signal. A kind of retro archaeology.
Now, having gone through the entire journey and looking at the labels of the cassettes themselves, I smile because
the answer was right in front of my eyes all this time.
On the label of the left cassette is the name of the computer TRS-80, and just below it, the manufacturer's name: 'Manufactured by Radio Shack in USA.'
(If you want to keep the intrigue until the end, don't go under the spoiler.)
Comparison of Audio Signals
First, let's digitize the audio recordings. You can listen to how it sounds:
And this is how a recording from a ZX Spectrum computer usually sounds:
In both cases, at the beginning of the recording, there is what is known as a pilot tone — a sound of a single frequency (in the first recording it's very short <1 sec, but distinguishable). The pilot tone serves as a signal to the computer that it needs to prepare to receive data. Typically, each computer recognizes only its 'own' pilot tone by the shape of the signal and its frequency.
I should mention the actual shape of the signal. For example, on the ZX Spectrum, its shape is rectangular:
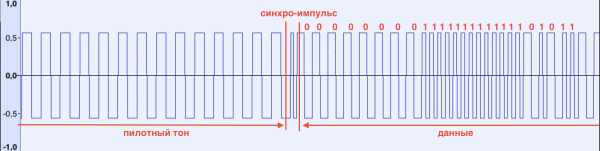
When the pilot tone is detected, the ZX Spectrum displays alternating red and blue stripes on the border area of the screen, indicating that the signal has been recognized. The pilot tone ends with a sync pulse., which signals the computer to start accepting data. It is characterized by a shorter duration (compared to the pilot tone and subsequent data) (see the figure)
After the sync pulse is received, the computer records each rise/fall of the signal, measuring its duration. If the duration is less than a certain threshold, a bit 1 is stored in memory; otherwise, 0. Bits are collected into bytes and the process repeats until N bytes are received. The number N is usually taken from the header of the file being loaded. The sequence of loading is as follows:
- pilot tone
- header (fixed length), contains the size of the data being loaded (N), name, and type of file
- pilot tone
- the data itself
To ensure that the data has been loaded correctly, the ZX Spectrum reads a so-called last byte parity byte, which is calculated when saving the file by performing an XOR operation on all the bytes of the recorded data. When reading the file, the computer calculates the parity byte from the received data and, if the result differs from the saved one, displays an error message ‘R Tape loading error’. Strictly speaking, the computer can issue this message earlier if it cannot recognize the pulse during reading (missed or its duration does not meet certain boundaries) (parity byte), which is calculated when saving a file by performing an XOR operation on all the bytes of recorded data. When reading a file, the computer calculates the parity byte from the retrieved data and, if the result differs from the saved one, displays an error message 'R Tape loading error'. Strictly speaking, the computer can issue this message even earlier if it cannot recognize the pulse during reading (either missed or its duration does not meet certain limits).
Now, let's see how the unknown signal looks:
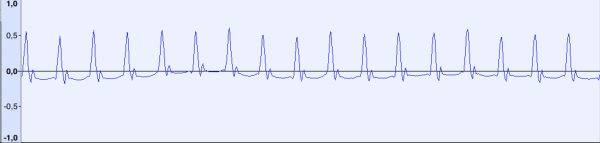
This is the pilot tone. The shape of the signal is significantly different, but it is clear that the signal consists of repeated short pulses of a certain frequency. At a sampling rate of 44100 Hz, the distance between the ‘peaks’ is approximately 48 samples (which corresponds to a frequency of ~918 Hz). Let’s remember this number.
Now let’s look at a fragment of the data:
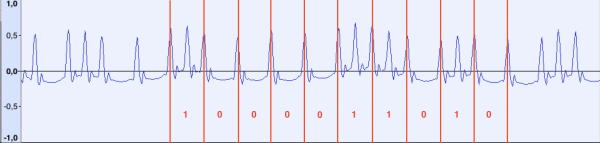
If you measure the distance between the individual pulses, you will find that the distance between the ‘long’ pulses is still about 48 samples, while between the short ones, it is ~24. Going a little ahead, it turns out that the ‘reference’ pulses at a frequency of 918 Hz follow continuously from the beginning to the end of the file. One could assume that during data transmission, if an additional pulse occurs between the reference pulses, it is counted as bit 1; otherwise, it is 0.
What about the sync pulse? Let’s look at the beginning of the data:
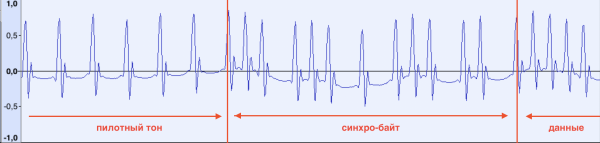
The pilot tone ends, and the data begins immediately. A little later, after analyzing several different audio recordings, it was discovered that the first byte of data is always the same (10100101b, A5h). It seems that the computer starts reading the data after it receives it.
One can also notice the shift of the first reference pulse right after the last '1' in the sync byte. This was detected significantly later during the development process of the data recognition program when the data at the beginning of the file could not be reliably read.
Now let's try to describe an algorithm that will process the audio file and extract the data.
Data Loading
First, let's consider some assumptions to simplify the algorithm:
- We will only consider files in WAV format;
- The audio file must start with a pilot tone and should not contain silence at the beginning;
- The original file must have a sample rate of 44100 Hz. In this case, the interval between reference pulses of 48 samples is already defined, and we do not need to calculate it programmatically;
- The sample format can be any (8/16 bit/floating point) — as we can convert it to the required format while reading;
- We assume that the original file is amplitude-normalized, which should stabilize the result;
The reading algorithm will be as follows:
- We read the file into memory, simultaneously converting the sample format to 8-bit;
- We determine the position of the first pulse in the audio data. To do this, we need to calculate the sample number with the maximum amplitude. For simplicity, let’s calculate it manually once. We will store it in the variable prev_pos;
- We add 48 to the position of the last pulse (pos := prev_pos + 48)
- Since increasing the position by 48 does not guarantee that we will reach the position of the next reference impulse (tape defects, unstable tape mechanism operation, etc.), it is necessary to adjust the impulse position pos. To do this, we will take a small segment of data (pos-8;pos+8) and find the maximum amplitude value on it. We will save the position corresponding to the maximum in pos. Here, 8 = 48/6 is an experimentally derived constant that ensures we identify the correct maximum without affecting other nearby impulses. In very bad cases, when the distance between impulses is significantly less than or greater than 48, a forced impulse search can be implemented, but I will not describe that in the algorithm for the sake of this article.
- At the previous step, it is also necessary to check whether the reference impulse is actually found. That is, simply searching for the maximum does not guarantee that the impulse is present in this segment. In my latest implementation of the reading program, I check the difference between the maximum and minimum amplitude values in the segment, and if it exceeds a certain threshold, I count the presence of the impulse. The question also arises about what to do if the reference impulse is not found. There are two options: either the data has ended and silence follows, or this should be considered as a reading error. However, let's skip this for the sake of simplifying the algorithm.
- At the next step, we need to determine the presence of data impulse (bit 0 or 1). To do this, we will take the midpoint of the segment (prev_pos;pos) as middle_pos equal to middle_pos := (prev_pos+pos)/2, and in a certain neighborhood of middle_pos within the segment (middle_pos-8;middle_pos+8), we will calculate the maximum and minimum amplitude. If the difference between them is greater than 10, we record the result as bit 1; otherwise, it is 0. 10 is a constant obtained experimentally.
- We save the current position in prev_pos (prev_pos := pos)
- We repeat starting from step 3 until we have read the entire file.
- The obtained bit array must be saved as a byte set. Since we did not take the sync byte into account when reading, the number of bits may not be divisible by 8, and the required bit offset is also unknown. In the first implementation of the algorithm, I was unaware of the existence of a sync byte and therefore just saved 8 files with different offsets. One of them contained the correct data. In the final algorithm, I simply remove all bits up to A5h, which allows generating a correct output file immediately.
Algorithm in Ruby, for those interested
I chose Ruby as the programming language because I spend most of my time coding in it. The option is not high-performance; however, optimizing reading speed is not a priority.
# Используем gem 'wavefile'
require 'wavefile'

reader = WaveFile::Reader.new('input.wav')
samples = []
format = WaveFile::Format.new(:mono, :pcm_8, 44100)

# Читаем WAV файл, конвертируем в формат Mono, 8 bit
# Массив samples будет состоять из байт со значениями 0-255
reader.each_buffer(10000) do |buffer|
  samples += buffer.convert(format).samples
end

# Позиция первого импульса (вместо 0)
prev_pos = 0
# Расстояние между импульсами
distance = 48
# Значение расстояния для окрестности поиска локального максимума
delta = (distance / 6).floor
# Биты будем сохранять в виде строки из "0" и "1"
bits = ""

loop do
  # Рассчитываем позицию следующего импульса
  pos = prev_pos + distance

  # Выходим из цикла если данные закончились
  break if pos + delta >= samples.size

  # Корректируем позицию pos обнаружением максимума на отрезке [pos - delta;pos + delta]
  (pos - delta..pos + delta).each { |p| pos = p if samples[p] > samples[pos] }

  # Находим середину отрезка [prev_pos;pos]
  middle_pos = ((prev_pos + pos) / 2).floor

  # Берем окрестность в середине
  sample = samples[middle_pos - delta..middle_pos + delta]

  # Определяем бит как "1" если разница между максимальным и минимальным значением на отрезке превышает 10
  bit = sample.max - sample.min > 10
  bits += bit ? "1" : "0"
end

# Определяем синхро-байт и заменяем все предшествующие биты на 256 бит нулей (согласно спецификации формата)
bits.gsub! /^[01]*?10100101/, ("0" * 256) + "10100101"

# Сохраняем выходной файл, упаковывая биты в байты
File.write "output.cas", [bits].pack("B*")
Result
After trying several algorithm variants and constants, I was lucky to get something extremely interesting:
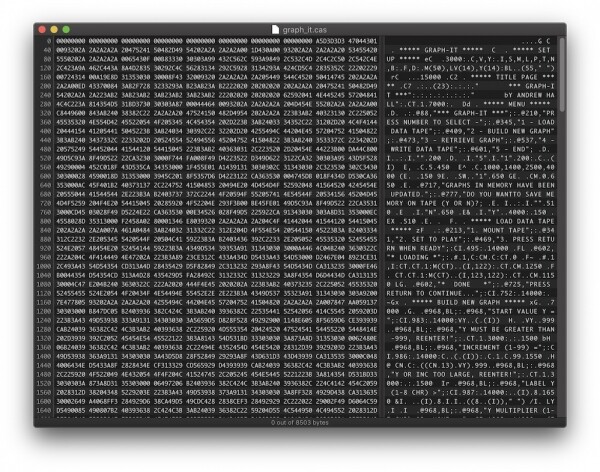
So, judging by the character strings, we have a program for plotting graphs. However, the program text lacks keywords. All keywords are encoded as bytes (with values greater than 80h). Now we need to determine which 80s computer could save programs in such a format.
In fact, this resembles a program written in BASIC. Approximately in the same format, the ZX Spectrum computer stores and saves programs to tape. Just in case, I checked the keywords against . However, the result was obviously negative.
I also checked the BASIC keywords of popular computers of that time, such as Atari, Commodore 64, and several others for which I managed to find documentation, but without success — my knowledge of different kinds of retro computers was not that extensive.
Then I decided to go by , and my gaze fell upon the manufacturer name Radio Shack and the computer TRS-80. These names were indeed written on the labels of the tapes that were lying on my desk! Previously, I was not familiar with these names and had never heard of the TRS-80 computer, so I thought that Radio Shack was like a manufacturer of audio cassettes, such as BASF, Sony, or TDK, and TRS-80 indicated playback duration. Why not?
Tandy/Radio Shack TRS-80 computer
It is highly likely that the audio recording I provided as an example at the beginning of the article was made on such a computer:
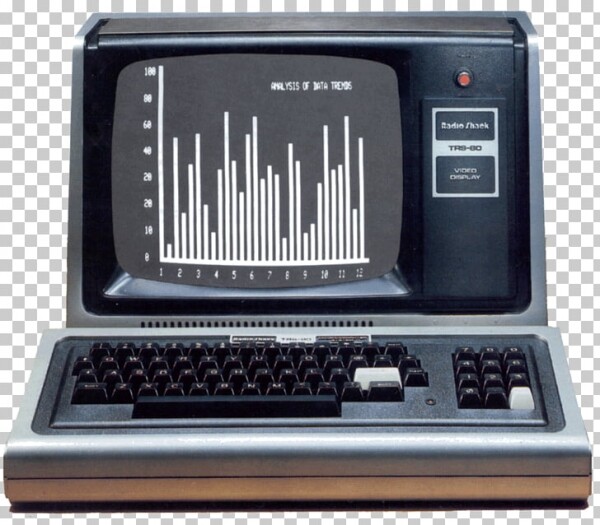
It turned out that this computer and its variants (Model I/Model III/Model IV, etc.) were very popular in their time (of course, not in Russia). Notably, the processor used in them was also the Z80. A lot of information about this computer can be found on the Internet. In the 1980s, information about the computer spread through Currently, there are several of the computer for different platforms.
I downloaded the emulator and for the first time, I was able to see how this computer operated. Of course, the computer did not support color output, the screen resolution was only 128x48 pixels, but there were many expansions and modifications that could increase the screen resolution. There were also many versions of operating systems for this computer and implementations of the BASIC language (which, unlike the ZX Spectrum, was not even 'burned' into the ROM in some models, allowing any version to be loaded from a diskette, just like the OS itself).
I also found a tool for converting audio recordings into .CAS format, which is supported by the emulators; however, I was unable to read the recordings from my tapes using it for some reason.
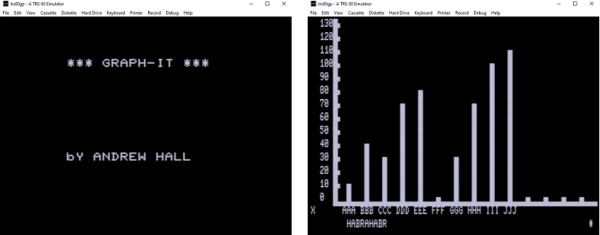
After figuring out the CAS file format (which turned out to be just a bitwise copy of the data from the tape I had on hand, except for the header containing the sync byte), I made several changes to my program and managed to produce a working CAS file, which worked in the emulator (TRS-80 Model III):
The latest version of the utility for conversion with automatic detection of the first pulse and the distance between reference pulses is packaged as a GEM package, and the source code is available at .
Conclusion
The journey turned out to be an exciting trip into the past, and I am glad that I ultimately found the solution. Among other things, I:
- Figured out the data saving format in ZX Spectrum and studied the built-in ROM subroutines for saving/reading data from audio cassettes.
- Got acquainted with the TRS-80 computer and its variants, studied the operating system, looked at program examples, and even had the opportunity to engage in debugging in machine code (after all, I am quite familiar with all Z80 mnemonics).
- I developed a complete utility for converting audio recordings to CAS format that can read data not recognized by the 'official' utility.
Source: habr.com
