


In previous articles, we began to discuss what Proxmox VE is and how it works. Today, we will talk about how to use the clustering feature and demonstrate the advantages it provides.
What is a cluster and why is it needed? A cluster is a group of servers connected by high-speed communication paths, functioning and presenting itself to the user as a single entity. There are several main scenarios for using a cluster:
- Ensuring Fault Tolerance (High-availability).
- Load balancing (Load Balancing).
- Increasing Performance (High Performance).
- Performing Distributed Computing (Distributed computing).
Each scenario imposes its own requirements on the components of the cluster. For example, a cluster performing distributed computing primarily requires high floating-point operation speed and low network latency. Such clusters are often used for research purposes.
Since we've touched on the topic of distributed computing, it’s worth noting that there’s also a concept known as grid system (from English grid — mesh, network). Despite their general similarity, a grid system should not be confused with a cluster. A grid is not a cluster in the conventional sense. Unlike a cluster, nodes in a grid are often heterogeneous and have low availability. This approach simplifies solving distributed computing tasks but does not allow for creating a unified entity from the nodes.
A prime example of a grid system is the popular computing platform (Berkeley Open Infrastructure for Network Computing). This platform was originally created for the project (Search for Extra-Terrestrial Intelligence at Home), which deals with the problem of searching for extraterrestrial intelligence through the analysis of radio signals.
How it worksA massive amount of data obtained from radio telescopes is broken into many small pieces and sent to the nodes of the grid system (in the SETI@home project, such nodes are volunteer computers). The data is processed at the nodes, and once processing is complete, it is sent back to the project's central server. In this way, the project addresses a complex global challenge without possessing the required computational power.
Now that we have a clear understanding of what a cluster is, let's consider how to create and implement it. We will use an open-source virtualization system. .
It is especially important to clearly understand the limitations and system requirements of Proxmox before starting to create a cluster, namely:
- the maximum number of nodes in the cluster — 32;
- all nodes must have the same version of Proxmox (there are exceptions, but they are not recommended for production);
- if High Availability functionality is planned to be implemented further, the cluster must have at least 3 nodes;
- for the nodes to interact with each other, the ports must be open UDP/5404, UDP/5405 for corosync and TCP/22 for SSH;
- the network latency between nodes must not exceed 2 ms.
Creating a cluster
Important! The configuration described below is for testing purposes. Be sure to check with Proxmox VE.
To launch a test cluster, we took three servers with the Proxmox hypervisor installed, all with the same configuration (2 cores, 2 GB of RAM).
If you want to know how to install Proxmox, we recommend reading our previous article — .
Initially, after the OS installation, a single server operates in Standalone-mode.
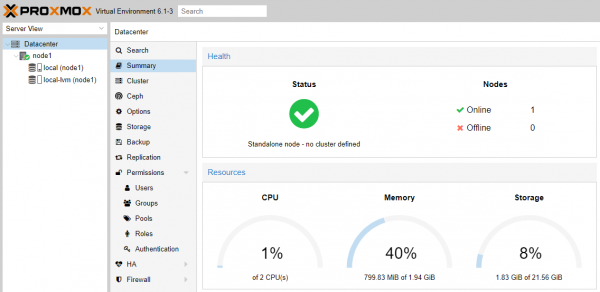
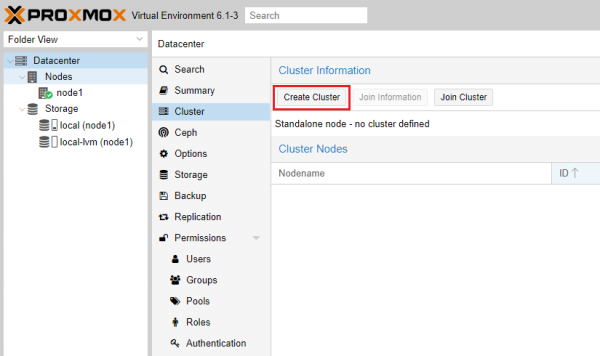
Let's create a cluster by clicking the button Create Cluster in the appropriate section.
We set a name for the future cluster and choose the active network connection.
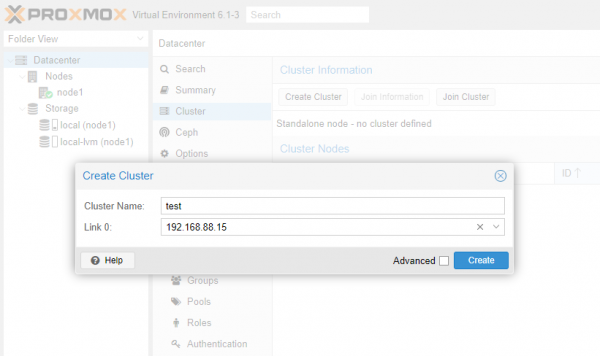
We click the Create button. The server will generate a 2048-bit key and save it along with the parameters of the new cluster in the configuration files.
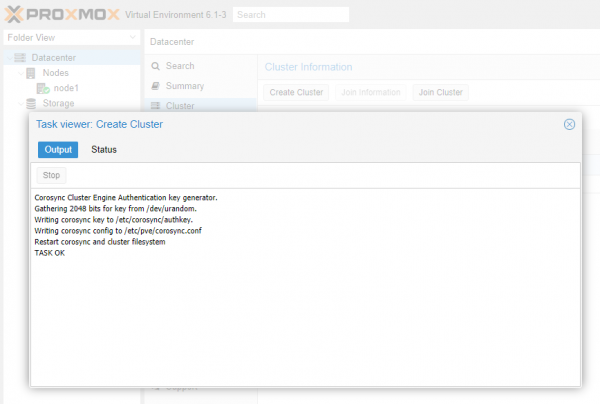
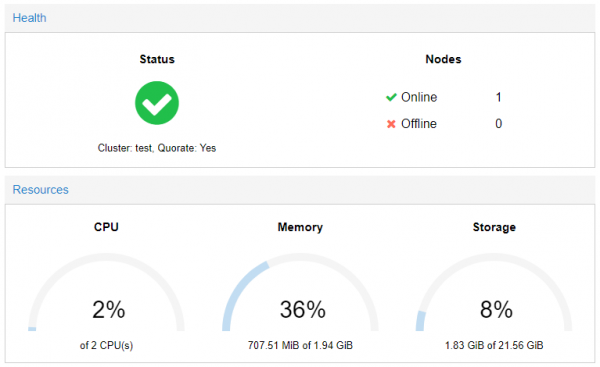
The message TASK OK indicates the successful completion of the operation. Now, looking at the overall system information, it is evident that the server has switched to cluster mode. For now, the cluster consists of only one node, meaning it lacks the capabilities that require a cluster.
Joining the cluster
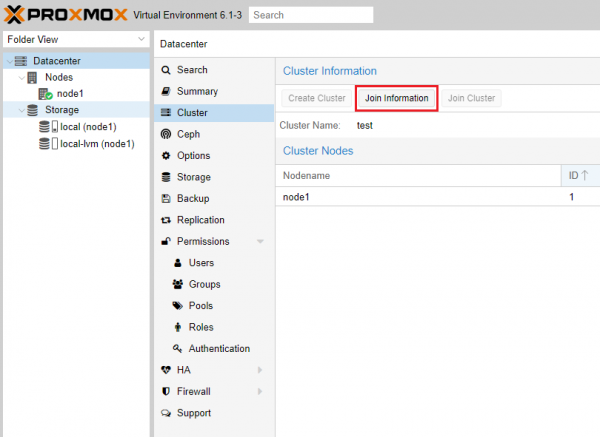
Before connecting to the created cluster, we need to obtain the information necessary for the connection. For this, we go to the section Cluster and click the button Join Information.
In the window that opens, we are interested in the contents of the same-named field. It needs to be copied.
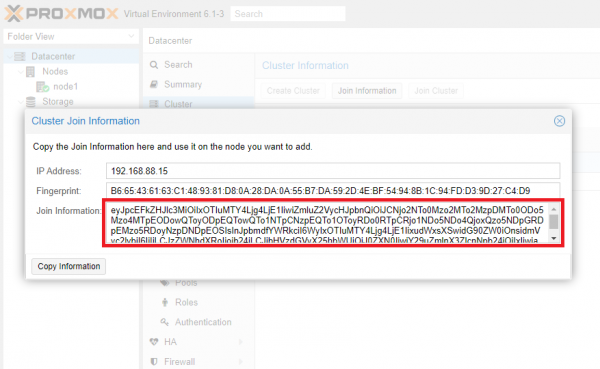
All necessary connection parameters are encoded here: the server address for connection and the digital fingerprint. We proceed to the server that needs to be included in the cluster. Click the button Join Cluster and in the opened window, paste the copied content.

Fields Peer Address and Fingerprint will be filled in automatically. Enter the root password for node number 1, select the network connection, and click the button Join.
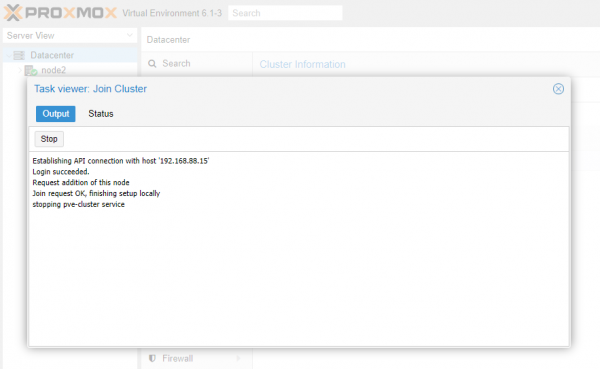
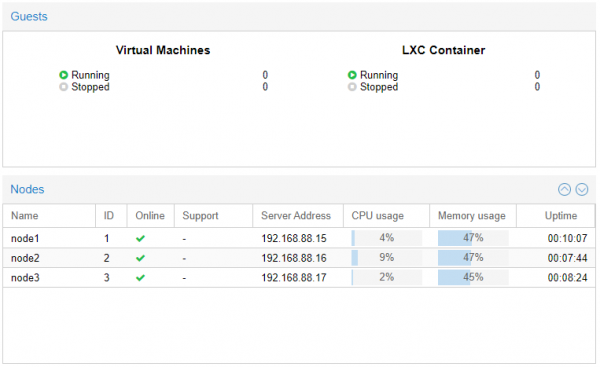
During the process of joining the cluster, the GUI web page may stop updating. This is normal; just refresh the page. In the same way, we add another node, resulting in a fully functional cluster of 3 working nodes.
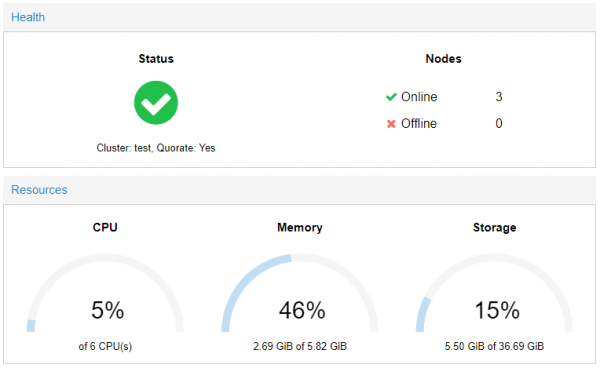
Now we can control all cluster nodes from a single GUI.
High Availability Organization
Proxmox "out of the box" supports HA functionality for both virtual machines and LXC containers. The tool ha-manager detects and handles errors and failures, performing failover from the failed node to the operational one. For the mechanism to work correctly, it is necessary for the virtual machines and containers to share a common storage.
After activating the High Availability functionality, the ha-manager software stack will continuously monitor the status of the virtual machine or container and asynchronously interact with other nodes in the cluster.
Join shared storage
For example, we deployed a small NFS file storage at the address 192.168.88.18. In order for all cluster nodes to use it, the following steps need to be taken.
Select in the web interface menu Datacenter — Storage — Add — NFS.
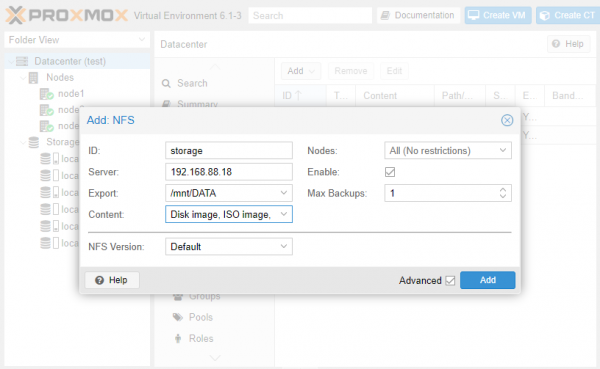
Fill in the fields ID and Server. In the dropdown list Export select the desired directory from the available ones, and in the list Content — the necessary data types. After clicking the button Add , the storage will be connected to all nodes in the cluster.
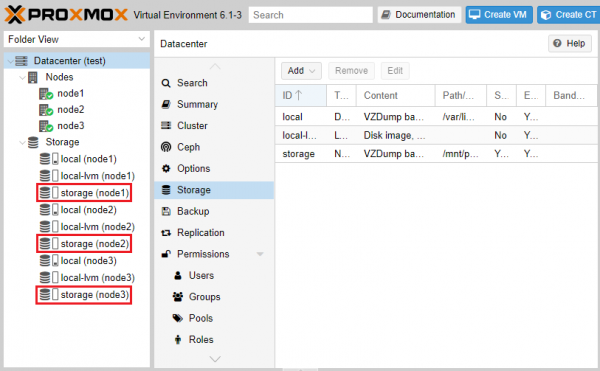
When creating virtual machines and containers on any of the nodes, specify our storage as the storage.
Configure HA
As an example, we will create a container with Ubuntu 18.04 and configure High Availability for it. After creating and starting the container, go to the section Datacenter — HA — Add. In the opened field, specify the ID of the virtual machine/container and the maximum number of restart and migration attempts between nodes.
If this limit is exceeded, the hypervisor will mark the VM as failed and transition it to an Error state, after which no further actions will be taken with it.
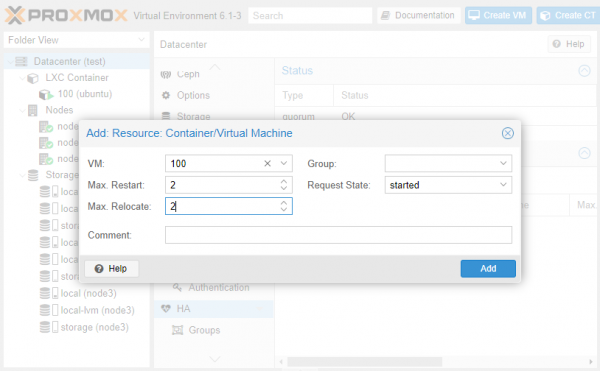
After clicking the button Add utility ha-manager will notify all nodes in the cluster that the VM with the specified ID is now under control and must be restarted on another node in case of a crash.
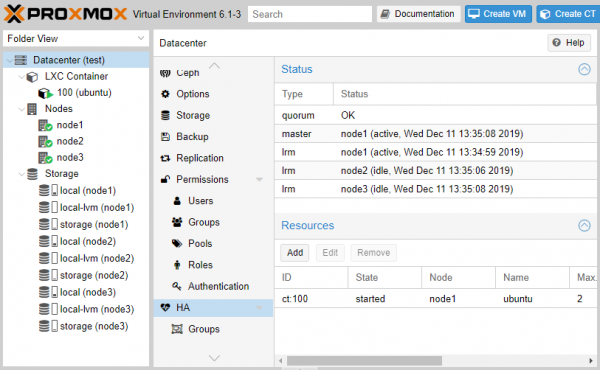
Let's simulate a failure
To see how the failover mechanism works, let's unexpectedly power off node1. We'll observe from another node what happens to the cluster. We see that the system has recorded the failure.
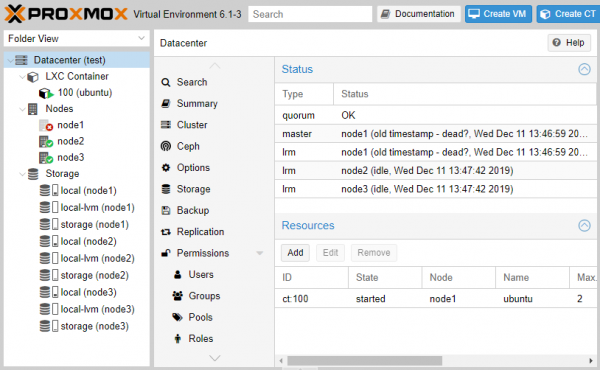
The operation of the HA mechanism does not guarantee continuous operation of the VM. As soon as a node 'fails', the VM's operation is temporarily halted until it is automatically restarted on another node.
And here’s where the 'magic' begins — the cluster automatically reassigned a node for our VM's operation, and within 120 seconds, the operation was automatically restored.

We power off node2. Let’s see if the cluster can handle it and if the VM will automatically return to operational status.
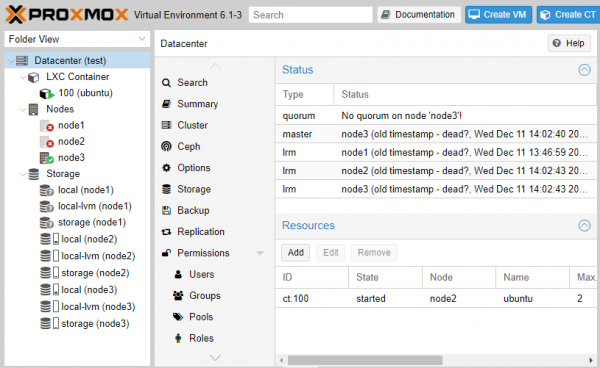
Unfortunately, as we can see, we have encountered an issue where there is no quorum left on the only surviving node, which automatically disables HA operation. We give the command to force quorum in the console.
pvecm expected 1 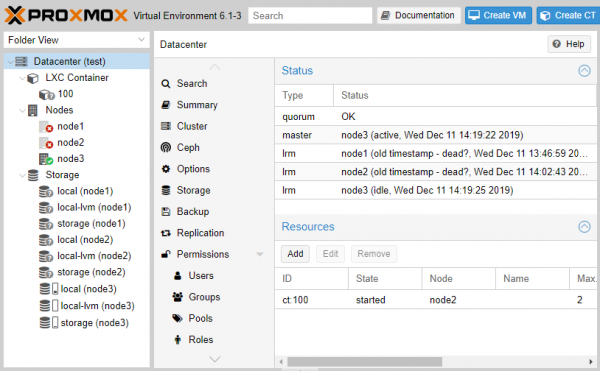
After 2 minutes, the HA mechanism worked correctly and, not finding node2, started our VM on node3.
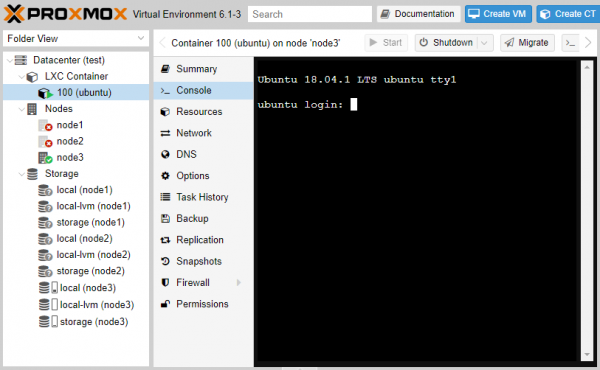
Once we turned node1 and node2 back on, the cluster's operation was fully restored. Note that the VM does not automatically migrate back to node1, but this can be done manually.
Summing up
We have explained how the clustering mechanism works in Proxmox and demonstrated how HA is set up for virtual machines and containers. Proper use of clustering and HA significantly increases infrastructure reliability and ensures recovery after failures.
Before creating a cluster, it is essential to plan from the start for what purposes it will be used and how much it will need to be scaled in the future. It’s also necessary to check the network infrastructure for readiness to operate with minimal latency, so that the future cluster operates flawlessly.
Tell us — do you utilize clustering capabilities in Proxmox? We look forward to your comments.
Previous articles on the topic of the Proxmox VE hypervisor:
Source: habr.com
