

Hello, Habr users! In the book, David Clinton describes 12 real projects, including automation of backup and recovery systems, setting up a personal file cloud like Dropbox, and creating a custom MediaWiki server. Through interesting examples, you will learn about virtualization, disaster recovery, security, backup, DevOps integration, and troubleshooting. Each chapter concludes with an overview of practical recommendations, a glossary of new terms, and exercises.
Excerpt "10.1. Creating an OpenVPN Tunnel"
In this book, I have already discussed encryption quite a bit. SSH and SCP can secure data transmitted over remote connections (Chapter 3), file encryption protects data at rest on the server (Chapter 8), and TLS/SSL certificates can secure data transmitted between websites and client browsers (Chapter 9). However, sometimes your data requires protection over a wider range of connections. For instance, some of your team members may need to work on the go, connecting to the network via Wi-Fi through public hotspots. It is certainly unwise to assume that all such hotspots are safe, but your people really need a way to connect to company resources — and this is where a VPN comes in.
A well-designed VPN tunnel provides a direct connection between remote clients and the server in such a way as to hide data while it is transmitted over an unsecured network. So what? You've already seen many tools that can do this with encryption. The real value of a VPN lies in the fact that once a tunnel is opened, you can connect remote networks as if they were all local. In a sense, you are utilizing a workaround.
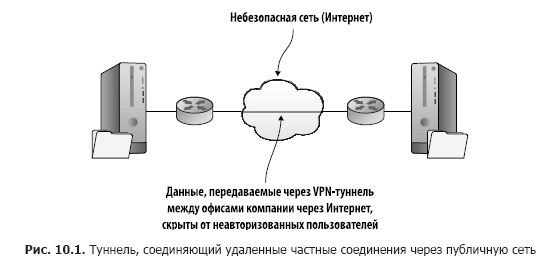
Using such an extended network, administrators can perform their work on their servers from anywhere. But more importantly, a company with resources distributed across several branches can make them all visible and accessible to all groups that need them, no matter where they are located (Fig. 10.1).
A tunnel on its own does not guarantee security. However, one of the encryption standards can be incorporated into the network structure, significantly enhancing the level of security. Tunnels created using the open-source OpenVPN package utilize the same TLS/SSL encryption you may have already read about. OpenVPN is not the only available tunneling option, but it is one of the most well-known. It is considered to be slightly faster and more secure than the alternative Layer 2 tunneling protocol that uses IPsec encryption.
Do you want your team to communicate securely with each other while on the road or working in different buildings? To achieve this, it is necessary to create an OpenVPN server to allow for application sharing and access to the local network environment of the server. For this to work, you simply need to run two virtual machines or two containers: one to serve as the server/host and the other as the client. Setting up a VPN is not a trivial process, so it’s probably worth taking a few minutes to picture the big picture.
10.1.1. Configuring the OpenVPN Server
Before you begin, I'll give you a helpful tip. If you’re planning to do everything yourself (and I highly recommend you do), you will likely find yourself working with several terminal windows open on your Desktop, each connected to its own machine. There is a risk that at some point, you will enter a command in the wrong window. To avoid this, you can use the hostname command to change the machine name displayed in the command line to something that clearly indicates where you are. Once you do this, you will need to log out of the server and log back in for the new settings to take effect. Here’s how it looks:

By sticking to this approach and assigning appropriate names to each of the machines you are working with, you will easily be able to keep track of where you are.
After using hostname, you may encounter annoying Unable to Resolve Host OpenVPN-Server messages when executing subsequent commands. Updating the /etc/hosts file with the corresponding new hostname should resolve the issue.
Preparing your server for OpenVPN
To install OpenVPN on your server, you need two packages: openvpn and easy-rsa (for managing the encryption key generation process). CentOS users should first install the epel-release repository if necessary, as you did in Chapter 2. To be able to verify access to the server application, you may also install the Apache web server (apache2 for Ubuntu and httpd on CentOS).
While you are setting up the server, I recommend enabling a firewall that blocks all ports except 22 (SSH) and 1194 (the default OpenVPN port). This example illustrates how ufw works on Ubuntu, but I’m sure you still remember the firewalld program from Chapter 9:
# ufw enable
# ufw allow 22
# ufw allow 1194
To allow internal routing between network interfaces on the server, you need to uncomment one line (net.ipv4.ip_forward = 1) in the /etc/sysctl.conf file. This will enable forwarding for remote clients as needed after they connect. To make the new setting take effect, run sysctl -p:
# nano /etc/sysctl.conf
# sysctl -p
Now the server environment is fully configured, but there's still something to do before you are ready: you will need to perform the following steps (we will discuss them in detail later).
- Create a key set for the public key infrastructure (PKI) on the server using the scripts provided with the easy-rsa package. Essentially, the OpenVPN server also acts as its own Certificate Authority (CA).
- Prepare the appropriate keys for the client
- Configure the server's server.conf file
- Set up your OpenVPN client
- Check your VPN
Generating encryption keys
To simplify matters, you can set up your key infrastructure on the same machine that runs the OpenVPN server. However, security recommendations generally advise using a separate CA server for deployments in a production environment. The process of generating and distributing encryption key resources for use in OpenVPN is illustrated in Figure 10.2.
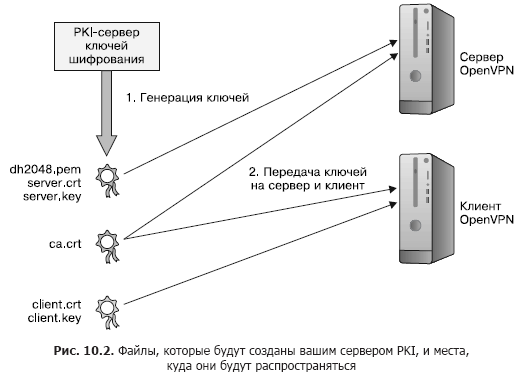
When you installed OpenVPN, a directory /etc/openvpn/ was automatically created, but it is currently empty. The openvpn and easy-rsa packages come with example template files that you can use as a basis for your configuration. To start the certification process, copy the easy-rsa template directory from /usr/share/ to /etc/openvpn and navigate to the easy-rsa/ directory:
# cp -r /usr/share/easy-rsa/ /etc/openvpn
$ cd /etc/openvpn/easy-rsa
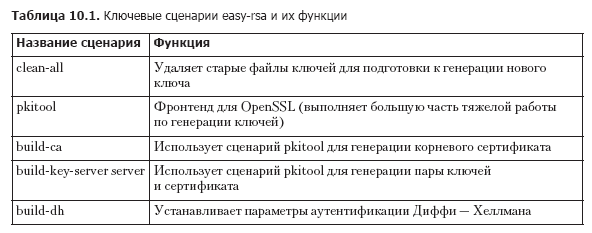
The easy-rsa catalog will now contain quite a few scripts. Table 10.1 lists the tools you will use to create keys.
The listed operations require root privileges, so you need to become root via sudo su.
The first file you will work with is called vars and contains environment variables that easy-rsa uses when generating keys. You need to edit this file to use your own values instead of the default ones already present. Here’s what my file will look like (listing 10.1).
Listing 10.1. Key sections of the file /etc/openvpn/easy-rsa/vars
export KEY_COUNTRY="CA"
export KEY_PROVINCE="ON"
export KEY_CITY="Toronto"
export KEY_ORG="Bootstrap IT"
export KEY_EMAIL="info@bootstrap-it.com"
export KEY_OU="IT"
Running the vars file will pass its values into the shell environment, from where they will be included in the content of your new keys. Why doesn't the sudo command work by itself? Because at the first stage we are editing the script named vars and then applying it. Applying means that the vars file passes its values into the shell environment, from where they will be included in the content of your new keys.
Be sure to run the file again using a new shell to complete the unfinished process. Once this is done, the script will prompt you to run another script, clean-all, to remove any content in the /etc/openvpn/easy-rsa/keys/:

Naturally, the next step will be to run the clean-all script, followed by build-ca, which uses the pkitool script to create the root certificate. You will be asked to confirm the identification settings provided by vars:
# ./clean-all
# ./build-ca
Generating a 2048 bit RSA private key
Next is the build-key-server script. Since it uses the same pkitool script along with the new root certificate, you will see the same questions to confirm the creation of the key pair. The keys will be named based on the arguments you pass, which, unless you are running multiple VPNs on this computer, will usually be server, as in the example:
# ./build-key-server server
[...]
Certificate is to be certified until Aug 15 23:52:34 2027 GMT (3650 days)
Sign the certificate? [y/n]:y
1 out of 1 certificate requests certified, commit? [y/n]y
Write out database with 1 new entries
Data Base Updated
OpenVPN uses parameters generated by the Diffie-Hellman algorithm (with the help of build-dh) to agree on authentication for new connections. The file created here should not be secret, but must be generated using the build-dh script for the currently active RSA keys. If you create new RSA keys in the future, you will also need to update the file based on the Diffie-Hellman algorithm:
# ./build-dhYour server keys will now be placed in the directory /etc/openvpn/easy-rsa/keys/, but OpenVPN is not aware of this. By default, OpenVPN will look for keys in /etc/openvpn/, so copy them:
# cp /etc/openvpn/easy-rsa/keys/server* /etc/openvpn
# cp /etc/openvpn/easy-rsa/keys/dh2048.pem /etc/openvpn
# cp /etc/openvpn/easy-rsa/keys/ca.crt /etc/openvpn
Preparing client encryption keys
As you have already seen, TLS encryption uses pairs of corresponding keys: one set on the server and the other on the remote client. This means that you will need client keys. Our old friend pkitool is just what you need for this. In this example, by running the program in the /etc/openvpn/easy-rsa/ directory, we pass it the client argument to generate files named client.crt and client.key:
# ./pkitool clientThe two client files along with the original ca.crt file, which is still located in the keys/ directory, now need to be securely transferred to your client. Due to their ownership and access rights, this may not be a straightforward task. The simplest approach is to manually copy the contents of the original file (and nothing but that content) into a terminal running on the desktop of your PC (highlight the text, right-click on it, and select Copy). Then paste it into a new file with the same name you create in the second terminal connected to your client.
But anyone can cut and paste. Instead, think like an administrator, because you won’t always have access to a GUI where cut/paste operations are possible. Copy the files to your user's home directory (so that the remote scp operation can access them), and then use chown to change the ownership of the files from root to a regular user without root privileges, so that the remote scp action can be performed. Make sure all your files are set and accessible by now. You will move them to the client a bit later:
# cp /etc/openvpn/easy-rsa/keys/client.key /home/ubuntu/
# cp /etc/openvpn/easy-rsa/keys/ca.crt /home/ubuntu/
# cp /etc/openvpn/easy-rsa/keys/client.crt /home/ubuntu/
# chown ubuntu:ubuntu /home/ubuntu/client.key
# chown ubuntu:ubuntu /home/ubuntu/client.crt
# chown ubuntu:ubuntu /home/ubuntu/ca.crt
With a full set of encryption keys ready for action, you need to tell the server how you want to set up the VPN. This is done using the server.conf file.
Reducing key presses
Is it too much typing? The parentheses extension can help reduce those six commands down to two. I'm sure you'll be able to study these two examples and understand what's going on. More importantly, you'll be able to apply these principles to operations involving dozens or even hundreds of elements:
# cp /etc/openvpn/easy-rsa/keys/{ca.crt,client.{key,crt}} /home/ubuntu/
# chown ubuntu:ubuntu /home/ubuntu/{ca.crt,client.{key,crt}}
Configuring the server.conf file
How can you know what the server.conf file should look like? Remember the easy-rsa directory template that you copied from /usr/share/? When you installed OpenVPN, a compressed configuration template file was left, which you can copy to /etc/openvpn/. I'll be relying on the fact that the template is archived and introduce you to a helpful tool: zcat.
You already know about displaying the text content of a file on the screen using the cat command, but what if the file is compressed with gzip? You can always decompress the file, and then cat will happily display it, but that's one or two extra steps than necessary. Instead, as you may have guessed, you can use the zcat command to load the uncompressed text into memory in one step. In the following example, instead of printing the text to the screen, you'll redirect it to a new file named server.conf:
# zcat
  /usr/share/doc/openvpn/examples/sample-config-files/server.conf.gz
  > /etc/openvpn/server.conf
$ cd /etc/openvpn
Let's put aside the extensive and useful documentation that comes with the file and take a look at how it might look when you're done editing. Note that a semicolon (;) tells OpenVPN not to read and execute the following line (listing 10.2).
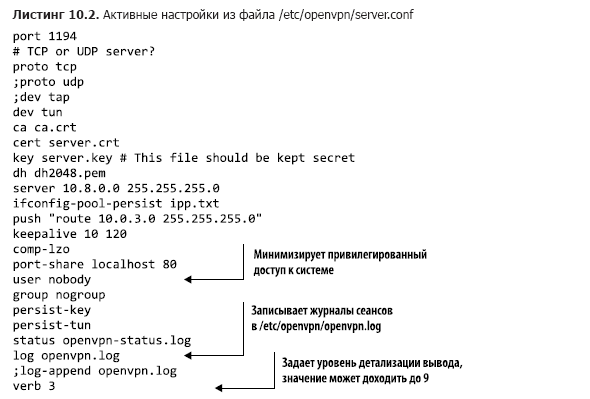
Let's go over some of these settings.
- By default, OpenVPN operates through port 1194. You can change this, for example, to further conceal your actions or avoid conflicts with other active tunnels. Since 1194 requires minimal coordination with clients, it's best to do so.
- OpenVPN uses either the Transmission Control Protocol (TCP) or the User Datagram Protocol (UDP) for data transmission. TCP may be a bit slower, but it's more reliable and is more likely to be understood by applications running on both ends of the tunnel.
- You can specify dev tun when you want to create a simpler and more efficient IP tunnel that transmits data content and nothing more. On the other hand, if you need to connect multiple network interfaces (and the networks they represent) by creating an Ethernet bridge, you will need to choose dev tap. If you do not understand what all this means, use the tun argument.
- The following four lines pass OpenVPN the names of three authentication files on the server and the dh2048 parameters file that you created earlier.
- The server line sets the range and subnet mask that will be used to assign IP addresses to clients upon login.
- The optional push parameter "route 10.0.3.0 255.255.255.0" allows remote clients to access private subnets behind the server. To accomplish this, network configuration on the server itself is also required so that the private subnet is aware of the OpenVPN subnet (10.8.0.0).
- The line port-share localhost 80 allows redirecting client traffic coming through port 1194 to a local web server listening on port 80. This is useful if you plan to engage a web server for testing your VPN. It only works when the tcp protocol is selected.
- The lines user nobody and group nogroup must be active — this means removing the semicolons (;). Forcing remote clients to run under nobody and nogroup ensures that sessions on the server will be unprivileged.
- log indicates that the current log entries will overwrite old entries each time OpenVPN is started, while log-append adds new entries to the existing log file. The log file openvpn.log is written to the /etc/openvpn/ directory.
Additionally, the configuration file often includes the value client-to-client so that multiple clients can see each other in addition to the OpenVPN server. If you are satisfied with your configuration, you can start the OpenVPN server:
# systemctl start openvpnDue to the changing nature of the relationship between OpenVPN and systemd, sometimes this syntax may be required to start the service: systemctl start openvpn@server.
Running ip addr to display the list of your server's network interfaces should now output a reference to the new interface named tun0. OpenVPN will create it to service incoming clients:
$ ip addr
[...]
4: tun0: mtu 1500 qdisc [...]
      link/none
      inet 10.8.0.1 peer 10.8.0.2/32 scope global tun0
          valid_lft forever preferred_lft forever
You may need to restart the server before everything starts working completely. The next stop is the client computer.
10.1.2. Configuring the OpenVPN Client
Traditionally, tunnels are built with at least two exits (otherwise, we would call them caves). A properly configured OpenVPN server directs traffic into and out of the tunnel from one side. However, you will also need some software running on the client side, that is, at the other end of the tunnel.
In this section, I will focus on manually configuring a Linux computer of some type to work as an OpenVPN client. But this is not the only way to achieve such functionality. OpenVPN supports client applications that can be installed and used on desktop and laptop computers running Windows or macOS, as well as on smartphones and tablets based on Android and iOS. For details, see openvpn.net.
The OpenVPN package will need to be installed on the client computer, just as it was installed on the server, although there is no need for easy-rsa here since the keys you are using already exist. You need to copy the template file client.conf to the /etc/openvpn/ directory, which has just been created. This time the file will not be archived, so the usual cp command will work well for this task:
# apt install openvpn
# cp /usr/share/doc/openvpn/examples/sample-config-files/client.conf
  /etc/openvpn/
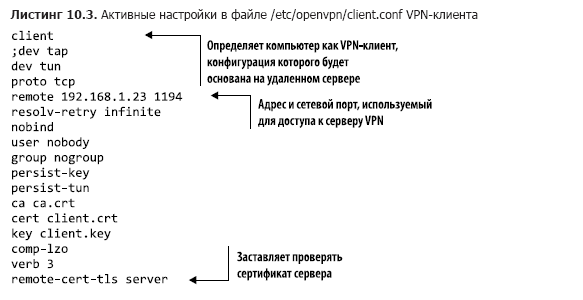
Most settings in your client.conf file will be quite understandable: they should match the values on the server. As seen from the following example file, a unique parameter is remote 192.168.1.23 1194, which tells the client the IP address of the server. Again, make sure this is your server's address. You should also make the client computer verify the server's certificate to prevent a potential 'man-in-the-middle' attack. One way to do this is to add the line remote-cert-tls server (listing 10.3).
Now you can navigate to the /etc/openvpn/ directory and extract the certification keys from the server. Replace the server IP address or domain name in the example with your values:

Nothing exciting is likely to happen until you run OpenVPN on the client. Since you need to pass a couple of arguments, you will do this from the command line. The argument --tls-client informs OpenVPN that you will be acting as a client and connecting via TLS encryption, and --config points to your configuration file:
# openvpn --tls-client --config /etc/openvpn/client.confCarefully read the command output to ensure that you are connected correctly. If something goes wrong the first time, it may be due to mismatched settings between the server and client configuration files or a network/firewall issue. Here are some troubleshooting tips.
- Pay close attention to the output from the OpenVPN operation on the client. It often contains valuable hints about what cannot be executed and why.
- Check for error messages in the openvpn.log and openvpn-status.log files in the /etc/openvpn/ directory on the server.
- Check for OpenVPN-related messages in the system logs on both the server and client, particularly those that are time-related. (journalctl -ce will display the most recent entries.)
- Make sure you have an active network connection between the server and client (more details in chapter 14).
About the Author
David Clinton — system administrator, educator, and writer. He has administered, written about, and created educational materials for many significant technical disciplines, including Linux systems, cloud computing (particularly AWS), and container technologies like Docker. He authored the book Learn Amazon Web Services in a Month of Lunches (Manning, 2017). Many of his educational video courses can be found on Pluralsight.com, and links to his other books (on Linux administration and server virtualization) are available at .
» Learn more about the book at
»
»
For Habr users, a 25% discount with the coupon — Linux
Upon payment for the print version of the book, an electronic version will be sent to your email.
Source: habr.com
