

According to data and , in 2019, 4.6 million qualified electronic signature (QES) certificates will be issued in Russia, complying with the requirements of Federal Law 63-FZ. This means that every second entrepreneur among the 8 million registered individual entrepreneurs (IEs) and limited liability companies (LLCs) uses an electronic signature. In addition to QES for EGAIS and cloud QES for reporting, issued by banks and accounting services, universal QES on secured tokens are of particular interest. Such certificates allow logging into government portals and signing any documents, making them legally binding.
With a QES certificate on a USB token, you can remotely conclude a contract with a counterparty or a remote employee, submit documents to the court; register an online cash register, settle tax debts, and submit a declaration in your personal account on nalog.ru; find out about debts and upcoming inspections on Gosuslugi.
The manual presented below will help work with QES on macOS – without needing to study the CryptoPro forums or set up a Windows virtual machine.
Content
What you need to work with QES on macOS:
Installing and configuring QES on macOS
- Installing CryptoPro CSP
- Installing RUTOKEN drivers
- Installing certificates
3.1. Remove all old GOST certificates
3.2. Install root certificates
3.3. Download certificates from the certificate authority
3.4. Install the certificate with RUTOKEN - Installing the special Chromium-GOST browser
- Installing browser extensions
5.1 CryptoPro Digital Signature Browser plug-in
5.2. Plugin for Gosuslugi
5.3. Configuring the plugin for Gosuslugi
5.4. Activating extensions
5.5. Configuring the CryptoPro Digital Signature Browser plug-in extension - Checking that everything works
6.1. Visit the test page of CryptoPro
6.2. Access your personal account on nalog.ru
6.3. Access Gosuslugi - What to do if it stops working
Changing the container PIN code
- Determining the name of the QES container
- Changing the PIN using a command from the terminal
Signing files in macOS
- Determining the hash of the QES certificate
- Signing the file using a command from the terminal
- Installing Apple Automator Script
Verifying the signature on the document
All information below is obtained from authoritative sources (CryptoPro and , , , ), and software is offered for download from trusted sites. The author is an independent consultant and not affiliated with any of the mentioned companies. By following this guide, you assume full responsibility for any actions and consequences.
What you need to work with QES on macOS:
- Digital Signature Certificate on a Rutoken Lite USB token or Rutoken Digital Signature
- cryptographic container in the CryptoPro format
- with a built-in license for CryptoPro CSP
Token devices eToken and JaCarta with CryptoPro on macOS are not supported. The Rutoken Lite device is the optimal choice, costs 500-1000 rubles, works quickly, and allows storing up to 15 keys.
The Crypto providers VipNet, Signal-COM, and LISSI are not supported on macOS. Containers cannot be converted in any way. CryptoPro is the optimal choice, and the cost of the certificate should be around 1300 rubles for individual entrepreneurs and 1600 rubles for legal entities.
Usually, the annual license for CryptoPro CSP is already embedded in the certificate and is provided free by many Certification Authorities. If this is not the case, it is necessary to purchase and activate a perpetual license for CryptoPro CSP strictly of version 4, costing 2700 rubles. CryptoPro CSP version 5 is currently not operational on macOS.
Installing and configuring QES on macOS
Obvious things
- all downloaded files are saved to the default directory: ~/Downloads/;
- in all installers, we do not change anything, everything stays as is;
- if macOS displays a warning that the software being launched is from an untrusted developer – you need to confirm the launch in system settings: System Preferences —> Security & Privacy —> Open Anyway;
- if macOS requests the user's password and permission to control the computer – you need to enter the password and agree to everything.
1. Install CryptoPro CSP
on the CryptoPro website and from the download and install the version CryptoPro CSP 4.0 R4 for macOS – .
2. Install Rutoken drivers
The website states that this is optional, but it is better to install it. Download and install from the Rutoken website Keychain Support Module – .
Next, connect the USB token, open terminal, and execute the command:
/opt/cprocsp/bin/csptest -card -enum -vThe response should be:
Activating Rutoken…
Card present…
[ErrorCode: 0x00000000]
3. Install certificates
3.1. Remove all old GOST certificates
If there were previous attempts to run the Digital Signature Certificate on macOS, it is necessary to clean up all previously installed certificates. The following commands in the terminal will delete only CryptoPro certificates and will not affect regular certificates from Keychain in macOS.
sudo /opt/cprocsp/bin/certmgr -delete -all -store mrootsudo /opt/cprocsp/bin/certmgr -delete -all -store uroot/opt/cprocsp/bin/certmgr -delete -allThe response of each command should be:
No certificate matching the criteria
or
Deleting complete
3.2. Install root certificates
Root certificates are common for all digital signatures issued by any certification authority. Downloading from UFO of the Ministry of Digital Development:
Install using commands in the terminal:
sudo /opt/cprocsp/bin/certmgr -inst -store mroot -f ~/Downloads/4BC6DC14D97010C41A26E058AD851F81C842415A.cersudo /opt/cprocsp/bin/certmgr -inst -store mroot -f ~/Downloads/8CAE88BBFD404A7A53630864F9033606E1DC45E2.cersudo /opt/cprocsp/bin/certmgr -inst -store mroot -f ~/Downloads/0408435EB90E5C8796A160E69E4BFAC453435D1D.cerEach command should return:
Installing:
…
[ErrorCode: 0x00000000]
3.3. Download certificates from the certificate authority
Next, you need to install the certificates from the certification authority where you issued the digital signature. Usually, the root certificates of each CA are located on its website in the downloads section.
Alternatively, certificates from any CA can be downloaded from . To do this, in the search form, you need to find the CA by name, go to the certificate page, and download all active certificates – that is, those for which the field 'Valid' the second date has not yet arrived. Download using the link from the field 'Fingerprint'.
Screenshots
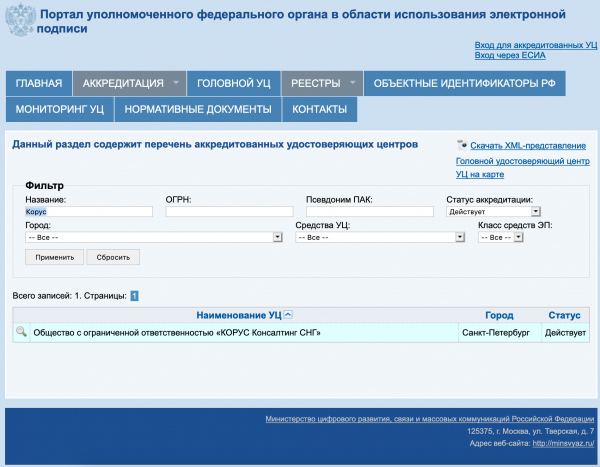
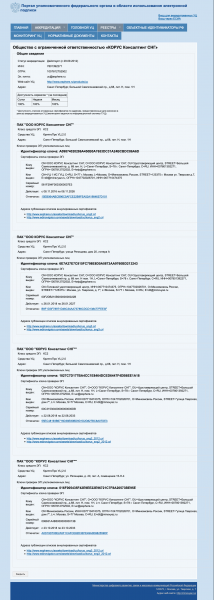
For example, for the CA Korus-Consulting: you need to download 4 certificates from :
The downloaded CA certificates are installed using commands from the terminal:
sudo /opt/cprocsp/bin/certmgr -inst -store mroot -f ~/Downloads/B9F1D3F78971D48C34AA73786CDCD138477FEE3F.cersudo /opt/cprocsp/bin/certmgr -inst -store mroot -f ~/Downloads/A0D19D700E2A5F1CAFCE82D3EFE49A0D882559DF.cersudo /opt/cprocsp/bin/certmgr -inst -store mroot -f ~/Downloads/55EC48193B6716D38E80BD9D1D2D827BC8A07DE3.cersudo /opt/cprocsp/bin/certmgr -inst -store mroot -f ~/Downloads/15EB064ABCB96C5AFCE22B9FEA52A1964637D101.cerwhere after ~/Downloads/ the names of the downloaded files follow, which will be unique for each CA.
Each command should return:
Installing:
…
[ErrorCode: 0x00000000]
3.4. Install the certificate with RUTOKEN
Command in the terminal:
/opt/cprocsp/bin/csptestf -absorb -certsThe command should return:
OK.
[ErrorCode: 0x00000000]
4. We install the special browser Chromium-GOST
For working with government portals, a special version of the browser Chromium is required – Chromium-GOST. The source code of the project is open, a link to the is provided on . Based on experience, other browsers CryptoFox and Yandex Browser are not suitable for working with government portals on macOS. It should be noted that in some builds of Chromium-GOST, the personal account on nalog.ru may hang or scrolling may stop working altogether, therefore the old verified build 71.0.3578.98 – .
We download and unpack the archive, install the browser by copying or drag & drop to the Applications folder. After installation, we forcibly close Chromium and do not open it yet; we work from Safari.
killall Chromium-Gost5. Installing extensions for the browser
5.1 CryptoPro Digital Signature Browser plug-in
From the KryptoPro website, download and install the KryptoPro Digital Signature Browser plug-in version 2.0 for users – .
5.2. Plugin for Gosuslugi
From from the State Services portal, download and install Plugin for working with the state services portal (version for macOS) – .
5.3. Configuring the plugin for Gosuslugi
Download the correct configuration file for the State Services extension from the KryptoPro website – .
Execute the commands in the terminal:
sudo rm /Library/Internet Plug-Ins/IFCPlugin.plugin/Contents/ifc.cfgsudo cp ~/Downloads/ifc.cfg /Library/Internet Plug-Ins/IFCPlugin.plugin/Contentssudo cp /Library/Google/Chrome/NativeMessagingHosts/ru.rtlabs.ifcplugin.json /Library/Application Support/Chromium/NativeMessagingHosts5.4. Activating extensions
Launch the Chromium-Gost browser and type in the address bar:
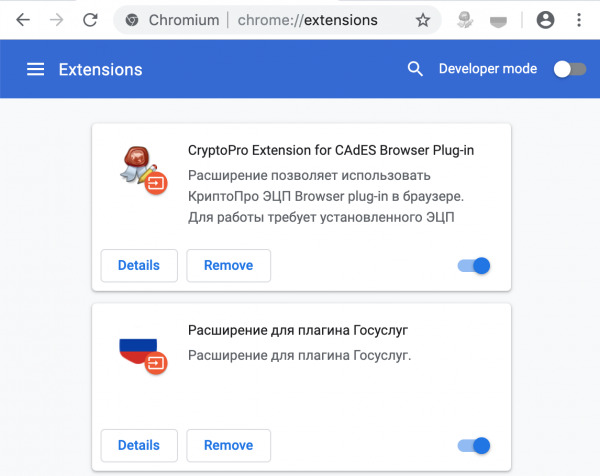
chrome://extensions/Enable both installed extensions:
- CryptoPro Extension for CAdES Browser Plug-in
- Extension for the State Services plug-in
Screenshot
5.5. Configuring the CryptoPro Digital Signature Browser plug-in extension
In the Chromium-Gost address bar, type:
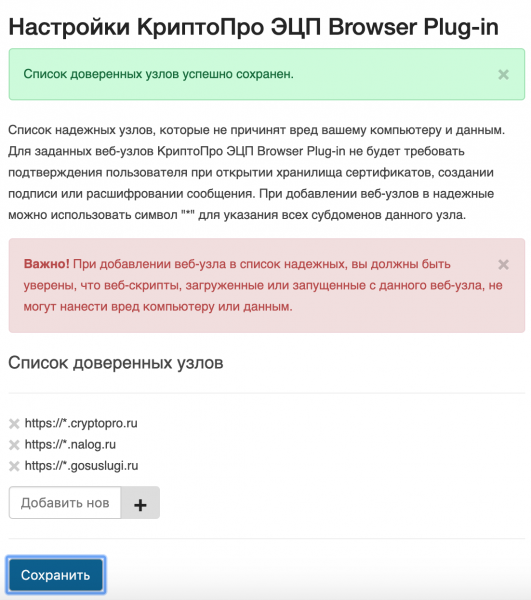
/etc/opt/cprocsp/trusted_sites.htmlOn the page that appears, sequentially add the following sites to the list of trusted nodes:
https://*.cryptopro.ru
https://*.nalog.ru
https://*.gosuslugi.ru
Click “Save”. A green banner should appear:
The list of trusted nodes has been successfully saved.
Screenshot
6. Check if everything is working
6.1. Visit the test page of CryptoPro
In the Chromium-Gost address bar, type:
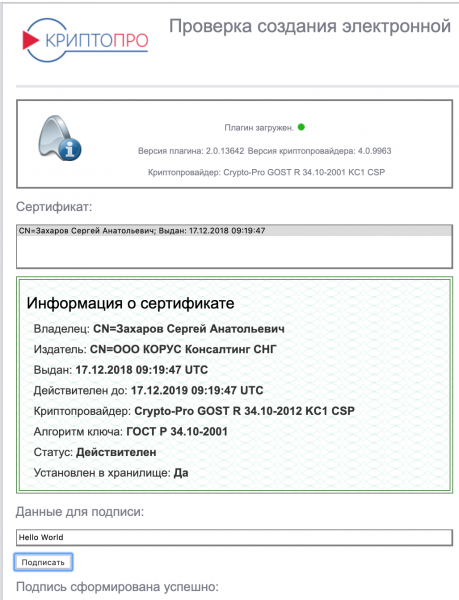
https://www.cryptopro.ru/sites/default/files/products/cades/demopage/cades_bes_sample.htmlIt should display “Plugin loaded”, and your certificate should be present in the list below.
Select your certificate from the list and click “Sign”. The certificate PIN code will be requested. In the end, it should display
Signature created successfully
Screenshot
6.2. Access your personal account on nalog.ru
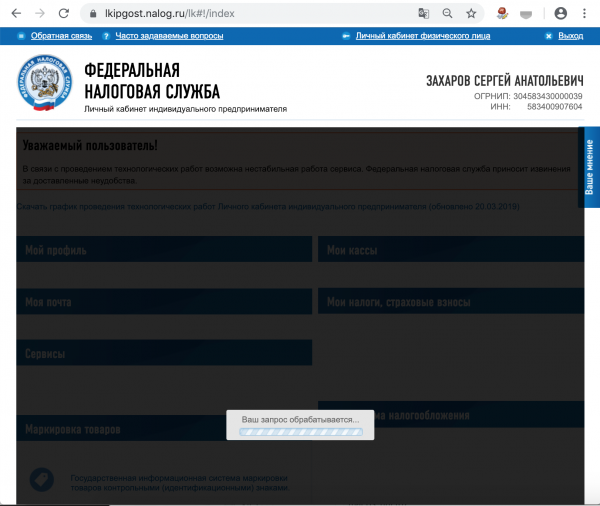
You may not be able to access links from the nalog.ru website, as checks will not pass. You should go by direct links:
- Personal Account Individual Entrepreneur:
- Personal Account Legal Entity:
Screenshot
6.3. Access Gosuslugi
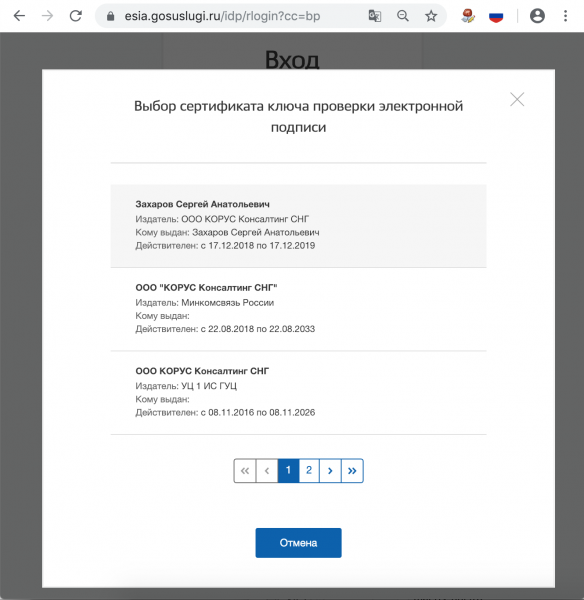
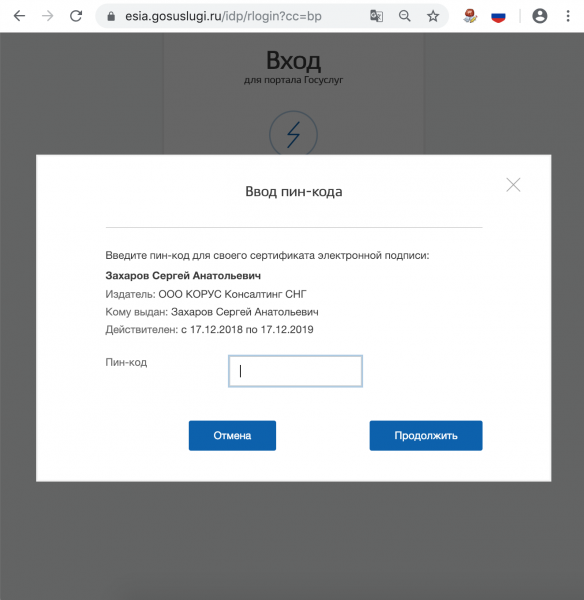
When authorizing, select ‘Login with electronic signature’. In the appearing list ‘Choose the certificate for verifying the electronic signature’, all certificates, including root and CA, will be displayed; you need to select yours from the USB token and enter the PIN.
Screenshot
7. What to do if it stopped working
Reconnect the USB token and check that it is recognized using the command in the terminal:
sudo /opt/cprocsp/bin/csptest -card -enum -vClear the browser cache for all time, for which type in the address bar of Chromium-Gost:
chrome://settings/clearBrowserDataReinstall the KЭП certificate using the command in the terminal:
/opt/cprocsp/bin/csptestf -absorb -certs
Changing the container PIN code
The default user PIN code on the Rutoken 12345678, and it must not be left as is. Requirements for the Rutoken PIN code: max. 16 characters, may contain Latin letters and numbers.
1. Find out the name of the KЭП container
Multiple certificates can be stored on a USB token and other storage devices, and you need to select the correct one. With the USB token inserted, you can get a list of all containers in the system using the command in the terminal:
/opt/cprocsp/bin/csptest -keyset -enum_cont -fqcn -verifycontextThe command should output at least 1 container and return
[ErrorCode: 0x00000000]
The required container has the form
.Aktiv Rutoken liteXXXXXXXX
If several such containers are displayed, it means that multiple certificates are recorded on the token, and you are aware of which one is needed. The value XXXXXXXX after the slash needs to be copied and inserted into the command below.
2. Change the PIN using a command from the terminal
/opt/cprocsp/bin/csptest -passwd -qchange -container "XXXXXXXX"where XXXXXXXX – the name of the container obtained in step 1 (must be in quotes).
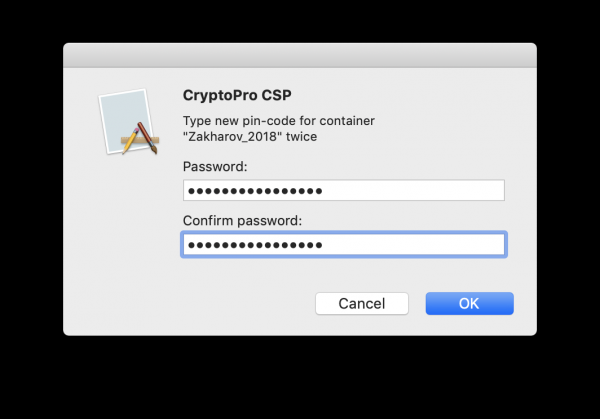
A CryptoPro dialog will appear asking for the old PIN code to access the certificate, followed by another dialog for entering the new PIN code. Done.
Screenshot
Signing files in macOS
In macOS, files can be signed with the software (license cost 2500 rubles), or with a simple command through the terminal – for free.
1. Determine the hash of the electronic signature certificate
There may be multiple certificates on the token and in other storage devices. You need to clearly identify the one you will use to sign documents from now on. This is done once.
The token must be inserted. Get a list of certificates in the storage using the command from the terminal:
/opt/cprocsp/bin/certmgr -listThe command should output at least 1 certificate of the following type:
Certmgr 1.1 © 'Crypto-Pro', 2007-2018.
program for managing certificates, CRLs and stores
= = = = = = = = = = = = = = = = = = = =
1——-
Issuer: E=help@esphere.ru,… CN=LLC KORUS Consulting CIS…
Subject: E=sergzah@gmail.com,… CN=Zakharev Sergey Anatolyevich…
Serial: 0x0000000000000000000000000000000000
SHA1 Hash: XXXXXXXXXXXXXXXXXXXXXXXXXXXXXXXXXXXXXXXX
…
Container: SCARDrutoken_lt_00000000 000 000
…
= = = = = = = = = = = = = = = = = = = =
[ErrorCode: 0x00000000]
The parameter Container of the required certificate should have a value in the format SCARDrutoken…. If there are multiple certificates with such values, it means that multiple certificates are recorded on the token, and you are aware of which one is needed. The parameter value SHA1 Hash (40 characters) needs to be copied and inserted into the command below.
2. File signing with a command from the terminal
In the terminal, navigate to the directory with the file for signing and execute the command:
/opt/cprocsp/bin/cryptcp -signf -detach -cert -der -strict -thumbprint ХХХХХХХХХХХХХХХХХХХХХХХХХХХХХХХХХХХХХХХХ FILEwhere XXXX… – the hash of the certificate obtained in step 1, and FILE – the file name for signing (with all extensions, but without the path).
The command should return:
Signed message is created.
[ErrorCode: 0x00000000]
An electronic signature file with the extension *.sgn will be created – this is a detached signature in CMS format with DER encoding.
3. Installing the Apple Automator Script
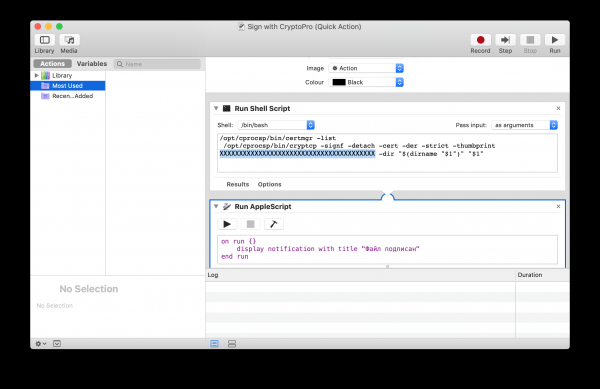
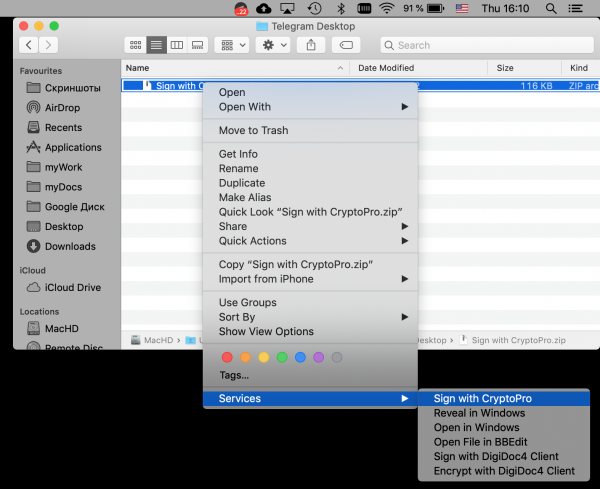
To avoid working with the terminal each time, you can install an Automator Script once, which allows you to sign documents from the Finder's context menu. To do this, download the archive – .
- Unpack the archive ‘Sign with CryptoPro.zip’
- Launch Automator
- Locate and open the unpacked file ‘Sign with CryptoPro.workflow’
- In the section Run Shell Script change the text XXXXXXXXXXXXXX to the value of the SHA1 Hash digital signature certificate obtained above.
- Save the script: ⌘Command + S
- Run the file ‘Sign with CryptoPro.workflow’ and confirm the installation.
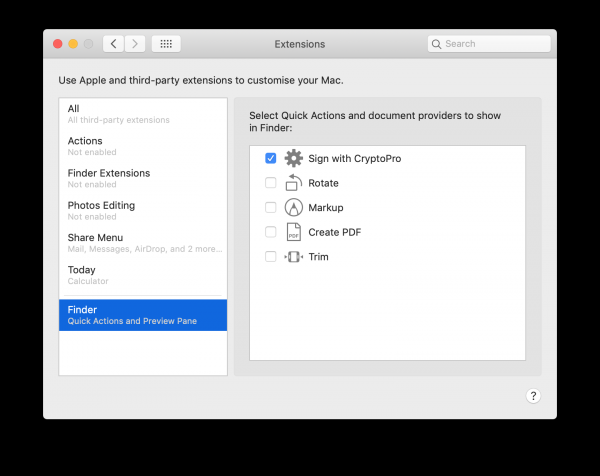
- Go to System Preferences -> Extensions -> Finder and verify that Sign with CryptoPro quick action is checked.
- In Finder, right-click any file, and in the section Quick Actions and/or Services select the item Sign with CryptoPro
- In the dialog that appears, enter the user PIN code for the digital signature
- A file with the extension *.sgn will appear in the current directory – a detached signature in CMS format with DER encoding.
Screenshots
Apple Automator window:
System Preferences:
Finder context menu:
Verifying the signature on the document
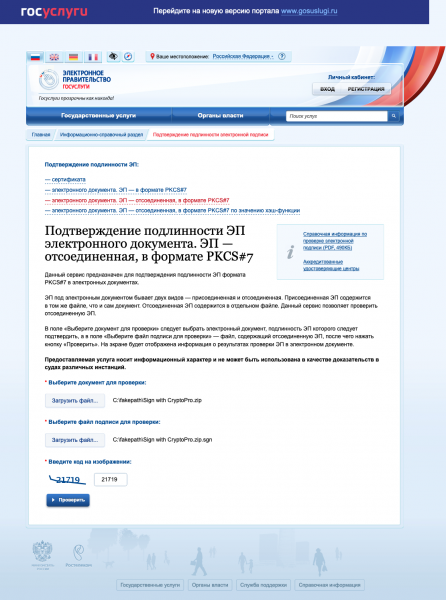
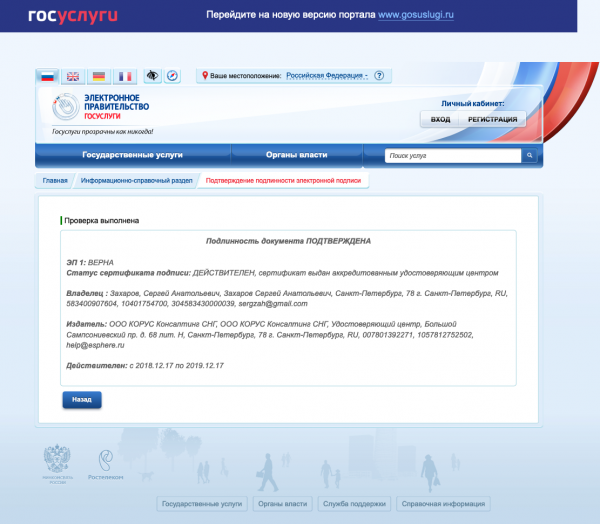
If the document's content contains no secrets or mysteries, it's easiest to use the web service on the State Services portal – . This way you can make a screenshot from an authoritative source and be sure that the signature is all okay.
Screenshots
Source: habr.com
