

It all started when the team lead of one of our developer teams asked to expose their new application, which had recently undergone containerization, in a testing mode. I did it. About 20 minutes later, there was a request to update the application because an important feature had been added. I updated it. A couple of hours later... well, you can guess what happened next...
I must admit, I’m quite lazy (didn’t I confess this before? no?), and considering that the team leads have access to Jenkins, where we have our entire CI/CD, I thought: let them deploy as they see fit! I remembered a joke: give a person a fish, and they will be fed for a day; name the person Full and they will be Full for a lifetime. And I went to craft a job, which would be able to deploy a container with the application of any successfully built version into Kubernetes and pass any values to it. ENV (my grandfather, a philologist and former English teacher, would be shaking his head and looking at me with an expressive gaze if he read this sentence).
So, in this note, I will share how I learned to:
- Dynamically update jobs in Jenkins from the job itself or from other jobs;
- Connect to the cloud console (Cloud shell) from a node with the Jenkins agent installed;
- Deploy a workload in Google Kubernetes Engine.
In reality, I'm slightly exaggerating. It’s assumed that at least part of your infrastructure is in Google Cloud, and thus you are a user, and of course, you have a GCP account. But that’s not the focus of this note.
This is another one of my cheat sheets. I feel compelled to write these notes only in one case: when I face a task that I initially don’t know how to solve, the solution isn’t readily available online, so I do my research piece by piece until I finally solve the problem. And so that in the future, when I forget how I did it, I don’t have to go searching again and compile it all together, I write these cheat sheets for myself.
Disclaimer: 1. This note was written 'for myself', and claims no status as a best practice. I would gladly read suggestions on 'it would have been better to do this' in the comments.
2. If the practical part of the note is considered salt, then, like all my previous notes, this one is a weak saline solution.
Dynamic Update of Job Settings in Jenkins
I anticipate your question: what does dynamic job update have to do with anything? I could just manually enter the string parameter and proceed!
To answer: I am indeed lazy; I dislike hearing complaints like, 'Misha, the deployment crashes, all is lost!' You start looking, and there’s a typo in some launch parameter value. Therefore, I prefer to do everything as foolproof as possible. If there’s a chance to prevent the user from entering data directly by providing a list of values to choose from instead, I set up a selection.
The plan is as follows: we create a job in Jenkins, where before launching, you could select a version from a list, specify values for parameters passed to the container through ENV, then it builds the container and pushes it to the Container Registry. From there, the container is launched in Kubernetes as workload with the parameters specified in the job.
We won’t discuss the process of creating and configuring a job in Jenkins; that’s off-topic. We will assume that the job is ready. To implement an updatable list of versions, we need two things: an existing list-source with a priori valid version numbers and a variable of type Choice parameter in the job. In our example, let’s name the variable BUILD_VERSION, and we won't dwell on it in detail. However, let’s take a closer look at the source list.
There aren’t too many options. Two came to my mind immediately:
- Use the Remote Access API that Jenkins offers to its users;
- Request the contents of a remote repository folder (in our case, this is JFrog Artifactory, which is not critical).
Jenkins Remote Access API
As is customary, I prefer to avoid lengthy explanations.
I will merely allow myself a loose translation of a piece from the first paragraph :
Jenkins provides an API for remote machine-readable access to its functionality. <…> Remote access is offered in a REST-like style. This means there’s no single entry point for all capabilities, and instead, a URL of the form '…/api/', where '…' denotes the object to which the API capabilities apply.
In other words, if the deployment job we are currently discussing is available at the address http://jenkins.mybuild.er/view/AweSomeApp/job/AweSomeApp_build, the API endpoints for this task are available at http://jenkins.mybuild.er/view/AweSomeApp/job/AweSomeApp_build/api/
Next, we have a choice of how to receive the output. Let's settle on XML, as the API only allows filtering in this case.
Let's just try to get a list of all job runs. We're only interested in the build name (displayName) and its result (result):
http://jenkins.mybuild.er/view/AweSomeApp/job/AweSomeApp_build/api/xml?tree=allBuilds[displayName,result]Did it work?
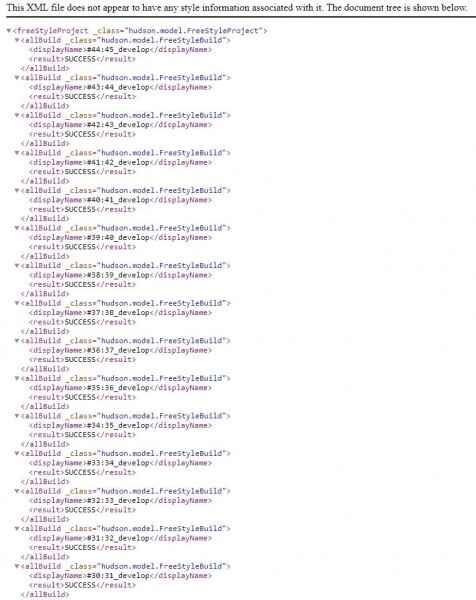
Now let's filter only those runs that have the result SUCCESS. We'll use the argument &exclude and pass the path to the value not equal to SUCCESS. Yes, yes. Double negation is a statement. We're excluding everything that doesn't interest us:
http://jenkins.mybuild.er/view/AweSomeApp/job/AweSomeApp_build/api/xml?tree=allBuilds[displayName,result]&exclude=freeStyleProject/allBuild[result!='SUCCESS'] Screenshot of the successful list
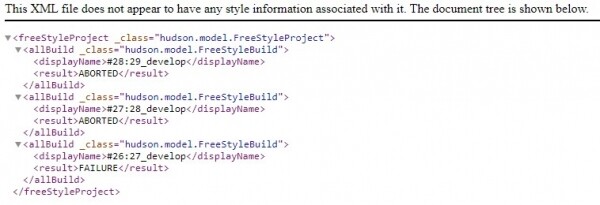
And just for fun, let's make sure the filter didn't deceive us (filters never lie!) and list the 'non-successful' ones:
http://jenkins.mybuild.er/view/AweSomeApp/job/AweSomeApp_build/api/xml?tree=allBuilds[displayName,result]&exclude=freeStyleProject/allBuild[result='SUCCESS'] Screenshot of the non-successful list
List of versions from the folder on the remote server
There is a second way to get the version list. I like it even more than calling the Jenkins API. Well, because if the application was built successfully, it means it was packaged and placed in the appropriate folder in the repository. Kind of, the repository is by default a storage for working versions of applications. So, let's ask it what versions are stored. We will curl, grep, and awk the remote folder. If someone is interested in a one-liner, it’s under the spoiler.
One-liner command
Note two things: I’m passing credentials for connection in the header, and I don’t need all versions from the folder, and I'm filtering only those created within the last month. Edit the command according to your realities and needs:
curl -H "X-JFrog-Art-Api:VeryLongAPIKey" -s http://arts.myre.po/artifactory/awesomeapp/ | sed 's/a href=//g' | grep "$(date +%b)-$(date +%Y)|$(date +%b --date='-1 month')-$(date +%Y)" | awk '{print $1}' | grep -oP '>K[^/]+ )Job settings and the job configuration file in Jenkins
Now that we’ve worked with the source of the version list, let’s integrate the obtained list into the task. For me, the obvious solution was to add a step in the application build job. A step that would execute in case of a 'success' result.
Open the build job settings and scroll to the very bottom. Click the buttons: Add build step -> Conditional step (single). In the step settings, we choose the condition Current build status, set the value SUCCESS, and the action to perform in case of success Run shell command.
And now for the most interesting part. Jenkins job configurations are stored in files. In XML format. At the path http://path-to-job/config.xml Accordingly, you can download the configuration file, edit it as needed, and place it back where it was taken from.
Remember, earlier we agreed to create a parameter for the version list. BUILD_VERSION?
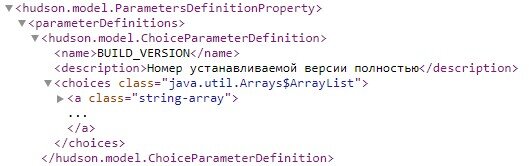
Let's download the configuration file and take a look inside it. Just to make sure that the parameter is present and indeed in the right format.
A screenshot under the spoiler.
Your presented fragment of config.xml should look the same. With the exception that the contents of the choices element are currently missing.
Are we sure? Well, let's write a script that will execute in case of a successful build.
The script will obtain the list of versions, download the configuration file, write the list of versions into the required spot in it, and then place it back. Yes. That's right. Writing the list of versions into the XML where the list of versions already exists (this will happen in the future, after the first run of the script). I know that there are still die-hard fans of regular expressions out there. I don't belong to them. Please install on the machine where the config will be edited. It seems to me that this is not such a big price to pay to avoid editing XML with sed.
Under the spoiler, I provide the code that performs the above-described sequence in its entirety.
We write the list of versions to the config from a folder on the remote server.
#!/bin/bash
############## Скачиваем конфиг
curl -X GET -u username:apiKey http://jenkins.mybuild.er/view/AweSomeApp/job/AweSomeApp_k8s/config.xml -o appConfig.xml

############## Удаляем и заново создаем xml-элемент для списка версий
xmlstarlet ed --inplace -d '/project/properties/hudson.model.ParametersDefinitionProperty/parameterDefinitions/hudson.model.ChoiceParameterDefinition[name="BUILD_VERSION"]/choices[@class="java.util.Arrays$ArrayList"]/a[@class="string-array"]' appConfig.xml

xmlstarlet ed --inplace --subnode '/project/properties/hudson.model.ParametersDefinitionProperty/parameterDefinitions/hudson.model.ChoiceParameterDefinition[name="BUILD_VERSION"]/choices[@class="java.util.Arrays$ArrayList"]' --type elem -n a appConfig.xml

xmlstarlet ed --inplace --insert '/project/properties/hudson.model.ParametersDefinitionProperty/parameterDefinitions/hudson.model.ChoiceParameterDefinition[name="BUILD_VERSION"]/choices[@class="java.util.Arrays$ArrayList"]/a' --type attr -n class -v string-array appConfig.xml

############## Читаем в массив список версий из репозитория
readarray -t vers < <( curl -H "X-JFrog-Art-Api:Api:VeryLongAPIKey" -s http://arts.myre.po/artifactory/awesomeapp/ | sed 's/a href=//' | grep "$(date +%b)-$(date +%Y)|$(date +%b --date='-1 month')-$(date +%Y)" | awk '{print $1}' | grep -oP '>K[^/]+' )

############## Пишем массив элемент за элементом в конфиг
printf '%sn' "${vers[@]}" | sort -r |
                while IFS= read -r line
                do
                    xmlstarlet ed --inplace --subnode '/project/properties/hudson.model.ParametersDefinitionProperty/parameterDefinitions/hudson.model.ChoiceParameterDefinition[name="BUILD_VERSION"]/choices[@class="java.util.Arrays$ArrayList"]/a[@class="string-array"]' --type elem -n string -v "$line" appConfig.xml
                done

############## Кладем конфиг взад
curl -X POST -u username:apiKey http://jenkins.mybuild.er/view/AweSomeApp/job/AweSomeApp_k8s/config.xml --data-binary @appConfig.xml

############## Приводим рабочее место в порядок
rm -f appConfig.xml
If you preferred the option of getting versions from Jenkins and you're as lazy as I am, then under the spoiler is the same code, but the list is from Jenkins:
We write the list of versions from Jenkins to the config.
Just note: my build name consists of a sequence number and a version number, separated by a colon. Accordingly, awk cuts off the unnecessary part. Modify this line as needed for your purposes.
#!/bin/bash
############## Скачиваем конфиг
curl -X GET -u username:apiKey http://jenkins.mybuild.er/view/AweSomeApp/job/AweSomeApp_k8s/config.xml -o appConfig.xml

############## Удаляем и заново создаем xml-элемент для списка версий
xmlstarlet ed --inplace -d '/project/properties/hudson.model.ParametersDefinitionProperty/parameterDefinitions/hudson.model.ChoiceParameterDefinition[name="BUILD_VERSION"]/choices[@class="java.util.Arrays$ArrayList"]/a[@class="string-array"]' appConfig.xml

xmlstarlet ed --inplace --subnode '/project/properties/hudson.model.ParametersDefinitionProperty/parameterDefinitions/hudson.model.ChoiceParameterDefinition[name="BUILD_VERSION"]/choices[@class="java.util.Arrays$ArrayList"]' --type elem -n a appConfig.xml

xmlstarlet ed --inplace --insert '/project/properties/hudson.model.ParametersDefinitionProperty/parameterDefinitions/hudson.model.ChoiceParameterDefinition[name="BUILD_VERSION"]/choices[@class="java.util.Arrays$ArrayList"]/a' --type attr -n class -v string-array appConfig.xml

############## Пишем в файл список версий из Jenkins
curl -g -X GET -u username:apiKey 'http://jenkins.mybuild.er/view/AweSomeApp/job/AweSomeApp_build/api/xml?tree=allBuilds[displayName,result]&exclude=freeStyleProject/allBuild[result!=%22SUCCESS%22]&pretty=true' -o builds.xml

############## Читаем в массив список версий из XML
readarray vers < <(xmlstarlet sel -t -v "freeStyleProject/allBuild/displayName" builds.xml | awk -F":" '{print $2}')

############## Пишем массив элемент за элементом в конфиг
printf '%sn' "${vers[@]}" | sort -r |
                while IFS= read -r line
                do
                    xmlstarlet ed --inplace --subnode '/project/properties/hudson.model.ParametersDefinitionProperty/parameterDefinitions/hudson.model.ChoiceParameterDefinition[name="BUILD_VERSION"]/choices[@class="java.util.Arrays$ArrayList"]/a[@class="string-array"]' --type elem -n string -v "$line" appConfig.xml
                done

############## Кладем конфиг взад
curl -X POST -u username:apiKey http://jenkins.mybuild.er/view/AweSomeApp/job/AweSomeApp_k8s/config.xml --data-binary @appConfig.xml

############## Приводим рабочее место в порядок
rm -f appConfig.xml
In theory, if you have tested the code written based on the examples above, you should already see a dropdown list with versions in the deployment task. It should look somewhat like the screenshot under the spoiler.
A correctly filled version list

If everything worked, copy and paste the script into Run shell command and save the changes.
Connecting to Cloud Shell
We use collectors in our containers. As a delivery tool for applications and a configuration manager, we use Ansible. Therefore, when it comes to building containers, three options come to mind: install Docker in Docker, install Docker on a machine with Ansible, or build containers in the cloud console. We agreed to stay silent about Jenkins plugins in this note. Remember?
I decided: well, since containers can be built 'out of the box' in the cloud console, why complicate things? Keep it clean, right? I want to build Jenkins containers in the cloud console and then deploy them to Kubernetes from there. Moreover, the internal infrastructure at Google has extremely high bandwidth, which will positively affect deployment speed.
To connect to the cloud console, two things are needed: gcloud and access rights to Google Cloud API for the VM instance from which the connection will be made.
For those planning to connect from outside Google's cloud at all,
Google allows the option to disable interactive authorization in its services. This will enable connections to the console even from a coffee machine, as long as it runs on *nix and has its own console.
If you would like me to elaborate on this topic in this note, please write in the comments. If enough votes gather, I will provide an update on this topic.
The simplest way to grant permissions is through the web interface.
- Stop the VM instance from which the connection to the cloud console will be made.
- Open the Instance Details and click Change.
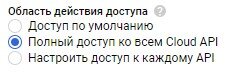
- At the very bottom of the page, select the access scope of the instance. Full access to all Cloud APIs.
Screenshot

- Save the changes and restart the instance.
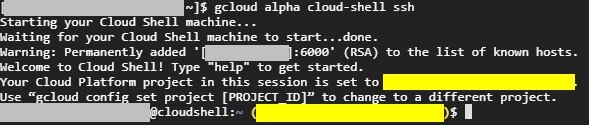
Once the VM has booted up, connect to it via SSH and ensure the connection occurs without errors. Use the command:
gcloud alpha cloud-shell ssh A successful connection looks something like this:
Deployment in GKE
Since we are striving to fully transition to IaC (Infrastructure as Code), our Dockerfiles are stored in Git. On one hand, Kubernetes deployment is described with a YAML file used solely for this task, which is itself kind of code. On the other hand, my point is that the plan is as follows:
- We take the variable values. BUILD_VERSION and, optionally, the values of variables to be passed through ENV.
- Downloading the Dockerfile from Git.
- Generating YAML for deployment.
- Uploading both of these files via SCP to the cloud console.
- Building the container there and pushing it to the Container Registry
- Applying the load deployment file in Kubernetes.
Let's be more specific. Since we are talking about ENV, let's assume we need to pass the values of two parameters: PARAM1 and PARAM2. We add their assignment for deployment, type — String Parameter.
Screenshot
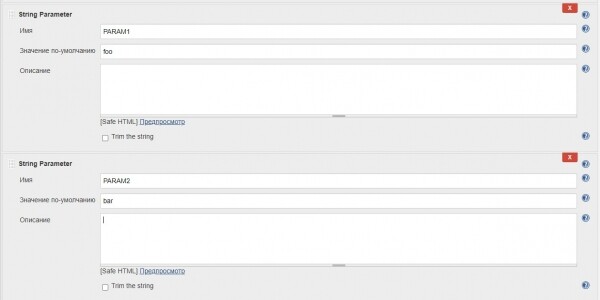
We will generate the YAML simply by redirecting echo to a file. It is assumed, of course, that your Dockerfile contains PARAM1 and PARAM2, that the name of the deployment will be awesomeapp, and the built container with the specified version is located in Container Registry at the path gcr.io/awesomeapp/awesomeapp-$BUILD_VERSION, where $BUILD_VERSION was just selected from the dropdown list.
Command listing
touch deploy.yaml
echo "apiVersion: apps/v1" >> deploy.yaml
echo "kind: Deployment" >> deploy.yaml
echo "metadata:" >> deploy.yaml
echo "  name: awesomeapp" >> deploy.yaml
echo "spec:" >> deploy.yaml
echo "  replicas: 1" >> deploy.yaml
echo "  selector:" >> deploy.yaml
echo "    matchLabels:" >> deploy.yaml
echo "      run: awesomeapp" >> deploy.yaml
echo "  template:" >> deploy.yaml
echo "    metadata:" >> deploy.yaml
echo "      labels:" >> deploy.yaml
echo "        run: awesomeapp" >> deploy.yaml
echo "    spec:" >> deploy.yaml
echo "      containers:" >> deploy.yaml
echo "      - name: awesomeapp" >> deploy.yaml
echo "        image: gcr.io/awesomeapp/awesomeapp-$BUILD_VERSION:latest" >> deploy.yaml
echo "        env:" >> deploy.yaml
echo "        - name: PARAM1" >> deploy.yaml
echo "          value: $PARAM1" >> deploy.yaml
echo "        - name: PARAM2" >> deploy.yaml
echo "          value: $PARAM2" >> deploy.yaml
To the Jenkins agent, after connecting via gcloud alpha cloud-shell ssh interactive mode is not available, so we send commands to the cloud console using the parameter —command.
Cleaning the home directory in the cloud console of the old Dockerfile:
gcloud alpha cloud-shell ssh --command="rm -f Dockerfile"Placing the freshly downloaded Dockerfile in the home directory of the cloud console using SCP:
gcloud alpha cloud-shell scp localhost:./Dockerfile cloudshell:~Building, tagging, and pushing the container to the Container Registry:
gcloud alpha cloud-shell ssh --command="docker build -t awesomeapp-$BUILD_VERSION ./ --build-arg BUILD_VERSION=$BUILD_VERSION --no-cache"
gcloud alpha cloud-shell ssh --command="docker tag awesomeapp-$BUILD_VERSION gcr.io/awesomeapp/awesomeapp-$BUILD_VERSION"
gcloud alpha cloud-shell ssh --command="docker push gcr.io/awesomeapp/awesomeapp-$BUILD_VERSION"
We do the same with the deployment file. Note that the commands below use fictional names for the cluster where the deployment occurs (awsm-cluster) and the project name (awesome-project), where the cluster is located.
gcloud alpha cloud-shell ssh --command="rm -f deploy.yaml"
gcloud alpha cloud-shell scp localhost:./deploy.yaml cloudshell:~
gcloud alpha cloud-shell ssh --command="gcloud container clusters get-credentials awsm-cluster --zone us-central1-c --project awesome-project &&
kubectl apply -f deploy.yaml"
We start the task, open the console output, and hope to see a successful container build.
Screenshot
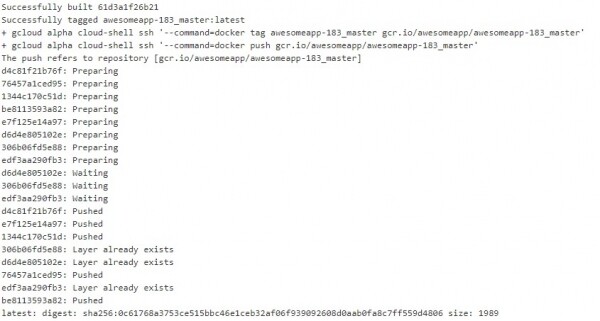
And then a successful deployment of the built container.
Screenshot

I intentionally overlooked the configuration. IngressFor one simple reason: once configured with a specific name, it will remain functional regardless of how many deployments you perform with that name. Moreover, it's somewhat outside the main topic. workload All of the above steps could probably have been avoided by simply installing some plugin for Jenkins, of which there are millions. But for some reason, I don't like plugins. To be more precise, I only resort to them when there's no way out.
Instead of conclusions
I also just enjoy digging into a new topic for me. The text above is also a way to share the findings I've made while solving the task described at the beginning. To share with those who aren't, by any means, a fierce wolf in DevOps. If my findings help at least someone, I will be satisfied.
Let's create a deployment task in GKE without plugins, SMS, or registration. We're peeking under Jenkins' jacket.
Source: habr.com
