

Hello colleagues, welcome to the lesson on migrating Check Point databases from R77.30 to R80.10.
When using Check Point products, the need to migrate existing rules and object databases arises sooner or later for the following reasons:
- When purchasing a new device, it is necessary to migrate the database from the old device to the new device (to the current version of GAIA OS or higher).
- It is necessary to upgrade the device from one version of GAIA OS to a higher version on the local machine.
To address the first task, only the tool called Management Server Migration Tool, or simply Migration Tool, is suitable. For task #2, the CPUSE solution or Migration Tool can be used.
Next, let's take a closer look at both methods.
Upgrading to a new device
Database Migration involves installing the latest version of the Management on the new machine, and then migrating the database from the existing security management server to the new one using the Migration Tool. This method minimizes the risk of upgrading for the existing configuration.
To migrate the database using the Migration Tool, you must meet the requirements:
- There must be more free disk space than five times the size of the exported database archive.
- The network settings on the target server must match those of the source server.
- Creating a backup. The database export should be performed to a remote server.
The GAIA operating system already includes the Migration Tool, which can be used when importing a database or for migration to a version of the operating system identical to the initial one. In order to migrate the database to a higher version of the operating system, you need to download the Migration Tool of the corresponding version from the ‘Tools’ section on the Check Point R80.10 support website: - Backup and migration of SmartEvent / SmartReporter Server. The ‘backup’ and ‘migrate export’ utilities do not include SmartEvent database / SmartReporter database data.
For backup and migration, you need to use the ‘eva_db_backup’ or ‘evs_backup’ utilities.
Note: Article sk110173 in the CheckPoint knowledge base.
Let's take a look at the functions this tool contains:
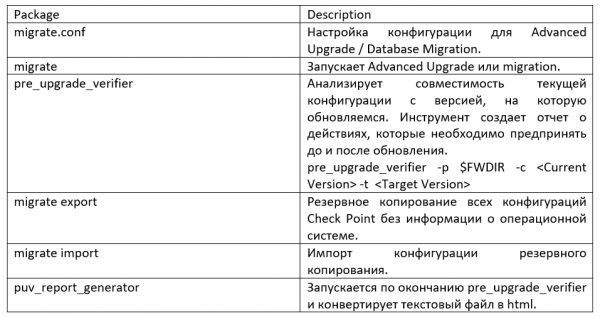
Before proceeding with data migration, first unpack the downloaded Migration Tool into the folder "/opt/CPsuite-R77/fw1/bin/upgrade_tools/". The database export should be done using commands from the directory where you unpacked the tool.
Before running the export or import command, close all SmartConsole clients or run cpstop on the Security Management Server.
To create an export file of the management database on the source server:
- Enter expert mode.
- Run the pre-check tool: pre_upgrade_verifier -p $FWDIR -c R77 -t R80.10. If there are errors, fix them before proceeding.
- Run: ./migrate export filename.tgz. This command exports the contents of the Security Management Server database to a TGZ file.
- Follow the instructions. The database is exported to the file you named in the command. Make sure you defined it as TGZ.
- If SmartEvent is installed on the source server, export the event database.
Next, we will import the security server databases that were exported. Before you start: install the R80 Security Management Server. Note that the network settings of the new R80.10 Management Server must match those of the old server.
To import the configuration of the management server:
- Enter expert mode.
- Transfer (via FTP, SCP, or similar) the exported configuration file to the remote server compiled from the source to the new server.
- Disconnect the source server from the network.
- Transfer the configuration file from the remote server to the new server.
- Calculate the MD5 for the transferred file and compare it with the MD5 calculated on the source server: # md5sum filename.tgz
- Import the database: ./migrate import filename.tgz
- Update check.
At the end of step 7, we summarize that the database migration was successful using the Migration Tool. In case of failure, you can always turn on the source server, so that operations are not affected.
It is worth noting that migration from a standalone server is not supported.
Local update
CPUSE (Check Point Upgrade Service Engine) automatically updates Check Point products for the Gaia OS. Software update packages are divided into categories, namely major releases, minor releases, and Hotfixes. Gaia automatically finds and displays available software update packages and images relevant to the version of Gaia OS to which you can upgrade. Using CPUSE, you can perform a clean installation of the new version of GAIA OS, as well as upgrade the system with database migration.
To upgrade to a higher version or perform a clean installation using CPUSE, the machine must have sufficient free (unallocated) space — at least the size of the root partition.
The transition to a new version is performed on a new partition of the hard disk, while the "old" partition is converted into a Gaia Snapshot (the new partition space is taken from unallocated space on the hard disk). It is also advisable to take a snapshot before upgrading the system and upload it to a remote server.
Upgrade Process:
- Check the update package (if you have not done so already) — verify that this package can be installed without conflicts: right-click on the package — click "Verifier."
The result should be approximately as follows:
- Installation is allowed
- Upgrade is allowed
- Install the package: right-click on the package and click "Upgrade":
CPUSE shows the following warning in the Gaia Portal: After this upgrade, there will be an automatic reboot (Existing OS settings and the Check Point Database are preserved). - You will see the corresponding data migration progress after upgrading to R80.10:
- Upgrading Products
- Importing Database
- Configuring Products
- Creating SIC Data
- Stopping Processes
- Starting Processes
- Installed, self-test passed
- The system will automatically reboot
- Installing policy in SmartConsole
As you can see, everything is going quite smoothly; in case of an issue, you can roll back to the old settings using the created snapshot.
Practice
The provided video tutorial contains both theoretical and practical parts. The first half of the video duplicates the described theoretical part, while the practical example demonstrates data migration using both methods.
Conclusion
In this lesson, we examined Check Point's solutions for updating and migrating database objects and rules. For new devices, the only option is to use the Migration Tool. If you want to upgrade GAIA OS and have the desire and ability to redeploy the machine, our company recommends, based on existing experience, to migrate the database using the Migration Tool. This method minimizes the upgrade risks for the existing configuration compared to CPUSE. Additionally, when upgrading via CPUSE, many unnecessary old files remain on the disk, and removing them requires an additional tool, which brings extra actions and new risks.
If you don't want to miss future lessons, subscribe to our group , and . However, if for any reason you were unable to find the necessary document or resolve your issue with Check Point, feel free to reach out to .
Source: habr.com
