

MinIO is a great solution when you need to easily and simply organize object storage. Its straightforward setup, support for numerous platforms, and solid performance have won it widespread appreciation. Therefore, we had no choice but to announce compatibility a month ago. . Including a critical feature like Immutability. In fact, MinIO has a whole section in the documentation dedicated to our integration.
So today we will discuss how to:
- Set up MinIO very quickly.
- Set up MinIO a bit less quickly, but with significantly better quality.
- Use it as an Archive Tier for scalable Veeam SOBR repositories.

What are you?
A brief introduction for those who haven't encountered MinIO before. It is an open-source object storage compatible with the Amazon S3 API. It is released under the Apache v2 license and follows a philosophy of spartan minimalism.
This means it doesn't have a sprawling GUI with dashboards, graphs, and numerous menus. MinIO simply starts its server with one command, allowing you to store data while harnessing the full power of the S3 API. However, it's worth noting that this simplicity can be deceptive when it comes to resource usage. RAM and CPU are utilized extensively, but the reasons will be discussed below. Moreover, such platforms as FreeNAS and TrueNAS use MinIO under the hood.
And that concludes the introduction.
Setting up MinIO is very quick
Its setup is so fast that we will look at it for both Windows and Linux. There are options available for Docker, Kubernetes, and even macOS, but the essence will remain the same.
So, in the case of Windows, we go to the official website and download the latest version. There, we can also find the instructions for running it:
minio.exe server F:Data
And there's also a link to a slightly more detailed . There’s no point in disregarding the instructions, so we run it and get a response like this.
That's it! The storage is working, and you can start using it. I wasn't kidding when I said that MinIO is minimalism and simply works. If you follow the link provided at startup, the maximum available functions there are to create a bucket. And you can start writing data.
For Linux enthusiasts, everything remains no less simple. A straightforward instruction:
wget https://dl.min.io/server/minio/release/linux-amd64/minio
chmod +x minio
./minio server /data
The result will be indistinguishable from what was seen earlier.
Configuring MinIO is somewhat more meaningful.
As we understand, the previous paragraph is just for testing purposes. And, to be honest, we widely use MinIO for testing, which we are not ashamed to admit. Of course, it works, but it's embarrassing to take something like that beyond the test environments. So, we pick up a file and start refining it.
HTTPS
The first mandatory step on the way to production is encryption. There are already a million and one manuals available online on how to add certificates to MinIO, but their general plan is as follows:
- Create a certificate.
- On Windows, place it in C:Users%User%.miniocerts.
- On Linux, in ${HOME}/.minio/certs.
- Restart the server.
Using the mundane Let’s Encrypt is boring and documented everywhere, so our path is that of a samurai. Therefore, on Windows, download , and on Linux, just check that we have OpenSSL installed. Then perform a little console magic:
- Create the keys: openssl ecparam -genkey -name prime256v1 | openssl ec -out private.key.
- Create a certificate from the key: openssl req -new -x509 -days 3650 -key private.key -out public.crt.
- Copy private.key and public.crt to the directory specified above.
- Restart MinIO.
If everything went as it should, the status will show lines similar to these.

Enable MinIO Erasure Coding.
First, a few words about the subject. In brief: this is a software solution for protecting data from corruption and loss. Like RAID, but much more reliable. While classic RAID6 can afford to lose two disks, MinIO can easily survive the loss of half. The technology is more detailed in the . But if we take its essence, it is an implementation of Reed-Solomon codes: all information is stored as data blocks, to which there are parity blocks. And it seems this has been done many times before, but there is one important "but": we can explicitly specify the ratio of parity blocks to data blocks for the stored objects.
Want 1:1? Certainly!
Want 5:2? No problem!
A very important feature if you are using multiple nodes and want to find your own balance between maximum data security and resource expenditure. Out of the box, MinIO uses the N/2 formula (where N is the total number of disks), meaning it distributes your data across N/2 data disks and N/2 parity disks. Translated to simple terms: you can lose half of the disks and still recover the data. This ratio is set through , allowing you to choose what is more important: reliability or capacity.
The guide provides an example: suppose you have an installation with 16 disks and need to store a file that is 100 MB in size. If you use default settings (8 disks for data, 8 for parity blocks), the file will take up nearly double the space, i.e., 200 MB. If the disk ratio is 10/6, then it will require 160 MB. A 14/2 ratio would take 114 MB.
Another important difference from RAID: in the event of disk failure, MinIO will operate at the object level, restoring one after another without stopping the entire system. In contrast, a traditional RAID system will have to restore the entire volume, which can take an unpredictable amount of time. To the author's memory, a disk shelf that lost two disks took a week and a half to recalculate. It was quite unpleasant.
And an important note: MinIO divides all disks for Erasure Coding into sets of 4 to 16 disks, using the largest possible set size. Furthermore, a single piece of information will only be stored within one set.
It all sounds great, but how complicated will the setup be? Let's take a look. We take the command to run and simply list the disks on which we need to create storage. If everything is done correctly, the report will show the number of disks involved. And a tip, it’s unwise to add half of the disks on one host at once, as this could lead to data loss.
c:minio>minio.exe server F: G: H: I: J: K:
Next, to manage and configure the MinIO server, we will need an agent, which can be downloaded from the official website.
To avoid typing the address and access keys each time (and it’s not secure), it’s convenient to create an alias at the first launch using the formula mc alias set [YOUR-ACCESS-KEY] [YOUR-SECRET-KEY]
mc alias set veeamS3 https://172.17.32.52:9000 YOURS3ACCESSKEY YOURSECERTKEOr you can add your host right away:
mc config host add minio-veeam https://minio.jorgedelacruz.es YOURS3ACCESSKEY YOURSECERTKEYThen we will create an immutable bucket with a beautiful command
mc mb --debug -l veeamS3/immutable

mc:  PUT /immutable/ HTTP/1.1
Host: 172.17.32.52:9000
User-Agent: MinIO (windows; amd64) minio-go/v7.0.5 mc/2020-08-08T02:33:58Z
Content-Length: 0
Authorization: AWS4-HMAC-SHA256 Credential=minioadmin/20200819/us-east-1/s3/aws4_request, SignedHeaders=host;x-amz-bucket-object-lock-enabled;x-amz-content-sha256;x-amz-date, Signature=**REDACTED**
X-Amz-Bucket-Object-Lock-Enabled: true
X-Amz-Content-Sha256: UNSIGNED-PAYLOAD
X-Amz-Date: 20200819T092241Z
Accept-Encoding: gzip
mc:  HTTP/1.1 200 OK
Content-Length: 0
Accept-Ranges: bytes
Content-Security-Policy: block-all-mixed-content
Date: Wed, 19 Aug 2020 09:22:42 GMT
Location: /immutable
Server: MinIO/RELEASE.2020-08-16T18-39-38Z
Vary: Origin
X-Amz-Request-Id: 162CA0F9A3A3AEA0
X-Xss-Protection: 1; mode=block
mc:  Response Time:  253.0017ms
—debug allows you to see not just the final message, but more detailed information.
-l means —with-lock, which means immutable
If we now return to the web interface, our new bucket will appear there.
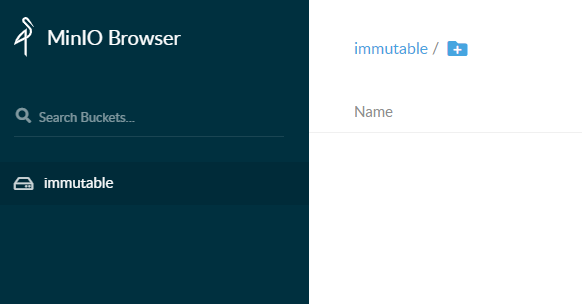
That's all for now. We have created a secure storage and are ready to move on to integration with Veeam.
You can also ensure that everything is working great:
c:minio>mc admin info veeamS3

● 172.17.32.52:9000
  Uptime: 32 minutes
  Version: 2020-08-16T18:39:38Z
  Network: 1/1 OK
  Drives: 6/6 OK
0 B Used, 1 Bucket, 0 Objects
6 drives online, 0 drives offline
MinIO and Veeam
Attention! If for some incredible reason you want to work through HTTP, then at the address HKEY_LOCAL_MACHINESOFTWAREVeeamVeeam Backup and Replication create a DWORD key SOBRArchiveS3DisableTLS. Set its value to 1 and remember that we strongly disapprove of such behavior and do not advise anyone.
Attention again! If for some misunderstanding you continue to use Windows 2008 R2, you will most likely receive an error like this when trying to connect MinIO to Veeam: Failed to establish connection to Amazon S3 endpoint. This is resolved with the official patch from .
Well, the preparations are done, let's open the VBR interface and go to the Backup Infrastructure tab, where we will invoke the new repository addition wizard.
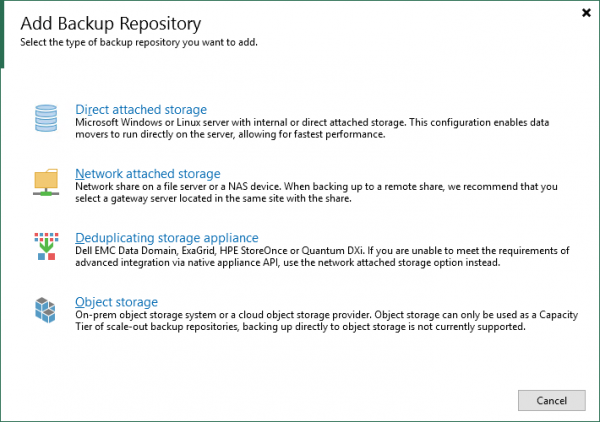
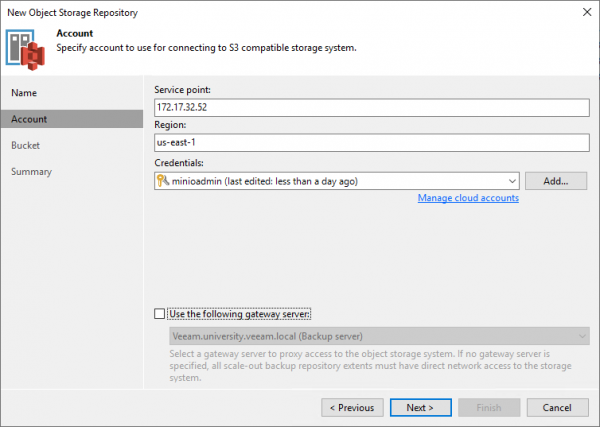
Of course, we are interested in Object storage, specifically S3 Compatible. In the opened wizard, we specify the name, go through the steps specifying the address and account. If required, do not forget to specify the gate through which requests to the storage will be proxied.
After which we select the bucket, folder, and check the box Make recent backups immutable. Or we don't check it. But since we made the storage with support for this feature, it would be a shame not to use it.
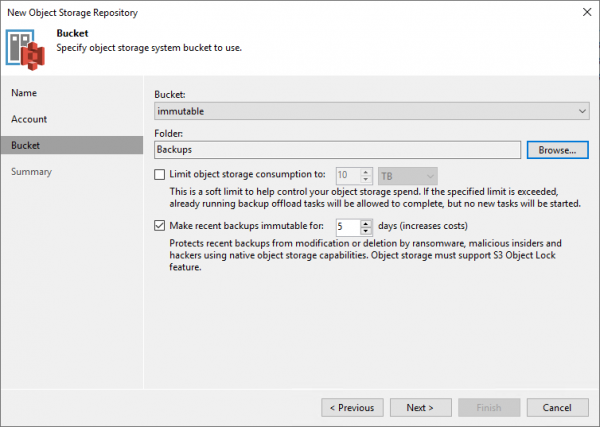
Next > Finish and enjoy the result.
Now you need to add it to the SOBR repository as a Capacity Tier. For this, either create a new one or edit the existing one. We are interested in the Capacity Tier step.
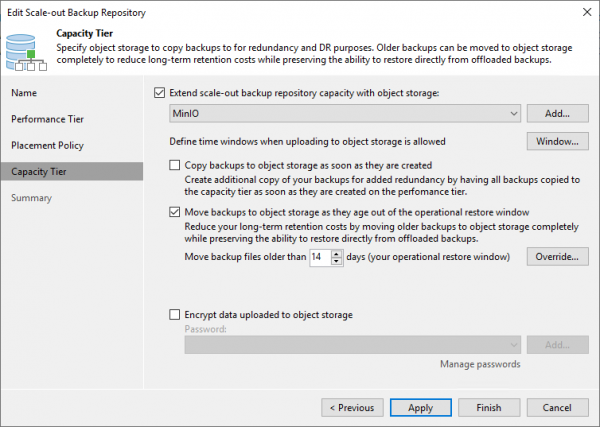
Here we need to select which scenario we will be working with. All options are quite well described in another, , so I won't repeat myself.
And upon completing the wizard, tasks for copying or moving backups will be automatically launched. But if your plans do not include putting the load on all systems right away, make sure to set acceptable intervals for operation using the Window button.
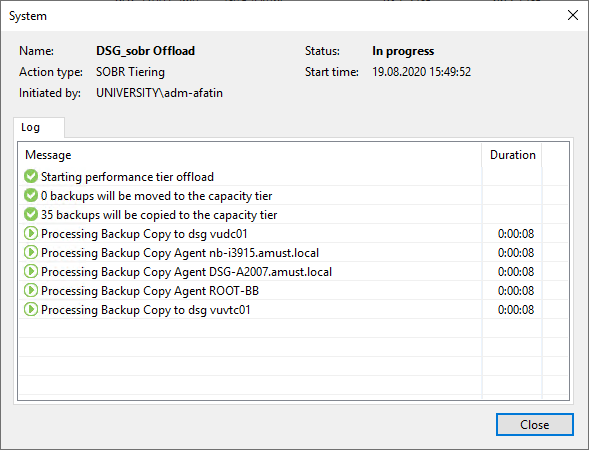
And, of course, you can create separate Backup Copy jobs. Some believe this is even more convenient, as they are somewhat clearer and more predictable for users who don't want to delve into the details of how the capacity tier works. And there are enough details, so I recommend the relevant article linked above once more.
And finally — the answer to the tricky question: what will happen if one attempts to delete a backup from Immutable storage?
Here's the answer:
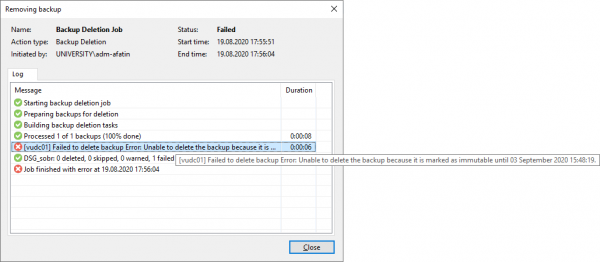
That's all for today. In true tradition, here’s a list of useful topics on the subject:
- Manual
- Example of using .
- General manual for setting up .
- Thread on our about S3 storage.
Source: habr.com
