

At True Engineering, we have set up a process for continuously delivering updates to our clients' servers and would like to share this experience.
First, we developed an online system for the client and deployed it in our own Kubernetes cluster. Now, our high-load solution has moved to the client's platform, for which we have set up a fully automated Continuous Deployment process. As a result, we have accelerated our time-to-market for delivering changes to the production environment.
In this article, we will discuss all the stages of the Continuous Deployment (CD) process for delivering updates to the client's platform:
- how this process starts,
- synchronizing with the client's Git repository,
- building the backend and frontend,
- automatically deploying the application in a testing environment,
- and automatically deploying to production.
During this process, we will share details about the setup.
1. Starting CD
Continuous Deployment begins when a developer pushes changes to the release branch of our Git repository.
Our application is based on a microservices architecture, and all its components are stored in a single repository. This way, all microservices can be built and installed even if only one of them has changed.
We organized the work through a single repository for several reasons:
- Convenience of development — the application is actively developed, so it is possible to work with all the code at once.
- A unified CI/CD pipeline, which ensures that the application as a single system undergoes all tests and is delivered to the client's production environment.
- Eliminating version confusion — we do not have to maintain a map of microservices versions and describe each microservice's configuration in Helm scripts.
2. Synchronizing with the client's source code Git repository
Changes made are automatically synchronized with the client's Git repository. There, the application build is set up to trigger after the branch is updated, followed by deployment to production. Both processes occur in their environment from the Git repository.
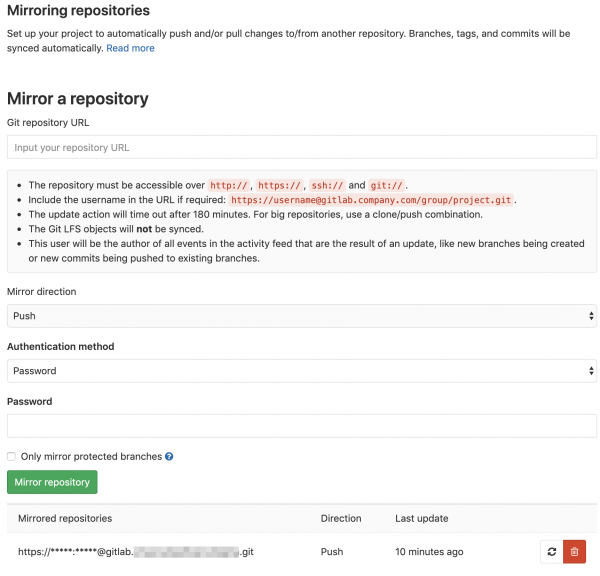
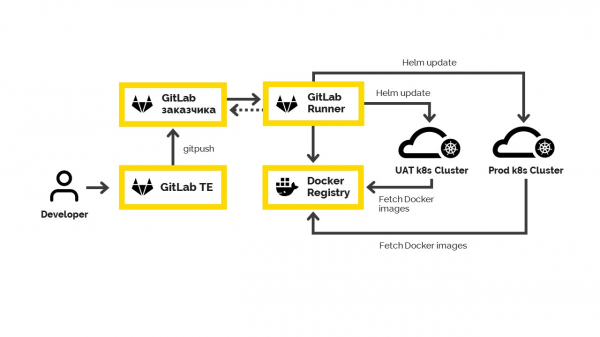
We cannot work directly with the client's repository, as we need our own environments for development and testing. For this purpose, we use our own Git repository, which is synchronized with their Git repository. Once a developer pushes changes to the corresponding branch of our repository, GitLab immediately sends these changes to the client.
After that, a build needs to be made. It consists of several stages: building the backend and frontend, testing, and deployment to production.
3. Building the Backend and Frontend
Building the backend and frontend are two parallel tasks performed in the GitLab Runner system. The configuration for the initial build is located in this same repository.
.
GitLab Runner fetches the code from the required repository, compiles the Java application with the build command, and sends it to the Docker registry. Here we build the backend and frontend, obtaining Docker images that we store in the client's repository. For managing Docker images, we use .
We synchronize the versions of our images with the release version that will be deployed in Docker. For smooth operation, we made several configurations:
1. Between the testing environment and production, containers are not rebuilt. We have parameterized so that the same container can operate without rebuilding with all settings, environment variables, and services in both the testing environment and production.
2. To update the application via Helm, its version must be specified. Our backend and frontend build and application update are three separate tasks, so it is important to use the same application version everywhere. For this task, we use data from Git history since our K8S cluster and application configuration are in one Git repository.
We obtain the application version from the results of executing the command
git describe --tags --abbrev=7.
4. Automatic Deployment of All Changes in the Testing Environment (UAT)
The next stage in this build script performs automatic updates of the K8S cluster. This occurs provided that the entire application is built and all artifacts are published in the Docker Registry. After this, the update of the testing environment is started.
The cluster update is initiated using . If something goes wrong, Helm will automatically roll back all its changes. There is no need to monitor its operation.
We provide a K8S cluster configuration along with the build. Therefore, the next step is to update it: configMaps, deployments, services, secrets, and any other K8S configurations we've modified.
After that, Helm initiates a RollOut update for the application in the test environment. Before deploying the application in production, this is done so that users can manually check business features that we've released in the test environment.
5. Automated Deployment of All Changes to Prod
To deploy the update to the production environment, you just need to press a button in GitLab — and the containers are immediately delivered to the production environment.
The same application can run in different environments — test and production — without being rebuilt. We use the same artifacts without changing anything in the application, while the parameters are set externally.
Flexible parameterization of application settings depends on the environment in which the application will run. We have externalized all environment configurations: everything is parameterized through K8S configurations and Helm parameters. When Helm deploys the build in the test environment, it applies test parameters, and in the production environment, it applies production parameters.
The most challenging part was to parameterize all the used services and variables that depend on the environment and to convert them into environment variables and the description-configuration of environment parameters for Helm.
Environment variables are used in the application parameters. Their values are set in the containers using K8S configmap, which is templated using Go templates. For example, setting an environment variable for the domain name can be done like this:
APP_EXTERNAL_DOMAIN: {{ (pluck .Values.global.env .Values.app.properties.app_external_domain | first) }}
.Values.global.env – this variable contains the environment name (prod, stage, UAT).
.Values.app.properties.app_external_domain – in this variable, we set the required domain in the .Values.yaml file.
When updating the application, Helm creates the configmap.yaml file from templates and fills in the value of APP_EXTERNAL_DOMAIN based on the environment in which the application update is started. This variable is set within the container. It is accessible from the application, meaning that each environment will have a different value for this variable.
Recently, Spring Cloud introduced support for K8S, including work with configMaps: . While the project is still actively evolving and undergoing significant changes, we cannot use it in production yet. However, we are closely monitoring its progress and using it in DEV configurations. As soon as it stabilizes, we will switch from using environment variables to it.
Total
So, Continuous Deployment is set up and operational. All updates occur at the push of a button. Delivery of changes to the production environment is automated, and importantly, updates do not interrupt system operations.
Plans for the future: automatic database migration
We are considering upgrading the database and the possibility of rolling back these changes. Two different versions of the application are running simultaneously: the old version is running while the new one is being deployed. We will only turn off the old version once we ensure that the new version is functioning correctly. The database migration should allow both versions of the application to operate.
Therefore, we cannot simply change the name of the column or other data. However, we can create a new column, copy data from the old column to it, and write triggers that will copy and update data in the other column during the update. After the successful deployment of the new version, following the post-launch support period, we will be able to delete the old column and the now unnecessary trigger.
If the new version of the application is not functioning correctly, we can roll back to the previous version, including the previous database version. In summary, our changes will allow for simultaneous operation with several versions of the application.
We plan to automate database migration through a K8S job, integrating it into the CD process. We will definitely share this experience on Habr.
Source: habr.com
