

This article's translation was prepared in anticipation of the course launch .
DRBD (Distributed Replicated Block Device) is a distributed, flexible, and versatile data storage solution for Linux. It mirrors the contents of block devices, such as hard drives, partitions, logical volumes, etc., between servers. It creates copies of data on two storage devices so that in case of a failure of one, the data on the second can be used.
One could say that it is somewhat like 1 with disks mirrored across different servers. However, it does not operate the same way as RAID (even network RAID).
Originally, DRBD was primarily used in high availability (HA) clusters; however, starting with version nine, it can be utilized for deploying cloud storage solutions.
In this article, we will explain how to install DRBD on CentOS and briefly demonstrate how to use it for storage (partition) replication on two servers. This is an ideal article to get started with DRBD on Linux.
Test Environment
We will use a two-node cluster for this setup.
- Node 1: 192.168.56.101 – tecmint.tecmint.lan
- Node 2: 192.168.56.102 – server1.tecmint.lan
Step 1: Installing DRBD packages
DRBD is implemented as a Linux kernel module. It acts as a driver for a virtual block device, so it is located at the bottom of the system's I/O stack.
DRBD can be installed from ELRepo or EPEL. Let’s start by importing the ELRepo package signing key and enabling the repository on both nodes as shown below.
# rpm --import https://www.elrepo.org/RPM-GPG-KEY-elrepo.org
# rpm -Uvh http://www.elrepo.org/elrepo-release-7.0-3.el7.elrepo.noarch.rpm
Then you need to install the DRBD kernel module and utilities on both nodes using:
# yum install -y kmod-drbd84 drbd84-utilsIf you have SELinux enabled, you need to configure policies to free DRBD processes from SELinux control.
# semanage permissive -a drbd_t
Additionally, if your system has a firewall (firewalld) running, you need to add the DRBD port 7789 to allow data synchronization between the two nodes.
Run these commands for the first node:
# firewall-cmd --permanent --add-rich-rule='rule family="ipv4"  source address="192.168.56.102" port port="7789" protocol="tcp" accept'
# firewall-cmd --reload
Then run these commands for the second node:
# firewall-cmd --permanent --add-rich-rule='rule family="ipv4" source address="192.168.56.101" port port="7789" protocol="tcp" accept'
# firewall-cmd --reload
Step 2: Preparing low-level storage
Now that we have DRBD installed on both cluster nodes, we need to prepare storage areas of approximately the same size on them. This can be a disk partition (or an entire physical hard drive), a RAID logical device, or any other type of block device present in your system.
For this article, we will create a test block device of size 2 GB using the dd command.
# dd if=/dev/zero of=/dev/sdb1 bs=2024k count=1024Let's assume this is an unused partition (/dev/sdb1) on the second block device (/dev/sdb) connected to both nodes.
Step 3. Configuring DRBD
The main DRBD configuration file is /etc/drbd.conf, while additional configuration files can be found in the directory /etc/drbd.d.
To replicate storage, we need to add the necessary configurations to the file /etc/drbd.d/global_common.conf, which contains global and common sections of the DRBD configuration, while we need to define resources in .res files.
Let's back up the original file on both nodes, and then open a new file for editing (use a text editor of your choice).
# mv /etc/drbd.d/global_common.conf /etc/drbd.d/global_common.conf.orig
# vim /etc/drbd.d/global_common.conf
Add the following lines to both files:
global {
 usage-count  yes;
}
common {
 net {
  protocol C;
 }
}
Save the file, then close the editor.
Let's pause briefly at the line protocol C. DRBD supports three different replication modes (i.e., three degrees of replication synchronization), namely:
- protocol A: asynchronous replication protocol; most often used in long-distance replication scenarios.
- protocol B: semi-synchronous replication protocol or synchronous memory protocol.
- protocol C: commonly used for nodes in networks with short distances; this is undoubtedly the most frequently used replication protocol in DRBD setups.
Important: The choice of replication protocol affects two deployment factors: protection and latency. Conversely, throughput is not significantly dependent on the chosen replication protocol.
Step 4. Adding a Resource
A Resource is a collective term that refers to all aspects of a specific replicated dataset. We will define our resource in the file /etc/drbd.d/test.res.
Add the following to the file on both nodes (don't forget to replace the variables with actual values for your environment).
Pay attention to the host names; we need to specify the network host name, which can be obtained using the uname command. -n.
resource test {
        on tecmint.tecmint.lan {
 		device /dev/drbd0;
       		disk /dev/sdb1;
        		meta-disk internal;
                	address 192.168.56.101:7789;
        }
        on server1.tecmint.lan  {
		device /dev/drbd0;
        		disk /dev/sdb1;
        		meta-disk internal;
                	address 192.168.56.102:7789;
        }
}
}
where:
- on hostname: the section on refers to the nested configuration operator.
- test: this is the name of the new resource.
- device /dev/drbd0: specifies a new virtual block device managed by DRBD.
- disk /dev/sdb1: this is the partition of the block device that acts as the backup device for the DRBD device.
- meta-disk: defines where DRBD stores its metadata. Internal means that DRBD stores its metadata on the same physical low-level device as the actual data in production.
- address: specifies the IP address and port number of the corresponding node.
Also, note that if both hosts have the same values for parameters, you can specify them directly in the resource section.
For example, the above configuration can be restructured as:
resource test {
	device /dev/drbd0;
	disk /dev/sdb1;
        	meta-disk internal;
        	on tecmint.tecmint.lan {
 		address 192.168.56.101:7789;
        	}
        	on server1.tecmint.lan  {
		address 192.168.56.102:7789;
        		}
}
Step 5. Initialization and starting of the resource
To interact with DRBD, we will use the following administration tools (which interact with the kernel module for configuring and administering DRBD resources):
- drbdadm: high-level administration tool for DRBD.
- drbdsetup: lower-level administration tool for connecting DRBD devices to their backup devices, configuring pairs of DRBD devices to mirror their backup devices, and checking the configuration of running DRBD devices.
- Drbdmeta: metadata management tool.
After adding all initial configurations for the resource, we need to call the resource on both nodes.
# drbdadm create-md test 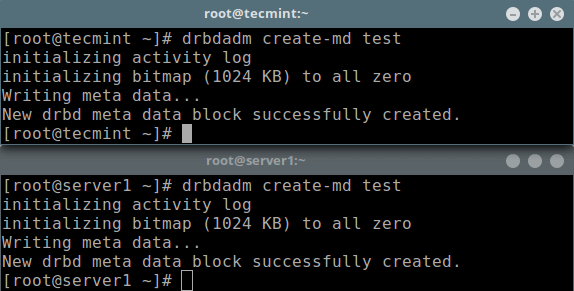
Initializing metadata storage
Next, we need to start it, which will connect the resource to its backup device, then set replication parameters and connect the resource to its peer:
# drbdadm up test Now, if you run the command , you will notice that the DRBD device/volume drbd0 is linked to the backup device /dev/sdb1:
# lsblk 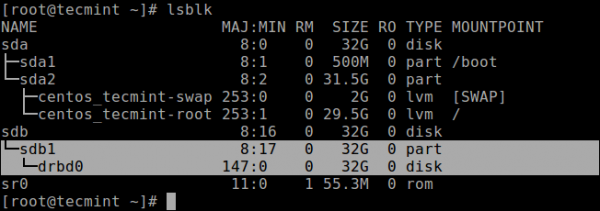
List of block devices
To disable the resource, run:
# drbdadm down testTo check the status of the resource, execute the following command (note that at this stage, the state of the disks is expected) Inconsistent/Inconsistent):
# drbdadm status test
OR
# drbdsetup status test --verbose --statistics #for a more detailed status 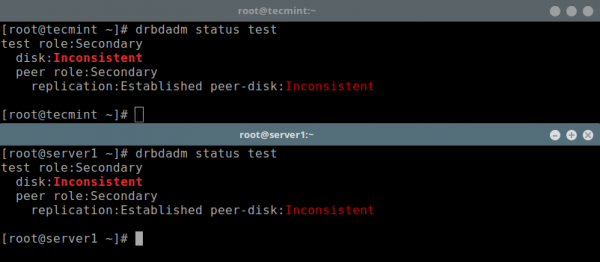
Resource status check on the
sides
Step 6: Setting the primary resource/source for initial device synchronization
At this stage, DRBD is already ready for operation. Now we need to specify which node should be used as the source for initial device synchronization.
Run the following command only on one node to initiate the initial full synchronization:
# drbdadm primary --force test
# drbdadm status test 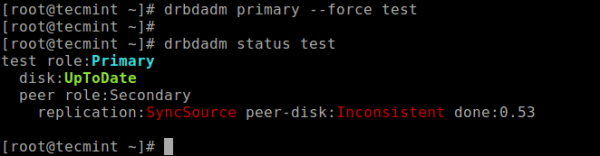
Setting the primary node as the initial device
After synchronization is complete, the status of both disks should be UpToDate.
Step 7: Testing the DRBD setup
Finally, we need to check whether the DRBD device will function as needed for storing replicated data. Remember that we used an empty disk volume, so we must create a filesystem on the device and mount it to see if we can use it for storing replicated data.
We need to create a filesystem on the device using the following command on the node from which we started the initial full synchronization (the one with the resource having the primary role):
# mkfs -t ext4 /dev/drbd0 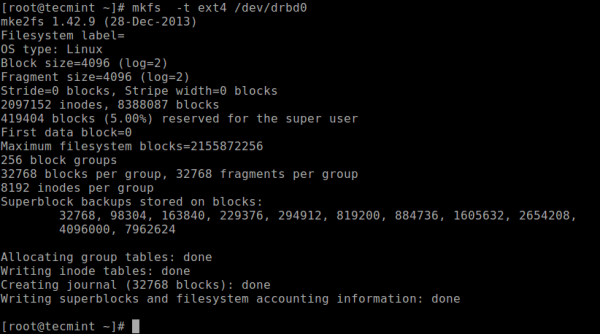
Creating a filesystem on the Drbd volume
Then mount it as shown (you can give the mount point an appropriate name):
# mkdir -p /mnt/DRDB_PRI/
# mount /dev/drbd0 /mnt/DRDB_PRI/
Now copy or create some files in the above mount point and make a long listing using :
# cd /mnt/DRDB_PRI/
# ls -l 
Output a list of the contents of the primary Drbd volume
Next, unmount the device (make sure the mount is not open, change the directory after unmounting to avoid errors) and change the role of the node from primary to secondary:
# umount /mnt/DRDB_PRI/
# cd
# drbdadm secondary test
Make the other node (which has the resource with the secondary role) primary, then connect to it and perform a long listing of the mount points. If the setup works correctly, all files stored on the volume should be there:
# drbdadm primary test
# mkdir -p /mnt/DRDB_SEC/
# mount /dev/drbd0 /mnt/DRDB_SEC/
# cd /mnt/DRDB_SEC/
# ls -l 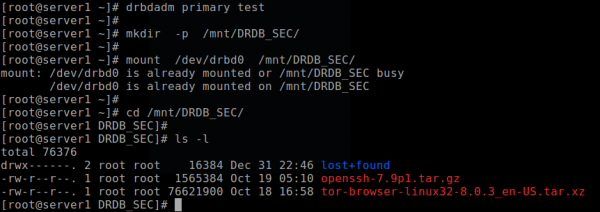
Checking the DRBD setup running on the secondary node.
For more information, refer to the administration tool documentation pages:
# man drbdadm
# man drbdsetup
# man drbdmeta
Note: .
Summary
DRBD is extremely flexible and versatile, making it a storage replication solution suitable for adding HA to virtually any application. In this article, we showed how to install DRBD on CentOS 7 and briefly demonstrated how to use it for storage replication. Feel free to share your thoughts with us using the feedback form below.
Source: habr.com
