

Before a feature goes into production, in our era of complex orchestrators and CI/CD, it has to go through a long journey from commit to testing and delivery. In the past, you could just throw new files via FTP (which no one does anymore, right?), and the 'deployment' process took seconds. Now you need to create a merge request and wait a considerable time for the feature to reach users.
Part of this journey is building the Docker image. Sometimes the build takes minutes, and sometimes — dozens of minutes, which is hard to call normal. In this article, we will take a simple application, package it into an image, apply several methods to speed up the build, and discuss the nuances of these methods.
We have considerable experience in creating and maintaining media websites: , , , … Not long ago we expanded our portfolio by releasing the production website . And while we quickly polished new features and fixed old bugs, slow deployment became a big problem.
We deploy on GitLab. We build images, push them to the GitLab Registry, and roll them out in production. In this list, the longest part is building images. For example, without optimization, each backend build took 14 minutes.

Eventually, it became clear that this couldn't go on, and we sat down to figure out why the images were taking so long to build. In the end, we managed to reduce the build time to 30 seconds!

For this article, to avoid tying it to the Reminder environment, we will consider an example of building an empty application on Angular. So, let's create our application:
ng n appWe add PWA to it (after all, we are progressive):
ng add @angular/pwa --project appWhile a million npm packages are being downloaded, let’s understand how a Docker image is structured. Docker provides the ability to package applications and run them in an isolated environment called a container. Thanks to this isolation, you can run many containers on one server simultaneously. Containers are significantly lighter than virtual machines, as they run directly on the system's kernel. To run a container with our application, we first need to create an image that packages everything necessary for our application's operation. Essentially, an image is a snapshot of the file system. For example, let's take a Dockerfile:
FROM node:12.16.2
WORKDIR /app
COPY . .
RUN npm ci
RUN npm run build --prod
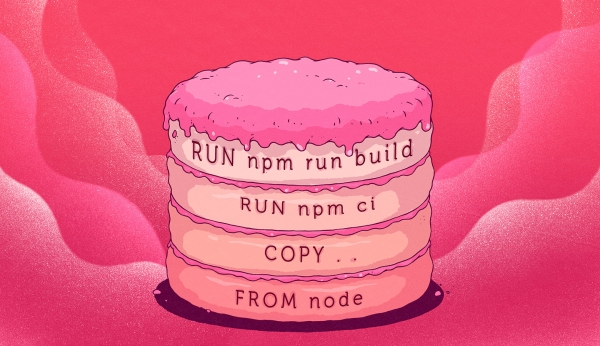
A Dockerfile is a set of instructions; as each is executed, Docker saves changes to the file system and applies them to the previous ones. Each command creates its own layer. A finished image is a combination of these layers.
What is important to know: each layer can be cached by Docker. If nothing has changed since the last build, Docker will use the existing layer instead of executing the command. Since the main speed gain in building will come from using the cache, we will focus on measuring the speed of the build with a ready cache. So, let's break it down step by step:
- We will remove images locally so that previous runs do not affect the test.
docker rmi $(docker images -q) - We start the build for the first time.
time docker build -t app . - We modify the file src/index.html — simulating a programmer's work.
- We start the build a second time.
time docker build -t app .
If the environment for building images is set up correctly (which will be covered shortly), Docker will already have a bunch of caches on board when the build starts. Our task is to learn to use the cache so that the build proceeds as quickly as possible. Since we assume that the build without the cache occurs only once — the very first time — we can ignore how slow this first attempt was. In our tests, the important part is the second build when the caches are warmed up and we are ready to bake our pie. Nevertheless, some tips will also affect the first build.
Let's place the Dockerfile described above in the project folder and run the build. All of the listings provided have been shortened for readability.
$ time docker build -t app .
Sending build context to Docker daemon 409MB
Step 1/5 : FROM node:12.16.2
Status: Downloaded newer image for node:12.16.2
Step 2/5 : WORKDIR /app
Step 3/5 : COPY . .
Step 4/5 : RUN npm ci
added 1357 packages in 22.47s
Step 5/5 : RUN npm run build --prod
Date: 2020-04-16T19:20:09.664Z - Hash: fffa0fddaa3425c55dd3 - Time: 37581ms
Successfully built c8c279335f46
Successfully tagged app:latest

real 5m4.541s
user 0m0.000s
sys 0m0.000s
We change the contents of src/index.html and run it a second time.
$ time docker build -t app .
Sending build context to Docker daemon 409MB
Step 1/5 : FROM node:12.16.2
Step 2/5 : WORKDIR /app
 ---> Using cache
Step 3/5 : COPY . .
Step 4/5 : RUN npm ci
added 1357 packages in 22.47s
Step 5/5 : RUN npm run build --prod
Date: 2020-04-16T19:26:26.587Z - Hash: fffa0fddaa3425c55dd3 - Time: 37902ms
Successfully built 79f335df92d3
Successfully tagged app:latest

real 3m33.262s
user 0m0.000s
sys 0m0.000s
To check if we obtained the image, we will run the command docker images:
REPOSITORY   TAG      IMAGE ID       CREATED              SIZE
app          latest   79f335df92d3   About a minute ago   1.74GB
Before building, Docker takes all the files in the current context and sends them to its daemon. Sending build context to Docker daemon 409MB. The build context is specified as the last argument of the build command. In our case, this is the current directory — ".", — and Docker pulls everything we have in this folder. 409 MB is a lot: let's think about how to fix this.
Reducing the context
To reduce the context, there are two options. Either place all the files needed for the build in a separate folder and specify that folder as the context for Docker. This might not always be convenient, so there is an option to specify exclusions: what should not be included in the context. For this, we will put a .dockerignore file in the project and specify what is not needed for the build:
.git
/node_modules
and run the build again:
$ time docker build -t app .
Sending build context to Docker daemon 607.2kB
Step 1/5 : FROM node:12.16.2
Step 2/5 : WORKDIR /app
 ---> Using cache
Step 3/5 : COPY . .
Step 4/5 : RUN npm ci
added 1357 packages in 22.47s
Step 5/5 : RUN npm run build --prod
Date: 2020-04-16T19:33:54.338Z - Hash: fffa0fddaa3425c55dd3 - Time: 37313ms
Successfully built 4942f010792a
Successfully tagged app:latest

real 1m47.763s
user 0m0.000s
sys 0m0.000s
607.2 KB is much better than 409 MB. Plus, we reduced the image size from 1.74 to 1.38 GB:
REPOSITORY   TAG      IMAGE ID       CREATED         SIZE
app          latest   4942f010792a   3 minutes ago   1.38GB
Let's try to further reduce the image size.
Using Alpine
Another way to save on image size is to use a smaller parent image. The parent image is the image on which our image is based. The base layer is specified with the command FROM in the Dockerfile. In our case, we are using an image based on Ubuntu, which already has nodejs installed. And it weighs …
$ docker images -a | grep node
node 12.16.2 406aa3abbc6c 17 minutes ago 916MB
... almost a gigabyte. We can significantly reduce the size by using an image based on Alpine Linux. Alpine is a very small Linux. The Docker image for nodejs based on Alpine weighs only 88.5 MB. So let's replace our bulky base image:
FROM node:12.16.2-alpine3.11
RUN apk --no-cache --update --virtual build-dependencies add
    python
    make
    g++
WORKDIR /app
COPY . .
RUN npm ci
RUN npm run build --prod
We had to install some things that are necessary for building the application. Yes, Angular won't build without Python ¯(°_o)⁄¯
But the image size dropped by 150 MB:
REPOSITORY   TAG      IMAGE ID       CREATED          SIZE
app          latest   aa031edc315a   22 minutes ago   761MB
Let's go even further.
Multi-stage build
Not everything in the image is needed for production.
$ docker run app ls -lah
total 576K
drwxr-xr-x 1 root root 4.0K Apr 16 19:54 .
drwxr-xr-x 1 root root 4.0K Apr 16 20:00 ..
-rwxr-xr-x 1 root root 19 Apr 17 2020 .dockerignore
-rwxr-xr-x 1 root root 246 Apr 17 2020 .editorconfig
-rwxr-xr-x 1 root root 631 Apr 17 2020 .gitignore
-rwxr-xr-x 1 root root 181 Apr 17 2020 Dockerfile
-rwxr-xr-x 1 root root 1020 Apr 17 2020 README.md
-rwxr-xr-x 1 root root 3.6K Apr 17 2020 angular.json
-rwxr-xr-x 1 root root 429 Apr 17 2020 browserslist
drwxr-xr-x 3 root root 4.0K Apr 16 19:54 dist
drwxr-xr-x 3 root root 4.0K Apr 17 2020 e2e
-rwxr-xr-x 1 root root 1015 Apr 17 2020 karma.conf.js
-rwxr-xr-x 1 root root 620 Apr 17 2020 ngsw-config.json
drwxr-xr-x 1 root root 4.0K Apr 16 19:54 node_modules
-rwxr-xr-x 1 root root 494.9K Apr 17 2020 package-lock.json
-rwxr-xr-x 1 root root 1.3K Apr 17 2020 package.json
drwxr-xr-x 5 root root 4.0K Apr 17 2020 src
-rwxr-xr-x 1 root root 210 Apr 17 2020 tsconfig.app.json
-rwxr-xr-x 1 root root 489 Apr 17 2020 tsconfig.json
-rwxr-xr-x 1 root root 270 Apr 17 2020 tsconfig.spec.json
-rwxr-xr-x 1 root root 1.9K Apr 17 2020 tslint.json
Using docker run app ls -lah We launched a container based on our image app and executed the command within it ls -lah, after which the container finished its work.
In production, we only need the folder dist. However, we need a way to expose the files. We can run an HTTP server using Node.js. But let's simplify things. Can you guess the Russian word that contains four letters 'ы'? Correct! Ынжыныксы. We'll take an image with nginx and place the folder dist and a small configuration:
server {
    listen 80 default_server;
    server_name localhost;
    charset utf-8;
    root /app/dist;

    location / {
        try_files $uri $uri/ /index.html;
    }
}
This can all be accomplished with a multi-stage build. Let's modify our Dockerfile:
FROM node:12.16.2-alpine3.11 as builder
RUN apk --no-cache --update --virtual build-dependencies add
    python
    make
    g++
WORKDIR /app
COPY . .
RUN npm ci
RUN npm run build --prod

FROM nginx:1.17.10-alpine
RUN rm /etc/nginx/conf.d/default.conf
COPY nginx/static.conf /etc/nginx/conf.d
COPY --from=builder /app/dist/app .
Now we have two instructions FROM in the Dockerfile, each running its own build stage. We named the first one builder, and from the last FROM onwards, our final image will be prepared. The final step is to copy the artifact from our previous build stage to the final image with nginx. The image size has significantly decreased:
REPOSITORY   TAG      IMAGE ID       CREATED          SIZE
app          latest   2c6c5da07802   29 minutes ago   36MB
Let's run a container with our image and make sure everything works:
docker run -p8080:80 appWith the option -p8080:80 we mapped port 8080 on our host machine to port 80 inside the container, where nginx is running. We open in the browser and see our application. Everything works!
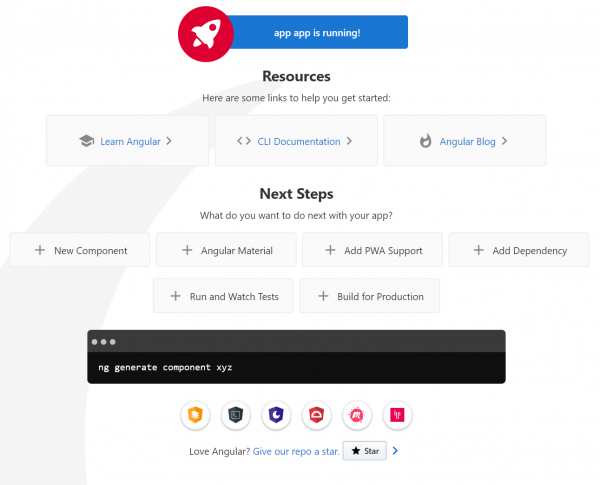
Reducing the image size from 1.74 GB to 36 MB significantly shortens the time it takes to deliver your application to production. But let's return to build time.
$ time docker build -t app .
Sending build context to Docker daemon 608.8kB
Step 1/11 : FROM node:12.16.2-alpine3.11 as builder
Step 2/11 : RUN apk --no-cache --update --virtual build-dependencies add python make g++
 ---> Using cache
Step 3/11 : WORKDIR /app
 ---> Using cache
Step 4/11 : COPY . .
Step 5/11 : RUN npm ci
added 1357 packages in 47.338s
Step 6/11 : RUN npm run build --prod
Date: 2020-04-16T21:16:03.899Z - Hash: fffa0fddaa3425c55dd3 - Time: 39948ms
 ---> 27f1479221e4
Step 7/11 : FROM nginx:stable-alpine
Step 8/11 : WORKDIR /app
 ---> Using cache
Step 9/11 : RUN rm /etc/nginx/conf.d/default.conf
 ---> Using cache
Step 10/11 : COPY nginx/static.conf /etc/nginx/conf.d
 ---> Using cache
Step 11/11 : COPY --from=builder /app/dist/app .
Successfully built d201471c91ad
Successfully tagged app:latest

real 2m17.700s
user 0m0.000s
sys 0m0.000s
We are changing the order of layers
The first three steps were cached (hint Using cache). In the fourth step, all project files are copied, and in the fifth step, dependencies are installed RUN npm ci — a total of 47.338s. Why reinstall dependencies every time when they change very rarely? Let's figure out why they were not cached. The thing is, Docker checks layer by layer to see if the command and related files have changed. In the fourth step, we copy all the files of our project, and among them, of course, there are changes, so Docker not only does not take this layer from the cache, but all subsequent ones as well! Let’s make some minor changes to the Dockerfile.
FROM node:12.16.2-alpine3.11 as builder
RUN apk --no-cache --update --virtual build-dependencies add
    python
    make
    g++
WORKDIR /app
COPY package*.json ./
RUN npm ci
COPY . .
RUN npm run build --prod

FROM nginx:1.17.10-alpine
RUN rm /etc/nginx/conf.d/default.conf
COPY nginx/static.conf /etc/nginx/conf.d
COPY --from=builder /app/dist/app .
First, package.json and package-lock.json are copied, then the dependencies are installed, and only after that the entire project is copied. As a result:
$ time docker build -t app .
Sending build context to Docker daemon 608.8kB
Step 1/12 : FROM node:12.16.2-alpine3.11 as builder
Step 2/12 : RUN apk --no-cache --update --virtual build-dependencies add python make g++
 ---> Using cache
Step 3/12 : WORKDIR /app
 ---> Using cache
Step 4/12 : COPY package*.json ./
 ---> Using cache
Step 5/12 : RUN npm ci
 ---> Using cache
Step 6/12 : COPY . .
Step 7/12 : RUN npm run build --prod
Date: 2020-04-16T21:29:44.770Z - Hash: fffa0fddaa3425c55dd3 - Time: 38287ms
 ---> 1b9448c73558
Step 8/12 : FROM nginx:stable-alpine
Step 9/12 : WORKDIR /app
 ---> Using cache
Step 10/12 : RUN rm /etc/nginx/conf.d/default.conf
 ---> Using cache
Step 11/12 : COPY nginx/static.conf /etc/nginx/conf.d
 ---> Using cache
Step 12/12 : COPY --from=builder /app/dist/app .
Successfully built a44dd7c217c3
Successfully tagged app:latest

real 0m46.497s
user 0m0.000s
sys 0m0.000s
46 seconds instead of 3 minutes — significantly better! The correct order of layers is important: first, we copy what doesn't change, then what changes rarely, and finally — what changes frequently.
Next, a few words about building images in CI/CD systems.
Using previous images as cache
If we are using some SaaS solution for building, then the local Docker cache may be clean and fresh. To allow Docker to retrieve baked layers, provide it with the previously built image.
Let’s consider, for example, the build of our application in GitHub Actions. We will use the following config
on:
  push:
    branches:
      - master

name: Test docker build

jobs:
  deploy:
    name: Build
    runs-on: ubuntu-latest
    env:
      IMAGE_NAME: docker.pkg.github.com/${{ github.repository }}\/app
      IMAGE_TAG: ${{ github.sha }}

    steps:
    - name: Checkout
      uses: actions\/checkout@v2

    - name: Login to GitHub Packages
      env:
        TOKEN: ${{ secrets.GITHUB_TOKEN }}
      run: |
        docker login docker.pkg.github.com -u $GITHUB_ACTOR -p $TOKEN

    - name: Build
      run: |
        docker build
          -t $IMAGE_NAME:$IMAGE_TAG
          -t $IMAGE_NAME:latest
          .

    - name: Push image to GitHub Packages
      run: |
        docker push $IMAGE_NAME:latest
        docker push $IMAGE_NAME:$IMAGE_TAG

    - name: Logout
      run: |
        docker logout docker.pkg.github.com
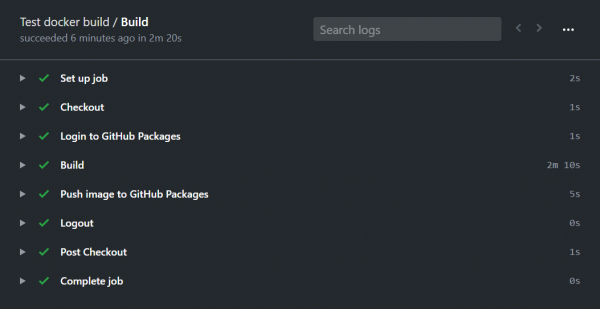
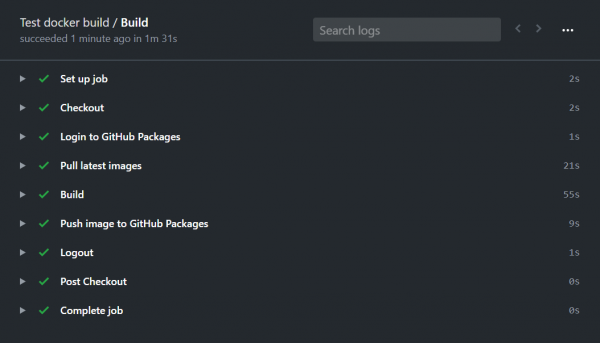
The image is built and pushed to GitHub Packages in two minutes and 20 seconds:
Now let's modify the build to utilize cache based on previously built images:
on:
  push:
    branches:
      - master

name: Test docker build

jobs:
  deploy:
    name: Build
    runs-on: ubuntu-latest
    env:
      IMAGE_NAME: docker.pkg.github.com/${{ github.repository }}\/app
      IMAGE_TAG: ${{ github.sha }}

    steps:
    - name: Checkout
      uses: actions\/checkout@v2

    - name: Login to GitHub Packages
      env:
        TOKEN: ${{ secrets.GITHUB_TOKEN }}
      run: |
        docker login docker.pkg.github.com -u $GITHUB_ACTOR -p $TOKEN

    - name: Pull latest images
      run: |
        docker pull $IMAGE_NAME:latest || true
        docker pull $IMAGE_NAME-builder-stage:latest || true

    - name: Images list
      run: |
        docker images

    - name: Build
      run: |
        docker build
          --target builder
          --cache-from $IMAGE_NAME-builder-stage:latest
          -t $IMAGE_NAME-builder-stage
          .
        docker build
          --cache-from $IMAGE_NAME-builder-stage:latest
          --cache-from $IMAGE_NAME:latest
          -t $IMAGE_NAME:$IMAGE_TAG
          -t $IMAGE_NAME:latest
          .

    - name: Push image to GitHub Packages
      run: |
        docker push $IMAGE_NAME-builder-stage:latest
        docker push $IMAGE_NAME:latest
        docker push $IMAGE_NAME:$IMAGE_TAG

    - name: Logout
      run: |
        docker logout docker.pkg.github.com
First, it is necessary to explain why two commands are executed. buildThe reason is that in a multi-stage build, the resulting image will consist of layers from the last stage. Layers from previous stages will not be included in the image. Therefore, when using the final image from the previous build, Docker will not be able to find the prepared layers for building the image with nodejs (builder stage). To solve this issue, an intermediate image is created. $IMAGE_NAME-builder-stage and is sent to GitHub Packages so it can be used in subsequent builds as a cache source.
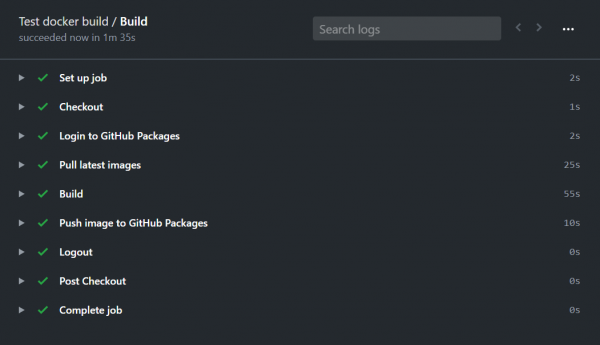
Total build time has been reduced to one and a half minutes. Half a minute is spent pulling previous images.
Pre-building images
Another way to resolve the issue of Docker's clean cache is to move some layers to a different Dockerfile, build it separately, push it to the Container Registry, and use it as a parent.
We create our own nodejs image for building an Angular application. We create Dockerfile.node in the project.
FROM node:12.16.2-alpine3.11
RUN apk --no-cache --update --virtual build-dependencies add
    python
    make
    g++
We build and push the public image to Docker Hub:
docker build -t exsmund/node-for-angular -f Dockerfile.node .
docker push exsmund/node-for-angular:latest
Now we use the prepared image in our main Dockerfile:
FROM exsmund/node-for-angular:latest as builder
...
In our example, the build time did not decrease, but pre-built images can be useful if you have many projects and need to install the same dependencies in each.
We have discussed several methods for speeding up Docker image builds. If you want fast deployment, try applying the following in your project:
- reducing context;
- using smaller parent images;
- multi-stage builds;
- changing the order of instructions in the Dockerfile to effectively utilize the cache;
- configuring cache in CI/CD systems;
- pre-building images.
I hope this example clarifies how Docker works and helps you optimize your deployment. A repository has been created for you to experiment with the examples from the article. .
Source: habr.com
