

The update process for your Kubernetes cluster
At some point while using a Kubernetes cluster, there is a need to upgrade the running nodes. This can involve package updates, kernel upgrades, or deploying new virtual machine images. In Kubernetes terminology, this is referred to as .
This post is part of a series of 4 posts:
- This post.
- Graceful termination of pods in a Kubernetes cluster
- Delayed termination of a pod upon its deletion
- How to avoid downtime in your Kubernetes cluster using PodDisruptionBudgets
(Translator's note: translations of the other articles in the series will be available soon)
In this article, we will describe all the tools Kubernetes provides to achieve zero downtime for the nodes running in your cluster.
Defining the problem
Initially, we will take a naive approach to identify problems and assess the potential risks of this approach, accumulating knowledge to address each of the problems we encounter throughout the series. As a result, we will achieve a configuration that utilizes lifecycle hooks, readiness probes, and Pod disruption budgets to achieve our zero downtime goal.
To start our journey, let’s take a concrete example. Suppose we have a Kubernetes cluster with two nodes, running an application with two pods located behind Service:
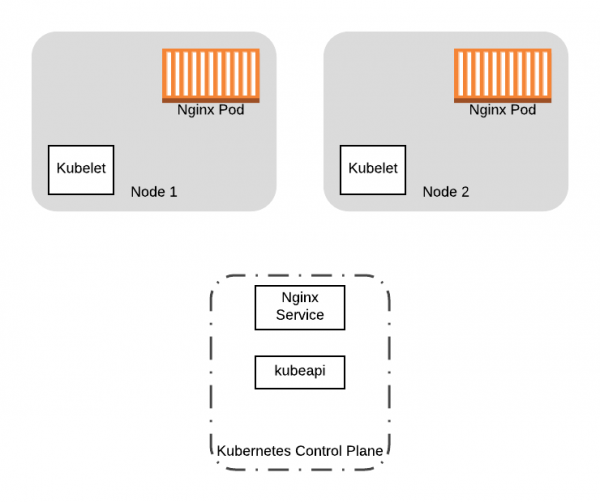
Let's start with two pods with Nginx and the Service running on our two Kubernetes cluster nodes.
We want to upgrade the kernel version of the two working nodes in our cluster. How do we do this? A simple solution would be to boot new nodes with the updated configuration and then shut down the old nodes while launching the new ones. While this will work, there will be several issues with this approach:
- When you shut down the old nodes, the pods running on them will also be shut down. What if the pods need to be cleaned up for proper shutdown? The virtualization system you are using may not wait for the cleanup process to finish.
- What if you turn off all nodes at the same time? You will experience considerable downtime while the pods migrate to the new nodes.
We need a way to correctly migrate pods from old nodes while ensuring that none of our workflows are running while we make changes to the node. Or when we perform a complete cluster replacement, as in the example (i.e., replacing VM images), we want to move running applications from the old nodes to the new ones. In both cases, we want to prevent new pods from being scheduled on the old nodes, and then evict all running pods from them. To achieve these goals, we can use the command kubectl drain.
Evicting all pods from the node
The drain operation allows you to evict all pods from a node. During the execution of the drain, the node is marked as unschedulable (flag NoSchedule). This prevents new pods from being placed on it. Then, the drain starts evicting pods from the node, terminating containers that are currently running on the node by sending a signal TERM to the containers in the pod.
Although kubectl drain it will do a great job of evicting pods, there are two more factors that can cause the drain operation to fail:
- Your application must be able to terminate correctly when it receives
TERMthe signal. When pods are evicted, Kubernetes sends the signalTERMto the containers and waits for them to stop for a specified amount of time, after which, if they have not stopped, it forcibly terminates them. In any case, if your container does not handle the signal correctly, you may still shut down the pods improperly if they happen to be active at that specific moment (for example, if a transaction is occurring in the database). - You lose all pods that contain your application. It may be unavailable when new containers are launched on the new nodes, or, if your pods are deployed without controllers, they may not restart at all.
Minimizing downtime
To minimize downtime from voluntary disruptions, such as during the drain operation for a node, Kubernetes provides the following failure handling options:
In the other parts of the cycle, we will use these Kubernetes features to mitigate the impact of migrating pods. To better trace the main idea, we'll use our example above with the following resource configuration:
---
apiVersion: apps/v1
kind: Deployment
metadata:
 name: nginx-deployment
 labels:
   app: nginx
spec:
 replicas: 2
 selector:
   matchLabels:
     app: nginx
 template:
   metadata:
     labels:
       app: nginx
   spec:
     containers:
     - name: nginx
       image: nginx:1.15
       ports:
       - containerPort: 80
---
kind: Service
apiVersion: v1
metadata:
 name: nginx-service
spec:
 selector:
   app: nginx
 ports:
 - protocol: TCP
   targetPort: 80
   port: 80
This configuration is a minimal example Deployment, which manages nginx pods in the cluster. Additionally, the configuration describes a resource Service, which can be used to access the nginx pods in the cluster.
Throughout the lifecycle, we will iteratively expand this configuration so that it ultimately includes all features provided by Kubernetes to minimize downtime.
To get a fully integrated and tested version of Kubernetes cluster updates for zero downtime on AWS and other resources, visit .
Also, read other articles in our blog:
Source: habr.com
