


In autumn 2019, Check Point discontinued support for the R77.XX versions, and it was necessary to upgrade. Much has been said about the differences between the versions, the pros and cons of switching to R80. Let's focus instead on how to upgrade the Check Point virtual appliances (CloudGuard for VMware ESXi, Hyper-V, KVM Gateway NGTP) and what might go wrong.
So, we had 2 CCSE engineers, more than a dozen Check Point R77.30 virtual clusters, several clouds, a few hotfixes, and a whole sea of various bugs, glitches, and everything in between, all colors and sizes, along with very tight deadlines. Let's get started!
Contents:
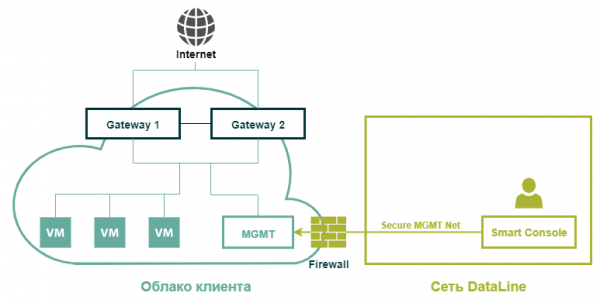
This is what a typical client's cloud infrastructure looks like with a virtual Check Point
Preparation
First, we need to check the resource adequacy for the upgrade. The recommended minimum requirements for R80.20 now look like this:
Device
CPU
RAM
HDD
Security Gateway
2 core
4 Gb
From 15 GB
SMS
2 core
6 Gb
—
The recommendations are described in the document .
But let's be realistic. While this is sufficient for the absolute minimum configuration, in practice, we usually have HTTPS inspection enabled, SmartEvent running on SMS, etc., which, of course, require significantly more resources. Nevertheless, not vastly different than for R77.30.
However, there are nuances. They primarily pertain to the size of physical memory. Many operations during the upgrading process will require space on the hard drive.
For the management server, the amount of free disk space will greatly depend on the size of the current logs (if we wish to preserve them) and the number of saved Database Revisions, although we won't need many of them anymore. Naturally, for cluster nodes (unless you’re also storing logs locally), this is not significant. Here's how you can check for the required space:
- Connect to the Smart Management Server via SSH, enter expert mode, and type the command:
[Expert@cp-sms:0]# df -h
- The output will show a configuration similar to this:
Filesystem Size Used Avail Use% Mounted on
/dev/mapper/vg_splat-lv_current 30G 7.4G 21G 27% /
/dev/sda1 289M 24M 251M 9% /boot
Currently, we are interested in the partition
/dev/mapper/vg_splat-lv_log 243G 177G 53G 78% /var/log - We are currently interested in the section /var/log
Be aware that depending on the policy for storing and deleting old log files, as well as the size of the exported database, more space may be required. If the free space becomes less than specified in the log file retention policy when creating the archive, the system will start deleting old logs and will NOT include them in the archive.
Additionally, the update process will require at least 13 GB of unallocated space on the hard disk. You can check its availability with the command:
[Expert@cp-sms:0]# pvs
You should see output similar to this:
PV VG Fmt Attr PSize PFree
/dev/sda3 vg_splat lvm2 a- 141.69G 43.69G
In this case, we have 43 GB available. There are sufficient resources. You can proceed with the update.
Updating the Check Point SMS management server
Before starting the work, you need to do the following:
- Install the Migration Tools package on the management server. To do this, you need to download the image from the portal.
- Upload the archive to the management server via WinSCP to the folder /var/log/UpgradeR77.30_R80.20 (if necessary, create the folder beforehand).
- Connect to the management server via SSH and navigate to the archive folder:cd /var/log/UpgradeR77.30_R80.20/
- Decompress the file:tar -zxvf ./.tgz
- Run the pre_upgrade_verifier utility with the command: ./pre_upgrade_verifier -p $FWDIR -c R77 -t R80.20
- Upon executing the command, a report on incompatible settings will be generated. It is available at: /opt/CPsuite-R77/fw1/log/pre_upgrade_verification_report.(xls, html, txt). It is more convenient to export it via SCP and view it through a browser.
To resolve all incompatible settings, use. - Afterward, restart the pre_upgrade_verifier utility to ensure that all incompatibility issues have been resolved.
- Next, gather information about the network interfaces, routing table, and export the GAIA configuration:
ip a > /var/log/UpgradeR77.30_R80.20/cp-sms-config.txt
ip r > /var/log/UpgradeR77.30_R80.20/cp-sms-config.txt
clish -c "show configuration" > /var/log/UpgradeR77.30_R80.20/cp-sms-config.txt - Export the resulting file via SCP.
- Create a snapshot at the virtualization level.
- Increase the SSH session timeout to 8 hours. This can vary: depending on the size of the exported database, it may take from several minutes to several hours. To do this:
[Expert@HostName]# clish -c "show inactivity-timeout" Check the current clish timeout,[Expert@HostName]# clish -c "set inactivity-timeout 720" Specify the new clish timeout (in minutes),
[Expert@HostName]# echo $TMOUT Check the current expert mode timeout,
[Expert@HostName]# export TMOUT=3600 Specify the new expert mode timeout (in seconds); if you set the value to 0, the timeout will be disabled.
- Loading and mounting the installation image SMS.iso to the virtual machine.
Before the next step, Make sure to double-check that you have enough unallocated space on your hard drive (reminder, you need 13 GB).
- Before beginning the configuration export, change the log file using the command: fw logswitch
Exporting configuration and logs
- Launch the migrate_export utility to extract the configuration. To do this, navigate to the previously created folder: cd /var/log/UpgradeR77.30_R80.20/ and use the command: ./migrate export -l /var/log/UpgradeR77.30_R80.20/SMS_w_logs_export_r77_r80.tgz
or
go to the folder: cd $FWDIR/bin/upgrade_tools/ and
execute the command from there: ./migrate export -l /var/log/UpgradeR77.30_R80.20/SMS_w_logs_export_r77_r80.tgz - Get the checksum from the archive: md5sum /var/log/UpgradeR77.30_R80.20/SMS_w_logs_export_r77_r80.tgz
- Save the obtained value in a text file.
- Connect to SMS via SCP and export the configuration archive to your workstation. Be sure to use binary file transfer.
Exporting the SmartEvent database
Here we will need a pre-installed SMS version R80. Any test version will suffice.
- From SMS, we need the script located here:$RTDIR/bin/eva_db_backup.csh
- Upload the script via SCP eva_db_backup.csh to the folder: /var/log/UpgradeR77.30_R80.20/
- Connect to SMS via SSH. Copy the file to the folder: cp /var/log/UpgradeR77.30_R80.20/eva_db_backup.csh
$RTDIR/bin/eva_db_backup.csh - Change the encoding: dos2unix $RTDIR/bin/eva_db_backup.csh
- Add ownership: chown -v admin:root $RTDIR/bin/eva_db_backup.csh
- Set permissions: chmod -v 0755 $RTDIR/bin/eva_db_backup.csh
- Run the SmartEvent database export: $RTDIR/bin/eva_db_backup.csh
- Transfer the obtained files via SCP: $RTDIR/bin/-db-backup.backup and $RTDIR/bin/eventiaUpgrade.tar to your workstation.
Upgrade
- Navigate to WebUI GAIA SMS → CPUSE → Show all packages.
- In case CPUSE reports a connection error to the Check Point cloud, check DGW, DNS, and Proxy settings.
- If everything is correct and the error persists, you need to update CPUSE manually, following.
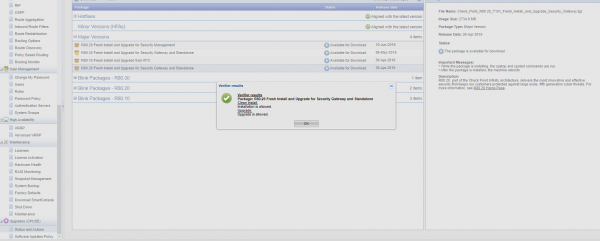
- Download the image and proceed with Verifier. If necessary, resolve discrepancies.
As a result, you should see the following message:

- Select R80.20 Fresh Install and Upgrade for Security Management.
- When installing the update, select Clean Install. After installation, the system will reboot.
- Go through the First Time Wizard.
- After gaining access, check the accounts.
- Connect to SMS via SSH and change our user's shell to /bin/bash:
set user shell /bin/bash
save config (if we want to keep bin/bash as the default shell after reboot).
- Next, connect to SMS via SCP and, in Binary mode, transfer the configuration archive SMS_w_logs_export_r77_r80.tgz in the folder /var/log/UpgradeR77.30_R80.20/
- Get the checksum from the archive: md5sum /var/log/UpgradeR77.30_R80.20/SMS_w_logs_export_r77_r80.tgz and compare with the previous value. The checksums must match.
- We increase the SSH session timeout to 8 hours. To do this:
[Expert@HostName]# clish -c "show inactivity-timeout" Check the current clish timeout,
[Expert@HostName]# clish -c "set inactivity-timeout 720" Specify the new clish timeout (in minutes),
[Expert@HostName]# echo $TMOUT Check the current expert mode timeout,
[Expert@HostName]# export TMOUT=3600 specify the new timeout in expert mode (in seconds). Setting the value to 0 will disable the timeout.
- To import settings, run the migrate import utility. For this, go to the folder: cd $FWDIR/bin/upgrade_tools/and start the import: ./migrate imp
ort -l /var/log/UpgradeR77.30_R80.20/SMS_w_logs_export_r77_r80.tgz
Enjoy life for the next couple of hours. DO NOT DISCONNECT THE SSH SESSION during the procedure. At the end, the migrate process will either display a message about the successful completion of the operation or an error.
Checklist of checks after the update
- Availability of resources.
- SIC with GW.
- Licenses. If the licenses are displayed incorrectly or do not appear on SMS, run the command vsec_central_licence to distribute the licenses.
- Policy installation.
Import the SmartEvent database
- Activate the SmartEvent blade.
- Connect via WinSCP to SMS and transfer the previously exported files in binary mode -db-backup.backup and eventiaUpgrade.tar in the folder /var/log/UpgradeR77.30_R80.20/
- Run the script with the command: $RTDIR/bin/eventiaUpgrade.sh -upgrade /var/log/UpgradeR77.30_R80.20/eventiaUpgrade.tar
- Check the status: watch -n 10 eventiaUpgrade.sh
- Check the logs in SmartEvent. SLEEP!
Upgrade the Check Point GW cluster (Active/Backup)
Before starting work
- Save the GAIA configuration from each cluster node to a file using the command: clish -c "show configuration" > ./.txt
- Export files using WinSCP.
- Connect to the WebUI of both nodes and go to the tab CPUSE → Show all packages.
- Find the update package for version R80.20 Fresh Install, click Download.
- Verify that the CCP protocol is operating in Broadcastmode by entering the command: cphaprob -a if
If the mode selected is Multicast, change it with the command: cphaconf set_ccp broadcast (the command is executed on each node). - Set Downtime for the involved nodes in your monitoring system.
- Check that the virtualization level has the parameters enabled: MAC Address Change and Forged Transmits for the sync network.
Upgrade
- SSH into the Active node and run the command to monitor the cluster state: watch -n 2 cphaprob stat
- Return to the WebUI of the Standby node on the tab CPUSE and for the selected package R80.20 Fresh Install running Verifier.
- Analyze the Verifier report. If the installation is allowed, proceed.
- Select the package R80.20 Fresh Install and start the UpgradeDuring the Upgrade process, the system will restart. GAIA settings are preserved. While rebooting, we will monitor the cluster status. After loading, the status of the updated node should change to READY. In some cases, we experienced a moment when the not-yet-updated node switched to Active Attention status and stopped displaying the status of the updated node. Don’t worry – this scenario is also permissible.
- After the update is complete, we open SmartDashboard.
- We open the cluster object and change the cluster version from R77.30 to R80.20. Click OK. If an error occurs when saving changes:
An internal error has occurred. (Code: 0x8003001D, Could not access file for write operation),
follow. After that, we save the changes and click Install Policy. - In the settings, remove the checkbox from the parameter For gateway clusters, if installation on a cluster member fails, do not install on that cluster.
- We install the policy. The system will issue an error for the Active node that has not yet been updated.
- Connect to the updated node via ssh and run the command to monitor the cluster status: watch -n 2 cphaprob stat
- Connect to the WebUI of the Active node and go to the tab CPUSE → Show all packages.Find the update package for version R80.20 Fresh Install, click Download.
- Set Downtime for the involved nodes in your monitoring system.
- Return to the WebUI of the Active node to the tab CPUSE and for the selected package R80.20 Fresh Install running Verifier.
- Analyze the Verifier report. If the installation is allowed, proceed.
- Select the package R80.20 Fresh Install and start the Upgrade. During the Upgrade process, the system will restart. GAIA settings are preserved. While rebooting, we monitor the cluster status on the already updated node. After rebooting, the cluster status on the updated node will change from READY to ACTIVE.
- When the Upgrade process is complete, we launch SmartDashboard and install the policy.
Checklist of checks after the update
- Event logs in SmartLog, VPN tunnel status.
- GAIA settings.
- Recovering the cluster after test Failover.
- Licenses and contracts. If licenses are displayed incorrectly or not at all on SMS, run the command vsec_central_licence to redistribute licenses.
- CoreXL.
- SecureXL.
- Hotfix and CPinfo on two nodes.
Conclusion
Basically, that’s all – you’ve successfully updated.
Overall, the process took us an average of 6 to 12 hours, depending on the sizes of the exported databases. The work was done over two nights: one for the SMS update, the other for the cluster.
There were no traffic downtimes, despite the fact that we faced all the aforementioned errors ourselves.
Of course, new difficulties may arise during the update process, but this is Check Point, and as we all know, there is always a hotfix!
Wishing you successful pink-black nights and updates!
Source: habr.com
