

 I am one of the developers of the operating system , and in this article, I will explain how I managed to run OpenCV on the STM32746G board.
If you search for something like 'OpenCV on STM32 board', you can find quite a few people interested in using this library on STM32 boards or other microcontrollers.
There are several videos that, judging by their titles, should demonstrate what is needed, but usually (in all the videos I've seen), the STM32 board was only used to capture an image from a camera and display the result on the screen, while the actual image processing was done either on a regular computer or on more powerful boards (like the Raspberry Pi).
Why is this difficult?
The popularity of search queries is explained by the fact that OpenCV is the most popular computer vision library, meaning that more developers are familiar with it, and the ability to run desktop-ready code on a microcontroller significantly simplifies the development process. But why are there still no popular ready-made solutions for this problem?
The challenge of using OpenCV on small boards is associated with two peculiarities:
- Even compiling the library with the minimal set of modules, it simply won't fit in the flash memory of the STM32F7Discovery (even without taking the OS into account) due to its very large code size (several megabytes of instructions).
- The library itself is written in C++, which means
- Support for C++ runtime (exceptions, etc.) is needed.
- There is little support for LibC/Posix, which is usually found in operating systems for embedded systems— a standard C++ library and standard template library STL (vector, etc.) are required.
Porting to Embox
As usual, before porting any programs to an operating system, it’s a good idea to try building it in the form intended by the developers. In our case, there are no issues with this— the source code can be found at , the library can be built under GNU/Linux using a regular cmake.
The good news is that OpenCV can be built as a static library right out of the box, which makes porting easier. We build the library with the standard configuration and check how much space it occupies. Each module is built into a separate library.
> size lib/*so --totals
   text    data     bss     dec     hex filename
1945822   15431     960 1962213  1df0e5 lib/libopencv_calib3d.so
17081885     170312   25640 17277837    107a38d lib/libopencv_core.so
10928229     137640   20192 11086061     a928ed lib/libopencv_dnn.so
 842311   25680    1968  869959   d4647 lib/libopencv_features2d.so
 423660    8552     184  432396   6990c lib/libopencv_flann.so
8034733   54872    1416 8091021  7b758d lib/libopencv_gapi.so
  90741    3452     304   94497   17121 lib/libopencv_highgui.so
6338414   53152     968 6392534  618ad6 lib/libopencv_imgcodecs.so
21323564     155912  652056 22131532    151b34c lib/libopencv_imgproc.so
 724323   12176     376  736875   b3e6b lib/libopencv_ml.so
 429036    6864     464  436364   6a88c lib/libopencv_objdetect.so
6866973   50176    1064 6918213  699045 lib/libopencv_photo.so
 698531   13640     160  712331   ade8b lib/libopencv_stitching.so
 466295    6688     168  473151   7383f lib/libopencv_video.so
 315858    6972   11576  334406   51a46 lib/libopencv_videoio.so
76510375     721519  717496 77949390    4a569ce (TOTALS)
As seen from the last line, .bss and .data take up not much space, but the code exceeds 70 MiB. It is clear that if this is statically linked with a specific application, the code size will decrease.
Let's try to eliminate as many modules as possible to assemble a minimal example (which, for instance, will simply output the version of OpenCV), so let's take a look. cmake .. -LA and disable everything that can be disabled in the options.
        -DBUILD_opencv_java_bindings_generator=OFF
        -DBUILD_opencv_stitching=OFF
        -DWITH_PROTOBUF=OFF
        -DWITH_PTHREADS_PF=OFF
        -DWITH_QUIRC=OFF
        -DWITH_TIFF=OFF
        -DWITH_V4L=OFF
        -DWITH_VTK=OFF
        -DWITH_WEBP=OFF
> size lib/libopencv_core.a --totals
text data bss dec hex filename
3317069 36425 17987 3371481 3371d9 (TOTALS)On one hand, this is just one module of the library; on the other hand, this is without compiler optimization for code size (-Os). ~3 MiB of code is still quite a lot, but it gives hope for success.
Running in the emulator
It’s much easier to debug in the emulator, so first, let's ensure that the library works on qemu. As the emulated platform, I've chosen Integrator/CP because, firstly, it’s also ARM, and secondly, Embox supports graphical output for this platform.
In Embox, there is a mechanism for building external libraries, using it we add OpenCV as a module (passing all the same options for the 'minimal' build as static libraries), after that, I add the simplest application, which looks like this:
version.cpp:

#include
#include

int main() {
    printf("OpenCV: %s", cv::getBuildInformation().c_str());

    return 0;
}
Building the system, launching — we get the expected output.
root@embox:/#opencv_version
OpenCV:
General configuration for OpenCV 4.0.1 =====================================
  Version control:               bd6927bdf-dirty

  Platform:
    Timestamp:                   2019-06-21T10:02:18Z
    Host:                        Linux 5.1.7-arch1-1-ARCH x86_64
    Target:                      Generic arm-unknown-none
    CMake:                       3.14.5
    CMake generator:             Unix Makefiles
    CMake build tool:            /usr/bin/make
    Configuration:               Debug

  CPU/HW features:
    Baseline:
      requested:                 DETECT
      disabled:                  VFPV3 NEON

  C/C++:
    Built as dynamic libs?:      NO
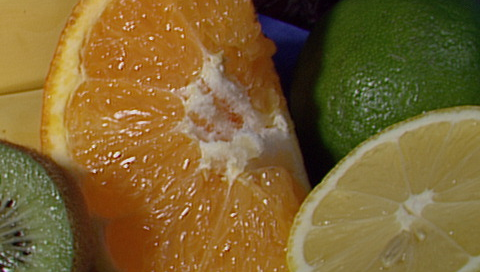
The next step is to run an example, preferably a standard one from those provided by the developers themselves. I chose the .
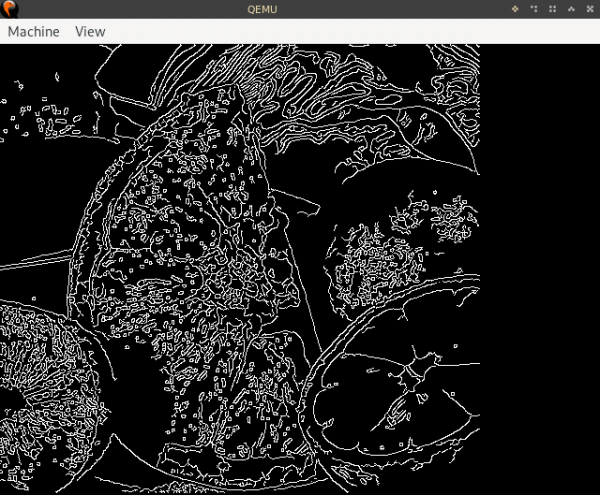
The example had to be rewritten a bit to display the image with the results directly in the frame buffer. This was necessary because the function imshow() can render images through QT, GTK, and Windows interfaces, which, of course, will not be in the STM32 configuration. In fact, QT can also be run on STM32F7Discovery, but this will be covered in another article 🙂
After a brief investigation into the format in which the edge detector's output is stored, we receive the image.
Original image
Result
Running on STM32F7Discovery
The 32F746GDISCOVERY has several hardware memory sections that we can use in one way or another.
- 320KiB of RAM
- 1MiB of flash memory for the image
- 8MiB of SDRAM
- 16MiB QSPI NAND flash drive
- Connector for microSD card
The SD card can be used to store images, but in the context of running a minimal example this is not very useful.
The display has a resolution of 480×272, which means that the memory for the frame buffer will be 522,240 bytes at a depth of 32 bits, i.e., this is more than the size of the RAM, so we will place the frame buffer and heap (which will be needed for OpenCV to store image data and auxiliary structures) in SDRAM, while everything else (memory for stacks and other system needs) will go to RAM.
If we take a minimal configuration for STM32F7Discovery (removing the entire network, all commands, making the stacks as small as possible, etc.) and add OpenCV with examples, the required memory will be as follows:
   text    data     bss     dec     hex filename
2876890  459208  312736 3648834  37ad42 build/base/bin/embox
For those who are not very familiar with where sections are allocated, let me explain: in .text and .rodata lie the instructions and constants (roughly speaking, readonly data), in .data lie the mutable data, in .bss lie the 'zeroed' variables that still need space (this section will 'go' into RAM).
The good news is that .data/.bss should fit, but the problem is that .text there's only 1MiB of memory for the image. You could remove the image from the example and read it, for instance, from an SD card into memory at startup, but fruits.png weighs about 330KiB, so this won't solve the problem: most of it .text consists of OpenCV code. .text Essentially, there’s only one option left — load part of the code onto the QSPI flash (it has a special mode for mapping memory onto the system bus, so the processor can access this data directly). However, this presents a problem: firstly, the memory of the QSPI flash is not accessible immediately after the device reboot (you need to separately initialize the memory-mapped mode); secondly, you cannot 'flash' this memory with a conventional bootloader.
Ultimately, it was decided to link all the code into QSPI and flash it with a custom bootloader that will retrieve the required binary via TFTP.
The idea of porting this library to Embox appeared about a year ago, but it was repeatedly postponed for various reasons. One of them was support for libstdc++ and the standard template library. The issue of C++ support in Embox is beyond the scope of this article, so I will only say here that we managed to achieve this support to the extent needed for this library 🙂
Result
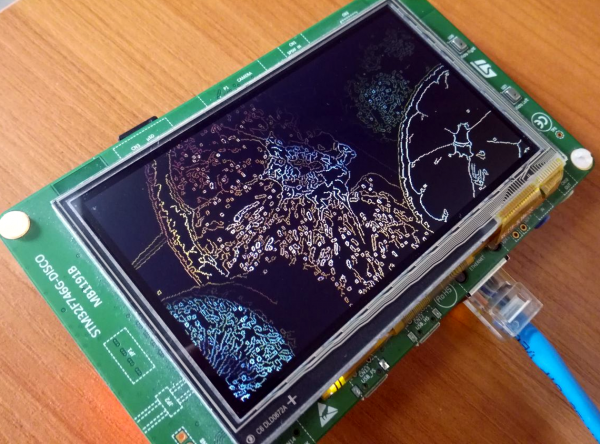
In the end, these issues were overcome (at least to a sufficient degree for the OpenCV example to work), and the example ran. The board takes 40 long seconds to find edges using the Canny filter. This is, of course, too long (there are ideas on how to optimize this, and a separate article can be written about this in case of success).
Nevertheless, the intermediate goal was to create a prototype that would demonstrate the fundamental capability to run OpenCV on STM32; consequently, this goal was achieved, hooray!
tl;dr: step-by-step instructions
0: Download the Embox sources, for example, like this:
git clone https://github.com/embox/embox && cd ./embox
1: Let's start with building the bootloader which will 'flash' the QSPI flash.make confload-arm/stm32f7cube
make confload-arm/stm32f7cubeNow it's necessary to configure the network since we will load the image via TFTP. To set the IP addresses for the board and the host, the conf/rootfs/network file needs to be modified.
Configuration example:
iface eth0 inet static
    address 192.168.2.2
    netmask 255.255.255.0
    gateway 192.168.2.1
    hwaddress aa:bb:cc:dd:ee:02
gateway — the address of the host from which the image will be loaded, address — the address of the board.
After this, we compile the bootloader:
make2: Regular boot of the bootloader (pardon the pun) to the board — there’s nothing specific here, it should be done like any other application for STM32F7Discovery. If you’re not sure how to do this, you can read about it. .
3: Compiling the image with the configuration for OpenCV.
    make confload-platform/opencv/stm32f7discovery
    make
4: Extracting from ELF the sections that need to be written to QSPI into qspi.bin
    arm-none-eabi-objcopy -O binary build/base/bin/embox build/base/bin/qspi.bin
        --only-section=.text --only-section=.rodata
        --only-section='.ARM.ex*'
        --only-section=.data
In the conf directory, there is a script that does this, so we can run it.
./conf/qspi_objcopy.sh # Required binary -- build/base/bin/qspi.bin5: Using tftp, we upload qspi.bin to the QSPI flash. On the host, you need to copy qspi.bin to the root folder of the tftp server (usually this is /srv/tftp/ or /var/lib/tftpboot/; packages for the respective server are available in most popular distributions, usually called tftpd or tftp-hpa, sometimes you need to run systemctl start tftpd.service to start it).
    # вариант для tftpd
    sudo cp build/base/bin/qspi.bin /srv/tftp
    # вариант для tftp-hpa
    sudo cp build/base/bin/qspi.bin /var/lib/tftpboot
On Embox (i.e. in the bootloader), you need to execute the following command (assuming the server address is 192.168.2.1):
embox> qspi_loader qspi.bin 192.168.2.16: Using the command goto you need to "jump" into QSPI memory. The specific location will vary depending on how the image is linked; you can check this address with the command mem 0x90000000 (the start address is stored in the second 32-bit word of the image); you will also need to set the stack with the flag -s, the stack address is located at 0x90000000, for example:
    embox>mem 0x90000000
    0x90000000:     0x20023200  0x9000c27f  0x9000c275  0x9000c275
                      ↑           ↑
              this is the address    this is the address
                of the stack        of the first
                           instruction

    embox>goto -i 0x9000c27f -s 0x20023200 # The flag -i is needed to disable interrupts during system initialization
7: We launch
embox> edges 20and enjoy a 40-second edge detection 🙂
If something goes wrong — report an issue in , or in the mailing list embox-devel@googlegroups.com, or in the comments here.
Source: habr.com
