

Today, I will tell you about real-time error tracking in a React application. Front-end applications are typically not used for error tracking. Some companies often postpone error tracking, returning to it after documentation, testing, and more. However, if you can improve your product, just do it!
1. Why do you need Sentry?
I assume you are interested in tracking errors in a production environment.
Do you think that’s not enough?
Well, let’s look at the details.
Main reasons for developers to use Sentry:
- Helps mitigate risks when deploying erroneous code.
- Assists QA in testing the code.
- Receives quick notifications about issues.
- Allows for quick bug fixes.
- Provides a convenient error display in the admin panel.
- Sorts errors by user segments / browser.
Key reasons for CEOs / Project Leads.
- Saves money (Sentry can be installed on your servers).
- Collects user feedback.
- Gains insight into what is wrong with your project in real-time.
- Understands the number of problems users face with your application.
- Helps identify areas where your developers made mistakes.
I believe developers would be most interested in this article. You can also use this list of reasons to convince management to integrate Sentry.
Be cautious with the last point on the list for businesses.
Are you already interested?

What is Sentry?
Sentry is an open-source error tracking application that helps developers monitor and fix crashes in real-time. Remember that the application also enhances efficiency and improves user experience. Sentry supports JavaScript, Node, Python, PHP, Ruby, Java, and other programming languages.

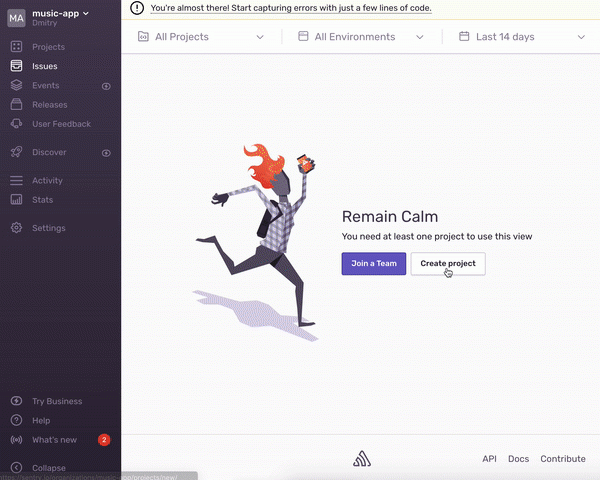
2. Log in and create a project.
- Open your Sentry account. You may need to log in. (Note that Sentry can be installed on your servers.)
- The next step is to create a project.
- Select your language from the list. (We are going to choose React. Click 'Create Project')
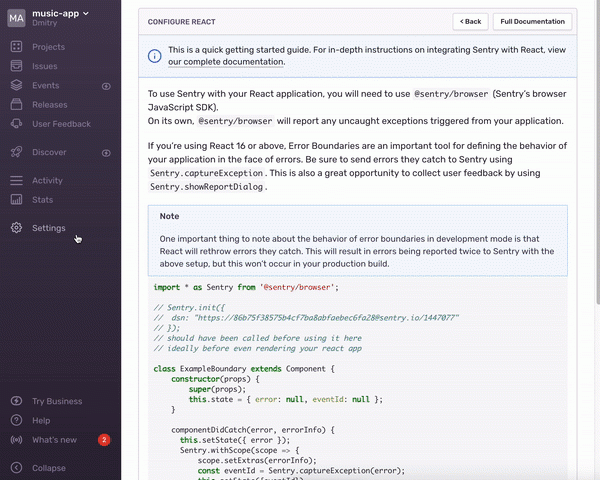
Set up your application. A basic example of how to integrate Sentry into a container can be seen below:
import * as Sentry from '@sentry/browser';
// Sentry.init({
// dsn: "<https:>"
// });
// should have been called before using it here
// ideally before even rendering your react app
class ExampleBoundary extends Component {
constructor(props) {
super(props);
this.state = { error: null };
}
componentDidCatch(error, errorInfo) {
this.setState({ error });
Sentry.withScope(scope => {
Object.keys(errorInfo).forEach(key => {
scope.setExtra(key, errorInfo[key]);
});
Sentry.captureException(error);
});
}
render() {
if (this.state.error) {
// render fallback UI
return (
<a onclick="{()" > Sentry.showReportDialog()}>Report feedback</a>
);
} else {
// when there's not an error, render children untouched
return this.props.children;
}
}
}Sentry has a helpful Wizard that will guide you on what to do next. You can follow these steps. I want to show you how to create your first error handler. Great, we've set up a project! Let's move on to the next step.
3. Integrating React and Sentry
You need to install the npm package in your project.
npm i @sentry/browserInitialize Sentry in your container:
Sentry.init({
 // dsn: #dsnUrl,
});
The DSN is located in Projects -> Settings -> Client Keys. You can find client keys in the search bar.
componentDidCatch(error, errorInfo) {
  Sentry.withScope(scope => {
    Object.keys(errorInfo).forEach(key => {
      scope.setExtra(key, errorInfo[key]);
    });
    Sentry.captureException(error);
 });
}
4. Tracking the First Error
For example, I used a simple music application with the Deezer API. You can see it. . We need to create an error. One way to do this is to access a property of 'undefined'.
We need to create a button that calls console.log with user.email. After this action, we should see an error message: Uncaught TypeError (cannot read property of undefined email) because the user object is missing. You can also use Javascript exception.
The entire container looks like this:
import React, { Component } from "react";
import { connect } from "react-redux";
import { Input, List, Skeleton, Avatar } from "antd";
import * as Sentry from "@sentry/browser";
import getList from "..\/store\/actions\/getList";
const Search = Input.Search;
const mapState = state => ({
list: state.root.list,
loading: state.root.loading
});
const mapDispatch = {
getList
};
class Container extends Component {
constructor(props) {
super(props);
Sentry.init({
dsn: "https:\/\/fc0edcf6927a4397855797a033f04085@sentry.io\/1417586",
});
}
componentDidCatch(error, errorInfo) {
Sentry.withScope(scope => {
Object.keys(errorInfo).forEach(key => {
scope.setExtra(key, errorInfo[key]);
});
Sentry.captureException(error);
});
}
render() {
const { list, loading, getList } = this.props;
const user = undefined;
return (
<div classname="App">
<button
type="button"
onclick="{()" > console.log(user.email)}
>
test error1
</button>
<div onclick="{()" > Sentry.showReportDialog()}>Report feedback1</div>
<h1>Music Finder</h1>
<br />
<search onsearch="{value" > getList(value)} enterButton \/>
{loading && <skeleton avatar title="{false}" loading="{true}" active />}
{!loading && (
<list
itemlayout="horizontal"
datasource="{list}"
locale="{{" emptytext: <div /> }}
renderItem={item => (
<List.Item>
<List.Item.Meta
avatar={<avatar src="{item.artist.picture}" />}
title={item.title}
description={item.artist.name}
\/>
</List.Item>
)}
/>
)}
</div>
);
}
}
export default connect(
mapState,
mapDispatch
)(Container);After integrating this button, you should test it in your browser.
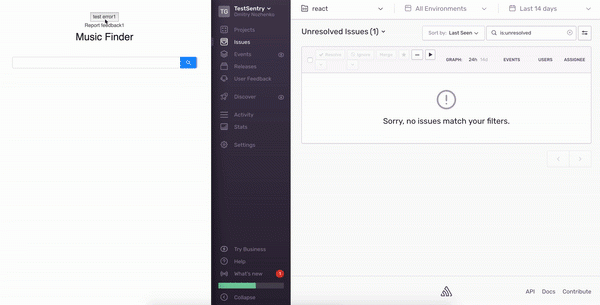
We have our first error
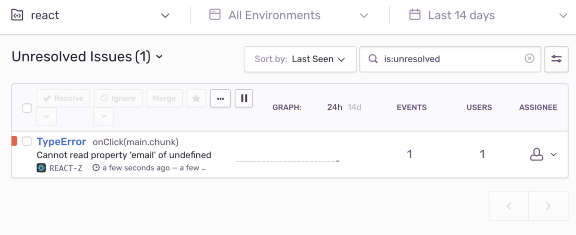
Whoo-hoo!

If you click on the error header, you will see a stack trace.
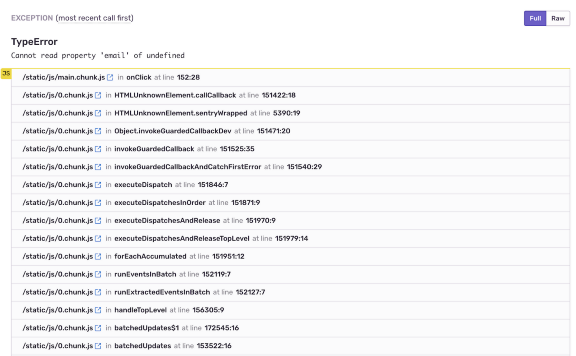
The messages look bad. Of course, we saw error messages without understanding where this code is. By default, it refers to the source map in ReactJS, as they are not configured.
I would also like to provide instructions on setting up the source map, but that would make this article much longer than I intended.
You can explore this topic . If you are interested in this article, will publish a second part on integrating the source map. So make sure to like and subscribe , so you don't miss the second part.
5. Using Sentry the endpoint API
Okay. We've covered the JavaScript exception in the previous sections. However, what are we going to do with XHR errors?
Sentry also has custom error handling. I've used it for tracking API errors.
Sentry.captureException(err)You can customize the error name, level, add data, unique user data using your application, email, etc.
superagent
  .get(`https://deezerdevs-deezer.p.rapidapi.com/search?q=${query}`)
  .set("X-RapidAPI-Key", #id_key)
  .end((err, response) => {
    if (err) {
      Sentry.configureScope(
        scope => scope
          .setUser({"email": "john.doe@example.com"})
          .setLevel("Error")
      );
      return Sentry.captureException(err);
    }

    if (response) {
      return dispatch(setList(response.body.data));
    }
  });
I would like to use a common function for API catch.
import * as Sentry from "@sentry/browser";

export const apiCatch = (error, getState) => {
  const store = getState();
  const storeStringify = JSON.stringify(store);
  const { root: { user: { email } } } = store;

  Sentry.configureScope(
    scope => scope
      .setLevel("Error")
      .setUser({ email })
      .setExtra("store", storeStringify)
  );
    // Sentry.showReportDialog(); - If you want to get users' feedback on error
  return Sentry.captureException(error);
};
Import this function into the API call.
export default query => (dispatch, getState) => {
  superagent
    .get(`https://deezerdevs-deezer.p.rapidapi.com/search?q=${query}`)
    .set("X-RapidAPI-Key", #id_key)
    .end((error, response) => {
      if (error) {
        return apiCatch(error, getState)
      }

      if (response) {
        return dispatch(setList(response.body.data));
      }
    });
};
Let's check the methods:
- setLevel allows you to insert a level error into the Sentry dashboard. It has properties - ‘fatal’, ‘error’, ‘warning’, ‘log’, ‘info’, ‘debug’, ‘critical’).
- setUser helps save any user data (id, email address, payment plan, etc.).
- setExtra allows you to set any data you need, such as the store.
If you want to receive user feedback on an error, you should use the showReportDialog function.
Sentry.showReportDialog();Output:
Today we described one way to integrate Sentry into a React application.
→ Telegram chat about
Source: habr.com
