

In We figured out how to create a bot and initialized an instance of the class. Bot We also learned about the methods for sending messages using it.
In this article, I continue this topic, so I recommend starting to read this article only after reading .
This time we will figure out how to bring our bot to life, add command support to it, and also get acquainted with the class Updater.
In the course of the article, we will write several simple bots, the last one will determine whether a day is a holiday or a working day in a given country based on the specified date and country code according to the production calendar. But, as before, the goal of the article is to familiarize you with the package interface telegram.bot for solving your own tasks.

All articles from the "Writing a Telegram Bot in R" series
Content
If you're interested in data analysis, you might find my and channels interesting. Most of their content is devoted to the R language.
The Updater Class
Updater — is a class that simplifies the development of a Telegram bot for you, and uses the class under the hood Dispatcher. The purpose of the class Updater is to get updates from the bot (in the previous article, we used the method for this purpose getUpdates()), and pass them on to Dispatcher.
In turn, Dispatcher contains the handlers you created, i.e. objects of the class Handler.
Handlers — the handlers
With the help of handlers, you add Dispatcher the bot's reactions to various events. At the time of writing the article, the following types of handlers have been added to telegram.bot MessageHandler — Message handler
- CommandHandler — Command handler
- CallbackQueryHandler — Handler for data sent from inline keyboards
- ErrorHandler — Error handler when requesting updates from the bot
- If you have never used bots before and are unaware of what a command is, you need to send commands to the bot using a forward slash
Adding the first command to the bot, the command handler
as a prefix. / Let's start with simple commands, i.e. we will teach our bot to greet on command
Code 1: Teaching the bot to greet /hi.
Code 1: Teaching the bot to greet
library(telegram.bot)

# Creating an instance of the Updater class
updater <- Updater('YOUR BOT TOKEN')

# Writing a greeting method
say_hello <- function(bot, update) {

  # User's first name to greet
  user_name <- update$message$from$first_name

  # Sending a welcome message
  bot$sendMessage(update$message$chat_id,
                  text = paste0("Greetings, ", user_name, "!"),
                  parse_mode = "Markdown")

}

# Creating a handler
hi_hendler <- CommandHandler('hi', say_hello)

# Adding the handler to the dispatcher
updater <- updater + hi_hendler

# Starting the bot
updater$start_polling()
Run the example code above, replacing 'YOUR BOT TOKEN' with the actual token you received when creating the bot through BotFather (I explained how to create a bot in ).
Element.getAnimations() start_polling() class Updater, which is used at the end of the code to start an infinite loop requesting and processing updates from the bot.
Now let's open Telegram and send our bot the first command /hi.
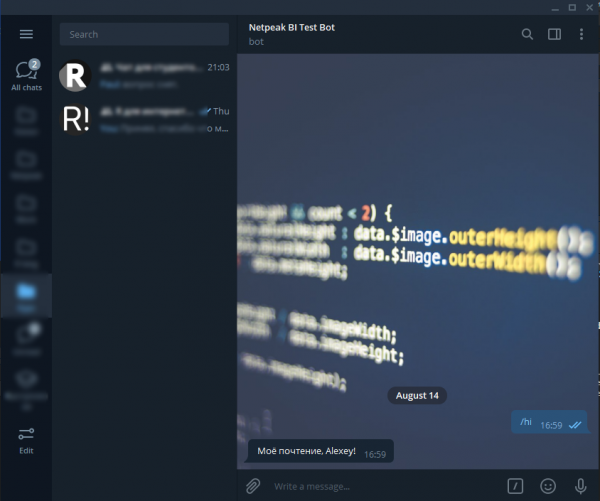
Now our bot understands the command /hi, and knows how to greet us.
The process of building such a simple bot can be schematically illustrated as follows.
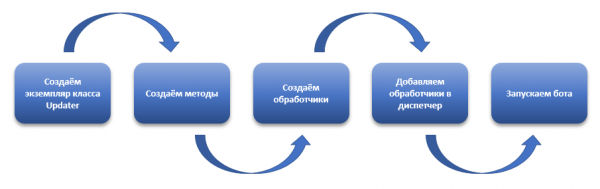
- Creating an instance of the class
Updater; - Creating methods, i.e., functions that our bot will perform. In the example code, this function is
say_hello(). Functions that you will use as bot methods must have two required arguments — bot and update, and one optional — args. The argument bot, which is your bot. With it, you can respond to messages, send messages, or use any other available methods. The argument update is what the bot received from the user, essentially what we received in the first article using the methodgetUpdates(). The argument args allows you to handle additional data sent by the user along with the command, we will revisit this topic a bit later; - Creating handlers, i.e., linking some user actions to the methods created in the previous step. Essentially, a handler is a trigger, an event that calls a function of the bot. In our example, such a trigger is sending the command
/hi, implemented by the commandhi_hendler <- CommandHandler('hi', say_hello). The first argument of the functionCommandHandler()allows you to set the command, in our casehi, that the bot will respond to. The second argument allows you to specify the bot's method, we will call the methodsay_hello, which will be executed when the user invokes the command specified in the first argument; - Next, we add the created handler to the dispatcher of our class instance
Updater. Handlers can be added in several ways; in the example above, I used the simplest method, with the sign+, i.e.updater <- updater + hi_handler. The same can be done using the methodadd_handler(), which belongs to the classDispatcher, this method can be found like this:updater$dispatcher$add_handler(); - We start the bot with the command
start_polling().
Text message handler and filters
We have figured out how to send commands to the bot, but sometimes we need the bot to respond not only to commands but also to regular text messages. For this, we need to use message handlers — MessageHandler.
Standalone MessageHandler will respond to absolutely all incoming messages. Therefore, message handlers are often used with filters. Let's teach the bot to greet not only when the command /hi, but also whenever one of the following words is included in the message sent to the bot: hello, hi, salute, hey, bonjour.
For now, we will not write any new methods, as we already have a method through which the bot greets us. We only need to create the required filter and message handler.
Code 2: Adding a text message handler and filter
library(telegram.bot)

# creating an instance of the Updater class
updater <- Updater('YOUR BOT TOKEN')

# Writing a method for greeting
## greeting command
say_hello <- function(bot, update) {

  # Username to greet
  user_name <- update$message$from$first_name

  # Sending greeting message
  bot$sendMessage(update$message$chat_id,
                  text = paste0("Hello, ", user_name, "!"),
                  parse_mode = "Markdown",
                  reply_to_message_id = update$message$message_id)

}

# creating filters
MessageFilters$hi <- BaseFilter(function(message) {

  # checking if the message text contains the words: hello, hi, salute, hey, bonjour
  grepl(x           = message$text,
        pattern     = 'hello|hi|salute|hey|bonjour',
        ignore.case = TRUE)
  }
)

# creating handler
hi_handler <- CommandHandler('hi', say_hello) # handler for the hi command
hi_txt_hnd <- MessageHandler(say_hello, filters = MessageFilters$hi)

# adding handlers to the dispatcher
updater <- updater +
             hi_handler +
             hi_txt_hnd

# starting the bot
updater$start_polling()
Run the example code above, replacing 'YOUR BOT TOKEN' with the actual token you received when creating the bot through BotFather (I explained how to create a bot in ).
Now let's try sending the bot a few messages that contain the previously mentioned greeting words:
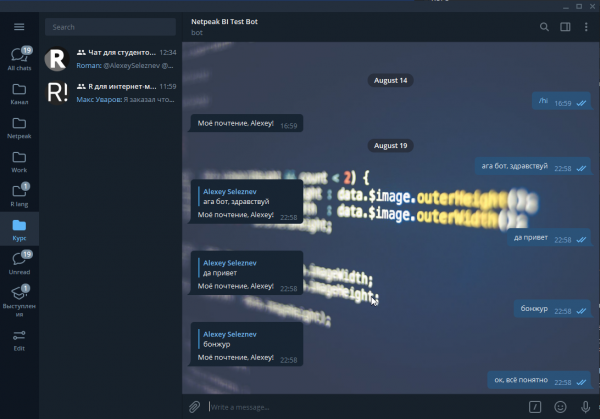
So, first of all, we taught the bot not just to greet, but to respond to greetings. We did this using the argument reply_to_message_id, which is available in the method sendMessage(), where you need to pass the id of the message you want to reply to. You can get the message id like this: update$message$message_id.
But the main thing we did was add a filter to the bot using the function BaseFilter():
# создаём фильтры
MessageFilters$hi <- BaseFilter(

  # анонимная фильтрующая функция
  function(message) {

    # проверяем, встречается ли в тексте сообщения слова приветствия
    grepl(x           = message$text,
          pattern     = 'привет|здравствуй|салют|хай|бонжур',
          ignore.case = TRUE)
  }

)
As you may have noticed, filters need to be added to the object MessageFilters, which already has a small set of built-in filters. In our example, we added an element to the object MessageFilters , which is a new filter. hiYou need to pass the filtering function. Essentially, a filter is just a function that receives a message instance and returns
In the function BaseFilter() . In our example, we wrote the simplest function that uses the basic function TRUE or FALSEgrepl() to check the message text, and if it matches the regular expression hello|hi|greeting|hey|bonjour Next, we create a message handler brings back TRUE.
hi_txt_hnd <- MessageHandler(say_hello, filters = MessageFilters$hi) MessageHandler(). The first argument of the function is the method that will call the handler, and the second argument is the filter according to which it will be called. In our case, this is the filter we created MessageFilters$hi And finally, we add the handler we just created to the dispatcher.
hi_txt_hnd updater <- updater + hi_handler + hi_txt_hnd.
As I mentioned earlier, in the packageand in the object telegram.bot there is already a set of built-in filters that you can use: MessageFilters all — All messages
- text — Text messages
- command — Commands, i.e., messages that start with
- reply — Messages that are replies to another message
/ - audio — Messages that contain an audio file
- document — Messages with a sent document
- photo — Messages with sent images
- sticker — Messages with a sent sticker
- video — Messages with video
- voice — Voice messages
- contact — Messages that contain a Telegram user's contact
- location — Messages with geolocation
- venue — Forwarded messages
- game — Games
- If you want to combine some filters in one handler, just use the sign
— as a logical | , and the sign ORas a logical & as a logical one I can useFor example, if you want the bot to call the same method when it receives a video, image, or document, use the following example for creating a message handler:
handler <- MessageHandler(callback,
  MessageFilters$video | MessageFilters$photo | MessageFilters$document
)
Adding commands with parameters
We already know what commands are, how to create them, and how to make the bot execute the desired command. However, in some cases, besides the command name, we also need to pass certain data for it to execute.
Below is an example of a bot that returns the type of day from the production calendar based on the specified date and country.
The bot below uses the production calendar API .
Code 3: A bot that reports the type of day based on the date and country.
library(telegram.bot)

# Create an instance of the Updater class
updater <- Updater('1165649194:AAFkDqIzQ6Wq5GV0YU7PmEZcv1gmWIFIB_8')

# Write a method for greeting
## greeting command
check_date <- function(bot, update, args) {

  # Incoming data
  day     <- args[1]  # date
  country <- args[2]  # country

  # Check the entered parameters
  if ( !grepl('\d{4}-\d{2}-\d{2}', day) ) {

    # Send Custom Keyboard
    bot$sendMessage(update$message$chat_id,
                    text = paste0(day, " - incorrect date, please enter a date in the format YYYY-MM-DD"),
                    parse_mode = "Markdown")

  } else {
    day <- as.Date(day)
    # Convert to POSIXtl format
    y <- format(day, "%Y")
    m <- format(day, "%m")
    d <- format(day, "%d")

  }

  # Country for checking
  ## Check if a country is specified
  ## If not specified, set to ru
  if ( ! country %in% c('ru', 'ua', 'by', 'kz', 'us') ) {

    # Send Custom Keyboard
    bot$sendMessage(update$message$chat_id,
                    text = paste0(country, " - incorrect country code, possible values: ru, by, kz, ua, us. Requested data for Russia."),
                    parse_mode = "Markdown")

    country <- 'ru'

  }

  # Request data from API
  # Compose HTTP request
  url <- paste0("https://isdayoff.ru/api/getdata?",
                "year=",  y, "&",
                "month=", m, "&",
                "day=",   d, "&",
                "cc=",    country, "&",
                "pre=1&",
                "covid=1")

  # Get response
  res <- readLines(url)

  # Interpret response
  out <- switch(res,
                "0"   = "Working day",
                "1"   = "Non-working day",
                "2"   = "Shortened working day",
                "4"   = "covid-19",
                "100" = "Error in date",
                "101" = "Data not found",
                "199" = "Service error")

  # Send message
  bot$sendMessage(update$message$chat_id,
                  text = paste0(day, " - ", out),
                  parse_mode = "Markdown")

}

# Create a handler
date_handler <- CommandHandler('check_date', check_date, pass_args = TRUE)

# Add handler to dispatcher
updater <- updater + date_handler

# Start the bot
updater$start_polling()
Run the example code above, replacing 'YOUR BOT TOKEN' with the actual token you received when creating the bot through BotFather (I explained how to create a bot in ).
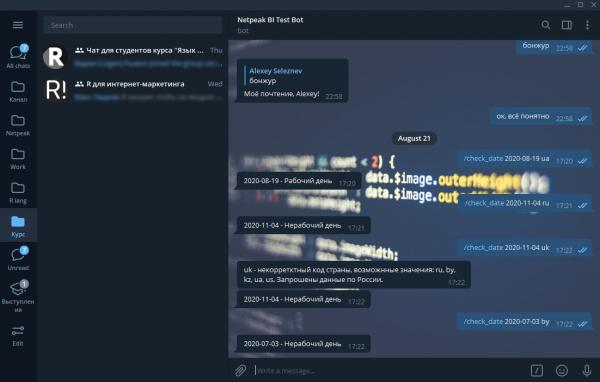
We have created a bot that has only one method in its arsenal. check_date, this method is invoked by the same command.
However, in addition to the command name, this method expects you to enter two parameters: the country code and the date. The bot then checks whether the specified day in the given country is a holiday, a shortened working day, or a working day according to the official production calendar.
To allow the method we are creating to accept additional parameters along with the command, use the argument pass_args = TRUE in the function CommandHandler(), and when creating the method, in addition to mandatory parameters bot, update create an optional one — argsThe method created this way will accept parameters that you pass to the bot after the command name. Parameters must be separated by spaces, and they will be received in the method as a text vector.
Let's run and test our bot.
Running the bot in the background
The last step we need to take is to run the bot in the background.
To do this, follow the algorithm described below:
- Save the bot's code in a file with the .R extension. In RStudio, this is done through the menu File, with the command Save As….
- Add the path to the bin folder, which is located in the folder where you installed the R language, to the Path variable, the instructions .
- Create a plain text file with one line written in it:
R CMD BATCH C:UsersAlseyDocumentsmy_bot.R. Instead of C:UsersAlseyDocumentsmy_bot.R write the path to your bot script. It is important that there are no Cyrillic characters or spaces in the path, as this may cause issues when starting the bot. Save it and change its extension from txt to bat. - Open the Windows Task Scheduler. There are many ways to do this, for instance, open any folder and enter
%windir%system32taskschd.msc /s. Other ways to launch it can be found . - In the upper right menu of the scheduler, click "Create Task...".
- In the "General" tab, assign an arbitrary name to your task and switch the toggle to "Run for all users".
- Go to the "Actions" tab, click "Create". In the "Program or script" field, click "Browse", find the file created in the second step bat , and click OK.
- Click OK, and if necessary, enter your operating system account password.
- Find the created task in the scheduler, select it, and click the "Run" button in the lower right corner.
Our bot is running in the background and will operate until you stop the task or turn off your PC or server on which it was launched.
Conclusion
In this article, we covered how to write a fully functional bot that can not only send messages but also respond to incoming messages and commands. The knowledge gained is already sufficient for solving most of your tasks.
In the next article, we will discuss how to add a keyboard to the bot for more convenient operation.
Subscribe to my and channels.
Source: habr.com
