

This is the third article in the series "Creating a Telegram Bot in R Language." In previous publications, we learned how to create a Telegram bot, send messages through it, and added commands and message filters. Therefore, before you start reading this article, I highly recommend familiarizing yourself with , as I will not be revisiting the previously described fundamentals of bot development here.
In this article, we will improve the usability of our bot by adding a keyboard, which will make the bot's interface intuitive and easy to use.
All articles from the "Writing a Telegram Bot in R" series
Content
If you're interested in data analysis, you might find my and channels interesting. Most of their content is devoted to the R language.
3.1.
3.2.
3.3.
What types of keyboards does a Telegram bot support?
At the time of writing this article, telegram.bot allows you to create keyboards of two types:
- Reply — A basic, standard keyboard located below the message input panel. This keyboard simply sends a text message to the bot, with the text that is written on the button itself.
- Inline — A keyboard that is tied to a specific message from the bot. This keyboard sends data related to the pressed button to the bot; this data may differ from the text on the button itself, and such buttons are processed via CallbackQueryHandler.
To have the bot open the keyboard, you need to pass the previously created keyboard as an argument when sending a message with the method sendMessage(), in the argument reply_markup.
Below, we will examine several examples.
Reply Keyboard
As I mentioned above, this is the primary control keyboard of the bot.
Example of creating a Reply keyboard from the official documentation
bot <- Bot(token = "TOKEN")
chat_id <- "CHAT_ID"

# Create Custom Keyboard
text <- "Aren't those custom keyboards cool?"
RKM <- ReplyKeyboardMarkup(
  keyboard = list(
    list(KeyboardButton("Yes, they certainly are!")),
    list(KeyboardButton("I'm not quite sure")),
    list(KeyboardButton("No..."))
  ),
  resize_keyboard = FALSE,
  one_time_keyboard = TRUE
)

# Send Custom Keyboard
bot$sendMessage(chat_id, text, reply_markup = RKM)
The above is an example from the official documentation of the package telegram.bot. The function used to create the keyboard is ReplyKeyboardMarkup(), which in turn takes a list of lists of buttons that are created by the function KeyboardButton().
Why in ReplyKeyboardMarkup() Is it necessary to pass not just a list, but a list of lists? The thing is, you are passing the main list, and in it, you define each row of buttons as separate lists, since multiple buttons can be placed in one row.
Argument resize_keyboard allows for automatic adjustment of the optimal size of keyboard buttons, and the argument one_time_keyboard allows the keyboard to be hidden after each button press.
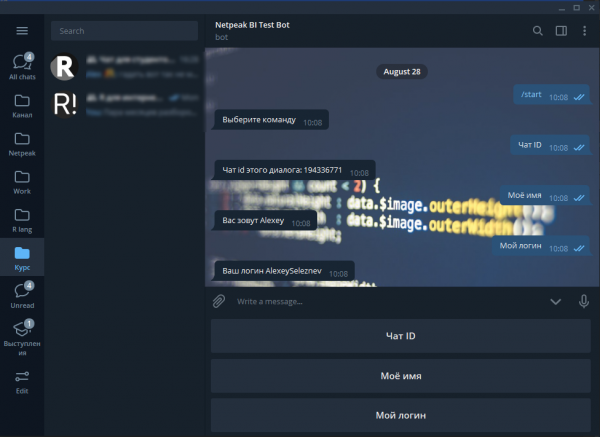
Let's write a simple bot with 3 buttons:
- Chat ID — Request the chat ID of the dialogue with the bot
- My name — Request your name
- My username — Request your username in Telegram
Code 1: Simple bot with Reply keyboard
library(telegram.bot)

# Create an instance of the Updater class
updater <- Updater('YOUR_BOT_TOKEN')

# Create methods
## Method to start the keyboard
start <- function(bot, update) {

  # Create the keyboard
  RKM <- ReplyKeyboardMarkup(
    keyboard = list(
      list(KeyboardButton("Chat ID")),
      list(KeyboardButton("My name")),
      list(KeyboardButton("My username"))
    ),
    resize_keyboard = FALSE,
    one_time_keyboard = TRUE
  )

  # Send the keyboard
  bot$sendMessage(update$message$chat_id,
                  text = 'Choose a command',
                  reply_markup = RKM)

}

## Method returning the chat ID
chat_id <- function(bot, update) {

  bot$sendMessage(update$message$chat_id,
                  text = paste0("Chat ID of this dialogue: ", update$message$chat_id),
                  parse_mode = "Markdown")

}

## Method returning the name
my_name <- function(bot, update) {

  bot$sendMessage(update$message$chat_id,
                  text = paste0("Your name is ", update$message$from$first_name),
                  parse_mode = "Markdown")

}

## Method returning the username
my_username <- function(bot, update) {

  bot$sendMessage(update$message$chat_id,
                  text = paste0("Your username is ", update$message$from$username),
                  parse_mode = "Markdown")

}

# Create filters
## Messages with the text Chat ID
MessageFilters$chat_id <- BaseFilter(function(message) {

  # Check the text of the message
  message$text == "Chat ID"

}
)

## Messages with the text My name
MessageFilters$name <- BaseFilter(function(message) {

  # Check the text of the message
  message$text == "My name"

}
)

## Messages with the text My username
MessageFilters$username <- BaseFilter(function(message) {

  # Check the text of the message
  message$text == "My username"
)

# Create handlers
h_start    <- CommandHandler('start', start)
h_chat_id  <- MessageHandler(chat_id, filters = MessageFilters$chat_id)
h_name     <- MessageHandler(my_name, filters = MessageFilters$name)
h_username <- MessageHandler(my_username, filters = MessageFilters$username)

# Add handlers to the dispatcher
updater <- updater +
            h_start +
            h_chat_id +
            h_name +
            h_username

# Start the bot
updater$start_polling()
Run the example code above, replacing 'YOUR BOT TOKEN' with the actual token you received when creating the bot through BotFather (I explained how to create a bot in ).
After launching, give the bot a command /start, since it is the one we defined to launch the keyboard.
If you're currently having difficulty understanding the provided code example regarding the creation of methods, filters, and handlers, you should return to the previous section. , where I explained everything in detail.
We created 4 methods:
- start — Launching the keyboard
- chat_id — Requesting the chat ID
- my_name — Requesting your name
- my_username — Requesting your username
In the object MessageFilters we added 3 message filters based on their text:
- chat_id — Messages with the text
"Chat ID" - name — Messages with the text
"My name" - username — Messages with the text
"My username"
And we created 4 handlers that will execute the specified methods based on the given commands and filters.
# создаём обработчики
h_start    <- CommandHandler('start', start)
h_chat_id  <- MessageHandler(chat_id, filters = MessageFilters$chat_id)
h_name     <- MessageHandler(my_name, filters = MessageFilters$name)
h_username <- MessageHandler(my_username, filters = MessageFilters$username)
The keyboard itself is created within the method start() with the command ReplyKeyboardMarkup().
RKM <- ReplyKeyboardMarkup(
    keyboard = list(
      list(KeyboardButton("Chat ID")),
      list(KeyboardButton("My name")),
      list(KeyboardButton("My username"))
    ),
    resize_keyboard = FALSE,
    one_time_keyboard = TRUE
)
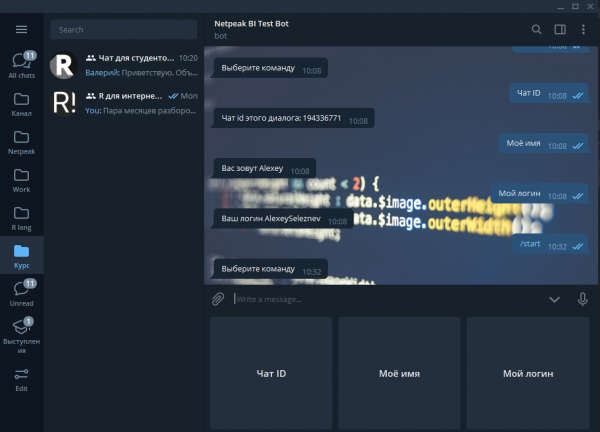
In our case, we arranged all the buttons one below the other, but we can position them in one row by modifying the list of button lists. Since one row within the keyboard is created through a nested list of buttons, to display our buttons in one row, we need to rewrite part of the code for generating the keyboard like this:
RKM <- ReplyKeyboardMarkup(
    keyboard = list(
      list(
          KeyboardButton("Chat ID"),
          KeyboardButton("My name"),
          KeyboardButton("My username")
     )
    ),
    resize_keyboard = FALSE,
    one_time_keyboard = TRUE
)
The keyboard is sent to the chat using the method sendMessage(), in the argument reply_markup.
  bot$sendMessage(update$message$chat_id,
                  text = 'Choose a command',
                  reply_markup = RKM)
Inline Keyboard
As I mentioned earlier, the Inline keyboard is tied to a specific message. Working with it is somewhat more complex than with the main keyboard.
Initially, you need to add a method to the bot to invoke the Inline keyboard.
To respond to pressing the Inline button, you can also use the bot's method answerCallbackQuery(), which can display a notification in the Telegram interface to the user who pressed the Inline button.
The data sent from the Inline button is not considered text; therefore, a special handler must be created to process it using the command CallbackQueryHandler().
The code for building the Inline keyboard is provided in the official documentation of the package telegram.bot.
The Inline keyboard construction code from the official documentation
# Initialize bot
bot <- Bot(token = "TOKEN")
chat_id <- "CHAT_ID"

# Create Inline Keyboard
text <- "Could you type their phone number, please?"
IKM <- InlineKeyboardMarkup(
  inline_keyboard = list(
    list(
      InlineKeyboardButton(1),
      InlineKeyboardButton(2),
      InlineKeyboardButton(3)
    ),
    list(
      InlineKeyboardButton(4),
      InlineKeyboardButton(5),
      InlineKeyboardButton(6)
    ),
    list(
      InlineKeyboardButton(7),
      InlineKeyboardButton(8),
      InlineKeyboardButton(9)
    ),
    list(
      InlineKeyboardButton("*"),
      InlineKeyboardButton(0),
      InlineKeyboardButton("#")
    )
  )
)

# Send Inline Keyboard
bot$sendMessage(chat_id, text, reply_markup = IKM)
The Inline keyboard must be built using the command InlineKeyboardMarkup(), based on the same principle as the Reply keyboard. In InlineKeyboardMarkup() it is necessary to pass a list of lists of Inline buttons, each individual button is created by the function InlineKeyboardButton().
An Inline button can either send some data to the bot using the argument callback_data, or open a specific HTML page defined by the argument. url.
As a result, there will be a list where each element is also a list of Inline buttons that need to be combined into a single row.
Next, we will look at several examples of bots with Inline buttons.
Example of the simplest bot with support for Inline buttons
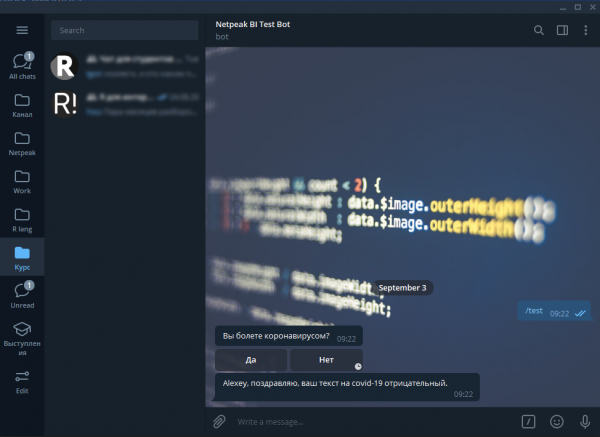
To start, we will write a bot for express testing for covid-19. Upon command /test, it will send you a keyboard with two buttons, depending on which button is pressed, it will send you a message with the results of your testing.
Code 2: A Simple Bot with an Inline Keyboard
library(telegram.bot)

# create an instance of the Updater class
updater <- Updater('YOUR BOT TOKEN')

# method to send the Inline keyboard
test <- function(bot, update) {

  # create the Inline keyboard
  IKM <- InlineKeyboardMarkup(
    inline_keyboard = list(
      list(
        InlineKeyboardButton("Yes", callback_data = 'yes'),
        InlineKeyboardButton("No", callback_data = 'no')
      )
    )
  )

  # Send keyboard to chat
  bot$sendMessage(update$message$chat_id,
                  text = "Are you suffering from coronavirus?",
                  reply_markup = IKM)
}

# method to handle button press
answer_cb <- function(bot, update) {

  # data received from the button
  data <- update$callback_query$data

  # get the username of the person who pressed the button
  uname <- update$effective_user()$first_name

  # process the result
  if ( data == 'no' ) {

    msg <- paste0(uname, ", congratulations, your covid-19 test is negative.")

  } else {

    msg <- paste0(uname, ", unfortunately your covid-19 test is positive.")

  }

  # Send the message
  bot$sendMessage(chat_id = update$from_chat_id(),
                  text = msg)

  # inform the bot that the request from the button has been accepted
  bot$answerCallbackQuery(callback_query_id = update$callback_query$id)
}

# create handlers
inline_h      <- CommandHandler('test', test)
query_handler <- CallbackQueryHandler(answer_cb)

# add handlers to the dispatcher
updater <- updater + inline_h + query_handler

# start the bot
updater$start_polling()
Run the example code above, replacing 'YOUR BOT TOKEN' with the actual token you received when creating the bot through BotFather (I explained how to create a bot in ).
Result:
We created two methods:
- test — For sending the Inline keyboard to the chat
- answer_cb — For processing the data sent from the keyboard.
Data that will be sent with each button is specified in the argument callback_data, when creating the button. You can get the data sent by the button using the construction update$callback_query$data, inside the method answer_cb.
For the bot to respond to the Inline keyboard, the method answer_cb processed by a special handler: CallbackQueryHandler(answer_cb). Which triggers the specified method when an Inline button is pressed. The handler CallbackQueryHandler takes two arguments:
callback— The method that needs to be executedpattern— A filter based on the data bound to the button with the argumentcallback_data.
Accordingly, with the argument pattern we can write a separate method for each button press:
Code 3: Separating methods for each Inline button
library(telegram.bot)

# creating an instance of the Updater class
updater <- Updater('YOUR BOT TOKEN')

# method to send an Inline keyboard
test <- function(bot, update) {

  # creating the Inline keyboard
  IKM <- InlineKeyboardMarkup(
    inline_keyboard = list(
      list(
        InlineKeyboardButton("Yes", callback_data = 'yes'),
        InlineKeyboardButton("No", callback_data = 'no')
      )
    )
  )

  # Sending the keyboard in the chat
  bot$sendMessage(update$message$chat_id,
                  text = "Are you infected with coronavirus?",
                  reply_markup = IKM)
}

# method to handle pressing the Yes button
answer_cb_yes <- function(bot, update) {

  # getting the username of the person who pressed the button
  uname <- update$effective_user()$first_name

  # processing the result
  msg <- paste0(uname, ", unfortunately your test for covid-19 is positive.")

  # Sending the message
  bot$sendMessage(chat_id = update$from_chat_id(),
                  text = msg)

  # informing the bot that the button request was accepted
  bot$answerCallbackQuery(callback_query_id = update$callback_query$id)
}

# method to handle pressing the No button
answer_cb_no <- function(bot, update) {

  # getting the username of the person who pressed the button
  uname <- update$effective_user()$first_name

  msg <- paste0(uname, ", congratulations, your test for covid-19 is negative.")

  # Sending the message
  bot$sendMessage(chat_id = update$from_chat_id(),
                  text = msg)

  # informing the bot that the button request was accepted
  bot$answerCallbackQuery(callback_query_id = update$callback_query$id)
}

# creating handlers
inline_h          <- CommandHandler('test', test)
query_handler_yes <- CallbackQueryHandler(answer_cb_yes, pattern = 'yes')
query_handler_no  <- CallbackQueryHandler(answer_cb_no, pattern = 'no')

# adding handlers to the dispatcher
updater <- updater +
            inline_h +
            query_handler_yes +
            query_handler_no

# starting the bot
updater$start_polling()
Run the example code above, replacing 'YOUR BOT TOKEN' with the actual token you received when creating the bot through BotFather (I explained how to create a bot in ).
Now we have written 2 separate methods, i.e., one method for pressing each button, and used the argument pattern, when creating their handlers:
query_handler_yes <- CallbackQueryHandler(answer_cb_yes, pattern = 'yes')
query_handler_no  <- CallbackQueryHandler(answer_cb_no, pattern = 'no')
The method code ends answer_cb with the command bot$answerCallbackQuery(callback_query_id = update$callback_query$id), which informs the bot that the data from the inline keyboard has been received.
Example of a bot that reports the current weather for the selected city
Let's try to write a bot that requests weather data.
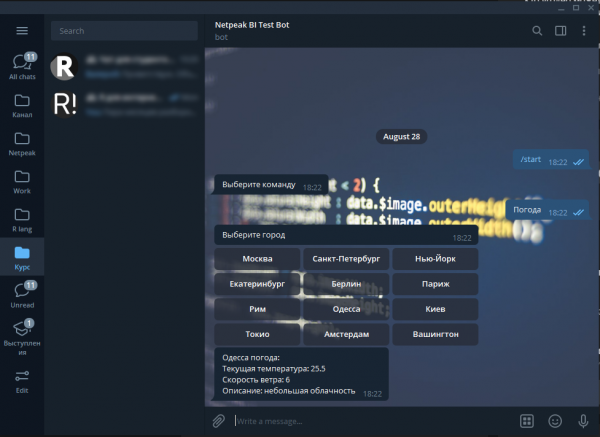
The logic of its operation will be as follows. Initially, you use a command /start to call the main keyboard, which contains just one button labeled 'Weather'. By pressing this button, you receive a message with an inline keyboard to select the city for which you want to know the current weather. You choose one of the cities and receive the current weather.
In this code example, we will use several additional packages:
httr— a package for handling HTTP requests, which is the basis for working with any API. In our case, we will use a free API .stringr— a package for working with text; in our case, we will use it to format the weather message for the selected city.
Code 4: A bot that reports the current weather for the selected city
library(telegram.bot)
library(httr)
library(stringr)

# Create an instance of the Updater class
updater <- Updater('YOUR BOT TOKEN')

# Create methods
## Method to launch the main keyboard
start <- function(bot, update) {

  # Create the keyboard
  RKM <- ReplyKeyboardMarkup(
    keyboard = list(
      list(
        KeyboardButton("Weather")
      )
    ),
    resize_keyboard = TRUE,
    one_time_keyboard = TRUE
  )

  # Send the keyboard
  bot$sendMessage(update$message$chat_id,
                  text = 'Choose a command',
                  reply_markup = RKM)

}

## Method to call the Inline keyboard
weather <- function(bot, update) {

  IKM <- InlineKeyboardMarkup(
    inline_keyboard = list(
      list(
        InlineKeyboardButton(text = 'Moscow', callback_data = 'New York,us'),
        InlineKeyboardButton(text = 'Saint Petersburg', callback_data = 'Saint Petersburg'),
        InlineKeyboardButton(text = 'New York', callback_data = 'New York')
      ),
      list(
        InlineKeyboardButton(text = 'Yekaterinburg', callback_data = 'Yekaterinburg,ru'),
        InlineKeyboardButton(text = 'Berlin', callback_data = 'Berlin,de'),
        InlineKeyboardButton(text = 'Paris', callback_data = 'Paris,fr')
      ),
      list(
        InlineKeyboardButton(text = 'Rome', callback_data = 'Rome,it'),
        InlineKeyboardButton(text = 'Odessa', callback_data = 'Odessa,ua'),
        InlineKeyboardButton(text = 'Kyiv', callback_data = 'Kyiv,fr')
      ),
      list(
        InlineKeyboardButton(text = 'Tokyo', callback_data = 'Tokyo'),
        InlineKeyboardButton(text = 'Amsterdam', callback_data = 'Amsterdam,nl'),
        InlineKeyboardButton(text = 'Washington', callback_data = 'Washington,us')
      )
    )
  )

  # Send Inline Keyboard
  bot$sendMessage(chat_id = update$message$chat_id,
                  text = "Choose a city",
                  reply_markup = IKM)
}

# Method for weather information
answer_cb <- function(bot, update) {

  # Get the city from the message
  city <- update$callback_query$data

  # Send request
  ans <- GET('https://api.openweathermap.org/data/2.5/weather',
             query = list(q     = city,
                          lang  = 'en',
                          units = 'metric',
                          appid = '4776568ccea136ffe4cda9f1969af340'))

  # Parse the response
  result <- content(ans)

  # Form the message
  msg <- str_glue("{result$name} weather:\n",
                  "Current temperature: {result$main$temp}\n",
                  "Wind speed: {result$wind$speed}\n",
                  "Description: {result$weather[[1]]$description}")

  # Send weather information
  bot$sendMessage(chat_id = update$from_chat_id(),
                  text    = msg)

  bot$answerCallbackQuery(callback_query_id = update$callback_query$id)
}

# Create filters
## Messages with the text Weather
MessageFilters$weather <- BaseFilter(function(message) {

  # Check message text
  message$text == "Weather"

}
)

# Create handlers
h_start         <- CommandHandler('start', start)
h_weather       <- MessageHandler(weather, filters = MessageFilters$weather)
h_query_handler <- CallbackQueryHandler(answer_cb)

# Add handlers to the dispatcher
updater <- updater +
              h_start +
              h_weather +
              h_query_handler

# Start the bot
updater$start_polling()
Run the example code above, replacing 'YOUR BOT TOKEN' with the actual token you received when creating the bot through BotFather (I explained how to create a bot in ).
As a result, our bot will work approximately like this:
Schematic representation of this bot can be illustrated like this:
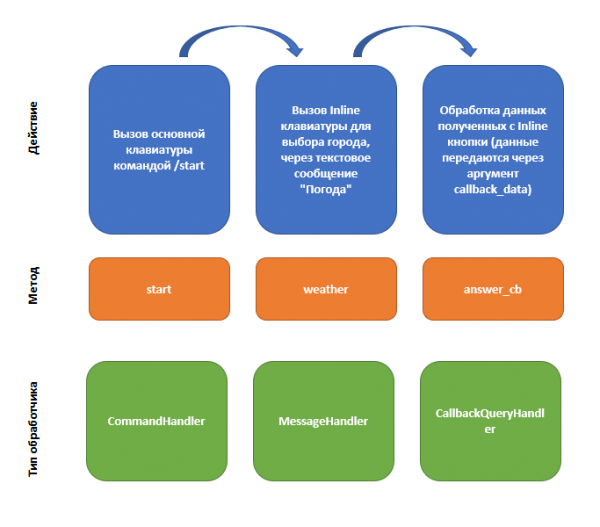
We created 3 methods available within our weather bot:
- start — Launching the bot's main keyboard
- weather — Launching the Inline keyboard for city selection
- answer_cb — The main method that requests weather data from the API for the specified city and sends it to the chat.
Element.getAnimations() start we start with the command /start, which is implemented by the handler CommandHandler('start', start).
To execute the method weather we created a corresponding filter:
# создаём фильтры
## сообщения с текстом Погода
MessageFilters$weather <- BaseFilter(function(message) {

  # проверяем текст сообщения
  message$text == "Погода"

}
)
And we call this method with the following message handler: MessageHandler(weather, filters = MessageFilters$weather).
And ultimately, our main method answer_cb reacts to the pressing of Inline buttons, which is implemented by a special handler: CallbackQueryHandler(answer_cb).
Inside the method answer_cb, we read the data sent from the keyboard and store it in the variable city: city <- update$callback_query$data. After which we request weather data from the API, format and send a message, and finally use the method answerCallbackQuery to inform the bot that we have processed the pressing of the Inline button.
An example of a bot that displays a list of the latest articles with links from the specified Hub from .
I provide this bot example to show you how to output Inline buttons that lead to web pages.
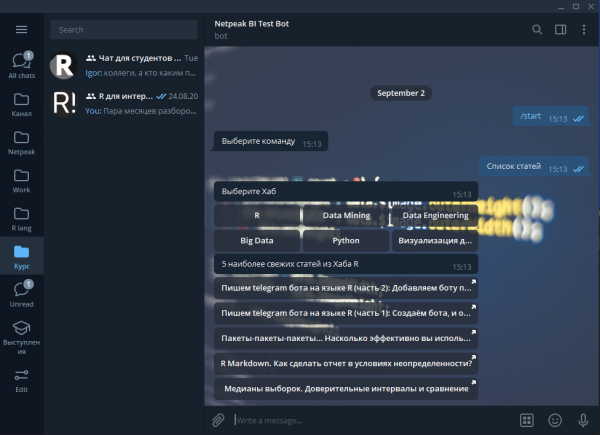
The logic of this bot is similar to the previous one; initially, we launch the main keyboard with the command /start. Then the bot gives us a choice of a list of 6 hubs, we select the hub of interest, and receive 5 of the freshest publications from the chosen Hub.
As you understand, in this case, we need to obtain a list of articles, and for this, we will use a special package habR, which allows requesting articles from Habr and some statistics about them in R.
You can install the package habR only from github, for which you will need an additional package devtools. To install, use the code provided below.
install.packages('devtools')
devtools::install_github('selesnow/habR')
Now let's look at the code for building the bot described above:
Code 5: A bot that outputs the list of the freshest articles from the selected Hub
library(telegram.bot)
library(habR)

# Creating an instance of the Updater class
updater <- Updater('YOUR_BOT_TOKEN')

# Creating methods
## Method to launch the main keyboard
start <- function(bot, update) {

  # Creating the keyboard
  RKM <- ReplyKeyboardMarkup(
    keyboard = list(
      list(
        KeyboardButton("Article List")
      )
    ),
    resize_keyboard = TRUE,
    one_time_keyboard = TRUE
  )

  # Sending the keyboard
  bot$sendMessage(update$message$chat_id,
                  text = 'Select a command',
                  reply_markup = RKM)

}

## Method to call the Inline keyboard
habs <- function(bot, update) {

  IKM <- InlineKeyboardMarkup(
    inline_keyboard = list(
      list(
        InlineKeyboardButton(text = 'R', callback_data = 'R'),
        InlineKeyboardButton(text = 'Data Mining', callback_data = 'data_mining'),
        InlineKeyboardButton(text = 'Data Engineering', callback_data = 'data_engineering')
      ),
      list(
        InlineKeyboardButton(text = 'Big Data', callback_data = 'bigdata'),
        InlineKeyboardButton(text = 'Python', callback_data = 'python'),
        InlineKeyboardButton(text = 'Data Visualization', callback_data = 'data_visualization')
      )
    )
  )

  # Send Inline Keyboard
  bot$sendMessage(chat_id = update$message$chat_id,
                  text = "Select Hub",
                  reply_markup = IKM)
}

# Method for responding to weather inquiries
answer_cb <- function(bot, update) {

  # Getting the city from the message
  hub <- update$callback_query$data

  # Sending a message indicating that data from the button has been received
  bot$answerCallbackQuery(callback_query_id = update$callback_query$id,
                          text = 'Please wait a few minutes, the request is being processed')

  # Sending a message indicating to wait while the bot collects data
  mid <- bot$sendMessage(chat_id = update$from_chat_id(),
                         text = "Please wait a few minutes while I gather data on the selected Hub")

  # Parsing Habr
  posts <- head(habr_hub_posts(hub, 1), 5)

  # Deleting the message indicating to wait
  bot$deleteMessage(update$from_chat_id(), mid$message_id)

  # Forming the list of buttons
  keys <- lapply(1:5, function(x) list(InlineKeyboardButton(posts$title[x], url = posts$link[x])))

  # Forming the keyboard
  IKM <- InlineKeyboardMarkup(
    inline_keyboard = keys
    )

  # Sending information about the weather
  bot$sendMessage(chat_id = update$from_chat_id(),
                  text = paste0("The 5 most recent articles from Habr: ", hub),
                  reply_markup = IKM)

}

# Creating filters
## Messages with the text Weather
MessageFilters$hubs <- BaseFilter(function(message) {

  # Checking the text of the message
  message$text == "Article List"

}
)

# Creating handlers
h_start         <- CommandHandler('start', start)
h_hubs          <- MessageHandler(habs, filters = MessageFilters$hubs)
h_query_handler <- CallbackQueryHandler(answer_cb)

# Adding handlers to the dispatcher
updater <- updater +
  h_start +
  h_hubs  +
  h_query_handler

# Starting the bot
updater$start_polling()
Run the example code above, replacing 'YOUR BOT TOKEN' with the actual token you received when creating the bot through BotFather (I explained how to create a bot in ).
As a result, we will get this output:
The list of available Hubs for selection has been hardcoded into the method habs:
## Метод вызова Inine клавиатуры
habs <- function(bot, update) {

  IKM <- InlineKeyboardMarkup(
    inline_keyboard = list(
      list(
        InlineKeyboardButton(text = 'R', callback_data = 'r'),
        InlineKeyboardButton(text = 'Data Mining', callback_data = 'data_mining'),
        InlineKeyboardButton(text = 'Data Engineering', callback_data = 'data_engineering')
      ),
      list(
        InlineKeyboardButton(text = 'Big Data', callback_data = 'bigdata'),
        InlineKeyboardButton(text = 'Python', callback_data = 'python'),
        InlineKeyboardButton(text = 'Визуализация данных', callback_data = 'data_visualization')
      )
    )
  )

  # Send Inline Keyboard
  bot$sendMessage(chat_id = update$message$chat_id,
                  text = "Выберите Хаб",
                  reply_markup = IKM)
}
We retrieve the list of articles from the specified Hub using the command habr_hub_posts(), from the package habR. Here, we specify that we do not need the list of articles for all time, only the first page containing 20 articles. From the resulting table, we use the command head() to keep only the top 5, which are the most recent articles.
  # парсим Хабр
  posts <- head(habr_hub_posts(hub, 1), 5)
The logic is very similar to the previous bot, but in this case, we generate the Inline keyboard with the list of articles dynamically using the function lapply().
  # формируем список кнопок
  keys <- lapply(1:5, function(x) list(InlineKeyboardButton(posts$title[x], url = posts$link[x])))

  # формируем клавиатуру
  IKM <- InlineKeyboardMarkup(
    inline_keyboard =  keys
    )
In the button text, we insert the article title posts$title[x], and in the argument url the link to the article: url = posts$link[x].
Next, we create the filter, handlers, and launch our bot.
Conclusion
Now, the bots you have created will be significantly more convenient to work with, as management will be conducted through the keyboard rather than command input. At least when interacting with the bot through a smartphone, the keyboard will noticeably simplify the process of using it.
In the next article, we will figure out how to build a logical dialogue with the bot and work with databases.
Source: habr.com
