

Once in one of the old and already abandoned articles, I wrote about how easily and casually one can stream video from a canvas through websockets. In that article, I superficially discussed how to capture video from the camera and audio from the microphone using , how to encode the obtained stream and send it through websockets to the server. However, in reality, this is not typically done; for streaming, either special software is used, which needs to be installed and configured: off the top of my head, this could be , or WebRTC is utilized, which works out of the box, meaning it does not require the installation of any plugins like Flash Player, which will be removed from the Chromium browser in December.
Today we will talk about WebRTC.
Web Real-Time Communication (WebRTC) is not just one protocol; it's a whole collection of standards, protocols, and JavaScript APIs that together enable peer-to-peer video and audio communication in real-time, and can also be used for transmitting any binary data. Typically, the peers are browsers, but it can also be a mobile application, for example. To establish p2p communication between clients, the browser needs to support various types of video and audio encoding, multiple network protocols, and ensure hardware interaction with the browser (through OS layers): webcams, sound cards. All of this technological mess is hidden behind the abstraction of JavaScript APIs for the convenience of the developer.
In the end, it all boils down to three APIs:
— we discussed last time, today I will write a bit more about it. It's used to obtain video/audio streams from the 'hardware'
— provides communication between two clients (p2p)
— serves to transmit arbitrary data between two clients
Preparing audio and video streams for transmission
Everything starts with the 'capture' of media streams from the webcam and microphone. Raw streams are certainly not suitable for organizing a teleconference; each stream needs to be processed: improving quality, synchronizing audio with video, adding synchronization markers in the video stream, and ensuring the bitrate corresponds to the constantly changing bandwidth of the channel. The browser takes care of all this; developers don’t need to worry about encoding media streams. Modern browsers already have software layers for capturing, quality enhancement (removing echo and noise from sound, improving visuals), and encoding video and audio. The layer scheme is shown in Fig. 1:
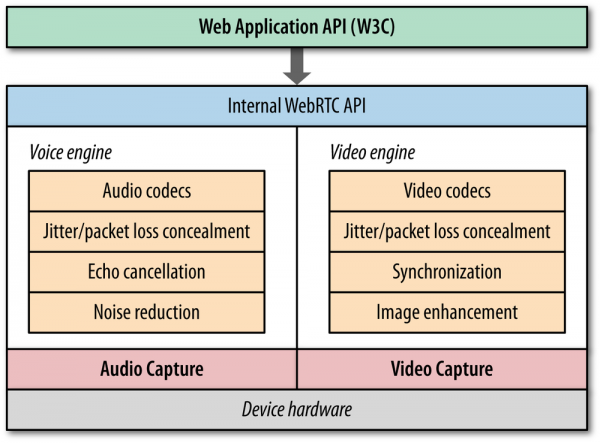 Fig. 1. Audio and video processing layers in the browser
All processing happens directly in the browser itself; no additional plugins are required. However, it's still not completely rosy as of 2020. There are still browsers that do not fully support , you can follow the link and check the compatibility table at the bottom. In particular, IE disappoints again.
With the obtained streams, one can do very interesting things: one can clone, change the video resolution, manipulate audio quality, one can 'attach' a Media Stream to the
— these guys are involved in realtime CV using Javascript. They have a whole of various JS libraries for working with video streams on canvas: face detection, object recognition, applying filters (masks, like on Instagram), etc. A great example of how video can be processed in real-time directly in the browser without additional plugins.
— the API documentation for capturing video streams from the canvas. It is already supported in Chrome, Opera, and Firefox.
RTCPeerConnection
Now, we come to how to actually transfer video to another user? The first priority is In brief, at this step you need to create an RTCPeerConnection object:
const peerConnection = new RTCPeerConnection({
  iceServers: [{
    urls: 'stun:stun.l.google.com:19302'
  }]
});
One of the options we specify is iceServers — this is the server that helps establish a connection between two browsers behind a NAT. In other words, it addresses the problem of how to know the IP of your counterpart if they are behind their provider's NAT. The ICE protocol comes into play; although ICE is not strictly part of WebRTC, we will discuss that later.
Earlier, we obtained Usermedia streams:
navigator.mediaDevices.getUserMedia({ video: true, audio: true }).then(stream => {
  // Usermedia streams, typically this is video and audio
  const tracks = stream.getTracks();

   for (const track of tracks) {
     // each track is attached to the peerConnection
     peerConnection.addTrack(track);
   }
}).catch(console.error);
Next, the onnegotiationneeded event triggers on the peerConnection, where we need to create an offer (in SDP terms — Session Description Protocol) and set it in the peerConnection using the setLocalDescription method. We will discuss SDP — what it is and the formats of offer and answer — later.
After assigning LocalDescription to the peerConnection, the browser 'gathers' ice candidates, finding various paths for communication through NAT. The onicegatheringstatechange event is triggered. In the onicegatheringstatechange handler, we establish a connection with the webrtc-signaling server to exchange Session Descriptions between peers:
peerConnection.oniceconnectionstatechange = (event) => {
      console.log('Connection state: ', peerConnection.iceConnectionState);

      if (peerConnection.iceConnectionState === 'connected') {
        // Можем активировать кнопку Start broadcast
        setBroadcasting(true);
        setBroadcastingBtnActive(true);
      }
    };

// Событие срабатывает сразу, как только добавился медаиапоток в peerConnection
peerConnection.onnegotiationneeded = (event) => {
      // Создаем и назначаем SDP offer
      peerConnection.createOffer().
        then((offer) => peerConnection.setLocalDescription(offer)).
        catch(console.error);
    };

// Событие срабатывает каждый раз, как появляется ICE кандидат
peerConnection.onicegatheringstatechange = (ev) => {
      let connection = ev.target;

      // Now we can activate broadcast button
      if (connection.iceGatheringState === 'complete') {
        let delay = 50;
        let tries = 0;
        let maxTries = 3;

        let timerId = setTimeout(function allowStreaming() {
          if (isOnline) {
            setBroadcastingBtnActive(true);
            return;
          }

          if (tries < maxTries) {
            tries += 1;
            delay *= 2;
            timerId = setTimeout(allowStreaming, delay);
          } else {
            // TODO: show user notification
            console.error("Can't connect to server");

            alert("Can't connect to server");
          }
        }, delay);
      }
    };
The webrtc-signaling server is necessary for facilitating the exchange of session descriptions between two peers; this can be a simple websocket or XHR server built in any programming language. Its job is straightforward: to receive a session description from one peer and pass it to the other.
After exchanging Session descriptions, both parties are ready to transmit and receive video streams. On the side that receives the video stream, the ontrack event triggers on the peerConnection. In its handler, the received tracks can be assigned to
References and literature:
— documentation
— implementation of the WebRTC protocols in Go
— a little book from the creators of Pion
— the book High Performance Browser Networking, which thoroughly examines issues of ensuring high performance in web applications. It ends with a discussion of WebRTC. Although the book is old (2013), it remains relevant.
In the next part, I want to provide some more theory and practically discuss the reception and processing of video streams on the server using Pion, transcoding to HLS via FFmpeg for subsequent broadcasting to viewers in the browser.
For the impatient: (it's just an experiment).
Source: habr.com
