


Updated own guide to full-disk encryption in Runet V0.2.
Cowboy strategy:
[A] block system cipher Windows 7 installed system;
[B] GNU Block System Cipher/Linux (Debian) installed system (including /boot);
[C] GRUB2 setup, bootloader protection with digital signature/authentication/hashing;
[D] cleaning - destruction of unencrypted data;
[E] universal backup of encrypted OS;
[F] attack <at [C6]> target - GRUB2 loader;
[G] Helpful documentation.
╭───Scheme #room 40# :
├──╼ Windows 7 installed - full system encryption, not hidden;
├──╼ GNU/Linux installed (Debian and derived distributions) - full system encryption is not hidden(/, including /boot; swap);
├──╼ independent bootloaders: VeraCrypt bootloader installed in MBR, GRUB2 bootloader installed in extended partition;
├──╼ installation/reinstallation of the OS is not required;
└──╼ used cryptographic software: VeraCrypt; Cryptosetup; gnupg; sea horse; hashdeep; GRUB2 - Free/Free.
The above-described scheme partially solves the problem of “remote boot on a flash drive” and allows you to enjoy encrypted OS Windows/Linux and exchange data via an "encrypted channel" from one OS to another.
PC boot order (one of the options):
- turning on the machine;
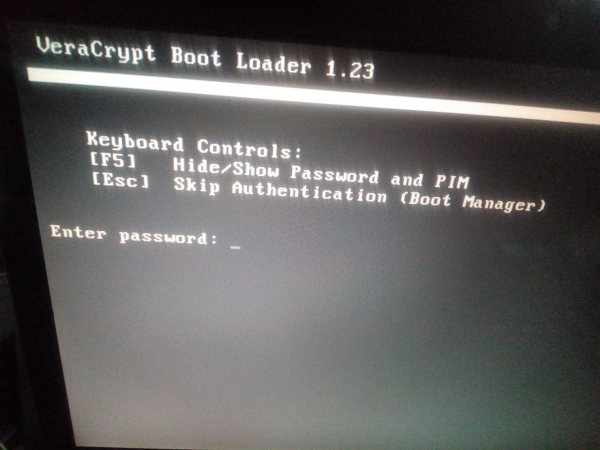
- downloading the VeraCrypt bootloader (entering the correct password will continue the download Windows 7);
- pressing the "Esc" key will load the GRUB2 bootloader;
- GRUB2 bootloader (choosing a distribution/ GNU/Linux/CLI), will require authentication of the GRUB2 superuser <login/password>;
- after successful authentication and selection of the distribution, you will need to enter a passphrase to unlock "/boot/initrd.img";
- after entering correct passwords in GRUB2 "required" to enter a password (third in a row, BIOS password or GNU user account password/Linux – not consider) to unlock and boot GNU/OSLinux, or automatic substitution of the secret key (two passwords + key, or password + key);
- External intrusion into GRUB2 configuration will freeze the GNU/Linux.
Troublesome? Ok, let's go automate processes.
When partitioning a hard drive (MBR table) A PC can have no more than 4 main partitions, or 3 main and one extended, as well as an unallocated area. An extended section, unlike the main one, can contain subsections. (logical drives=extended partition). In other words, the "extended partition" on the HDD replaces LVM for the current task: full system encryption. If your disk is partitioned into 4 main partitions, you need to use lvm, or transform (with formatting) section from main to advanced, or competently use all four sections and leave everything as it is, getting the desired result. Even if you have only one partition on your disk, Gparted will help you partition your HDD (for additional sections) without data loss, but still with a small price to pay for such actions.
The layout scheme of the hard disk, relative to which the entire article will be verbalized, is presented in the table below.
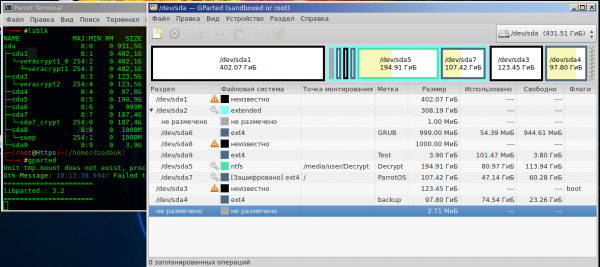
Table (No. 1) of sections 1TB.
You should have something similar.
sda1 - main partition #1 NTFS (encrypted);
sda2 - extended section marker;
sda6 - logical drive (the GRUB2 bootloader is installed on it);
sda8 - swap (encrypted swap file / not always);
sda9 - test logical disk;
sda5 - logical drive for the curious;
sda7 — GNU OS/Linux (transferred OS to an encrypted logical disk);
sda3 — main partition #2 with OS Windows 7 (encrypted);
sda4 - main partition #3 (it contained unencrypted GNU/Linux, used for backup/not always).
[A] Block system encryption Windows 7
A1. VeraCrypt
Download from or from a mirror installation version of VeraCrypt cryptographic software (at the time of publication of v1.24-Update3, the portable version of VeraCrypt is not suitable for system encryption). Check the checksum of the downloaded software
$ Certutil -hashfile "C:VeraCrypt Setup 1.24.exe" SHA256
and compare the result with the posted CS on the website of the VeraCrypt developer.
If HashTab software is installed, even easier: RMB (VeraCrypt Setup 1.24.exe)-properties-hash sum of files.
To verify the signature of the program, the software and the developer's public pgp key must be installed in the system ; .
A2. Installing/Launching VeraCrypt Software with Administrator Rights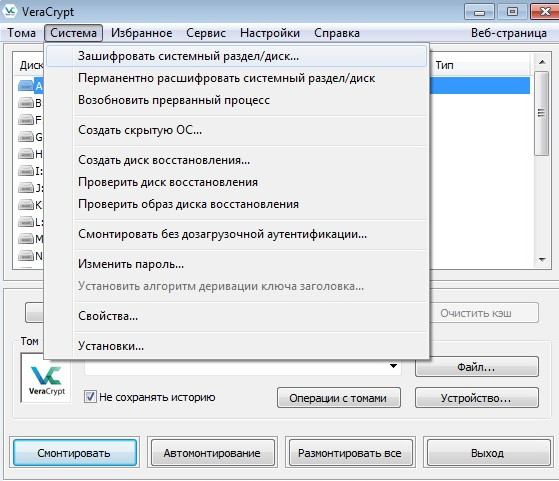
A3. Selecting system encryption options for the active partitionVeraCrypt – System – Encrypt system partition/drive – Normal – Encrypt system partition Windows – Multi-loading – (warning: "Inexperienced users are not recommended to use this method" and it's true, agree "Yes") – Boot disk (“yes”, even if not so, still “yes”) – Number of system disks “2 or more” – Multiple systems on one disk “Yes” – No Windows bootloader "No" (in fact, “Yes”, but the VeraCrypt/GRUB2 loaders will not share the MBR among themselves, more precisely, only the smallest part of the loader code is stored in the MBR/boot track, its main part is located within the file system) – Multiboot – Encryption settings…
If you deviate from the above steps (block system cipher schemes), then VeraCrypt will issue a warning and will not allow the partition to be encrypted.
The next step, towards targeted data protection, is to conduct a “Test” and choose an encryption algorithm. If you have an outdated CPU, then the Twofish encryption algorithm will most likely be the fastest. If the CPU is powerful, you will notice the difference: AES - encryption according to the test results will be several times faster than its crypto competitors. AES is a popular encryption algorithm, the hardware of modern CPUs is specially optimized for "secret" and "hacking".
VeraCrypt supports the ability to encrypt disks with AES cascade(twofish)/ and other combinations. On an old-nuclear Intel CPU ten years ago (no AES hardware support, A/T cascade encryption) performance degradation is essentially imperceptible. (for AMD CPUs of the same era/~parameters, performance is slightly reduced). The OS works in dynamics and the consumption of resources for transparent encryption is imperceptible. Unlike, for example, a noticeable decrease in performance due to the installed test unstable desktop environment Mate v1.20.1 (or v1.20.2 I don't remember exactly) in GNU/Linux, or due to the operation of the telemetry subroutine in Windows7↑. Experienced users typically conduct hardware performance tests before encryption. For example, in Aida64/Sysbench/systemd-analyze, they compare the results with the same tests after system encryption, thereby disproving the myth that "system encryption is harmful." Machine slowdown and inconvenience are noticeable when backing up/restoring encrypted data, because the "system data backup" operation itself is not measured in milliseconds, and those same "on-the-fly decryption/encryption" operations are added. Ultimately, each user allowed to tinker with cryptography balances the encryption algorithm between their needs, their level of paranoia, and ease of use.
It is better to leave the PIM parameter at the default so that you do not enter the exact iteration values each time you boot the OS. VeraCrypt uses a huge number of iterations to create a really "slow hash". An attack on such a "crypto snail" using the Brute force/rainbow tables method makes sense only with a short "simple" passphrase and a personal charset list of the victim. Paying for the strength of the password - the delay in entering the correct password when loading the OS (mounting VeraCrypt volumes in GNU/Linux — significantly faster).
Free software for brute force attacks (extraction of passphrase from VeraCrypt/LUKS disk header) hashcat. John the Ripper does not know how to “break Veracrypt”, and when working with LUKS, he does not understand Twofish cryptography.
Due to the cryptographic strength of encryption algorithms, unstoppable cypherpunks develop software with a different attack vector. For example, extracting metadata/keys from RAM (cold shoe/DMA attack), there is specialized free and non-free software for this purpose.
Once VeraCrypt has completed configuring/generating "unique metadata" for the encrypted active partition, it will prompt you to reboot your PC and test the functionality of its bootloader. After rebooting/starting Windows, VeraCrypt will load in standby mode, all that remains is to confirm the encryption process - Y.
At the final step of system encryption, VeraCrypt will offer to create a backup copy of the header of the active encrypted partition in the form of "veracrypt rescue disk.iso" - this must be done - in this software such operation is a requirement (in LUKS, as a requirement - this is unfortunately omitted, but underlined in the documentation). Rescue disk is useful to everyone, but to someone more than once. Loss (header rewrite/MBR) A backup copy of the header will permanently deny access to the decrypted partition with the OS Windows.
A4. Create rescue usb/disk VeraCryptBy default, VeraCrypt offers to burn "~2-3MB of metadata" to a CD, but not everyone has CDs or DVD-ROM drives, and creating a bootable "VeraCrypt Rescue Disk" flash drive will be a technical surprise for some: Rufus/GUIdd-ROSA ImageWriter and other similar software won't be able to handle this task, because in addition to copying the shifted metadata to the bootable flash drive, you need to copy/paste the image outside the USB drive's file system—in short, you need to properly copy the MBR/path to the flash drive. From under GNU/Linux OSLinux You can create a bootable flash drive using the "dd" utility, looking at this table.
Creating a rescue disk in the environment Windows — otherwise. The developer of VeraCrypt did not include the solution to this problem in the official on the "rescue disk," but offered a solution in a different way: he made additional software for creating a "USB rescue disk" freely available on his VeraCrypt forum. The archivist of this software Windows – “Create USB Veracrypt Rescue Disk.” After saving the rescue disk.iso, the process of block system encryption of the active partition will begin. The OS does not stop working during encryption, and a PC reboot is not required. Once the encryption process is complete, the active partition is fully encrypted and ready for use. If the VeraCrypt bootloader does not appear when you start the PC, and the header recovery operation does not help, check the “boot” flag; it should be set on the partition containing the file. Windows (regardless of encryption and other operating systems, see table No. 1).
This is a description of block system encryption with OS Windows finished.
[B] LUKS. GNU Encryption/Linux (~Debian) installed OS. Algorithm and Steps
In order to encrypt the installed Debian/derivative distribution, requires mapping a prepared partition to a virtual block device and transferring it to the mapped GNU disk/Linux, and install/configure GRUB2. If you don't have a barebones server and value your time, you should use the GUI, and most of the terminal commands described below are intended to be entered in "Chuck Norris mode."
B1. Booting PC from live usb GNU/Linux
"Perform a cryptotest on hardware performance"
lscpu && сryptsetup benchmark 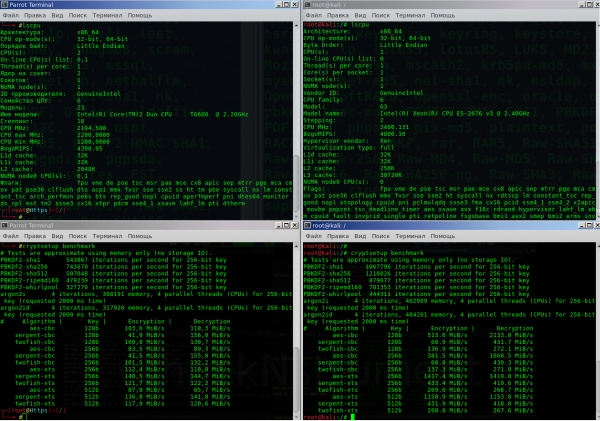
If you are a happy owner of a powerful car with AES hardware support, then the numbers will look like the right side of the terminal, if you are happy, but with antique iron, they will look like the left side.
B2. Disk layout. mounting/formatting the fs of the HDD logical disk in Ext4 (Gparted)
B2.1. Creating an encrypted sda7 partition headerTo describe the partition names, hereinafter, I will be in accordance with my partition table, laid out above. According to your disk layout, you must substitute your own partition names.
Logical Drive Encryption Mapping (/dev/sda7 > /dev/mapper/sda7_crypt).
#Simple creation of "LUKS-AES-XTS partition"
cryptsetup -v -y luksFormat /dev/sda7Options:
* luksFormat - LUKS header initialization;
* -y -passphrase (not key/file);
* -v - verbalization (output of information in the terminal);
* /dev/sda7 - your logical drive from the extended partition (where GNU is planned to be transferred/encrypted/Linux).
Default encryption algorithm <LUKS1: aes-xts-plain64, Key: 256 bits, LUKS header hashing: sha256, RNG: /dev/urandom> (depends on cryptsetup version).
#Проверка default-алгоритма шифрования
cryptsetup  --help #самая последняя строка в выводе терминала.
If there is no hardware support for AES on the CPU, the best choice would be to create an extended "LUKS-Twofish-XTS-partition".
B2.2. Advanced creation of "LUKS-Twofish-XTS-partition"
cryptsetup luksFormat /dev/sda7 -v -y -c twofish-xts-plain64 -s 512 -h sha512 -i 1500 --use-urandom Options:
* luksFormat - LUKS header initialization;
* /dev/sda7 is your future encrypted logical disk;
* -v verbalize;
* -y passphrase;
* -c selection of data encryption algorithm;
* -s encryption key size;
* -h hashing algorithm/cryptofunction, RNG is used (--use-urandom) to generate a unique logical disk header encryption/decryption key, secondary header key (XTS); a unique master key stored in the encrypted disk header, a secondary XTS key, all these metadata and an encryption routine that, using the master key and the secondary XTS key, encrypt / decrypt any data on the partition (except for the section heading) are stored in ~3MB on the selected hard disk partition.
* -i iterations in milliseconds, instead of "amount" (the time delay in processing the passphrase affects the OS loading and the cryptographic strength of the keys). To maintain the balance of cryptographic strength with a simple password like "russian" it is required to increase the value -(i), with a complex password like "?8dƱob/øfh" the value can be reduced.
* --use-urandom random number generator, generates keys and salt.
After mapping the sda7 > sda7_crypt partition (the operation is fast, since an encrypted header is created with ~3 MB metadata and that's it), you need to format and mount the sda7_crypt file system.
B2.3. Mapping
cryptsetup open /dev/sda7 sda7_crypt
#выполнение данной команды запрашивает ввод секретной парольной фразы.
options:
* open - match the section "with the name";
* /dev/sda7 - logical drive;
* sda7_crypt - name mapping that is used to mount the encrypted partition or initialize it when the OS boots.
B2.4. Formatting the sda7_crypt file system to ext4. Mounting a disk in the OS(Note: Gparted will no longer work with an encrypted partition)
#форматирование блочного шифрованного устройства
mkfs.ext4 -v -L DebSHIFR /dev/mapper/sda7_crypt
options:
* -v - verbalization;
* -L - disk label (which is displayed in Explorer among other disks).
Next, you should mount the virtual-encrypted block device /dev/sda7_crypt into the system
mount /dev/mapper/sda7_crypt /mntWorking with files in the /mnt folder will automatically encrypt / decrypt data in sda7.
More convenient to map and mount a partition in File Explorer (nautilus/caja GUI), the partition will already be in the disk selection list, all that remains is to enter a passphrase to open / decrypt the disk. The mapped name will be chosen automatically and not "sda7_crypt", but something like /dev/mapper/Luks-xx-xx…
B2.5. Disc header backup (metadata ~3mb)One of the most important operations that need to be done without delay - a backup copy of the "sda7_crypt" header. If overwrite/corrupt header (for example, installing GRUB2 on the sda7 partition, etc.), the encrypted data will be permanently lost without any possibility of recovering it, because it will not be possible to re-generate the same keys, the keys are created unique.
#Бэкап заголовка раздела
cryptsetup luksHeaderBackup --header-backup-file ~/Бэкап_DebSHIFR /dev/sda7
#Восстановление заголовка раздела
cryptsetup luksHeaderRestore --header-backup-file <file> <device>
options:
* luksHeaderBackup --header-backup-file - backup command;
* luksHeaderRestore --header-backup-file - restore command;
* ~/Backup_DebSHIFR - backup file;
* /dev/sda7 - the partition whose encrypted disk header is to be backed up.
At this step, <creating and editing an encrypted partition> is finished.
B3. Porting GNU OS/Linux (sda4) to the encrypted partition (sda7)
Create folder /mnt2 (Note - we are still working with live usb, sda7_crypt is mounted to /mnt), and we mount our GNU/Linux to /mnt2, which needs to be encrypted.
mkdir /mnt2
mount /dev/sda4 /mnt2
We carry out the correct transfer of the OS using the Rsync software
rsync -avlxhHX --progress /mnt2/ /mntRsync options are described in section E1.
Further, necessary defragment a disk partition
e4defrag -c /mnt/ #после проверки, e4defrag выдаст, что степень дефрагментации раздела~"0", это заблуждение, которое может вам стоить существенной потери производительности!
e4defrag /mnt/ #проводим дефрагментацию шифрованной GNU/Linux
Make it a rule to do e4defrag on encrypted GNU/LInux from time to time if you have an HDD.
Transfer and Synchronization [GNU/Linux > GNU/Linux-encrypted] at this step are completed.
B4. Configuring GNU/Linux on the encrypted partition sda7
After successfully transferring the OS /dev/sda4 > /dev/sda7, you need to enter GNU/Linux on the encrypted partition, and perform further configuration (without rebooting PC) regarding the encrypted system. That is, to be in live usb, but to execute commands "relative to the root of the encrypted OS." Simulate a similar situation will be "chroot". To quickly get information from which OS you are currently working on (encrypted or not, since the data in sda4 and sda7 are synchronized), unsync the OSes. Create in root directories (sda4/sda7_crypt) empty token files, such as /mnt/encryptedOS and /mnt2/decryptedOS. Quick check what OS you are on (including for the future):
ls /<Tab-Tab>B4.1. "Simulation of logging into an encrypted OS"
mount --bind /dev /mnt/dev
mount --bind /proc /mnt/proc
mount --bind /sys /mnt/sys
chroot /mnt
B4.2. Checking that the work is carried out relative to the encrypted system
ls /mnt<Tab-Tab>
#и видим файл "/шифрованнаяОС"
history
#в выводе терминала должна появиться история команд su рабочей ОС.
B4.3. Creating/configuring an encrypted swap, editing crypttab/fstabSince the swap file is formatted every time the OS starts, it makes no sense to create and map swap to the logical disk now, and type commands, as in paragraph B2.2. For Swap, at each start, their temporary encryption keys will be automatically generated. Lifecycle of swap-a keys: unmounting/dismounting a swap partition (+clear RAM); or restart the OS. Swap setup, open the file responsible for the configuration of block encrypted devices (similar to the fstab file, but responsible for crypto).
nano /etc/crypttab I make
#"target name" "source device" "key file" "options"
swap /dev/sda8 /dev/urandom swap,cipher=twofish-xts-plain64,size=512,hash=sha512
Options
* swap - mapped name when encrypting /dev/mapper/swap.
* /dev/sda8 - use your logical partition for swap.
* /dev/urandom - generator of random encryption keys for swap (with each new OS boot, new keys created). The /dev/urandom generator is less random than /dev/random, after all /dev/random is used when working in dangerous paranoid circumstances. On OS boot, /dev/random slows down loading for a few ± minutes (see systemd-analyze).
* swap,cipher=twofish-xts-plain64,size=512,hash=sha512: -partition knows it's swap and is formatted accordingly; encryption algorithm.
#Открываем и правим fstab
nano /etc/fstab
I make
# swap was on / dev / sda8 during installation
/dev/mapper/swap none swap sw 0 0
/dev/mapper/swap -name given in crypttab.
Alternative encrypted swap
If for some reason you don't want to give an entire partition as a swap file, then you can go in an alternative and better way: creating a swap file in a file on an encrypted OS partition.
fallocate -l 3G /swap #создание файла размером 3Гб (почти мгновенная операция)
chmod 600 /swap #настройка прав
mkswap /swap #из файла создаём файл подкачки
swapon /swap #включаем наш swap
free -m #проверяем, что файл подкачки активирован и работает
printf "/swap none swap sw 0 0" >> /etc/fstab #при необходимости после перезагрузки swap будет постоянный
Swap partition setup is complete.
B4.4. Setting up encrypted GNU/Linux (editing crypttab/fstab files)The /etc/crypttab file, as I wrote above, describes encrypted block devices that are configured at system boot time.
#правим /etc/crypttab
nano /etc/crypttab
if you matched the sda7>sda7_crypt section as in paragraph B2.1
# "target name" "source device" "key file" "options"
sda7_crypt UUID=81048598-5bb9-4a53-af92-f3f9e709e2f2 none luks
if you matched the sda7>sda7_crypt section as in paragraph B2.2
# "target name" "source device" "key file" "options"
sda7_crypt UUID=81048598-5bb9-4a53-af92-f3f9e709e2f2 none cipher=twofish-xts-plain64,size=512,hash=sha512
if you matched the sda7>sda7_crypt section as in paragraph B2.1 or B2.2, but do not want to re-enter the password to unlock and boot the OS, then you can substitute the secret key / random file instead of the password
# "target name" "source device" "key file" "options"
sda7_crypt UUID=81048598-5bb9-4a53-af92-f3f9e709e2f2 /etc/skey luks
Description
*none - Indicates that when booting the OS, a secret passphrase is required to unlock the root.
* UUID - partition identifier. To find out your ID, type in the terminal (reminder that all this time onwards, you are working in a terminal in a chroot environment and not in another live usb terminal).
fdisk -l #проверка всех разделов
blkid #должно быть что-то подобное
/dev/sda7: UUID=«81048598-5bb9-4a53-af92-f3f9e709e2f2» TYPE=«crypto_LUKS» PARTUUID=«0332d73c-07»
/dev/mapper/sda7_crypt: LABEL=«DebSHIFR» UUID=«382111a2-f993-403c-aa2e-292b5eac4780» TYPE=«ext4»
this line is visible when requesting blkid from the live usb terminal with sda7_crypt mounted).
UUID is taken from your sdaX (not sdaX_crypt!, UUID sdaX_crypt - will automatically go away when generating the grub.cfg config).
* cipher=twofish-xts-plain64,size=512,hash=sha512 -luks advanced mode encryption.
* /etc/skey - secret key file, which is substituted automatically to unlock OS boot (instead of entering the 3rd password). You can specify any file up to 8mb, but the data will be read <1mb.
#Создание "генерация" случайного файла <секретного ключа> размером 691б.
head -c 691 /dev/urandom > /etc/skey
#Добавление секретного ключа (691б) в 7-й слот заголовка luks
cryptsetup luksAddKey --key-slot 7 /dev/sda7 /etc/skey
#Проверка слотов "пароли/ключи luks-раздела"
cryptsetup luksDump /dev/sda7
It will look something like this:
(do it yourself and see for yourself).
cryptsetup luksKillSlot /dev/sda7 7 #удаление ключа/пароля из 7 слота/etc/fstab contains descriptive information about various file systems.
#Правим /etc/fstab
nano /etc/fstab
# "file system" "mount point" "type" "options" "dump" "pass"
# / was on / dev / sda7 during installation
/dev/mapper/sda7_crypt / ext4 errors=remount-ro 0 1
option
* /dev/mapper/sda7_crypt is the name of the sda7>sda7_crypt mapping, which is specified in the /etc/crypttab file.
The crypttab/fstab setup is now complete.
B4.5. Editing configuration files. Key momentB4.5.1. Editing the config /etc/initramfs-tools/conf.d/resume
#Если у вас ранее был активирован swap раздел, отключите его.
nano /etc/initramfs-tools/conf.d/resume
and comment out (if exists) "#" line "resume". The file must be completely empty.
B4.5.2. Editing the config /etc/initramfs-tools/conf.d/cryptsetup
nano /etc/initramfs-tools/conf.d/cryptsetupshould match
# /etc/initramfs-tools/conf.d/cryptsetup
CRYPTSETUP=yes
export CRYPTSETUP
B4.5.3. Editing the /etc/default/grub config (it is this config that is responsible for the ability to generate grub.cfg when working with encrypted /boot)
nano /etc/default/grub add the line "GRUB_ENABLE_CRYPTODISK=y"
set to 'y', grub-mkconfig and grub-install will check for encrypted drives and generate additional commands needed to access them at boot time (insmods ).
should be similar
GRUB_DEFAULT = 0
GRUB_TIMEOUT = 1
GRUB_DISTRIBUTOR=`lsb_release -i -s 2> /dev/null || echo Debian`
GRUB_CMDLINE_LINUX_DEFAULT="acpi_backlight=vendor"
GRUB_CMDLINE_LINUX="quiet splash noautomount"
GRUB_ENABLE_CRYPTODISK=y
B4.5.4. Editing the config /etc/cryptsetup-initramfs/conf-hook
nano /etc/cryptsetup-initramfs/conf-hook check that the line commented out <#>.
In the future, (and even now, this parameter will not have any value, but sometimes it interferes with updating the initrd.img image).
B4.5.5. Editing the config /etc/cryptsetup-initramfs/conf-hook
nano /etc/cryptsetup-initramfs/conf-hookadd
KEYFILE_PATTERN="/etc/skey"
UMASK=0077
This will pack the secret key "skey" into the initrd.img, the key is needed to unlock the root on OS boot (if there is no desire to enter the password again, the “skey” key is automatically substituted).
B4.6. Update /boot/initrd.img [version]To package the private key into initrd.img and apply the cryptsetup fixes, update the image
update-initramfs -u -k all when updating initrd.img (As the saying goes, "Maybe, but not certain") there will be warnings related to cryptsetup, or, for example, a notification about the loss of Nvidia modules - this is normal. After updating the file, check that it has really been updated see by time (relative to chroot environment ./boot/initrd.img). Attention! before [update-initramfs -u -k all] be sure to check that cryptsetup open /dev/sda7 sda7_crypt - this is the name that should be, which appears in /etc/crypttab, otherwise after reboot-a busybox error)
This step completes the setup of the configuration files.
[С] Installing and configuring GRUB2/Protection
C1. If necessary, format the dedicated partition for the bootloader (at least 20MB is enough for the partition)
mkfs.ext4 -v -L GRUB2 /dev/sda6C2. Mount /dev/sda6 to /mntSince we work in a chroot, there will be no /mnt2 directory in the root, and the /mnt folder will be empty.
mount the GRUB2 partition
mount /dev/sda6 /mntIf you have an older version of GRUB2 installed, in /mnt/boot/grub/i-386-pc (possible other platform, e.g. not "i386-pc") no cryptomodules (in short, the folder should contain modules, including these .mod: cryptodisk; luks; gcry_twofish; gcry_sha512; signature_test.mod), in such a case, GRUB2 needs to be shaken.
apt-get update
apt-get install grub2
Important! When updating the GRUB2 package from the repository, when asked “about the choice” of where to install the bootloader, you must refuse to install (reason - trying to install GRUB2 - in "MBR" or on live usb). Otherwise, you will corrupt the VeraCrypt header/loader. After updating the GRUB2 packages, and canceling the installation, the bootloader must be manually installed on a logical drive, and not in the "MBR". If your repository has an outdated version of GRUB2, try it from the official site - did not check (worked with fresh GRUB 2.02 ~BetaX boot loaders).
C3. Installing GRUB2 on extended partition [sda6]You must have a partition mounted [p.C.2]
grub-install --force --root-directory=/mnt /dev/sda6 options
* --force - install the bootloader, bypassing all the warnings that almost always exist and block the installation (required flag).
* --root-directory - directory installation to the root of sda6.
* /dev/sda6 - your sdaX partition (don't skip the <space> between /mnt /dev/sda6).
C4. Creating a configuration file [grub.cfg]Forget the "update-grub2" command, and use the full config file generation command
grub-mkconfig -o /mnt/boot/grub/grub.cfg after the completion of generating / updating the grub.cfg file, in the output terminal there should be lines (a) with the OS found on the disk (grub-mkconfig may find and load the OS from a live USB if you have a multiboot flash drive with Windows 10 and a bunch of live distributions - that's normal). If the terminal is “empty”, the “grub.cfg” file is not generated, then this is the case when there are GRUB bugs in the system (and most likely a loader from the test branch of the repository), reinstall GRUB2 from trusted sources.
The "simple configuration" installation and GRUB2 configuration is now complete.
C5. Proof-test of the encrypted GNU OS/LinuxCorrectly completing the crypto mission. Carefully exit the encrypted GNU/Linux (exit the chroot environment).
umount -a #размонтирование всех смонтированных разделов шифрованной GNU/Linux
Ctrl+d #выход из среды chroot
umount /mnt/dev
umount /mnt/proc
umount /mnt/sys
umount -a #размонтирование всех смонтированных разделов на live usb
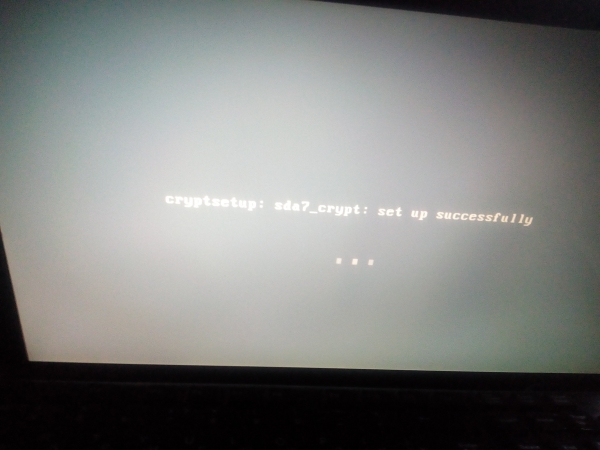
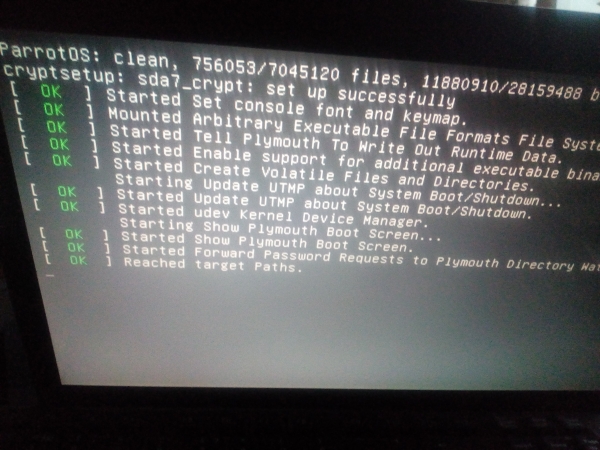
reboot After restarting the PC, the VeraCrypt bootloader should load.
*Enter the password for the active partition - the OS will start loading Windows.
*Pressing the "Esc" key will transfer control to GRUB2 when selecting encrypted GNU/Linux – you will need a password (sda7_crypt) to unlock /boot/initrd.img (if grub2 writes uuid "not found" - this is a problem with the grub2 bootloader, it should be reinstalled, for example, from the testing branch/stable and pd).
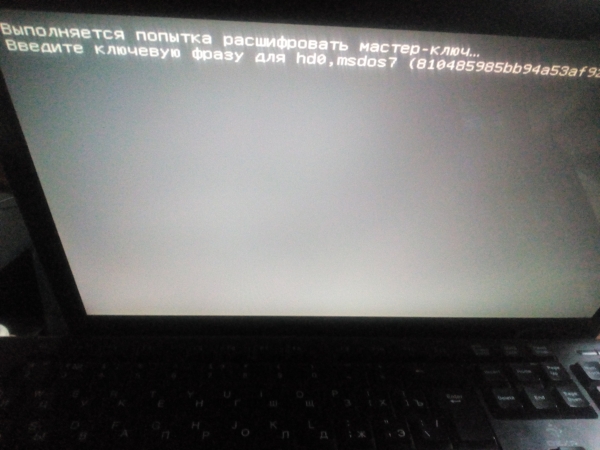
*Depending on how you set up the system (see section B4.4/4.5), after entering the correct password to unlock the /boot/initrd.img image, you will need a password to boot the OS kernel/root, or the secret key will be automatically substituted " skey", eliminating the need to re-enter the passphrase.
(screenshot "automatic substitution of the secret key").
*The familiar GNU boot process will then begin.Linux with user account authentication.
*After user authorization and login to the OS, you need to re-update /boot/initrd.img (see Q4.6).
update-initramfs -u -k allAnd in case of extra lines in the GRUB2 menu (from pickup OS-m with live usb) get rid of them
mount /dev/sda6 /mnt
grub-mkconfig -o /mnt/boot/grub/grub.cfg
A Brief Summary of GNU System EncryptionLinux:
- GNU/Linuxinux is completely encrypted, including /boot/kernel and initrd;
- the secret key is packaged in initrd.img;
- current authorization scheme (enter password to unlock initrd; password/key to boot OS; account authorization password Linux).
"Simple GRUB2 configuration" block partition system encryption is finished.
C6. Advanced GRUB2 configuration. Bootloader protection with digital signature + authentication protectionGNU/Linux The bootloader is encrypted entirely, but the bootloader cannot be encrypted—this is a BIOS requirement. For this reason, chained encrypted booting of GRUB2 is impossible, but simple chained booting is possible/available. From a security standpoint, this is not necessary [see Section F].
For the “vulnerable” GRUB2, the developers implemented the “signing/authentication” bootloader protection algorithm.
- When the bootloader is protected with “its own digital signature”, external modification of files, or an attempt to load additional modules in this bootloader, will lead to the boot process being blocked.
- When protecting the bootloader with authentication, to select the boot of any distribution kit, or enter additional commands in the CLI, you will need to enter the login and password of the superuser-GRUB2.
C6.1. Protecting the Bootloader with AuthenticationCheck that you are running in a terminal in an encrypted OS
ls /<Tab-Tab> #обнаружить файл-маркерcreate a superuser password for authorization in GRUB2
grub-mkpasswd-pbkdf2 #введите/повторите пароль суперпользователя. Get the password hash. Something like this
grub.pbkdf2.sha512.10000.DE10E42B01BB6FEEE46250FC5F9C3756894A8476A7F7661A9FFE9D6CC4D0A168898B98C34EBA210F46FC10985CE28277D0563F74E108FCE3ACBD52B26F8BA04D.27625A4D30E4F1044962D3DD1C2E493EF511C01366909767C3AF9A005E81F4BFC33372B9C041BE9BA904D7C6BB141DE48722ED17D2DF9C560170821F033BCFD8
mount the GRUB partition
mount /dev/sda6 /mnt edit the config
nano -$ /mnt/boot/grub/grub.cfg check the file search that there are no flags anywhere in "grub.cfg" ("-unrestricted" "-user",
add at the very end (before line ### END /etc/grub.d/41_custom ###)
"set superusers="root"
password_pbkdf2 root hash".
Should be something like this
# This file provides an easy way to add custom menu entries. Simply type the
# menu entries you want to add after this comment. Be careful not to change
# the 'exec tail' line above.
### END /etc/grub.d/40_custom ###### BEGIN /etc/grub.d/41_custom ###
if [ -f ${config_directory}/custom.cfg ]; then
source ${config_directory}/custom.cfg
elif [ -z "${config_directory}" -a -f $prefix/custom.cfg ]; then
source $prefix/custom.cfg;
fi
set superusers="root"
password_pbkdf2 root grub.pbkdf2.sha512.10000.DE10E42B01BB6FEEE46250FC5F9C3756894A8476A7F7661A9FFE9D6CC4D0A168898B98C34EBA210F46FC10985CE28277D0563F74E108FCE3ACBD52B26F8BA04D.27625A4D30E4F1044962D3DD1C2E493EF511C01366909767C3AF9A005E81F4BFC33372B9C041BE9BA904D7C6BB141DE48722ED17D2DF9C560170821F033BCFD8
### END /etc/grub.d/41_custom ###
#
If you often use the "grub-mkconfig -o /mnt/boot/grub/grub.cfg" command and do not want to make changes to grub.cfg every time, enter the above lines (Login: Password) to the GRUB user script to the very bottom
nano /etc/grub.d/41_custom cat<<EOF
set superusers="root"
password_pbkdf2 root grub.pbkdf2.sha512.10000.DE10E42B01BB6FEEE46250FC5F9C3756894A8476A7F7661A9FFE9D6CC4D0A168898B98C34EBA210F46FC10985CE28277D0563F74E108FCE3ACBD52B26F8BA04D.27625A4D30E4F1044962D3DD1C2E493EF511C01366909767C3AF9A005E81F4BFC33372B9C041BE9BA904D7C6BB141DE48722ED17D2DF9C560170821F033BCFD8
EOF
When generating the config "grub-mkconfig -o /mnt/boot/grub/grub.cfg", the lines responsible for authentication will be added automatically to grub.cfg.
This step completes the GRUB2 authentication setup.
C6.2. Protecting the bootloader with a digital signatureIt is assumed that you already have your personal pgp encryption key (or create such a key). Cryptographic software must be installed on the system: gnuPG; kleopatra/GPA; Seahorse. Crypto-software will make your life much easier in all such cases. Seahorse - stable version of the package 3.14.0 (the versions above, for example, V3.20 are inferior and have significant bugs).
The PGP key needs to be generated/run/added only in the su environment!
Generate a personal encryption key
gpg - -gen-keyExport your key
gpg --export -o ~/perskeyMount the logical drive in the OS if it is not already mounted
mount /dev/sda6 /mnt #sda6 – раздел GRUB2clear the GRUB2 partition
rm -rf /mnt/Install GRUB2 in sda6 by putting your private key in the main GRUB image "core.img"
grub-install --force --modules="gcry_sha256 gcry_sha512 signature_test gcry_dsa gcry_rsa" -k ~/perskey --root-directory=/mnt /dev/sda6 options
* --force - install the bootloader, bypassing all the warnings that always exist (required flag).
* --modules="gcry_sha256 gcry_sha512 signature_test gcry_dsa gcry_rsa" - instructs GRUB2 to preload the required modules on PC startup.
* -k ~/perskey - path to "PGP key" (after packing the key into an image, it can be deleted).
* --root-directory -set boot directory to sda6 root
/dev/sda6 is your sdaX partition.
Generate/update grub.cfg
grub-mkconfig -o /mnt/boot/grub/grub.cfgAdd the line "trust /boot/grub/perskey" to the end of the "grub.cfg" file (force to use pgp key.) Since we installed GRUB2 with a set of modules, including the “signature_test.mod” signature module, this eliminates the need to add commands like “set check_signatures=enforce” to the config.
Should look something like this (end lines in grub.cfg file)
### BEGIN /etc/grub.d/41_custom ###
if [ -f ${config_directory}/custom.cfg ]; then
source ${config_directory}/custom.cfg
elif [ -z "${config_directory}" -a -f $prefix/custom.cfg ]; then
source $prefix/custom.cfg;
fi
trust /boot/grub/perskey
set superusers="root"
password_pbkdf2 root grub.pbkdf2.sha512.10000.DE10E42B01BB6FEEE46250FC5F9C3756894A8476A7F7661A9FFE9D6CC4D0A168898B98C34EBA210F46FC10985CE28277D0563F74E108FCE3ACBD52B26F8BA04D.27625A4D30E4F1044962D3DD1C2E493EF511C01366909767C3AF9A005E81F4BFC33372B9C041BE9BA904D7C6BB141DE48722ED17D2DF9C560170821F033BCFD8
### END /etc/grub.d/41_custom ###
#
The path to "/boot/grub/perskey" does not need to point to a specific disk partition, for example hd0,6, for the bootloader itself "root" is the default path of the partition on which GRUB2 is installed (see set rot=..).
Signing GRUB2 (all files in all /GRUB directories) with your "perskey" key.
Easy solution how to sign (for nautilus/caja explorer): install the "seahorse" extension for the explorer from the repository. Your key must be added to the su environment.
Open the explorer from sudo "/mnt/boot" - RMB - sign. On the screen it looks like this
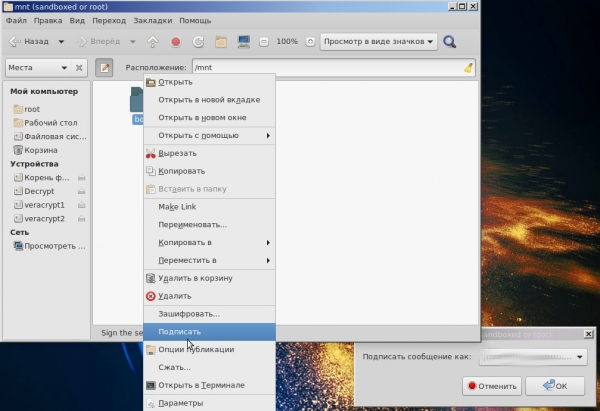
The key itself is "/mnt/boot/grub/perskey" (copy to grub directory) must also be signed with his own signature. Check that the [*.sig] file signatures appear in the directory/subdirectories.
In the above way, we sign "/boot" (our kernel, initrd). If your time is worth anything, then this method eliminates the need to write a bash script to sign "many files".
To remove all bootloader signatures (if something went wrong)
rm -f $(find /mnt/boot/grub -type f -name '*.sig')In order not to sign the bootloader after updating the system, we freeze all update packages related to GRUB2.
apt-mark hold grub-common grub-pc grub-pc-bin grub2 grub2-commonAt this step, <protecting the bootloader with a digital signature> advanced configuration of GRUB2 is completed.
C6.3. Proof-test of GRUB2 bootloader protected by digital signature and authenticationGRUB2. When choosing any GNU/Linux or enter the CLI (command line) superuser authorization is required. After entering the correct login / password, you will need the password from initrd

Screenshot, successful authentication of GRUB2-superuser.
If you forge any of the GRUB2 files / make changes to grub.cfg, or delete the file / signature, load the malicious module.mod, then a corresponding warning will appear. GRUB2 boot will pause.
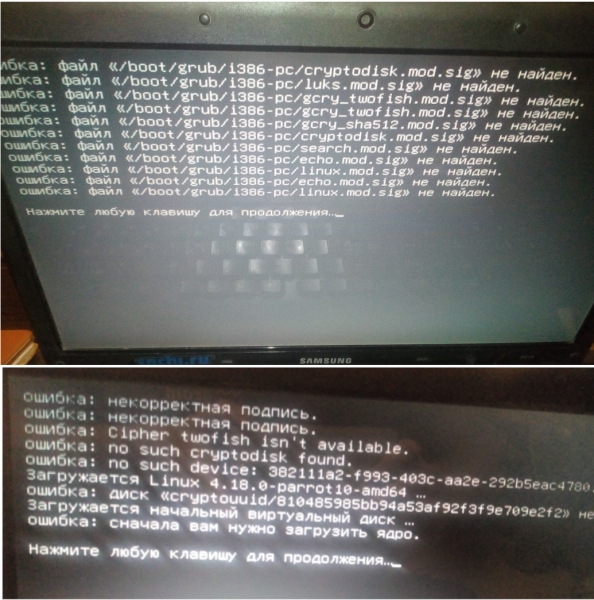
Screenshot, an attempt to interfere in GRUB2 "from outside".
Under "normal" boot "no intrusion", the system exit code status is "0". Therefore, it is not known whether the protection works or not. (that is, “with or without bootloader protection with a signature” during normal boot, the status is the same “0” - this is bad).
How to check digital signature protection?
An inconvenient way to check: forge/remove the module used by GRUB2, for example, remove the luks.mod.sig signature and get an error.
The correct way is to go to the CLI of the bootloader and type the command
trust_list In response, they should receive a “perskey” fingerprint, if the status is “0”, then the signature protection does not work, double-check clause C6.2.
At this step, the advanced setting "Protect GRUB2 with digital signature and authentication" is over.
C7 Alternative method to secure GRUB2 bootloader with hashingThe “Protection of the CPU loader / Authentication” method described above is a classic. Due to the imperfection of GRUB2, in paranoid conditions, it is subject to a real attack, which I will give below in paragraph [F]. In addition, after updating the OS / kernel, it is necessary to re-sign the bootloader.
Protecting the GRUB2 bootloader with hashing
Advantages over the classics:
- Higher level of reliability (hashing / verification takes place only from an encrypted local resource. The entire allocated partition under GRUB2 is controlled for any changes, and everything else is encrypted, in the classic scheme with CPU loader protection / Authentication, only files are controlled, but not free space, in which "something something sinister" can be added).
- Encrypted logging (a readable personal encrypted log is added to the scheme).
- Speed (Protection / verification of the entire partition allocated for GRUB2 occurs almost instantly).
- Automation of all cryptographic processes.
Downsides to the classics.
- Forging a signature (theoretically, it is possible to find a given hash function collision).
- Increased difficulty level (compared to the classic, it requires slightly more skills in GNU OS/Linux).
How the GRUB2/partition hashing idea works
The GRUB2 section is “signed”, when the OS is loaded, the bootloader section is checked for invariability, followed by logging in a safe environment (encrypted). If the bootloader or its partition is compromised, in addition to the invasion log, the following
Thing.
A similar check takes place four times a day, which does not load system resources.
Using the "-$ check_GRUB" command, an instant check occurs at any time without logging, but with information output to the CLI.
Using the "-$ sudo GRUB_signature" command, the GRUB2 bootloader / partition is instantly re-signed and its updated logging (needed after OS/boot update) and life goes on.
Implementation of the hashing method of the bootloader and its partition
0) Let's sign the GRUB bootloader/partition by first mounting it to /media/username
-$ hashdeep -c md5 -r /media/username/GRUB > /podpis.txt1) We create a script without an extension in the root of the encrypted OS ~/podpis, apply the necessary rights 744 security and protection from the “fool” to it.
Filling it with content
#!/bin/bash

#Проверка всего раздела выделенного под загрузчик GRUB2 на неизменность.
#Ведется лог "о вторжении/успешной проверке каталога", короче говоря ведется полный лог с тройной вербализацией. Внимание! обратить взор на пути: хранить ЦП GRUB2 только на зашифрованном разделе OS GNU/Linux.
echo -e "******************************************************************n" >> '/var/log/podpis.txt' && date >> '/var/log/podpis.txt' && hashdeep -vvv -a -k '/podpis.txt' -r '/media/username/GRUB' >> '/var/log/podpis.txt'

a=`tail '/var/log/podpis.txt' | grep failed` #не использовать "cat"!!
b="hashdeep: Audit failed"

#Условие: в случае любых каких-либо изменений в разделе выделенном под GRUB2 к полному логу пишется второй отдельный краткий лог "только о вторжении" и выводится на монитор мигание gif-ки "warning".
if [[ "$a" = "$b" ]]
then
echo -e "****n" >> '/var/log/vtorjenie.txt' && echo "vtorjenie" >> '/var/log/vtorjenie.txt' && date >> '/var/log/vtorjenie.txt' & sudo -u username DISPLAY=:0 eom '/warning.gif'
fi
Run the script from su, the hashing of the GRUB partition and its bootloader will be checked, save the log.
Let's create or copy, for example, a "malicious file" [virus.mod] to the GRUB2 partition and run a temporary check/test:
-$ hashdeep -vvv -a -k '/podpis.txt' -r '/media/username/GRUBThe CLI should see an invasion of our -stronghold-#Stripped log in CLI
Ср янв  2 11::41 MSK 2020
/media/username/GRUB/boot/grub/virus.mod: Moved from /media/username/GRUB/1nononoshifr
/media/username/GRUB/boot/grub/i386-pc/mda_text.mod: Ok
/media/username/GRUB/boot/grub/grub.cfg: Ok
hashdeep: Audit failed
   Input files examined: 0
  Known files expecting: 0
          Files matched: 325
Files partially matched: 0
            Files moved: 1
        New files found: 0
  Known files not found: 0
#As you can see, “Files moved: 1 and Audit failed” appeared, which means that the check failed.
Due to the peculiarities of the tested section, instead of "New files found" > "Files moved"
2) Put the gif here > ~/warning.gif, set permissions to 744.
3) Configuring fstab to automount the GRUB partition on boot
-$ sudo nano /etc/fstabLABEL=GRUB /media/username/GRUB ext4 defaults 0 0
4) We rotate the log
-$ sudo nano /etc/logrotate.d/podpis /var/log/subpis.txt {
daily
rotate 50
size 5M
dateext
compress
delaycompress
olddir /var/log/old
}/var/log/vtorjenie.txt {
monthly
rotate 5
size 5M
dateext
olddir /var/log/old
}
5) Adding a job to cron
-$ sudo crontab -e'/subscription'
0 */6 * * * '/subpis
6) Create permanent aliases
-$ sudo su
-$ echo "alias подпись_GRUB='hashdeep -c md5 -r /media/username/GRUB > /podpis.txt'" >> /root/.bashrc && bash
-$ echo "alias проверка_GRUB='hashdeep -vvv -a -k '/podpis.txt' -r /media/username/GRUB'" >> .bashrc && bash
After OS update -$ apt-get upgrade re-signing our GRUB partition
-$ подпись_GRUB
This step completes the hash protection of the GRUB partition.
[D] Cleanup - destruction of unencrypted data
Delete your personal files so completely that "not even God can read them," according to South Carolina spokesman Trey Gowdy.
As usual, there are various "myths and ”, about recovering data after deleting it from the hard drive. If you believe in cyber-witchcraft, or are a member of the Dr web community and have never tried data recovery after deletion/overwriting (e.g. recovery with R-studio), then the proposed method is unlikely to suit you, use the one that is closer to you.
After the successful port of GNU/Linux to an encrypted partition, the old copy must be deleted without the possibility of data recovery. Universal cleaning method: software for Windows/Linux free GUI software .
Quick formatting the partition, the data on which you want to destroy (using Gparted), run BleachBit, select "Clean up free space" - select a partition (your sdaX with a previous copy of GNU/Linux), the cleaning process will start. BleachBit - wipes the disk in one pass - this is what "we need", But! this only works in theory if you formatted the drive and cleaned it in BB v2.0 software.
Attention! BB wipes the disk, leaving metadata, filenames are preserved when data is destroyed (Ccleaner - leaves no metadata).
And the myth about the possibility of data recovery is not really a myth.Bleachbit V2.0-2 former unstable OS package Debian (and any other similar software: sfill; wipe-Nautilus - have also been seen in this dirty business) actually had a critical bug: "free space clearing" function it works incorrectly on HDD/Flash drives (ntfs/ext4). Software of this kind, when cleaning up free space, does not overwrite the entire disk, as many users think. And some (lot) deleted data The OS/software treats this data as non-deleted/user data and skips these files when clearing the OS/OS. The problem is that after such a long time, cleaning the disk "deleted files" can be recovered even after 3+ passes of disc wiping.
On GNU/Linux in Bleachbit 2.0 - 2 The functions for permanently deleting files and directories work reliably, but free space cleaning does not. For comparison: Windows In CCleaner, the "OSP for NTFS" function works properly, and God really won't be able to read the deleted data.
And so, to thoroughly remove "compromising" old unencrypted data, Bleachbit needs direct access to this data, then, use the function "delete files / directories irretrievably".
To delete “deleted files using standard OS tools” in Windows Use CCleaner/BB with the "OSP" feature. In GNU/Linux on this problem (removing deleted files) you need to get practice on your own (deleting data + an independent attempt to restore them and do not rely on the software version (if not a bookmark, then a bug)), only in this case you will be able to understand the mechanism of this problem and get rid of the deleted data completely.
Bleachbit v3.0 did not check, perhaps the problem has already been fixed.
Bleachbit v2.0 works honestly.
This step completes the disk cleanup.
[E] Generic Encrypted OS Backup
Each user has his own method of backing up data, but the encrypted data of "System OS" requires a slightly different approach to the task. Unified software such as "Clonezilla" and similar software cannot work directly with encrypted data.
Setting the backup task for encrypted block devices:
- universality - the same backup algorithm/software for Windows/Linux;
- the ability to work in the console with any GNU live USB/Linux without the need to download additional software (but still recommend the GUI);
- backup security - stored "images" must be encrypted / password-protected;
- the size of the encrypted data must match the size of the actual copied data;
- convenient extraction of the necessary files from the backup (no requirement to decrypt the entire section first).
For example, backup/restore via "dd" utility
dd if=/dev/sda7 of=/путь/sda7.img bs=7M conv=sync,noerror
dd if=/путь/sda7.img of=/dev/sda7 bs=7M conv=sync,noerror
Corresponds to almost all the points of the task, but according to paragraph 4 it does not stand up to criticism, since it copies the entire disk partition, including free space - not interesting.
For example, the GNU/ backupLinux via archiver [tar» | gpg] is convenient, but for backup Windows We need to look for another solution - it's not interesting.
E1. Universal Backup Windows/Linuxrsync (Grsync) + VeraCrypt volume combinationAlgorithm for creating a backup:
- creating an encrypted container (volume/file) VeraCrypt for OS;
- transfer / synchronization of the OS using the Rsync software to the VeraCrypt cryptocontainer;
- if necessary, upload the VeraCrypt volume to www.
Creating an encrypted VeraCrypt container has its own characteristics:
creating a dynamic volume (creation of DT is available only in Windows, can also be used in GNU/Linux);
creating a normal volume, but there is a requirement of a "paranoid nature" (according to the developer) - container formatting.
A dynamic volume is created almost instantly in the OS Windows, but when copying data from the GNU OS/Linux > VeraCrypt DT, in general, the performance of the backup operation is significantly reduced.
A regular 70 GB Twofish volume is created (Let's say, on average PC power) to HDD ~ in half an hour (overwriting the former container data in one pass, due to security requirements). From VeraCrypt Windows/Linux The quick formatting feature for a volume during its creation has been removed, so container creation is only possible through a "single-pass overwrite" or the creation of a low-performance dynamic volume.
Create a Regular VeraCrypt Volume (not dynamic/ntfs), there shouldn't be any problems.
Configure/create/open a container in VeraCrypt GUI> GNU/Linux live usb (the volume will be automounted to /media/veracrypt2, the OS volume Windows mounted in /media/veracrypt1). Create an encrypted backup of the OS Windows using the rsync GUI (grsync)by checking the boxes.
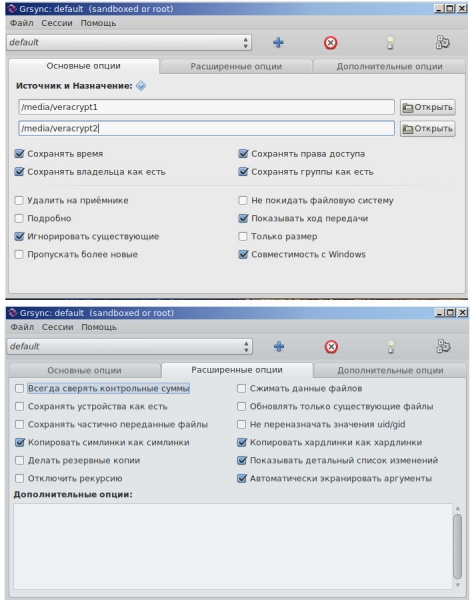
Wait for the end of the process. Upon completion of the backup, we will have one encrypted file.
Similarly, create a backup copy of the GNU/OSLinux, unchecking the GUI rsync “compatible with Windows».
Attention! Veracrypt container for "GNU backup/Linux» create in the file system ext4. If you make a backup to an ntfs container, then when you restore such a copy, you will lose all rights / groups to all your data.
You can carry out all operations in the terminal. Basic options for rsync:
* -g - save groups;
* -P --progress - the status of the time of work on the file;
* -H -copy hardlinks as is;
* -a -archive mode (several rlptgoD flags);
* -v -verbalization.
If you want to mount a volume Windows VeraCrypt" via the console in the cryptsetup software, you can create an alias (su)
echo "alias veramount='cryptsetup open --veracrypt --tcrypt-system --type tcrypt /dev/sdaX Windows_crypt && mount /dev/mapper/ Windows_crypt /media/veracrypt1'" >> .bashrc && bash
Now, on the command “veramount pictures”, a request for entering a passphrase will appear, and the encrypted system volume will be mounted in the OS. Windows.
Map/mount VeraCrypt system volume in cryptsetup command
cryptsetup open --veracrypt --tcrypt-system --type tcrypt /dev/sdaX Windows_crypt
mount /dev/mapper/Windows_crypt /mnt
Map/mount VeraCrypt partition/container in cryptsetup command
cryptsetup open --veracrypt --type tcrypt /dev/sdaY test_crypt
mount /dev/mapper/test_crypt /mnt
Instead of alias, we'll add (script to startup) the system volume with the OS Windows and a logical encrypted ntfs disk in GNU/Linux
Create a script and save it to ~/VeraOpen.sh
printf 'Ym9i' | base64 -d | cryptsetup open --veracrypt --tcrypt-system --type tcrypt /dev/sda3 Windows_crypt && mount /dev/mapper/Windows_crypt /media/Winda7 #декодируем пароль из base64 (bob) и отправляем его на запрос ввода пароля при монтировании системного диска ОС Windows.
printf 'Ym9i' | base64 -d | cryptsetup open --veracrypt --type tcrypt /dev/sda1 ntfscrypt && mount /dev/mapper/ntfscrypt /media/КонтейнерНтфс #аналогично, но монтируем логический диск ntfs.
We give out "true" rights:
sudo chmod 100 /VeraOpen.shCreate two identical files (same name!) in /etc/rc.local and ~/etc/init.d/rc.local
Filling the files
#!/bin/sh -e
#
# rc.local
#
# This script is executed at the end of each multiuser runlevel.
# Make sure that the script will «exit 0» on success or any other
# value on error.
#
# In order to enable or disable this script just change the execution
# bits.
#
# By default this script does nothing.

sh -c "sleep 1 && '/VeraOpen.sh'" #после загрузки ОС, ждём ~ 1с и только потом монтируем диски.
exit 0
We give out "true" rights:
sudo chmod 100 /etc/rc.local && sudo chmod 100 /etc/init.d/rc.local That's it, now when you boot GNU/Linux We don't need to enter passwords to mount encrypted NTFS disks; the disks are mounted automatically.
A brief note on what is described above in paragraph E1 step by step (but now for OS GNU/Linux)
1) Create a volume in the ext4 fs > 4gb (for the file) Linux in Veracrypt [Cryptobox].
2) Reboot to live usb.
3) ~$ cryptsetup open /dev/sda7 Lunux #map the encrypted partition.
4) ~$ mount /dev/mapper/Linux /mnt #mounting encrypted partition to /mnt.
5) ~$ mkdir mnt2 #create a directory for the future backup.
6) ~$ cryptsetup open --veracrypt --type tcrypt ~/Cryptobox Cryptobox && mount /dev/mapper/Cryptobox /mnt2 #Map the Veracrypt volume named "Cryptobox" and mount the Cryptobox in /mnt2.
7) ~$ rsync -avlxhHX --progress /mnt /mnt2/ #operation to backup an encrypted partition to a Veracrypt encrypted volume.
(p/s/ Attention! If you are porting encrypted GNU/Linux from one architecture/machine to another, for example, Intel > AMD (that is, you deploy a backup from one encrypted partition to another encrypted partition Intel > AMD), do not forget after transferring the encrypted OS, edit the secret substituted key instead of the password, maybe. the previous key ~/etc/skey - will no longer fit another encrypted partition, and it is undesirable to create a new key "cryptsetup luksAddKey" from under chroot - a glitch is possible, just in ~/etc/crypttab specify temporarily "none" instead of "/etc/skey" ”, after rebot and entering the OS, regenerate your secret substituted key again).
How IT veterans remember to make separate backups of encrypted OS partition headers Windows/Linux, or encryption will turn against you.
At this step, the backup of the encrypted operating systems is completed.
[F] Attack on the GRUB2 bootloader
DetailsIf you have protected your bootloader with a digital signature and/or authentication (See item C6.), then this will not protect against physical access. Encrypted data will still be inaccessible, but protection bypass (reset digital signature protection) GRUB2 allows cybervillains to inject their code into the bootloader without arousing suspicion (unless the user manually monitors the state of the bootloader, or comes up with their own solid custom-script-code for grub.cfg).
attack algorithm. intruder
*Boots PC from live usb. Any change (offender) files will alert the real owner of the PC about the intrusion into the bootloader. But a simple reinstallation of GRUB2 while keeping grub.cfg (and the subsequent possibility of editing it) will allow an attacker to edit any files (in this scenario, when loading GRUB2, the real user will not be notified. The status is the same <0>)
* Mounts an unencrypted partition, saves "/mnt/boot/grub/grub.cfg".
* Reinstall bootloader (removing "perskey" from the core.img image)
grub-install --force --root-directory=/mnt /dev/sda6 * Returns "grub.cfg" > "/mnt/boot/grub/grub.cfg", edits it if necessary, for example, adding its "keylogger.mod" module to the folder with loader modules, in "grub.cfg" > line "insmod keylogger". Or, for example, if the enemy is cunning, then after reinstalling GRUB2 (all signatures remain in place) it builds the main GRUB2 image using "grub-mkimage with the (-c) option." The "-c" option will allow you to load your config before loading the main "grub.cfg". The config can consist of just one line: redirect to any "modern.cfg", mixed with, for example, ~400 files (modules+signatures) in the /boot/grub/i386-pc folder. In this case, the offender can introduce arbitrary code and load modules without affecting "/boot/grub/grub.cfg", even if the user applied "hashsum" to the file and temporarily displayed it on the screen.
The attacker will not need to crack the login / password of the GRUB2 superuser, he will just need to copy the lines (responsible for authentication) "/boot/grub/grub.cfg" to your "modern.cfg"
set superusers="root"
password_pbkdf2 root grub.pbkdf2.sha512.10000.DE10E42B01BB6FEEE46250FC5F9C3756894A8476A7F7661A9FFE9D6CC4D0A168898B98C34EBA210F46FC10985CE28277D0563F74E108FCE3ACBD52B26F8BA04D.27625A4D30E4F1044962D3DD1C2E493EF511C01366909767C3AF9A005E81F4BFC33372B9C041BE9BA904D7C6BB141DE48722ED17D2DF9C560170821F033BCFD8
And the PC host will still have GRUB2 superuser authentication.
Chain loading (bootloader loads another bootloader), as mentioned above, does not make sense (it is for a different purpose). Due to the BIOS, the encrypted bootloader cannot be loaded (when chainloading, GRUB2 restarts > encrypted GRUB2, error!). However, if you still use the idea of chain loading, you can be sure that it is the encrypted one that is being loaded. (not upgraded) "grub.cfg" from the encrypted partition. And this is also a false sense of security, because everything that is listed in the encrypted "grub.cfg" (module loading) stacks with modules that are loaded from unencrypted GRUB2.
If you want to check this, then allocate/encrypt another sdaY partition, copy GRUB2 to it (grub-install operation on encrypted partition is not possible) and in "grub.cfg" (unencrypted config) change lines like this
menuentry 'GRUBx2' --class parrot --class gnu-linux --class gnu --class os $menuentry_id_option 'gnulinux-simple-382111a2-f993-403c-aa2e-292b5eac4780' {
load_video
insmod gzio
if [ x$grub_platform = xxen ]; then insmod xzio; insmod lzopio; fi
insmod part_msdos
insmod cryptodisk
insmod lux
insmod gcry_twofish
insmod gcry_twofish
insmod gcry_sha512
insmod ext2
cryptomount -u 15c47d1c4bd34e5289df77bcf60ee838
set root=’cryptouuid/15c47d1c4bd34e5289df77bcf60ee838′
normal /boot/grub/grub.cfg
}
lines
* insmod - loading the necessary modules to work with an encrypted disk;
* GRUBx2 - the name of the displayed line in the GRUB2 boot menu;
* cryptomount -u 15c47d1c4bd34e5289df77bcf60ee838 - see fdisk -l (sda9);
* set root - root setting;
* normal /boot/grub/grub.cfg - executable configuration file on the encrypted partition.
Confidence that it is the encrypted “grub.cfg” that is being loaded is a positive response to entering the password / unlocking “sdaY” when choosing the line “GRUBx2” in the GRUB menu.
When working in the CLI, so as not to get confused (and check if the "set root" environment variable worked), create empty marker files, for example, in the encrypted partition "/shifr_grub", in the unencrypted partition "/noshifr_grub". Validation in the CLI
cat /Tab-TabAs noted above, this will not help you from downloading malicious modules if such modules end up on your PC. For example, a keylogger that can save keystrokes to a file and mix with other files in "~/i386" until it is downloaded by an attacker with physical access to the PC.
The easiest way to check that digital signature protection is active (not reset), and no one invaded the bootloader, in the CLI we type the command
list_trusted in response, we get a cast of our “perskey”, or we don’t get anything if we were attacked (also need to check "set check_signatures=enforce").
A significant disadvantage of such a step is to type commands manually. If you add this command to "grub.cfg" and digitally sign the config, then the preliminary output of the key cast to the screen is too short in timing, and you may not have time to see the output when you get the GRUB2 boot.
There is no one to particularly complain about: the developer in his clause 18.2 officially declares
“Note that even with GRUB password protection, GRUB itself cannot prevent someone with physical access to the machine from altering that machine's firmware (eg, Coreboot or BIOS) configuration to cause the machine to boot from a different (attacker-controlled) device. GRUB is at best only one link in a secure boot chain".
GRUB2 is overloaded with features that can give a false sense of security, and its development has already outpaced the functionality of MS-DOS, despite it being just a bootloader. It's ironic that GRUB2 could become the OS "tomorrow," while bootable GNU/Linux virtual machines for it.
A short video about how I reset GRUB2 digital signature protection and declared my intrusion to a real user (scared, but instead of what is shown on the video, you can write not harmless arbitrary code/.mod).
Conclusions:
1) Block system encryption for Windows — it is easier to implement, and protection with one password is more convenient than protection with several passwords in GNU block system encryption/Linux, to be fair: the latter is automated.
2) I wrote the article as relevant, detailed simple A guide to full-disk encryption using VeraCrypt/LUKS on a single machine, which is currently the best on the RuNet (IMHO). The guide is over 50 characters long, so it didn't cover some interesting chapters: about cryptographers who disappear/keep a low profile; about what's in various GNU/GNU books.Linux They write little/nothing about cryptography; about Article 51 of the Constitution of the Russian Federation; about /ban , about why you need to encrypt "root / boot". The manual turned out to be already considerable, but detailed (describes even simple steps), in turn, this will save you a lot of time when you get into "real encryption".
3) Full disk encryption was performed on Windows 7 64; GNU/Linux Parrot 4x; GNU/Debian 9.0/9.5.
4) Implemented a successful attack on his GRUB2 bootloader.
5) The Tutorial was created to help all paranoids in the CIS, where encryption is legally allowed. And first of all, for those who want to roll full-disk encryption without demolishing their configured systems.
6) Revised and updated its manual, which is relevant in 2020.
[G] Helpful documentation
- (February 2012 RU)
- /usr/share/doc/cryptsetup(-run) [local share] (official detailed documentation on setting up GNU encryption/Linux using cryptsetup)
- (brief documentation on setting up GNU encryption/Linux using cryptsetup)
- (archlinux documentation)
- (arch manual page)
- (arch manual page)
- .
Tags: full disk encryption, partition encryption, full disk encryption Linux, full system encryption LUKS1.
Only registered users can participate in the survey. , you are welcome.
Do you encrypt?
17,1%I encrypt everything I can. I'm paranoid.14
34,2%I only encrypt important data.28
14,6%Sometimes I encrypt, sometimes I forget.12
34,2%No, I do not encrypt, it is inconvenient and costly.28
82 users voted. 22 users abstained.
Source: habr.com
