


Practical examples , that will elevate your remote system administrator skills to the next level. The commands and tips will help not only to use SSH, but also to navigate the network more effectively.
Knowing a few tricks ssh is useful for any system administrator, network engineer, or security specialist.
Practical SSH examples
First, the basics
Parsing SSH command line
In the following example, common parameters often seen when connecting to a remote server are used SSH.
localhost:~$ ssh -v -p 22 -C neo@remoteserver-v: Debug information output is especially useful when troubleshooting authentication issues. It can be used multiple times to provide additional information.-p 22: the port for connecting to the remote SSH server. 22 does not need to be specified since it is the default value, but if the protocol is on some other port, it should be specified using the parameter-p. The listening port is specified in the filesshd_configin the formatPort 2222.-C: compression for the connection. If you have a slow channel or you are viewing a lot of text, this may speed up the connection.neo@: The string before the @ symbol indicates the username for authentication on the remote server. If not specified, the username of the currently logged-in account will be used by default (~$ whoami). The user can also be specified with the parameter-l.remoteserver: the hostname to connect tossh, this can be a full domain name, an IP address, or any host in the local hosts file. To connect to a host that supports both IPv4 and IPv6, you can add a parameter to the command line-4or-6for proper resolution.
All the above parameters are optional except remoteserver.
Using the configuration file
While many are familiar with the file sshd_config, there is also a client configuration file for the command ssh. The default value ~/.ssh/config, but it can be specified as a parameter for the option -F.
Host *
     Port 2222

Host remoteserver
     HostName remoteserver.thematrix.io
     User neo
     Port 2112
     IdentityFile /home/test/.ssh/remoteserver.private_key
In the example configuration file above, there are two host entries. The first specifies all hosts, applying the configuration parameter Port 2222 to all. The second states that for the host remoteserver , a different username, port, FQDN, and IdentityFile should be used.
The configuration file can save a lot of time entering characters, allowing advanced configuration to be automatically applied when connecting to specific hosts.
Copying files over SSH using SCP
The SSH client comes with two other very handy tools for copying files via an encrypted SSH connection. Below is an example of standard usage of the scp and sftp commands. Note that many parameters for ssh also apply in these commands.
localhost:~$ scp mypic.png neo@remoteserver:/media/data/mypic_2.pngIn this example, the file mypic.png is copied to remoteserver in the folder /media/data and renamed to mypic_2.png.
Don't forget about the difference in the port parameter. Many get caught by this when executing scp from the command line. Here, the port parameter -P, not -p, as in the SSH client! You will forget, but don't worry, everyone forgets.
For those familiar with console ftp, many of the commands are similar in sftp. You can do push, put and ls, as your heart desires.
sftp neo@remoteserverPractical examples
In many of these examples, you can achieve results in various ways. As with all our and examples, practical examples that simply get the job done are preferred.
1. SSH socks proxy
The SSH Proxy feature numbered 1 is powerful for a good reason. It's more robust than many may assume, granting you access to any system that the remote server can reach, using virtually any application. An SSH client can tunnel traffic through a SOCKS proxy with a simple command. It’s important to understand that traffic to remote systems will originate from the remote server, as indicated in the web server logs.
localhost:~$ ssh -D 8888 user@remoteserver

localhost:~$ netstat -pan | grep 8888
tcp        0      0 127.0.0.1:8888       0.0.0.0:*               LISTEN      23880/ssh
Here we are starting a SOCKS proxy on TCP port 8888. The second command checks that the port is active and listening. 127.0.0.1 indicates that the service is running only on localhost. We can apply a slightly different command to listen on all interfaces, including ethernet or wifi, which allows other applications (like browsers, etc.) on our network to connect to the proxy service via the SSH SOCKS proxy.
localhost:~$ ssh -D 0.0.0.0:8888 user@remoteserverNow we can configure the browser to connect to the SOCKS proxy. In Firefox, select Settings | General | Network Settings. Specify the IP address and port to connect.
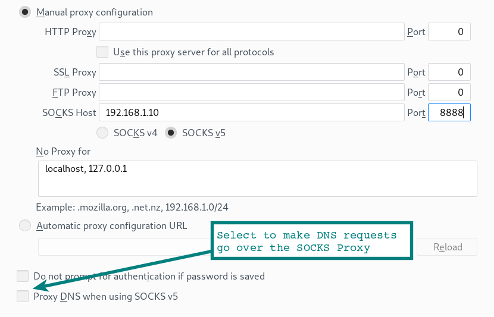
Note the option at the bottom of the form to ensure DNS requests from the browser also go through the SOCKS proxy. If you are using a proxy server to encrypt web traffic in your local network, you will likely want to select this option to tunnel DNS requests through the SSH connection.
Activating SOCKS proxy in Chrome
Launching Chrome with specific command-line parameters activates the SOCKS proxy and tunnels DNS requests from the browser. Trust but verify. Use to check that DNS requests are no longer visible.
localhost:~$ google-chrome --proxy-server="socks5://192.168.1.10:8888"Using other applications with the proxy
Keep in mind that many other applications can also use SOCKS proxies. The web browser is just the most popular among them. Some applications have configuration options to enable the proxy server. Others may require a little help from an auxiliary utility. For example, allows you to run Microsoft RDP and others through the SOCKS proxy.
localhost:~$ proxychains rdesktop $RemoteWindowsServerThe SOCKS proxy configuration options are specified in the proxychains configuration file.
Tip: If you are using Remote Desktop from Linux to Windows? Try the client This is a more modern implementation than
rdesktop, with much smoother interaction.
Using SSH over a socks proxy
You are sitting in a café or hotel and are forced to use rather unreliable WiFi. We launch an SSH proxy locally from the laptop and establish an SSH tunnel to the home network on a local Raspberry Pi. Using the browser or other applications configured for the socks proxy, we can access any network services in our home network or browse the internet through the home connection. Everything between your laptop and the home server (through Wi-Fi and the internet to home) is encrypted in the SSH tunnel.
2. SSH Tunnel (port forwarding)
In its simplest form, an SSH tunnel simply opens a port on your local system that connects to another port at the other end of the tunnel.
localhost:~$ ssh -L 9999:127.0.0.1:80 user@remoteserver Let's break down the parameter -L. It can be thought of as the local listening side. Thus, in the example above, port 9999 is listened to on the localhost side and forwarded through port 80 on remoteserver. Note that 127.0.0.1 refers to localhost on the remote server!
Let's step it up. In the next example, the listening ports are linked to other nodes in the local network.
localhost:~$ ssh -L 0.0.0.0:9999:127.0.0.1:80 user@remoteserverIn these examples, we are connecting to a port on a web server, but it could be a proxy server or any other TCP service.
3. SSH Tunnel to a remote host
We can use the same parameters to connect the tunnel from the remote server to another service running on a third system.
localhost:~$ ssh -L 0.0.0.0:9999:10.10.10.10:80 user@remoteserverIn this example, we are redirecting the tunnel from remoteserver to a web server running on 10.10.10.10. The traffic from remoteserver to 10.10.10.10 is no longer in the SSH tunnel.. The web server at 10.10.10.10 will consider remoteserver as the source of web requests.
4. Reverse SSH Tunnel
Here we set up a listening port on the remote server that will connect back to a local port on our localhost (or another system).
localhost:~$ ssh -v -R 0.0.0.0:1999:127.0.0.1:902 192.168.1.100 user@remoteserverIn this SSH session, a connection is established from port 1999 on remoteserver to port 902 on our local client.
5. Reverse SSH Proxy
In this case, we set up a socks proxy on our ssh connection, but the proxy listens on the remote end of the server. Connections to this remote proxy now appear from the tunnel as traffic from our localhost.
localhost:~$ ssh -v -R 0.0.0.0:1999 192.168.1.100 user@remoteserverTroubleshooting remote SSH tunnels
If you encounter issues with remote SSH options, check with netstat, which other interfaces the listening port is connected to. Although we specified 0.0.0.0 in the examples, if the value GatewayPorts downward API support (simultaneously with this in sshd_config is set to no, the listener will bind only to localhost (127.0.0.1).
Security Warning
Be aware that when opening tunnels and socks proxies, internal network resources may be accessible to untrusted networks (like the internet!). This can pose a serious security threat, so make sure you understand what the listener is and what it has access to.
6. Installing VPN over SSH
A common term among attack method specialists (pentesters, etc.) is 'pivot point in the network.' After establishing a connection in one system, this system becomes a gateway for further access to the network. A pivot point that allows lateral movement.
For such a pivot point, we can use SSH proxies and proxychains, but there are some limitations. For example, we won't be able to work directly with sockets, so we can't scan ports inside the network through SYN.
Using this more advanced VPN option, the connection reduces to layer 3. Then we can simply route traffic through the tunnel using standard network routing.
The method uses ssh, iptables, tun interfaces and routing.
First, you need to set these parameters in sshd_config. Since we are making changes to the interfaces on both the remote and client systems, we need root permissions on both sides.
PermitRootLogin yes
PermitTunnel yes
Then we will establish an ssh connection using the parameter that requests initialization of tun devices.
localhost:~# ssh -v -w any root@remoteserver Now we should have a tun device showing up in the interfaces (# ip a). The next step will add IP addresses to the tunnel interfaces.
SSH Client Side:
localhost:~# ip addr add 10.10.10.2/32 peer 10.10.10.10 dev tun0
localhost:~# ip tun0 up
SSH Server Side:
remoteserver:~# ip addr add 10.10.10.10/32 peer 10.10.10.2 dev tun0
remoteserver:~# ip tun0 up
Now we have a direct route to another host (route -n and ping 10.10.10.10).
Any subnet can be routed through the host on the other side.
localhost:~# route add -net 10.10.10.0 netmask 255.255.255.0 dev tun0 On the remote side, it’s necessary to enable ip_forward and iptables.
remoteserver:~# echo 1 > /proc/sys/net/ipv4/ip_forward
remoteserver:~# iptables -t nat -A POSTROUTING -s 10.10.10.2 -o enp7s0 -j MASQUERADE
Boom! VPN through SSH tunnel at network level 3. Now that's a victory.
If any issues arise, use and ping, to identify the cause. Since we are operating at level 3, our ICMP packets will go through this tunnel.
7. Copying SSH key (ssh-copy-id)
There are several ways to do this, but this command saves time by not needing to copy files manually. It simply copies ~/ .ssh/id_rsa.pub (or the default key) from your system to ~/ .ssh/authorized_keys on the remote server.
localhost:~$ ssh-copy-id user@remoteserver
8. Remote command execution (non-interactively)
The command ssh can be chained with other commands for a convenient interface. Just add the command you want to run on the remote host as the last parameter in quotes.
localhost:~$ ssh remoteserver "cat /var/log/nginx/access.log" | grep badstuff.php In this example, grep is executed on the local system after the log is downloaded over the SSH channel. If the file is large, it's better to run grep on the remote side, simply enclosing both commands in double quotes.
Another example performs the same function as ssh-copy-id from example 7.
localhost:~$ cat ~/ .ssh/id_rsa.pub | ssh remoteserver 'cat >> .ssh/authorized_keys'
9. Remote packet capture and viewing in Wireshark
I took one of our . Use it for remote packet capture with the output directly in the local Wireshark GUI.
:~$ ssh root@remoteserver 'tcpdump -c 1000 -nn -w - not port 22' | wireshark -k -i -
10. Copying a local folder to a remote server via SSH
A nice trick that compresses the folder using bzip2 (that's the -j parameter in the tarcommand), and then extracts the stream bzip2 on the other side, creating a duplicate of the folder on the remote server.
localhost:~$ tar -cvj /datafolder | ssh remoteserver "tar -xj -C /datafolder"
11. Remote GUI applications with SSH X11 forwarding
If both the client and the remote server have 'X' installed, you can remotely execute GUI commands, with a window appearing on your local desktop. This feature has existed for a long time but is still very useful. Launch a remote web browser or even the VMware Workstation console, as I do in this example.
localhost:~$ ssh -X remoteserver vmware Requires a line X11Forwarding yes in the file sshd_config.
12. Remote file copying with rsync and SSH
rsync is much more convenient scp, if periodic backups of a directory, a large number of files, or very large files are needed. It has a built-in recovery for interrupted transfers and only copies changed files, saving traffic and time.
In this example, compression is used gzip (-z) and archive mode (-a), which includes recursive copying.
:~$ rsync -az /home/testuser/data remoteserver:backup/
13. SSH over the Tor network
The anonymous Tor network can tunnel SSH traffic using the command torsocks. The next command will route the SSH proxy through Tor.
localhost:~$ torsocks ssh myuntracableuser@remoteserverwill use port 9050 on localhost for the proxy. As always when using Tor, it's crucial to thoroughly check what traffic is being tunneled and other operational security (opsec) issues. Where do your DNS requests go?
14. SSH to an EC2 instance
To connect to an EC2 instance, a private key is required. Download it (with the .pem extension) from the Amazon EC2 management console and change the permissions (chmod 400 my-ec2-ssh-key.pem). Keep the key in a secure location or place it in your folder ~/ssh/.
localhost:~$ ssh -i ~/ssh/my-ec2-key.pem ubuntu@my-ec2-public Parameter -i simply tells the ssh client to use this key. The file ~/.ssh/config is ideally suited for automating key usage when connecting to the EC2 host.
Host my-ec2-public
   Hostname ec2???.compute-1.amazonaws.com
   User ubuntu
   IdentityFile ~/ssh/my-ec2-key.pem
15. Editing text files with VIM over ssh/scp
For all enthusiasts vim this tip will save some time. With vim files can be edited via scp in one command. This method simply creates the file locally in /tmp, then copies it back as soon as we save it from vim.
localhost:~$ vim scp://user@remoteserver//etc/hosts Note: the format is slightly different from usual scp. After the host, we have a double //. This refers to the absolute path. A single slash would mean a path relative to the home folder. users.
**warning** (netrw) cannot determine method (format: protocol://[user@]hostname[:port]/[path])If you see this error, double-check the command format. This usually indicates a syntax error.
16. Mounting remote SSH as a local folder with SSHFS
Using sshfs — a file system client ssh — we can connect a local directory to a remote location with all file interactions in an encrypted session ssh.
localhost:~$ apt install sshfs On Ubuntu and Debian, we will install the package sshfs, and then we will simply mount the remote location to our system.
localhost:~$ sshfs user@remoteserver:/media/data ~/data/
17. Multiplexing SSH with ControlPath
By default, when there is an existing connection to a remote server using ssh the second connection with ssh or scp establishes a new session with additional authentication. The option ControlPath allows using the existing session for all subsequent connections. This significantly speeds up the process: the effect is noticeable even in a local network, especially when connecting to remote resources.
Host remoteserver
        HostName remoteserver.example.org
        ControlMaster auto
        ControlPath ~/.ssh/control/%r@%h:%p
        ControlPersist 10m
ControlPath specifies the socket for checking new connections for an active session. sshThe last option means that even after exiting the console, the existing session will remain open for 10 minutes, so during that time, you can reconnect using the existing socket. For more information, see the ssh_config man.
18. Streaming Video over SSH with VLC and SFTP
Even seasoned users of ssh and vlc (Video Lan Client) are not always aware of this convenient option when needing to watch a video over the network. In the settings File | Open Network Stream of the program vlc you can enter the location as sftp://. If a password is required, a prompt will appear.
sftp://remoteserver//media/uploads/myvideo.mkv
19. Two-Factor Authentication
The same two-factor authentication as for your bank account or Google account applies to the SSH service.
Of course, ssh it initially has a two-factor authentication function, which consists of a password and an SSH key. The advantage of a hardware token or Google Authenticator app is that it is typically a different physical device.
See our 8-minute guide on .
20. Jumping Between Hosts with ssh and -J
If you need to go through several SSH hosts to reach the final destination network due to network segmentation, a shortcut -J will save you time.
localhost:~$ ssh -J host1,host2,host3 user@host4.internal The key point here is to understand that this is not equivalent to the command ssh host1, then user@host1:~$ ssh host2 and so on. The -J option cleverly uses forwarding, allowing localhost to start a session with the next host in the chain. Thus, in the example above, our localhost authenticates to host4. This means our localhost keys are used, and the session from localhost to host4 is fully encrypted.
For this capability in ssh_config specify the configuration option ProxyJump. If you regularly transition through multiple hosts, automating via config will save a lot of time.
21. Blocking SSH brute-force attempts using iptables
Anyone who has managed an SSH service and looked at the logs knows about the number of brute-force attempts that happen every hour, every day. A quick way to reduce log noise is to move SSH to a non-standard port. Make changes in the file sshd_config using the configuration option Port##.
Using iptables you can also easily block connection attempts to the port upon reaching a certain threshold. A straightforward way to do this is to use , since it not only blocks SSH but also performs a bunch of other host-based intrusion detection measures (HIDS).
22. SSH Escape for changing port forwarding
And our last example ssh is intended for changing port forwarding on the fly within an existing session. sshImagine a scenario. You are deep in the network; maybe you've jumped through half a dozen hosts, and you need a local port on your workstation forwarded to Microsoft SMB of an old Windows 2003 system (anyone remember ms08-67?).
Pressing enter, try inputting in the console ~C. This is a control sequence in the session that allows you to modify the existing connection.
localhost:~$ ~C
ssh> -h
Commands:
      -L[bind_address:]port:host:hostport    Request local forward
      -R[bind_address:]port:host:hostport    Request remote forward
      -D[bind_address:]port                  Request dynamic forward
      -KL[bind_address:]port                 Cancel local forward
      -KR[bind_address:]port                 Cancel remote forward
      -KD[bind_address:]port                 Cancel dynamic forward
ssh> -L 1445:remote-win2k3:445
Forwarding port.
Here you can see that we redirected our local port 1445 to the Windows 2003 host we found in the internal network. Now simply run msfconsole, and you can proceed (assuming you plan to use this host).
Completion
These examples, tips, and commands ssh should provide a starting point; additional information about each command and capability is available on the reference pages (man ssh, man ssh_config, man sshd_config).
I have always been fascinated by the ability to access systems and execute commands from anywhere in the world. By developing your skills with tools like ssh , you will become more effective in any game you play.
Source: habr.com
