


Event-driven architecture enhances the cost efficiency of resources used, as they are engaged only when needed. There are many options for how to implement this without creating additional cloud entities as worker applications. Today, I will not talk about FaaS, but about webhooks. I will demonstrate a teaching example of event handling using object storage webhooks.
A few words about object storage and webhooks. Object storages allow you to store any data in the cloud as objects accessible via S3 or another API (depending on the implementation) through HTTP/HTTPS. Webhooks are essentially user-defined HTTP callbacks. They are usually triggered by an event, such as pushing code to a repository or a comment being posted on a blog. When an event occurs, the source site sends an HTTP request to the URL specified for the webhook. As a result, you can make events on one site trigger actions on another. In the case where the source site is an object storage, the changes in its contents act as events.In cases where the source site is an object storage, changes in its content act as events.
Examples of simple cases where such automation can be used:
- Creating copies of all objects in another cloud storage. Copies should be created 'on-the-fly', whenever files are added or changed.
- Automatically creating series of thumbnails for graphic files, adding watermarks to photos, and other image modifications.
- Notifying about the arrival of new documents (for instance, a distributed accounting service uploads reports to the cloud, while financial monitoring receives alerts about new reports, checks, and analyzes them).
- Slightly more complex cases involve forming a request to Kubernetes, which creates a pod with the necessary containers, passes the task parameters to it, and after processing, terminates the container.
As an example, we will create a variation of task 1, where changes in the Mail.ru Cloud Solutions (MCS) object storage bucket are synchronized to AWS object storage using webhooks. In a real, heavily loaded case, asynchronous operation should be considered by registering webhooks in a queue, but for the teaching task, we will implement it without this.
Workflow Diagram
The interaction protocol is detailed in . The workflow includes the following elements:
- Publishing Service, located on the S3 storage side, which publishes HTTP requests when the webhook is triggered.
- Webhook Receiver Server, which listens for requests from the publishing service via HTTP and performs the corresponding actions. The server can be written in any language; in our example, we will write the server in Go.
A unique feature of webhook implementation in the S3 API is the registration of the webhook receiver server with the publishing service. Specifically, the webhook receiver server must confirm the subscription to messages from the publishing service (in other webhook implementations, confirming the subscription is usually not required).
Accordingly, the webhook receiver server must support two main operations:
- respond to the publishing service's registration confirmation request,
- process incoming events.
Setting Up the Webhook Receiver Server
To run the webhook receiver server, a Linux server is needed. In this article, we will use a virtual instance deployed on MCS as an example.
Let's install the necessary software and start the webhook receiver server.
ubuntu@ubuntu-basic-1-2-10gb:~$ sudo apt-get install git
Reading package lists... Done
Building dependency tree
Reading state information... Done
The following packages were automatically installed and are no longer required:
 bc dns-root-data dnsmasq-base ebtables landscape-common liblxc-common
liblxc1 libuv1 lxcfs lxd lxd-client python3-attr python3-automat
python3-click python3-constantly python3-hyperlink
 python3-incremental python3-pam python3-pyasn1-modules
python3-service-identity python3-twisted python3-twisted-bin
python3-zope.interface uidmap xdelta3
Use 'sudo apt autoremove' to remove them.
Suggested packages:
 git-daemon-run | git-daemon-sysvinit git-doc git-el git-email git-gui
gitk gitweb git-cvs git-mediawiki git-svn
The following NEW packages will be installed:
 git
0 upgraded, 1 newly installed, 0 to remove and 46 not upgraded.
Need to get 3915 kB of archives.
After this operation, 32.3 MB of additional disk space will be used.
Get:1 http://MS1.clouds.archive.ubuntu.com/ubuntu bionic-updates/main
amd64 git amd64 1:2.17.1-1ubuntu0.7 [3915 kB]
Fetched 3915 kB in 1s (5639 kB/s)
Selecting previously unselected package git.
(Reading database ... 53932 files and directories currently installed.)
Preparing to unpack .../git_12.17.1-1ubuntu0.7_amd64.deb ...
Unpacking git (1:2.17.1-1ubuntu0.7) ...
Setting up git (1:2.17.1-1ubuntu0.7) ...
Cloning the folder with the webhook receiver server:
ubuntu@ubuntu-basic-1-2-10gb:~$ git clone
https://github.com/RomanenkoDenys/s3-webhook.git
Cloning into 's3-webhook'...
remote: Enumerating objects: 48, done.
remote: Counting objects: 100% (48/48), done.
remote: Compressing objects: 100% (27/27), done.
remote: Total 114 (delta 20), reused 45 (delta 18), pack-reused 66
Receiving objects: 100% (114/114), 23.77 MiB | 20.25 MiB/s, done.
Resolving deltas: 100% (49/49), done.
Let's start the server:
ubuntu@ubuntu-basic-1-2-10gb:~$ cd s3-webhook/
ubuntu@ubuntu-basic-1-2-10gb:~/s3-webhook$ sudo ./s3-webhook -port 80
Subscription to the publication service
You can register your webhook receiver server via API or web interface. For simplicity, we will register through the web interface:
- in the control panel.
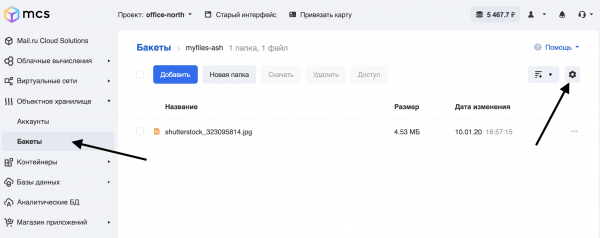
- Enter the bucket for which we will configure webhooks and click on the gear icon:
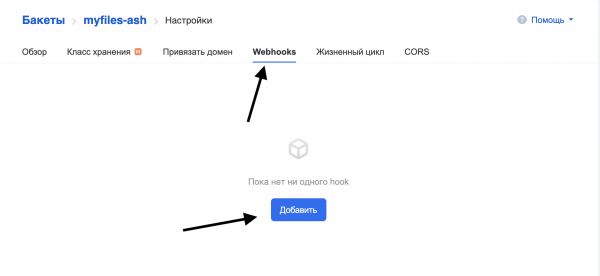
Go to the Webhooks tab and click Add:
Fill in the fields:
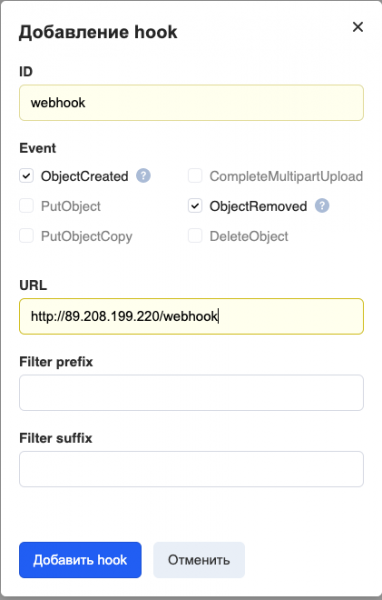
ID — the name of the webhook.
Event — which events to transmit. We set it to transmit all events that occur with files (addition and deletion).
URL — the address of the webhook receiver server.
Filter prefix/suffix — a filter that allows generating webhooks only for objects whose names match certain criteria. For example, to trigger a webhook only for files with the .png extension, in Filter suffix you need to write "png."
Currently, only ports 80 and 443 are supported for accessing the webhook receiver server.
Let's click Add hook and we'll see the following:
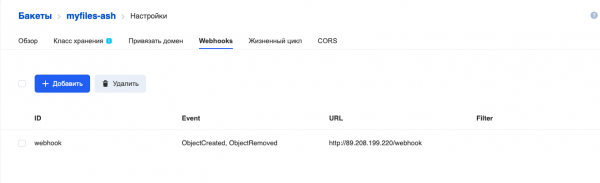
Hook added.
The webhook receiver server logs show the registration process of the hook:
ubuntu@ubuntu-basic-1-2-10gb:~/s3-webhook$ sudo ./s3-webhook -port 80
2020/06/15 12:01:14 [POST] incoming HTTP request from
95.163.216.92:42530
2020/06/15 12:01:14 Got timestamp: 2020-06-15T15:01:13+03:00 TopicArn:
mcs5259999770|myfiles-ash|s3:ObjectCreated:*,s3:ObjectRemoved:* Token:
E2itMqAMUVVZc51pUhFWSp13DoxezvRxkUh5P7LEuk1dEe9y URL:
http://89.208.199.220/webhook
2020/06/15 12:01:14 Generate response signature:
3754ce36636f80dfd606c5254d64ecb2fd8d555c27962b70b4f759f32c76b66d
Registration is complete. In the next section, we will take a closer look at the algorithm for the webhook receiver server's operation.
Webhook receiver server description
In our example, the server is written in Go. Let's break down the basic principles of its operation.
package main

// Generate hmac_sha256_hex
func HmacSha256hex(message string, secret string) string {
}

// Generate hmac_sha256
func HmacSha256(message string, secret string) string {
}

// Send subscription confirmation
func SubscriptionConfirmation(w http.ResponseWriter, req *http.Request, body []byte) {
}

// Send subscription confirmation
func GotRecords(w http.ResponseWriter, req *http.Request, body []byte) {
}

// Liveness probe
func Ping(w http.ResponseWriter, req *http.Request) {
    // log request
    log.Printf("[%s] incoming HTTP Ping request from %sn", req.Method, req.RemoteAddr)
    fmt.Fprintf(w, "Pongn")
}

//Webhook
func Webhook(w http.ResponseWriter, req *http.Request) {
}

func main() {

    // get command line args
    bindPort := flag.Int("port", 80, "number between 1-65535")
    bindAddr := flag.String("address", "", "ip address in dot format")
    flag.StringVar(&actionScript, "script", "", "external script to execute")
    flag.Parse()

    http.HandleFunc("/ping", Ping)
    http.HandleFunc("/webhook", Webhook)

log.Fatal(http.ListenAndServe(*bindAddr+":"+strconv.Itoa(*bindPort), nil))
}
Let's consider the main functions:
- Ping() — a route that responds at URL/ping, a basic implementation of a liveness probe.
- Webhook() — the main route, handler for URL/webhook:
- confirms subscription registration (transitions to the SubscriptionConfirmation function),
- processes incoming webhooks (Gotrecords function).
- HmacSha256 and HmacSha256hex functions — implementations of the HMAC-SHA256 encryption algorithms and HMAC-SHA256 with output in the form of a string of hexadecimal numbers for signature calculation.
- main — the main function, processes command line parameters and registers URL handlers.
Command line parameters accepted by the server:
- -port — the port on which the server will listen.
- -address — the IP address that the server will listen to.
- -script — an external program that is invoked for each incoming hook.
Let's take a closer look at some functions:
//Webhook
func Webhook(w http.ResponseWriter, req *http.Request) {

    // Read body
    body, err := ioutil.ReadAll(req.Body)
    defer req.Body.Close()
    if err != nil {
        http.Error(w, err.Error(), 500)
        return
    }

    // log request
    log.Printf("[%s] incoming HTTP request from %sn", req.Method, req.RemoteAddr)
    // check if we got subscription confirmation request
    if strings.Contains(string(body),
""Type":"SubscriptionConfirmation"") {
        SubscriptionConfirmation(w, req, body)
    } else {
        GotRecords(w, req, body)
    }

}
This function determines what was received — a request for subscription confirmation or a webhook. As follows from , in the case of subscription confirmation, the following JSON structure comes in the Post request:
POST http://test.com HTTP/1.1
x-amz-sns-messages-type: SubscriptionConfirmation
content-type: application/json

{
    "Timestamp":"2019-12-26T19:29:12+03:00",
    "Type":"SubscriptionConfirmation",
    "Message":"You have chosen to subscribe to the topic $topic. To confirm the subscription you need to response with calculated signature",
    "TopicArn":"mcs2883541269|bucketA|s3:ObjectCreated:Put",
    "SignatureVersion":1,
    "Token":"RPE5UuG94rGgBH6kHXN9FUPugFxj1hs2aUQc99btJp3E49tA"
}
You need to respond to this request:
content-type: application/json

{"signature":"ea3fce4bb15c6de4fec365d36bcebbc34ccddf54616d5ca12e1972f82b6d37af"}
Where the signature is calculated as:
signature = hmac_sha256(url, hmac_sha256(TopicArn,
hmac_sha256(Timestamp, Token)))
If a webhook comes in, then the structure of the Post request looks like this:
POST  HTTP/1.1
x-amz-sns-messages-type: SubscriptionConfirmation

{ "Records":
    [
        {
            "s3": {
                "object": {
                    "eTag":"aed563ecafb4bcc5654c597a421547b2",
                    "sequencer":1577453615,
                    "key":"some-file-to-bucket",
                    "size":100
                },
            "configurationId":"1",
            "bucket": {
                "name": "bucketA",
                "ownerIdentity": {
                    "principalId":"mcs2883541269"}
                },
                "s3SchemaVersion":"1.0"
            },
            "eventVersion":"1.0",
            "requestParameters":{
                "sourceIPAddress":"185.6.245.156"
            },
            "userIdentity": {
                "principalId":"2407013e-cbc1-415f-9102-16fb9bd6946b"
            },
            "eventName":"s3:ObjectCreated:Put",
            "awsRegion":"ru-msk",
            "eventSource":"aws:s3",
            "responseElements": {
                "x-amz-request-id":"VGJR5rtJ"
            }
        }
    ]
}
Accordingly, depending on the request, you need to understand how to process the data. I chose the entry "Type":"SubscriptionConfirmation", as it is present in the subscription confirmation request and not in the webhook. Based on the presence/absence of this record in the POST request, the further execution of the program goes either to the function SubscriptionConfirmation, or to the function GotRecords.
We will not delve into the SubscriptionConfirmation function, it is implemented based on the principles outlined in . You can study the source code of this function in .
The GotRecords function processes the incoming request and for each Record object calls an external script (the name of which was provided in the -script parameter) with the parameters:
- bucket name
- object key
- action:
- copy — if the incoming request EventName = ObjectCreated | PutObject | PutObjectCopy
- delete — if the incoming request EventName = ObjectRemoved | DeleteObject
Thus, if a webhook arrives with a POST request, as described , and the parameter -script=script.sh then the script will be called as follows:
script.sh bucketA some-file-to-bucket copyIt should be understood that this webhook receiving server is not a finished production solution, but a simplified example of a possible implementation.
An example of its operation
We will synchronize the files in the main bucket in MCS with a backup bucket in AWS. The main bucket is named myfiles-ash, and the backup — myfiles-backup (the configuration of the bucket in AWS falls outside the scope of this article). Accordingly, when a file is placed in the main bucket, its copy should appear in the backup, and when it is deleted from the main — it should be deleted in the backup.
We will work with the buckets using the awscli utility, which is compatible with both the MCS cloud storage and AWS cloud storage.
ubuntu@ubuntu-basic-1-2-10gb:~$ sudo apt-get install awscli
Reading package lists... Done
Building dependency tree
Reading state information... Done
After this operation, 34.4 MB of additional disk space will be used.
Unpacking awscli (1.14.44-1ubuntu1) ...
Setting up awscli (1.14.44-1ubuntu1) ...
Let's configure access to the MCS S3 API:
ubuntu@ubuntu-basic-1-2-10gb:~$ aws configure --profile mcs
AWS Access Key ID [None]: hdywEPtuuJTExxxxxxxxxxxxxx
AWS Secret Access Key [None]: hDz3SgxKwXoxxxxxxxxxxxxxxxxxx
Default region name [None]:
Default output format [None]:
Let's configure access to the AWS S3 API:
ubuntu@ubuntu-basic-1-2-10gb:~$ aws configure --profile aws
AWS Access Key ID [None]: AKIAJXXXXXXXXXXXX
AWS Secret Access Key [None]: dfuerphOLQwu0CreP5Z8l5fuXXXXXXXXXXXXXXXX
Default region name [None]:
Default output format [None]:
Let's check the accesses:
To AWS:
ubuntu@ubuntu-basic-1-2-10gb:~$ aws s3 ls --profile aws
2020-07-06 08:44:11 myfiles-backup
For MCS, when executing the command, you need to add —endpoint-url:
ubuntu@ubuntu-basic-1-2-10gb:~$ aws s3 ls --profile mcs --endpoint-url
https://hb.bizmrg.com
2020-02-04 06:38:05 databasebackups-0cdaaa6402d4424e9676c75a720afa85
2020-05-27 10:08:33 myfiles-ash
Access received.
Now let's write a script to handle the incoming hook, we'll call it s3_backup_mcs_aws.sh
#!/bin/bash
# Require aws cli
# if file added — copy it to backup bucket
# if file removed — remove it from backup bucket
# Variables
ENDPOINT_MCS="https://hb.bizmrg.com"
AWSCLI_MCS=`which aws`" --endpoint-url ${ENDPOINT_MCS} --profile mcs s3"
AWSCLI_AWS=`which aws`" --profile aws s3"
BACKUP_BUCKET="myfiles-backup"

SOURCE_BUCKET="${1}"
SOURCE_FILE="${2}"
ACTION="${3}"

SOURCE="s3://${SOURCE_BUCKET}/${SOURCE_FILE}"
TARGET="s3://${BACKUP_BUCKET}/${SOURCE_FILE}"
TEMP="/tmp/${SOURCE_BUCKET}/${SOURCE_FILE}"

case ${ACTION} in
    "copy")
    ${AWSCLI_MCS} cp "${SOURCE}" "${TEMP}"
    ${AWSCLI_AWS} cp "${TEMP}" "${TARGET}"
    rm ${TEMP}
    ;;

    "delete")
    ${AWSCLI_AWS} rm ${TARGET}
    ;;

    *)
    echo "Usage: ${0} sourcebucket sourcefile copy/delete"
    exit 1
    ;;
esac
Starting the server:
ubuntu@ubuntu-basic-1-2-10gb:~/s3-webhook$ sudo ./s3-webhook -port 80 -
script scripts/s3_backup_mcs_aws.sh
Let's check how this performs. Through we'll add the file test.txt to the myfiles-ash bucket. The logs in the console show that a request was made to the webhook server:
2020/07/06 09:43:08 [POST] incoming HTTP request from
95.163.216.92:56612
download: s3://myfiles-ash/test.txt to ../../../../tmp/myfiles-ash/test.txt
upload: ../../../../tmp/myfiles-ash/test.txt to
s3://myfiles-backup/test.txt
Let's check the contents of the myfiles-backup bucket in AWS:
ubuntu@ubuntu-basic-1-2-10gb:~/s3-webhook$ aws s3 --profile aws ls
myfiles-backup
2020-07-06 09:43:10       1104 test.txt
Now, through the web interface, let's delete the file from the myfiles-ash bucket.
Server logs:
2020/07/06 09:44:46 [POST] incoming HTTP request from
95.163.216.92:58224
delete: s3://myfiles-backup/test.txt
Bucket contents:
ubuntu@ubuntu-basic-1-2-10gb:~/s3-webhook$ aws s3 --profile aws ls
myfiles-backup
ubuntu@ubuntu-basic-1-2-10gb:~$
The file has been deleted, the task is completed.
Conclusion and ToDo
All the code used in this article is located . There you will also find script examples and examples of signature calculations for registering webhooks.
This code is merely an example of how to utilize S3 webhooks in your operations. As I mentioned earlier, if you plan to use such a server in production, you will need to at least rewrite the server for asynchronous operations: incoming webhooks should be registered in a queue (RabbitMQ or NATS) and then processed by worker applications. Otherwise, during massive influxes of webhooks, you may encounter a lack of server resources to perform tasks. Having queues allows you to distribute the server and workers and addresses the issues of retrying tasks in case of failures. It is also preferable to change logging to a more detailed and standardized format.
Good luck!
Further reading on the topic:
Source: habr.com
