


One of the most relevant use cases for the PVS-Studio analyzer is its integration with CI systems. Although the analysis of a project with PVS-Studio can be integrated into almost any continuous integration system with just a few commands, we continue to make this process even more convenient. PVS-Studio now supports converting the analyzer's output into a format for TeamCity — TeamCity Inspections Type. Let's see how this works.
Information about the software used
— a static analyzer for C, C++, C#, and Java code, designed to facilitate the task of finding and fixing various types of bugs. The analyzer can be used on Windows, Linux, and macOS. In this article, we will actively use not only the analyzer itself but also some utilities from its distribution.
— is a monitoring server that tracks compiler launches. It must be started just before the beginning of the project build. In tracing mode, the server will intercept the launches of all supported compilers. It is worth noting that this utility can only be used for analyzing C/C++ projects.
– a utility for converting the analyzer report into various formats.
Information about the project being examined
Let's try this functionality with a practical example – we will analyze the OpenRCT2 project.
— an open implementation of the game RollerCoaster Tycoon 2 (RCT2), enhancing it with new features and fixing bugs. The gameplay revolves around the construction and management of an amusement park that includes rides, shops, and facilities. The player must strive to make a profit and maintain a good reputation for the park while keeping guests happy. OpenRCT2 allows playing both scenarios and sandbox mode. Scenarios require the player to complete specific tasks within a set time, while sandbox mode allows the player to build a more flexible park without any restrictions or financial concerns.
Settings
To save time, I will skip the installation process and begin from the moment when the TeamCity server is running on my computer. We need to navigate to: localhost:{the port specified during installation}(in my case, localhost:9090) and enter the login credentials. After logging in, we will be greeted by:
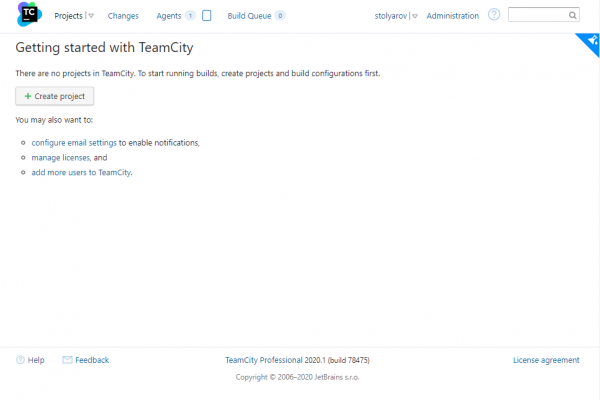
We'll click the Create Project button. Next, we'll choose Manually and fill in the fields.
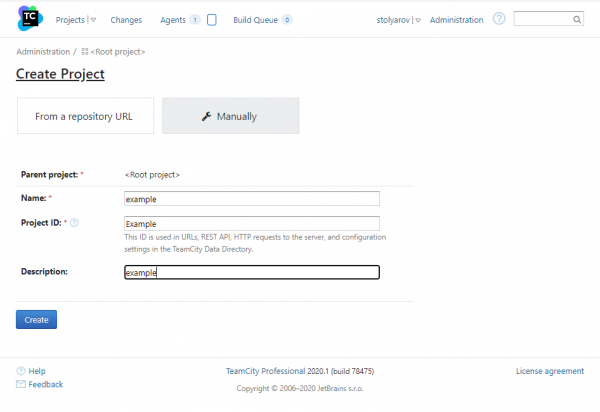
After clicking the button Create, a window with settings greets us.
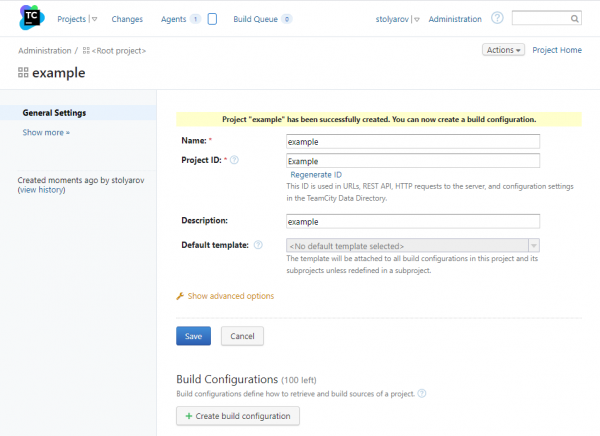
Let's click Create build configuration.
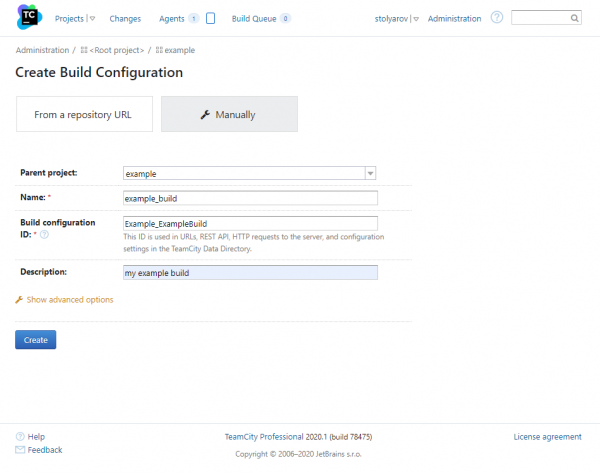
We fill in the fields and click Create. We see a window offering to choose a version control system. Since the source files are already stored locally, we click Skip.
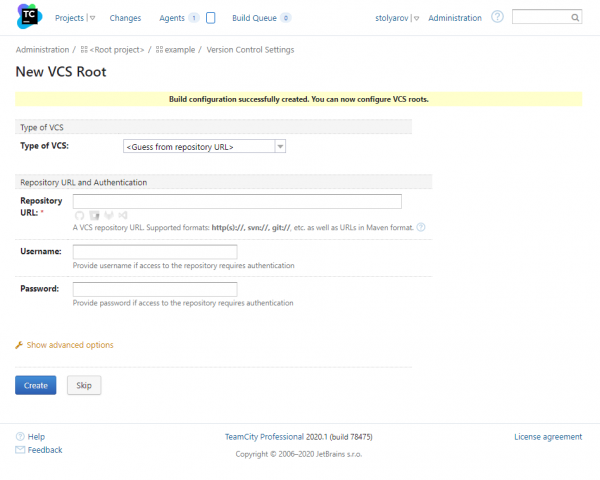
Finally, we move on to the project settings.
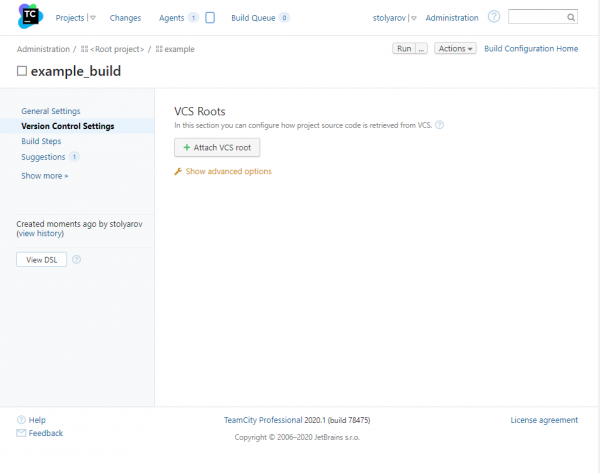
We'll add build steps, for this we click: Build steps -> Add build step.
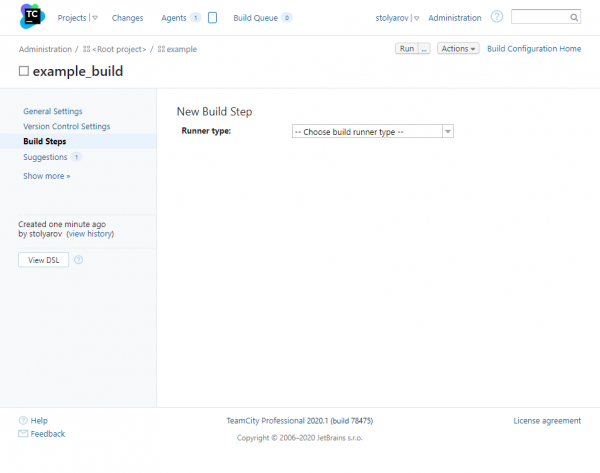
Here we will select:
- Runner type -> Command Line
- Run -> Custom Script
Since we will conduct analysis during the project compilation, building and analyzing must be one step, so we will fill in the field Custom Script:
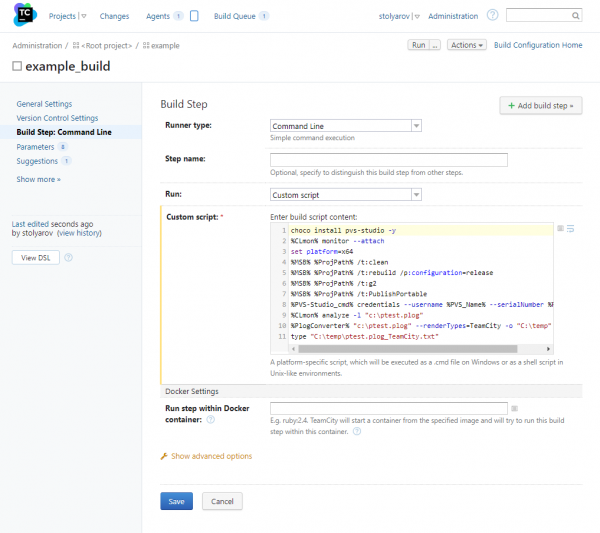
We will stop at separate steps later. It is important that loading the analyzer, building the project, analyzing it, generating the report, and formatting it take a total of eleven lines of code.
The last thing we need to do is set environment variables, which I have designated some paths for readability. For this, we go to: Parameters -> Add new parameter and add three variables:
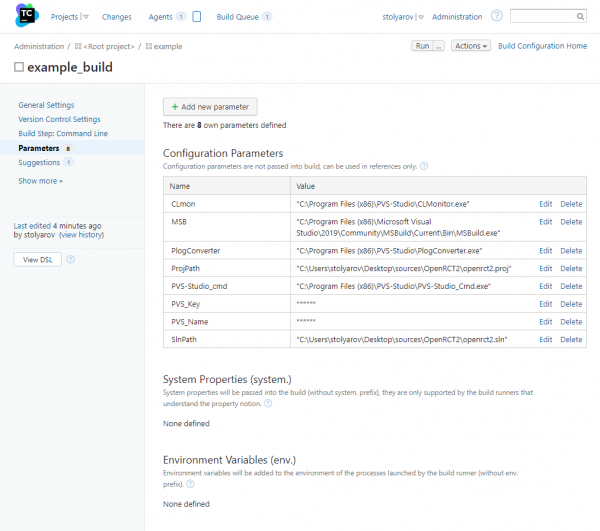
We just need to click the button Run in the upper right corner. While the project is being built and analyzed, I will tell you about the script.
Specifically the script
First, we need to download the latest PVS-Studio distribution. For this, we will use the Chocolatey package manager. For those who want to know more about this, there is a corresponding :
choco install pvs-studio -yNext, we will run the project build tracking utility CLMonitor.
%CLmon% monitor --attachThen we will build the project, where the environment variable MSB represents the path to the required version of MSBuild for the build
%MSB% %ProjPath% /t:clean
%MSB% %ProjPath% /t:rebuild /p:configuration=release
%MSB% %ProjPath% /t:g2
%MSB% %ProjPath% /t:PublishPortable
We will enter the username and license key for PVS-Studio:
%PVS-Studio_cmd% credentials --username %PVS_Name% --serialNumber %PVS_Key%After the build is completed, we will run CLMonitor again for generating preprocessed files and performing static analysis:
%CLmon% analyze -l "c:ptest.plog"Then we will use another utility from our distribution. PlogConverter converts the report from standard format to TeamCity specific format. This way we can view it right in the build window.
%PlogConverter% "c:ptest.plog" --renderTypes=TeamCity -o "C:temp"As the final action, we will output the formatted report to stdout, where it will be picked up by the TeamCity parser.
type "C:tempptest.plog_TeamCity.txt"Full script code:
choco install pvs-studio -y
%CLmon% monitor --attach
set platform=x64
%MSB% %ProjPath% /t:clean
%MSB% %ProjPath% /t:rebuild /p:configuration=release
%MSB% %ProjPath% /t:g2
%MSB% %ProjPath% /t:PublishPortable
%PVS-Studio_cmd% credentials --username %PVS_Name% --serialNumber %PVS_Key%
%CLmon% analyze -l "c:ptest.plog"
%PlogConverter% "c:ptest.plog" --renderTypes=TeamCity -o "C:temp"
type "C:tempptest.plog_TeamCity.txt"
Meanwhile, the project build and analysis have successfully completed, we can move to the tab Projects and verify this.
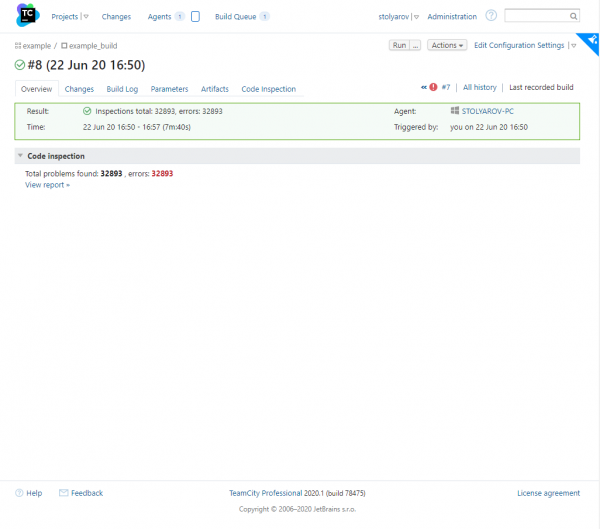
Now let's click on Inspections Total, to view the analyzer report:
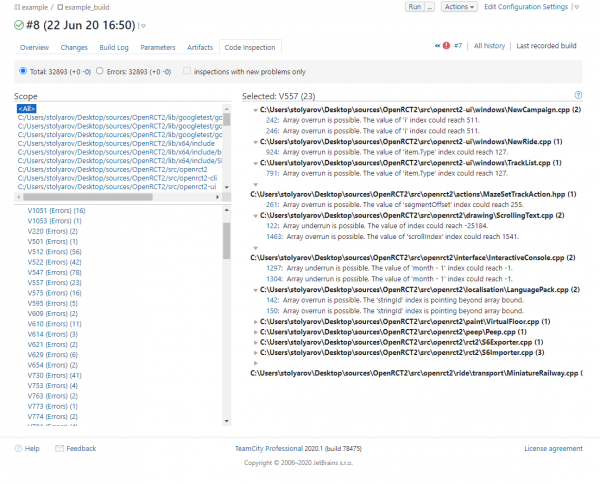
Warnings are grouped by the diagnostic rule numbers. To navigate through the code, click on the line number with a warning. Clicking on the question mark in the top right corner will open a new tab with documentation. You can also navigate through the code by clicking on the line number with a warning from the analyzer. Remote navigation is possible using SourceTreeRoot marker. Those interested in this analyzer work mode can refer to the appropriate section .
Viewing Analyzer Results
After we finished deploying and configuring the build, I suggest looking at some interesting warnings found in the examined project.
Warning N1
[CWE-401] The exception was thrown without releasing the 'result' pointer. A memory leak is possible. libopenrct2 ObjectFactory.cpp 443
Object* CreateObjectFromJson(....)
{
  Object* result = nullptr;
  ....
  result = CreateObject(entry);
  ....
  if (readContext.WasError())
  {
    throw std::runtime_error("Object has errors");
  }
  ....
}

Object* CreateObject(const rct_object_entry& entry)
{
  Object* result;
  switch (entry.GetType())
  {
    case OBJECT_TYPE_RIDE:
      result = new RideObject(entry);
      break;
    case OBJECT_TYPE_SMALL_SCENERY:
      result = new SmallSceneryObject(entry);
      break;
    case OBJECT_TYPE_LARGE_SCENERY:
      result = new LargeSceneryObject(entry);
      break;
    ....
    default:
      throw std::runtime_error("Invalid object type");
  }
  return result;
}
The analyzer has detected an error indicating that after dynamic memory allocation in CreateObject, upon throwing an exception, the memory is not freed, leading to a memory leak.
Warning N2
There are identical sub-expressions '(1ULL << WIDX_MONTH_BOX)' to the left and to the right of the '|' operator. libopenrct2ui Cheats.cpp 487
static uint64_t window_cheats_page_enabled_widgets[] =
{
  MAIN_CHEAT_ENABLED_WIDGETS |
  (1ULL << WIDX_NO_MONEY) |
  (1ULL << WIDX_ADD_SET_MONEY_GROUP) |
  (1ULL << WIDX_MONEY_SPINNER) |
  (1ULL << WIDX_MONEY_SPINNER_INCREMENT) |
  (1ULL << WIDX_MONEY_SPINNER_DECREMENT) |
  (1ULL << WIDX_ADD_MONEY) |
  (1ULL << WIDX_SET_MONEY) |
  (1ULL << WIDX_CLEAR_LOAN) |
  (1ULL << WIDX_DATE_SET) |
  (1ULL << WIDX_MONTH_BOX) |  // <=
  (1ULL << WIDX_MONTH_UP) |
  (1ULL << WIDX_MONTH_DOWN) |
  (1ULL << WIDX_YEAR_BOX) |
  (1ULL << WIDX_YEAR_UP) |
  (1ULL << WIDX_YEAR_DOWN) |
  (1ULL << WIDX_DAY_BOX) |
  (1ULL << WIDX_DAY_UP) |
  (1ULL << WIDX_DAY_DOWN) |
  (1ULL << WIDX_MONTH_BOX) |  // <=
  (1ULL << WIDX_DATE_GROUP) |
  (1ULL << WIDX_DATE_RESET),
  ....
};
Few, besides static analyzers, could pass this test of attentiveness. This example of copy-pasting is good for exactly that reason.
Warning N3
It is odd that the 'flags' field in derived class 'RCT12BannerElement' overwrites the field in base class 'RCT12TileElementBase'. Check lines: RCT12.h:570, RCT12.h:259. libopenrct2 RCT12.h 570
struct RCT12SpriteBase
{
  ....
  uint8_t flags;
  ....
};
struct rct1_peep : RCT12SpriteBase
{
  ....
  uint8_t flags;
  ....
};
Naturally, using a variable with the same name in the base class and in the derived class is not always a mistake. However, inheritance technology itself implies the presence of all fields of the parent class in the child class. By declaring fields with the same name in the derived class, we introduce confusion.
Warning N4
It is odd that the result of the 'imageDirection / 8' statement is part of the condition. Perhaps, this statement should have been compared with something else. libopenrct2 ObservationTower.cpp 38
void vehicle_visual_observation_tower(...., int32_t imageDirection, ....)
{
  if ((imageDirection / 8) && (imageDirection / 8) != 3)
  {
    ....
  }
  ....
}
Let's figure this out in more detail. The expression imageDirection / 8 will be false if imageDirection is in the range from -7 to 7. The second part: (imageDirection / 8) != 3 checks for being outside the range: from -31 to -24 and from 24 to 31. I find it quite strange to check numbers for inclusion in a certain range this way, and even if there is no error in this code snippet, I would recommend rewriting these conditions to be more explicit. This would significantly simplify life for those who will read and maintain this code. imageDirection V587
Warning N5
An odd sequence of assignments of this kind: A = B; B = A;. Check lines: 1115, 1118. libopenrct2ui MouseInput.cpp 1118
void process_mouse_over(....)
{
  ....
  switch (window->widgets[widgetId].type)
  {
    case WWT_VIEWPORT:
      ebx = 0;
      edi = cursorId;                                 // <=
      // Window event WE_UNKNOWN_0E was called here,
      // but no windows actually implemented a handler and
      // it's not known what it was for
      cursorId = edi;                                 // <=
      if ((ebx & 0xFF) != 0)
      {
        set_cursor(cursorId);
        return;
      }
      break;
      ....
  }
  ....
}
This code fragment was likely obtained through decompilation. Then, judging by the remaining comment, part of the non-working code was removed. However, a couple of operations over cursorId, which also don't carry much meaning.
Warning N6
[CWE-476] The 'player' pointer was used unsafely after it was verified against nullptr. Check lines: 2085, 2094. libopenrct2 Network.cpp 2094
void Network::ProcessPlayerList()
{
  ....
  auto* player = GetPlayerByID(pendingPlayer.Id);
  if (player == nullptr)
  {
    // Add new player.
    player = AddPlayer("", "");
    if (player)                                          // Flags & NETWORK_PLAYER_FLAG_ISSERVER)
       {
         _serverConnection->Player = player;
       }
    }
    newPlayers.push_back(player->Id);                    // <=
  }
  ....
}
This code can be easily fixed; we either need to check the pointer against null again or place it within the conditional operator. I would suggest the latter option: player against a null pointer, or include it within the body of the conditional operator. I would recommend the second option:
void Network::ProcessPlayerList()
{
  ....
  auto* player = GetPlayerByID(pendingPlayer.Id);
  if (player == nullptr)
  {
    // Add new player.
    player = AddPlayer("", "");
    if (player)
    {
      *player = pendingPlayer;
      if (player->Flags & NETWORK_PLAYER_FLAG_ISSERVER)
      {
        _serverConnection->Player = player;
      }
      newPlayers.push_back(player->Id);
    }
  }
  ....
}
Warning N7
[CWE-570] Expression 'name == nullptr' is always false. libopenrct2 ServerList.cpp 102
std::optional ServerListEntry::FromJson(...)
{
  auto name = json_object_get(server, "name");
  .....
  if (name == nullptr || version == nullptr)
  {
    ....
  }
  else
  {
    ....
    entry.name = (name == nullptr ? "" : json_string_value(name));
    ....
  }
  ....
}
We can eliminate the hard-to-read line of code in one go and solve the issue with the null check. nullptrI propose modifying the code as follows:
std::optional ServerListEntry::FromJson(...)
{
  auto name = json_object_get(server, "name");
  .....
  if (name == nullptr || version == nullptr)
  {
    name = "";
    ....
  }
  else
  {
    ....
    entry.name = json_string_value(name);
    ....
  }
  ....
}
Warning N8
[CWE-1164] The 'ColumnHeaderPressedCurrentState' variable was assigned the same value. libopenrct2ui CustomListView.cpp 510
void CustomListView::MouseUp(....)
{
  ....
  if (!ColumnHeaderPressedCurrentState)
  {
    ColumnHeaderPressed = std::nullopt;
    ColumnHeaderPressedCurrentState = false;
    Invalidate();
  }
}
The code looks quite strange. It seems to me there was a typo either in the condition or during the reassignment of the variable. ColumnHeaderPressedCurrentState values false.
Output
As we can see, integrating the PVS-Studio static analyzer into your project on TeamCity is quite straightforward. All it takes is to write a small configuration file. Code analysis will help identify problems right after the build, allowing for their resolution when the complexity and cost of fixes are still low.
If you want to share this article with an English-speaking audience, please use the link to the translation: Vladislav Stolyarov. .
Source: habr.com
