

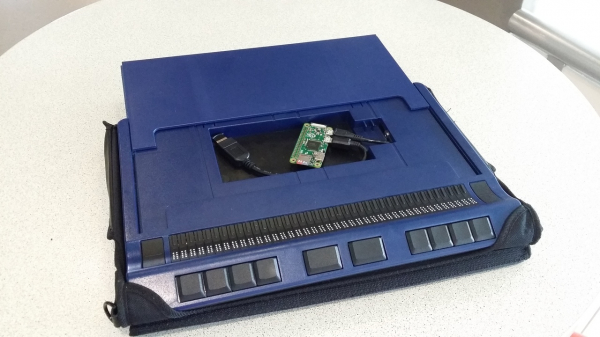
The author placed a Raspberry Pi Zero, a Bluetooth 'dongle,' and a cable inside their new Braille display, the Handy Tech Active Star 40. The built-in USB port provides power. It became a self-sufficient, monitor-free ARM computer running Linux, equipped with a keyboard and a Braille display. It can be charged/powered via USB, including from a power bank or solar charger. Therefore, it can run without electricity for several days, not just a few hours.
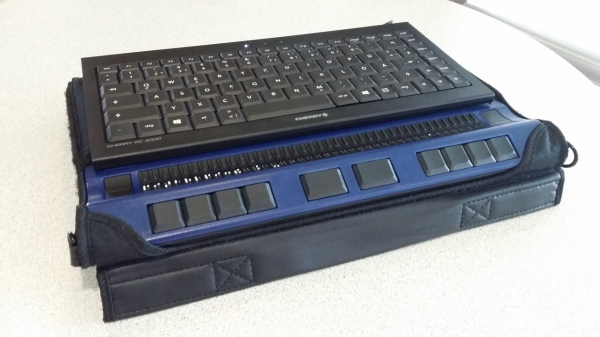
Size differentiation of Braille displays
First of all, they differ in line length. Devices with 60 or more characters are good for working with a desktop computer, while those with 40 characters are convenient for portability with a laptop. Now there are also Braille displays that connect to smartphones and tablets, with a line length of 14 or 18 characters.
In the past, Braille displays were quite bulky. For example, a 40-character display weighed as much as a 13-inch laptop. Now, they are compact enough to be placed in front of a laptop without the laptop being on top of the display.
This is certainly better, but it's still not very convenient to hold two separate devices on your lap. When working at a desk, there are no complaints, but one must remember that a laptop is otherwise called a 'laptop,' and when trying to justify that name, it turns out that the compact 40-character display is even less comfortable.
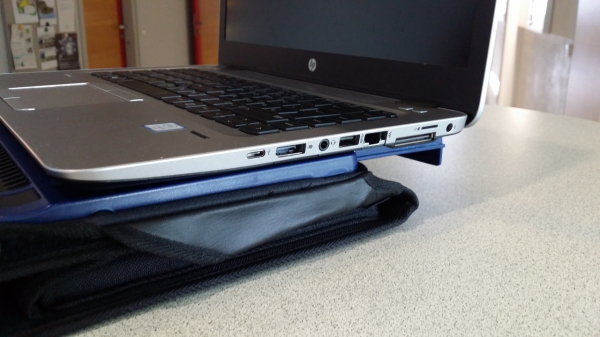
So the author waited for the long-promised new model in the Handy Tech Star series. Back in 2002, the previous model, the Handy Tech Braille Star 40, was released, where the chassis had enough surface area to place a laptop on top. If it didn't fit, there was a pull-out stand. Now this model has been replaced with the Active Star 40, which is practically the same but with upgraded electronics.
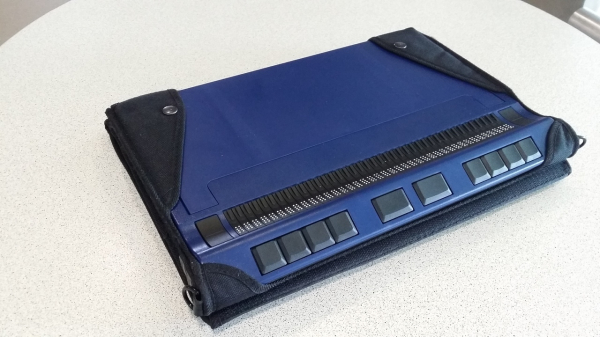
And the pull-out stand remains:
But the most convenient feature of the new model is the recess sized approximately for a smartphone (see COTV). It opens by sliding the platform back. Keeping a smartphone there turned out to be inconvenient, but the empty compartment needs to be utilized, inside which even a power outlet is provided.
The first idea the author had was to place a Raspberry Pi inside, but when the display was acquired, it turned out that the stand covering the compartment wouldn't fit with the 'berry'. If only the board were just 3 mm thinner...
But a colleague mentioned the release of the Raspberry Pi Zero, which was so compact that two... or perhaps even three could fit in the compartment. It was immediately ordered along with a 64 GB memory card, Bluetooth dongle, and Micro USB cable. A few days later everything arrived, and sighted friends helped the author prepare the card. Everything worked perfectly right away.
What was done for this
On the back panel of the Handy Tech Active Star 40, there are two USB ports for devices like keyboards. A compact keyboard with magnetic attachment is included. When the keyboard is connected and the display operates via Bluetooth, the computer additionally recognizes it as a Bluetooth keyboard.
Thus, if a Bluetooth dongle is connected to the Raspberry Pi Zero placed in the smartphone compartment, it can exchange data with the Braille display via Bluetooth using , and if a keyboard is also connected to the display, the 'berry' will work with it as well.
But that's not all. The 'berry' itself can access the internet via Bluetooth PAN from any supported device. The author configured their smartphone and computers at home and at work accordingly, but later plans to adapt another 'berry' — a classic one, not Zero, connected to Ethernet and another Bluetooth dongle.
BlueZ 5 and PAN
The method for configuring PAN using turned out to be non-obvious. The author found a Python script bt-pan (see below) that allows configuring PAN without a GUI.
With it, you can set up both a server and a client. Upon receiving the appropriate command via D-Bus while in client mode, it creates a new network device bnep0 immediately after establishing a connection with the server. Typically, DHCP is used to assign an IP address to this interface. In server mode, BlueZ requires specifying the name of the bridge device to which it can add a discovered device for connecting each client. Configuring the address for the bridge device and starting a DHCP server plus IP masquerading on the bridge is usually all that is needed.
Bluetooth PAN Access Point with Systemd
For the bridge configuration, the author used systemd-networkd:
File /etc/systemd/network/pan.netdev
[NetDev]
Name=pan
Kind=bridge
ForwardDelaySec=0
File /etc/systemd/network/pan.network
[Match]
Name=pan

[Network]
Address=0.0.0.0/24
DHCPServer=yes
IPMasquerade=yes
Now we need to have BlueZ configure the NAP profile. It turned out that the standard tools in BlueZ 5.36 cannot do this. If the author is mistaken, correct him: mlang (can wiggle its ears) blind (may have access and quantum) guru
But he found and to make the necessary calls to D-Bus.
For convenience, the author utilized the Systemd service to run the script and check for dependency resolution.
File /etc/systemd/system/pan.service
[Unit]
Description=Bluetooth Personal Area Network
After=bluetooth.service systemd-networkd.service
Requires=systemd-networkd.service
PartOf=bluetooth.service

[Service]
Type=notify
ExecStart=/usr/local/sbin/pan

[Install]
WantedBy=bluetooth.target
File /usr/local/sbin/pan
#!/bin/sh
# Ugly hack to work around #787480
iptables -F
iptables -t nat -F
iptables -t mangle -F
iptables -t nat -A POSTROUTING -o eth0 -j MASQUERADE

exec /usr/local/sbin/bt-pan --systemd --debug server pan
The second file would not be necessary if Debian supported IPMasquerade= (see. ).
After executing the commands systemctl daemon-reload and systemctl restart systemd-networkd you can start the Bluetooth PAN with the command systemctl start pan
Bluetooth PAN Client using Systemd
The client part can also be configured easily with Systemd.
File /etc/systemd/network/pan-client.network
[Match]
Name=bnep*

[Network]
DHCP=yes
File /etc/systemd/system/pan@.service
[Unit]
Description=Bluetooth Personal Area Network client

[Service]
Type=notify
ExecStart=/usr/local/sbin/bt-pan --debug --systemd client %I --wait
Now, after reloading the configuration, you can connect to the specified Bluetooth access point like this:
systemctl start pan@00:11:22:33:44:55Pairing via the command line
Of course, the server and client configuration must be performed after pairing them via Bluetooth. On the server, you need to start bluetoothctl and give it the commands:
power on
agent on
default-agent
scan on
scan off
pair XX:XX:XX:XX:XX:XX
trust XX:XX:XX:XX:XX:XX
After starting the scan, wait a few seconds for the desired device to appear in the list. Note its address and use it when issuing the pair command, and if necessary, the trust command.
On the client side, you need to do the same, but the trust command will definitely not be needed. The server requires it to accept the connection via the NAP profile without manual user confirmation.
The author is not sure this is the optimal command sequence. Perhaps, all that's needed is to pair the client with the server and execute the trust command on the server, but he hasn't tried it that way yet.
Permitting the use of the Bluetooth HID profile
It is required for the 'raspberry' to recognize the keyboard connected to the Braille display via a wire, and passed through the display itself via Bluetooth. It works the same way, only instead of agent on you need to give the command agent KeyboardOnly and bluetoothctl will find the device with the HID profile.
But configuring Bluetooth through the command line is quite complicated.
Although the author managed to configure everything, he understands that setting up BlueZ through the command line is inconvenient. At first, he thought that agents were only needed for entering PIN codes, but it turned out, for example, that in order to enable the HID profile, you need to type 'agent KeyboardOnly'. It is surprising that to launch Bluetooth PAN, one has to dig through repositories in search of the needed script. He remembers that in the previous version of BlueZ there was a ready-made tool pand — where has it gone in BlueZ 5? Has a new solution appeared that is unknown to the author but is obvious?
Performance
The data transfer rate was about 120 kbit/s, which is quite sufficient. A 1 GHz ARM processor is very fast for the command line interface. The author still plans to primarily use SSH and Emacs on the device.
Console fonts and screen resolution
The screen resolution used by the framebuffer on the Raspberry Pi Zero by default is quite strange: fbset reports it as 656×416 pixels (the monitor is, of course, not connected). With a console font of 8×16, it resulted in 82 characters per line and 26 lines.
Working with a 40-cell Braille display in this mode is inconvenient. The author would also like the display to output Unicode characters in Braille. Fortunately, Linux supports 512 characters, and most console fonts have 256. With console-setup, two 256-character fonts can be used together. The author added the following lines to the file /etc/default/console-setup:
SCREEN_WIDTH=80
SCREEN_HEIGHT=25
FONT="Lat15-Terminus16.psf.gz brl-16x8.psf"
Note: To make the brl-16×8.psf font available, you need to install console-braille.
What's next?
The Braille display has a 3.5 mm jack, but the author is unaware of adapters to extract the audio signal from Mini-HDMI. The built-in sound card on the 'Raspberry Pi' could not be utilized (strangely, the translator was sure there wasn't one in the Zero, but there are ways to output sound via PWM on GPIO). He plans to use a USB-OTG hub and connect an external sound card to output sound to the built-in speaker on the Braille display. For some reason, two external cards did not work; he is now looking for a similar device with a different chipset.
It is still inconvenient to manually disconnect the 'Raspberry Pi', wait a few seconds, and then unplug the Braille display. This is because it turns off the power from the connector in the compartment upon disconnection. The author plans to place a small buffer battery in the compartment and communicate to the 'Raspberry Pi' via GPIO about the disconnection of the display, so that it can proceed with shutting down. A miniature UPS, so to speak.
System Image
If you have the same Braille display and wish to do the same with it, the author is ready to provide the complete system image (based on Raspbian Stretch). Contact him at the address provided above. If there are enough interested parties, it may even lead to the release of kits including everything necessary for such a modification.
Acknowledgments
Thanks to Dave Mielke for proofreading the text.
Thanks to Simon Kainz for the photo illustrations.
Thanks to colleagues at Graz University of Technology for quickly introducing the author to the world of Raspberry Pi.
P.S. by the author on this topic (not opening — translator) was made just five days before the publication of the original article, and it can be considered that, except for issues with sound, the task has been practically solved. By the way, the final version of the text was edited using the 'self-sufficient Braille display' he built, connecting it via SSH to his home computer.
Source: habr.com
