

Today I want to share how to set up a two-factor authentication server to protect the corporate network, sites, services, ssh. The link will work on the server: LinOTP + FreeRadius.
Why do we need it?
This is a completely free, convenient solution, within your network, independent of third-party providers.
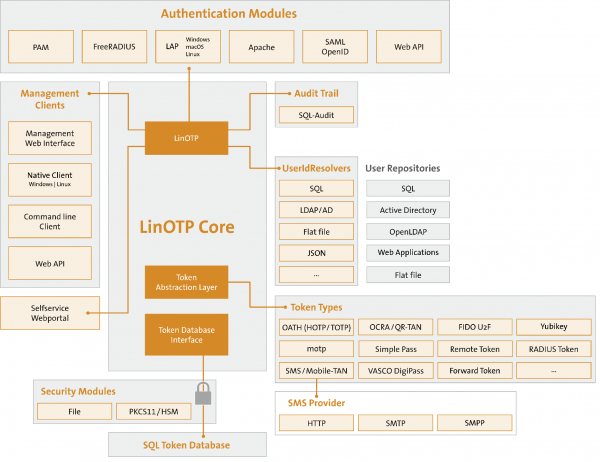
This service is very convenient, quite visual, unlike other open source products, and also supports a huge number of functions and policies (For example, login+password+(PIN+OTPToken)). Through the API, it integrates with sms sending services (LinOTP Config->Provider Config->SMS Provider), generates codes for mobile applications such as Google Autentificator and much more. I think it is more convenient than the service considered in .
This server works great with Cisco ASA, OpenVPN server, Apache2, and in general with almost everything that supports authentication via a RADIUS server (for example, for SSH in a data center).
Required:
1) Debian 8 (jessie) — Required! (test installation on debian 9 is described at the end of the article)
Start:
Set Debian 8.
Add the LinOTP repository:
# echo 'deb http://www.linotp.org/apt/debian jessie linotp' > /etc/apt/sources.list.d/linotp.listAdding keys:
# gpg --search-keys 913DFF12F86258E5Sometimes during a “clean” installation, after running this command, Debian gives out:
gpg: создан каталог `/root/.gnupg'
gpg: создан новый файл настроек `/root/.gnupg/gpg.conf'
gpg: ВНИМАНИЕ: параметры в `/root/.gnupg/gpg.conf' еще не активны при этом запуске
gpg: создана таблица ключей `/root/.gnupg/secring.gpg'
gpg: создана таблица ключей `/root/.gnupg/pubring.gpg'
gpg: не заданы серверы ключей (используйте --keyserver)
gpg: сбой при поиске на сервере ключей: плохой URI
This is the initial gnupg setup. It's OK. Just run the command again.
On the question Debiana:
gpg: поиск "913DFF12F86258E5" на hkp сервере keys.gnupg.net
(1)	LSE LinOTP2 Packaging <linotp2@lsexperts.de>
	  2048 bit RSA key F86258E5, создан: 2010-05-10
Keys 1-1 of 1 for "913DFF12F86258E5".  Введите числа, N) Следующий или Q) Выход>
Answer: 1
Next:
# gpg --export 913DFF12F86258E5 | apt-key add -# apt-get updateInstall mysql. In theory, you can use another sql server, but for simplicity I will use it as recommended for LinOTP.
(additional information, including reconfiguring the LinOTP database, can be found in the official documentation for . In the same place, you can find the command: dpkg-reconfigure linotp to change the settings if you have already installed mysql).
# apt-get install mysql-server# apt-get update (It doesn't hurt to check again for updates)
Install LinOTP and additional modules:
# apt-get install linotp We answer the questions of the installer:
Use Apache2: yes
Create a password for admin Linotp: "YourPassword"
Generate self-signed certificate?: yes
Use MySQL?: yes
Where is the database located: localhost
Create a LinOTP database (base name) on the server: LinOTP2
Create a separate user for the database: LinOTP2
Set the password for the user: "YourPassword"
Should I create a base now? (something like “Are you sure you want…”): yes
Enter the MySQL root password that you created during installation: "YourPassword"
Done.
(optional, you can not put)
# apt-get install linotp-adminclient-cli (optional, you can not put)
# apt-get install libpam-linotp And so our Linotp web interface is now available at:
"<b>https</b>: //IP_сервера/manage"I will talk about the settings in the web interface a little later.
Now, the most important thing! Raise FreeRadius and link it to Linotp.
Install FreeRadius and the LinOTP module
# apt-get install freeradius linotp-freeradius-perlback up the client and Users configs of the radius.
# mv /etc/freeradius/clients.conf /etc/freeradius/clients.old# mv /etc/freeradius/users /etc/freeradius/users.oldCreate an empty client file:
# touch /etc/freeradius/clients.confEditing our new config file (backed up config can be used as an example)
# nano /etc/freeradius/clients.confclient 192.168.188.0/24 {
secret = passwd # пароль для подключения клиентов
}Next, create the users file:
# touch /etc/freeradius/usersWe edit the file, telling the radius that we will use perl for authentication.
# nano /etc/freeradius/usersDEFAULT Auth-type := perlNext, edit the file /etc/freeradius/modules/perl
# nano /etc/freeradius/modules/perlWe need to set the path to the linotp perl script in the module parameter:
Perl { .......
.........
<source lang="bash">module = /usr/lib/linotp/radius_linotp.pm
.....
Next, we create a file in which we say from which (domain, database or file) to take data.
# touch /etc/linotp2/rlm_perl.ini# nano /etc/linotp2/rlm_perl.iniURL=https://IP_вашего_LinOTP_сервера(192.168.X.X)/validate/simplecheck
REALM=webusers1c
RESCONF=LocalUser
Debug=True
SSL_CHECK=FalseHere I will dwell a little more, because it is important:
Full description of the file with comments:
#IP of the linotp server (IP address of our LinOTP server)
URL=https://172.17.14.103/validate/simplecheck
#Our area that we will create in the LinOTP web interface.)
REALM=rearm1
#Name of the user group that is created in the LinOTP webmord.
RESCONF=flat_file
#optional: comment out if everything seems to work fine
Debug=True
#optional: use this, if you have selfsigned certificates, otherwise comment out (SSL if we create our own certificate and want to verify it)
SSL_CHECK=False
Next, create the file /etc/freeradius/sites-available/linotp
# touch /etc/freeradius/sites-available/linotp# nano /etc/freeradius/sites-available/linotpAnd copy the config into it (nothing needs to be edited):
authorize {
#normalizes maleformed client request before handed on to other modules (see '/etc/freeradius/modules/preprocess')
preprocess
#  If you are using multiple kinds of realms, you probably
#  want to set "ignore_null = yes" for all of them.
#  Otherwise, when the first style of realm doesn't match,
#  the other styles won't be checked.
#allows a list of realm (see '/etc/freeradius/modules/realm')
IPASS
#understands something like USER@REALM and can tell the components apart (see '/etc/freeradius/modules/realm')
suffix
#understands USERREALM and can tell the components apart (see '/etc/freeradius/modules/realm')
ntdomain
#  Read the 'users' file to learn about special configuration which should be applied for
# certain users (see '/etc/freeradius/modules/files')
files
# allows to let authentification to expire (see '/etc/freeradius/modules/expiration')
expiration
# allows to define valid service-times (see '/etc/freeradius/modules/logintime')
logintime
# We got no radius_shortname_map!
pap
}
#here the linotp perl module is called for further processing
authenticate {
perl
}
Next, we will make a sim link:
# ln -s ../sites-available/linotp /etc/freeradius/sites-enabledPersonally, I kill the default radius sites, but if you need them, you can either edit their config or disable them.
# rm /etc/freeradius/sites-enabled/default# rm /etc/freeradius/sites-enabled/inner-tunnel# service freeradius reload Now let's get back to the web muzzle and look at it in a little more detail:
In the upper right corner, click LinOTP Config -> UserIdResolvers -> New
We choose what we want: LDAP (AD win, LDAP samba), or SQL, or local users of the Flatfile system.
Fill in the required fields.
Next, we create REALMS:
In the upper right corner, click LinOTP Config -> Realms -> New.
and give a name to our REALMS, and also click on the UserIdResolvers created earlier.
All this data is needed by freeRadius in the /etc/linotp2/rlm_perl.ini file, which I wrote about above, so if you didn't edit it then, do it now.
All server is configured.
Supplement:
Setting up LinOTP on Debian 9:
Installation:
# echo 'deb http://linotp.org/apt/debian stretch linotp' > /etc/apt/sources.list.d/linotp.list # apt-get install dirmngr# apt-key adv --recv-keys 913DFF12F86258E5
# apt-get update# apt-get install mysql-server(by default, in Debian 9 MySQL (mariaDB) doesn't offer to set a root password. You can, of course, leave it blank, but if you read the news, this often leads to "epic fails," so we'll set it anyway.
# mysql -u root -puse mysql;UPDATE user SET Password = PASSWORD('тут_пароль') WHERE User = 'root';
exit# apt-get install linotp# apt-get install linotp-adminclient-cli# apt-get install python-ldap# apt install freeradius# nano /etc/freeradius/3.0/sites-enabled/linotpPaste the code (sent by JuriM, thanks to him for that!):
server linotp {
listen {
ipaddr=*
port=1812
type=auth
}
listen {
ipaddr=*
port=1813
type = acct
}
authorize {
preprocess
update {
&control:Auth-Type := Perl
}
}
authenticate {
Auth-Type Perl {
perl
}
}
accounting {
unix
}
}
Edit /etc/freeradius/3.0/mods-enabled/perl
perl {
filename = /usr/share/linotp/radius_linotp.pm
func_authenticate = authenticate
func_authorize = authorize
}
Unfortunately in debian 9 library radius_linotp.pm is not installed from the repositories, so we will take it from github.
# apt install git# git clone https://github.com/LinOTP/linotp-auth-freeradius-perl# cd linotp-auth-freeradius-perl/# cp radius_linotp.pm /usr/share/linotp/radius_linotp.pmnow let's fix /etc/freeradius/3.0/clients.conf
client servers {
ipaddr = 192.168.188.0/24
secret = your password
}
now let's fix nano /etc/linotp2/rlm_perl.ini
We insert there the same code as when installing on debian 8 (described above)
on the idea of everything. (not tested yet)
I will leave below a few links to set up systems that most often need to be protected by two-factor authorization:
Setting up two-factor authentication in
(it uses a different token generation server, but the settings of the ASA itself are the same).
Setting (LinOTP is also used there) - thanks to the author. There you can also find interesting things on setting up LiOTP policies.
Also, the CMS of many sites support two-factor authentication (For WordPress LinOTP even has its own special module on ), for example, if you want to make a secure section for company employees on your corporate website.
IMPORTANT FACT! DO NOT check the "Google authenticator" box to use Google Authenticator! The QR code is not readable then… (weird fact)
Information from the following articles was used to write the article:
Thanks to the authors.
Source: habr.com
