

Content Delivery Networks (CDNs) are used in websites and applications primarily to speed up the loading of static elements. This happens due to the caching of files on CDN servers located in different geographical regions. By requesting data via CDN, the user receives it from the nearest server.
The principle of operation and functionality of all content delivery networks is approximately the same. Having received a request to download a file, the CDN server takes it one-time from the original server and gives it to the user, at the same time caching it for a specified period of time. All subsequent requests are answered from the cache. All CDNs have options to preload files, clear the cache, set the expiration date, and more.
It happens that, for one reason or another, you need to organize your own content delivery network, and then - let the instructions for assembling the next bike be of help to us.

Source:
When you need your own CDN
Consider the cases where running your own CDN makes sense:
- when there is a desire to save money, and running costs even when using inexpensive CDNs like amount to several hundred dollars a month
- if we want to get a permanent cache or a cache without server and channel neighbors
- CDN services do not have points of presence in the region you need
- any special content delivery settings required
- we want to speed up the delivery of dynamic content by placing the production server closer to users
- there is a concern that a third-party CDN service may illegally collect or use information about user behavior (hello non-GDPR-compliant services) or engage in other illegal activities
In most other cases, it is more appropriate to use existing ready-made solutions.
What do you need to start
It's wonderful if you have your own Autonomous System (AS). With it, you can assign the same IP to several servers and at the network level, direct users to the nearest one. It is worth saying that even with the /24 address block, it is possible to build a content delivery network. Some server providers allow you to make an announcement for use in all regions available to them.
If you are not a happy owner of a block of IP addresses, then to run a simple CDN you will need:
- domain name or subdomain
- at least two servers in different regions. The server can be either dedicated or virtual
- geoDNS tool. With it, the user, having addressed the domain, will be directed to the nearest server
Register a domain and order servers
With domain registration, everything is simple - we register in any zone with any registrar. You can also use a subdomain for a CDN, for example something like cdn.domainname.com. Actually, in our example, we will do just that.
As for ordering servers, they should be rented in the regions and countries where your user audience is located. If the project is intercontinental, then it is convenient to choose hosting providers that offer servers all over the world at once. Examples: , и - for dedicated servers, и — for virtual cloud*.
For our private CDN, we will order 3 virtual servers on different continents. At vultr on the server for $5/mo we will get 25GB SSD places and 1TB of trafficDuring installation, we will select the latest one. DebianOur servers:
 Frankfurt, ip: 199.247.18.199
 Chicago, ip: 149.28.121.123
 Singapore, ip: 157.230.240.216
*Vultr and DigitalOcean promise $100 credit to users who register through the links in the article immediately after adding a payment method. The author also receives a small compliment from this, which is very significant for him now. Please be understanding.
Setting up geoDNS
In order for the user to be directed to the desired (closest) server when accessing a domain or CDN subdomain, we need a DNS server with the geoDNS function.
The principle and operation of geoDNS is as follows:
- Specifies the IP of the client that sent the DNS request, or the IP of the recursive DNS server that is used when processing the client request. Such recursive servers are usually DNS-s of providers.
- The IP of the client recognizes his country or region. For this, GeoIP databases are used, of which there are a great many today. There are good .
- Depending on the location of the client, gives him the IP address of the nearest CDN server.
DNS server with geoDNS function can be , but it is better to use ready-made solutions with a network of DNS servers around the world and from the box:
- from $9.95/mo, GeoDNS tariff, by default there is one DNS Failover
- from $25/mo, DNS Failover enabled
- from $35/mo for a net 50M geo-requests. DNS Failover is billed separately
- from $125/mo, there are 10 DNS Failovers
- , "Geo Steering" feature is available in Enterprise plans
When ordering geoDNS, you should pay attention to the number of requests included in the tariff and keep in mind that the actual number of requests to the domain can exceed expectations by several times. Millions of spiders, scanners, spammers and other evil spirits work tirelessly.
Almost all DNS services include an indispensable service for building a CDN - DNS Failover. With its help, you can set up monitoring of the operation of your servers and, in the absence of signs of life, automatically replace the address of a non-working server with a backup one in DNS responses.
To build our CDN, we will use , GeoDNS tariff.
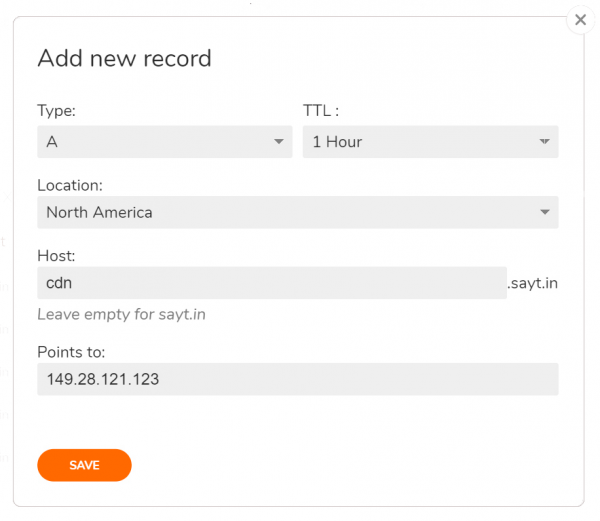
Let's add a new DNS zone in your personal account, specifying your domain. If we are building a CDN on a subdomain, and the main domain is already in use, then immediately after adding the zone, do not forget to add the existing working DNS records. The next step is to create several A-records for the CDN domain / subdomain, each of which will be applied to the region we specified. You can specify continents or countries as regions, sub-regions are available for the USA and Canada.
In our case, the CDN will be raised on a subdomain cdn.sayt.in. By adding a zone sayt.in, create the first A-record for the subdomain and point all of North America to the server in Chicago:
Let's repeat the action for other regions, remembering to create one entry for the default regions. Here's what happens in the end:
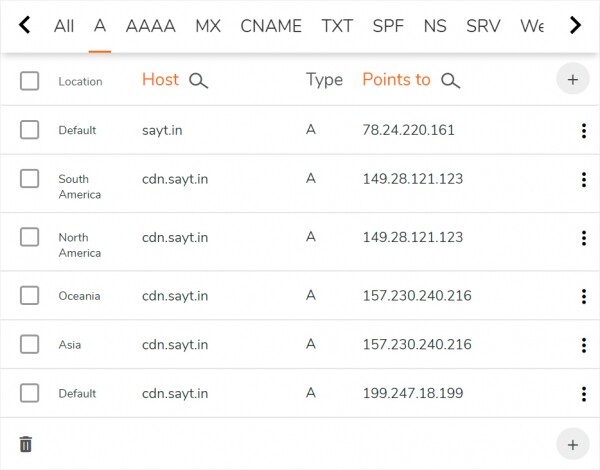
The last default entry in the screenshot means that all unspecified regions (and these are Europe, Africa, satellite Internet users, etc.) will be sent to the server in Frankfurt.
This completes the basic DNS setup. It remains to go to the domain registrar's website and replace the current domain NSs with those issued by ClouDNS. And while the NSs will be updated, we will prepare the servers.
Installation of SSL certificates
Our CDN will work over HTTPS, so if you already have SSL certificates for a domain or subdomain, upload them to all servers, for example, to the directory /etc/ssl/yourdomain/
If there are no certificates, you can get a free one from Let's Encrypt. Perfect for this . The client is convenient and easy to set up, and most importantly, it allows you to validate a domain/subdomain by DNS via the ClouDNS API.
We will install acme.sh on only one of the servers - European 199.247.18.199, from which certificates will be copied to all the others. To install, run:
root@cdn:~# wget -O - https://get.acme.sh | bash; source ~/.bashrcDuring the installation of the script, a CRON job will be created for further renewal of certificates without our participation.
When issuing a certificate, the domain will be checked using DNS using the API, so in the ClouDNS personal account in the Reseller API menu, you need to create a new user API and set a password for it. The resulting auth-id with a password will be written in the file ~/.acme.sh/dnsapi/dns_cloudns.sh (not to be confused with file dns_clouddns.sh). Here are the lines that need to be uncommented and edited:
CLOUDNS_AUTH_ID=<auth-id>
CLOUDNS_AUTH_PASSWORD="<пароль>"
Now we will request an SSL certificate for cdn.sayt.in
root@cdn:~# acme.sh --issue --dns dns_cloudns -d cdn.sayt.in --reloadcmd "service nginx reload"In the options, for the future, we have specified a command to automatically reload the web server configuration after each renewal of the certificate validity period in the future.
The whole process of obtaining a certificate can take up to 2 minutes, do not interrupt it. If a domain validation error occurs, try running the command again. At the end we will see where the certificates have been uploaded:

Remember these paths, they will need to be specified when copying the certificate to other servers, as well as in the web server settings. We do not pay attention to the error of reloading Nginx configs - it will not be on a fully configured server when updating certificates.
All we have left for SSL is to copy the received certificate to two other servers while maintaining the path to the files. Let's create the same directories on each of them and make a copy:
root@cdn:~# mkdir -p /root/.acme.sh/cdn.sayt.in/
root@cdn:~# scp -r root@199.247.18.199:/root/.acme.sh/cdn.sayt.in/* /root/.acme.sh/cdn.sayt.in/
To update certificates regularly, create a daily CRON job on both servers with the command:
scp -r root@199.247.18.199:/root/.acme.sh/cdn.sayt.in/* /root/.acme.sh/cdn.sayt.in/ && service nginx reload
In this case, access to the remote source server must be configured , i.e. without entering a password. Don't forget to do it.
Installing and configuring Nginx
To serve static content, we will use Nginx configured as a caching proxy server. Update the package lists and install it on all three servers:
root@cdn:~# apt update
root@cdn:~# apt install nginx
Instead of the default, we use the config from the spoiler below:
nginx.conf
user www-data;
worker_processes auto;
pid /run/nginx.pid;

events {
    worker_connections 4096;
    multi_accept on;
}

http {
    sendfile on;
    tcp_nopush on;
    tcp_nodelay on;
    types_hash_max_size 2048;

    include /etc/nginx/mime.types;
    default_type application/octet-stream;

    access_log off;
    error_log /var/log/nginx/error.log;

    gzip on;
    gzip_disable "msie6";
    gzip_comp_level 6;
    gzip_proxied any;
    gzip_vary on;
    gzip_types text/plain application/javascript text/javascript text/css application/json application/xml text/xml application/rss+xml;
    gunzip on;

    proxy_temp_path    /var/cache/tmp;
    proxy_cache_path   /var/cache/cdn levels=1:2 keys_zone=cdn:64m max_size=20g inactive=7d;
    proxy_cache_bypass $http_x_update;

server {
  listen 443 ssl;
  server_name cdn.sayt.in;

  ssl_certificate /root/.acme.sh/cdn.sayt.in/cdn.sayt.in.cer;
  ssl_certificate_key /root/.acme.sh/cdn.sayt.in/cdn.sayt.in.key;

  location / {
    proxy_cache cdn;
    proxy_cache_key $uri$is_args$args;
    proxy_cache_valid 90d;
    proxy_pass https://sayt.in;
    }
  }
}
Edit in the config:
- max_size — the size of the cache, not exceeding the available disk space
- inactive - storage time of cached data that no one accessed
- ssl_certificate и ssl_certificate_key — paths to SSL certificate and key files
- proxy_cache_valid - storage time of cached data
- proxy_pass — address of the original server from which the CDN will request files for caching. In our example, this sayt.in
As you can see, everything is simple. Difficulty can only arise in setting the caching time due to the similarity of the directives inactive и proxy_cache_valid. Let's analyze them with our example. Here's what happens when inactive=7d и proxy_cache_valid 90d:
- if the request is not repeated within 7 days, then the data will be deleted from the cache after this period
- if the request is repeated at least once every 7 days, then the data in the cache will be considered obsolete after 90 days and Nginx will update it with the next request, taking it from the original server
Finished to edit nginx.conf, reload the configuration:
root@cdn:~# service nginx reloadOur CDN is ready. For $15/mo. we received points of presence on three continents and 3 TB of traffic: 1 TB in each location.
Checking the work of CDN
Let's look at the pings to our CDN from different geographic locations. Any ping service will work for this.
Launch point
Host
IP
Avg time, ms
Germany Berlin
cdn.sayt.in
199.247.18.199
9.6
Netherlands, Amsterdam
cdn.sayt.in
199.247.18.199
10.1
France Paris
cdn.sayt.in
199.247.18.199
16.3
Great Britain, London
cdn.sayt.in
199.247.18.199
14.9
Canada, Toronto
cdn.sayt.in
149.28.121.123
16.2
USA, San Francisco
cdn.sayt.in
149.28.121.123
52.7
USA, Dallas
cdn.sayt.in
149.28.121.123
23.1
USA, Chicago
cdn.sayt.in
149.28.121.123
2.6
USA, New York
cdn.sayt.in
149.28.121.123
19.8
Singapore
cdn.sayt.in
157.230.240.216
1.7
Japan Tokyo
cdn.sayt.in
157.230.240.216
74.8
Australia, Sydney
cdn.sayt.in
157.230.240.216
95.9
The results are good. Now we will place a test image in the root of the main site test.jpg and check its download speed via CDN. It is said - . Content is delivered quickly.
Let's write a small script in case we want to clear the cache on the CDN point.
purge.sh
#!/bin/bash
if [ -z "$1" ]
then
    echo "Purging all cache"
    rm -rf /var/cache/cdn/*
else
    echo "Purging $1"
    FILE=`echo -n "$1" | md5sum | awk '{print $1}'`
    FULLPATH=/var/cache/cdn/${FILE:31:1}/${FILE:29:2}/${FILE}
    rm -f "${FULLPATH}"
fi
To delete the entire cache, just run it, a separate file can be cleaned like this:
root@cdn:~# ./purge.sh /test.jpgInstead of conclusions
Finally, I want to give some useful tips in order to immediately step over the rake that made my head hurt at the time:
- To increase the fault tolerance of the CDN, it is recommended to configure DNS Failover, which helps to quickly change the A record in the event of a server breakdown. This is done in the control panel DNS records of the domain.
- Sites with wide geographic coverage no doubt require a large number of CDNs, but let's not be fanatical. Most likely the user will not notice a significant difference compared to a paid CDN if you place servers in 6-7 locations: Europe, North America (east), North America (west), Singapore, Australia, Hong Kong or Japan
- Sometimes hosters do not allow the use of rented servers for CDN purposes. Therefore, if you suddenly decide to deploy a content delivery network as a service, do not forget to read the rules of a particular hosting provider in advance
- Study to represent how the continents are connected and take this into account when building a content delivery network
- Try to check to your servers. This way you can see the regions closest to the CDN points and configure GeoDNS more correctly
- Depending on the tasks, it will be useful to fine-tune Nginx for specific caching requirements and taking into account the load on the server. The articles about Nginx cache helped me a lot in this - and acceleration of work under heavy loads: и
Source: habr.com
