

Containers have become the preferred means of packaging an application with all of its software and operating system dependencies and then delivering them to different environments.
This article covers different ways to containerize a Spring Boot application:
- building a docker image using a dockerfile,
- building an OCI image from source using Cloud-Native Buildpack,
- and image optimization at runtime by separating JAR parts into different levels using layered tools.
Sample code
This article is accompanied by a working code example .
Container terminology
We'll start with the container terminology used throughout the article:
- Container image: a file of a specific format. We convert our application into a container image by running the build tool.
- Container: An executable instance of the container image.
- Container engine: The daemon process responsible for running the container.
- Container host: The host machine on which the container engine is running.
- Container registry: The general location used to publish and distribute the container image.
- OCI standard: - is a lightweight, open management structure formed within the framework of Linux Foundation. The OCI Image Specification defines industry standards for container image formats and runtimes to ensure that all container engines can run container images created by any build tool.
To containerize an application, we wrap our application in a container image and publish that image to the public registry. The container runtime retrieves this image from the registry, unpacks it, and runs the application inside it.
Version 2.3 of Spring Boot provides plugins for building OCI images.
is the most commonly used container implementation, and we use Docker in our examples, so all subsequent container references in this article will refer to Docker.
Building a container image in the traditional way
Building Docker images for Spring Boot applications is very easy by adding a few instructions to your Dockerfile.
We first create an executable JAR and, as part of the Dockerfile instructions, copy the executable JAR on top of the base JRE image after applying the necessary customizations.
Let's create our Spring application on with dependencies web, lombokи actuator. We also add a rest controller to provide an API with GETmethod.
Creating a Dockerfile
We then place this application in a container by adding Dockerfile:
FROM adoptopenjdk:11-jre-hotspot
ARG JAR_FILE=target/*.jar
COPY ${JAR_FILE} application.jar
EXPOSE 8080
ENTRYPOINT ["java","-jar","/application.jar"]
Our Dockerfile contains a base image, from adoptopenjdk, on top of which we copy our JAR file and then open the port, 8080which will listen for requests.
Application assembly
First you need to create an application using Maven or Gradle. Here we are using Maven:
mvn clean packageThis creates an executable JAR file for the application. We need to convert this executable JAR to a Docker image to run on the Docker engine.
Create a container image
We then put this JAR executable into the Docker image by running the command docker buildfrom the root directory of the project containing the Dockerfile created earlier:
docker build -t usersignup:v1 .We can see our image in the list with the command:
docker images The output of the above command includes our image usersignupalong with the base image, adoptopenjdkspecified in our Dockerfile.
REPOSITORY          TAG                 SIZE
usersignup          v1                  249MB
adoptopenjdk        11-jre-hotspot      229MB
View layers inside a container image
Let's look at the stack of layers inside the image. We will use to view these layers:
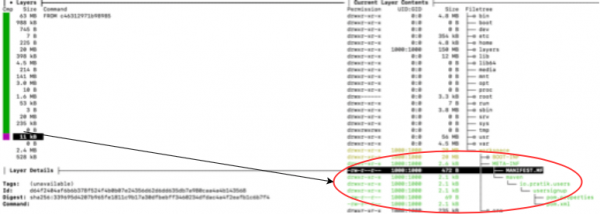
dive usersignup:v1Here is part of the output of the Dive command:

As we can see, the application layer makes up a significant portion of the image size. We want to reduce the size of this layer in the following sections as part of our optimization.
Building a container image with Buildpack
() is a generic term used by various Platform as a Service (PAAS) offerings to create a container image from source code. It was launched by Heroku in 2011 and has since been adopted by Cloud Foundry, Google App Engine, Gitlab, Knative and a few others.

Advantage of Cloud Build Packages
One of the main benefits of using Buildpack to build images is that image configuration changes can be managed centrally (builder) and propagated to all applications using the builder.
The build packages were closely tied to the platform. Cloud-Native Buildpacks provide standardization across platforms by supporting the OCI image format, which ensures that the image can be run by the Docker engine.
Using the Spring Boot Plugin
The Spring Boot plugin builds OCI images from source using Buildpack. Images are created using bootBuildImagetasks (Gradle) or spring-boot:build-imagetarget (Maven) and local Docker installation.
We can customize the name of the image we need to push to the Docker registry by specifying the name in image tag:
<plugin>
  <groupId>org.springframework.boot</groupId>
  <artifactId>spring-boot-maven-plugin</artifactId>
  <configuration>
    <image>
      <name>docker.io/pratikdas/${project.artifactId}:v1</name>
    </image>
  </configuration>
</plugin>
Let's use Maven to execute build-imagegoals for creating an application and creating a container image. We are not currently using any Dockerfiles.
mvn spring-boot:build-imageThe result will be something like this:
[INFO] --- spring-boot-maven-plugin:2.3.3.RELEASE:build-image (default-cli) @ usersignup ---
[INFO] Building image 'docker.io/pratikdas/usersignup:v1'
[INFO]
[INFO]  > Pulling builder image 'gcr.io/paketo-buildpacks/builder:base-platform-api-0.3' 0%
.
.
.. [creator]     Adding label 'org.springframework.boot.version'
.. [creator]     *** Images (c311fe74ec73):
.. [creator]           docker.io/pratikdas/usersignup:v1
[INFO]
[INFO] Successfully built image 'docker.io/pratikdas/usersignup:v1'
From the output, we see that paketo Cloud-Native buildpackused to create a working OCI image. As before, we can see the image listed as a Docker image by running the command:
docker images Conclusion:
REPOSITORY                             SIZE
paketobuildpacks/run                  84.3MB
gcr.io/paketo-buildpacks/builder      652MB
pratikdas/usersignup                  257MB
Creating a Container Image with Jib
Jib is an image authoring plugin from Google that provides an alternative method of creating a container image from source.
Customize jib-maven-pluginin pom.xml:
      <plugin>
        <groupId>com.google.cloud.tools</groupId>
        <artifactId>jib-maven-plugin</artifactId>
        <version>2.5.2</version>
      </plugin>
Next, we run the Jib plugin using the Maven command to build the application and create the container image. As before, we are not using any Dockerfiles here:
mvn compile jib:build -Dimage=<docker registry name>/usersignup:v1After executing the above Maven command, we get the following output:
[INFO] Containerizing application to pratikdas/usersignup:v1...
.
.
[INFO] Container entrypoint set to [java, -cp, /app/resources:/app/classes:/app/libs/*, io.pratik.users.UsersignupApplication]
[INFO]
[INFO] Built and pushed image as pratikdas/usersignup:v1
[INFO] Executing tasks:
[INFO] [==============================] 100.0% complete
The output shows that the container image has been created and placed in the registry.
Motivations and methods for creating optimized images
We have two main reasons for optimizing:
- Performance: In a container orchestration system, a container image is pulled from the image registry to the host running the container engine. This process is called planning. Pulling large images from the registry results in long scheduling times in container orchestration systems and long build times in CI pipelines.
- Security: large images also have a large area for vulnerabilities.
A Docker image is made up of a stack of layers, each representing a statement in our Dockerfile. Each layer represents the delta of changes in the underlying layer. When we pull a Docker image from the registry, it is pulled in layers and cached on the host.
Spring Boot uses as the default packaging format. When we look at a fat JAR, we see that the application is a very small part of the entire JAR. This is the part that changes the most. The rest consists of Spring Framework dependencies.
The optimization formula is centered around isolating the application at a separate level from Spring Framework dependencies.
The dependency layer that forms the bulk of the thick JAR file is downloaded only once and cached on the host system.
Only a thin layer of the app is pulled during app updates and container scheduling, as shown in this diagram:
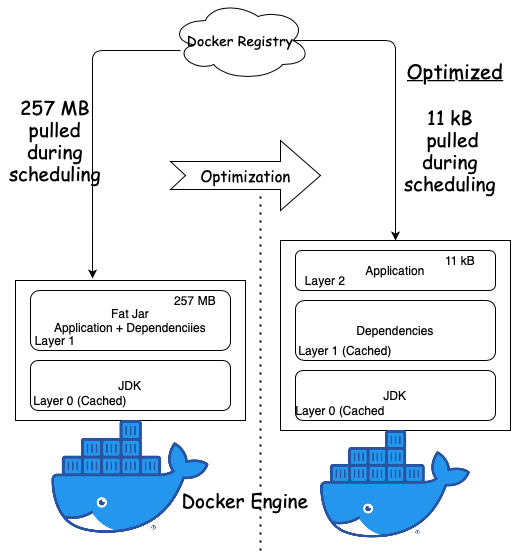
In the following sections, we'll look at how to create these optimized images for a Spring Boot application.
Building an Optimized Container Image for a Spring Boot Application with Buildpack
Spring Boot 2.3 supports layering by extracting parts of a thick JAR file into separate layers. The layering feature is disabled by default and needs to be explicitly enabled using the Spring Boot Maven plugin:
<plugin>
  <groupId>org.springframework.boot</groupId>
  <artifactId>spring-boot-maven-plugin</artifactId>
  <configuration>
    <layers>
      <enabled>true</enabled>
    </layers>
  </configuration>
</plugin>
We will use this configuration to build our container image first with Buildpack and then with Docker in the following sections.
Let's run build-imageMaven target to create a container image:
mvn spring-boot:build-imageIf we run Dive to see the layers in the resulting image, we can see that the application layer (circled in red) is much smaller in the kilobyte range compared to what we got using the thick JAR format:
Building an Optimized Container Image for a Spring Boot Application with Docker
Instead of using a Maven or Gradle plugin, we can also create a layered Docker JAR image with a Docker file.
When we use Docker, we need to take two extra steps to extract the layers and copy them into the final image.
The contents of the resulting JAR after building with Maven with layering enabled will look like this:
META-INF/
.
BOOT-INF/lib/
.
BOOT-INF/lib/spring-boot-jarmode-layertools-2.3.3.RELEASE.jar
BOOT-INF/classpath.idx
BOOT-INF/layers.idx
The output shows an additional JAR named spring-boot-jarmode-layertoolsи layersfle.idxfile. This additional JAR file provides layering capabilities, as described in the next section.
Extract dependencies on separate layers
To view and extract layers from our layered JAR, we use the system property -Djarmode=layertoolsfor start spring-boot-jarmode-layertoolsJAR instead of application:
java -Djarmode=layertools -jar target/usersignup-0.0.1-SNAPSHOT.jarRunning this command produces an output containing the available command options:
Usage:
  java -Djarmode=layertools -jar usersignup-0.0.1-SNAPSHOT.jar

Available commands:
  list     List layers from the jar that can be extracted
  extract  Extracts layers from the jar for image creation
  help     Help about any command
The output shows the commands list, extractи helpс helpbe the default. Let's run the command with listoption:
java -Djarmode=layertools -jar target/usersignup-0.0.1-SNAPSHOT.jar listdependencies
spring-boot-loader
snapshot-dependencies
applicationWe see a list of dependencies that can be added as layers.
Layers by default:
Layer name
Content
dependencies
any dependency whose version does not contain SNAPSHOT
spring-boot-loader
JAR Loader Classes
snapshot-dependencies
any dependency whose version contains SNAPSHOT
application
application classes and resources
Layers are defined in layers.idxfile in the order in which they should be added to the Docker image. These layers are cached on the host after the first fetch because they don't change. Only the updated application layer is downloaded to the host, which is faster due to the reduced size .
Building an image with dependencies extracted into separate layers
We will build the final image in two steps using a method called . In the first step we will extract the dependencies and in the second step we will copy the extracted dependencies into the final .
Let's modify our Dockerfile for a multi-stage build:
# the first stage of our build will extract the layers
FROM adoptopenjdk:14-jre-hotspot as builder
WORKDIR application
ARG JAR_FILE=target/*.jar
COPY ${JAR_FILE} application.jar
RUN java -Djarmode=layertools -jar application.jar extract

# the second stage of our build will copy the extracted layers
FROM adoptopenjdk:14-jre-hotspot
WORKDIR application
COPY --from=builder application/dependencies/ ./
COPY --from=builder application/spring-boot-loader/ ./
COPY --from=builder application/snapshot-dependencies/ ./
COPY --from=builder application/application/ ./
ENTRYPOINT ["java", "org.springframework.boot.loader.JarLauncher"]
We save this configuration in a separate file - Dockerfile2.
We build the Docker image using the command:
docker build -f Dockerfile2 -t usersignup:v1 .After executing this command, we get the following output:
Sending build context to Docker daemon  20.41MB
Step 1/12 : FROM adoptopenjdk:14-jre-hotspot as builder
14-jre-hotspot: Pulling from library/adoptopenjdk
.
.
Successfully built a9ebf6970841
Successfully tagged userssignup:v1
We can see that the Docker image is created with an image ID and then tagged.
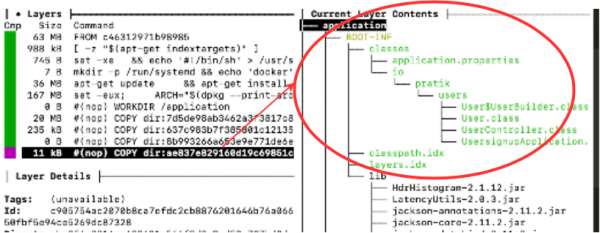
Finally, we run the Dive command as before to check out the layers inside the generated Docker image. We can provide an image ID or tag as input to the Dive command:
dive userssignup:v1As you can see from the output, the layer containing the application is now only 11 KB and the dependencies are cached in separate layers.
Extract internal dependencies on separate layers
We can further reduce the size of the application layer by extracting any of our custom dependencies into a separate layer instead of packaging them with the application by declaring them in ymlsimilar file named layers.idx:
- "dependencies":
  - "BOOT-INF/lib/"
- "spring-boot-loader":
  - "org/"
- "snapshot-dependencies":
- "custom-dependencies":
  - "io/myorg/"
- "application":
  - "BOOT-INF/classes/"
  - "BOOT-INF/classpath.idx"
  - "BOOT-INF/layers.idx"
  - "META-INF/"
In this file layers.idxwe have added a custom dependency named, io.myorgcontaining organization dependencies retrieved from the shared repository.
Final World
In this article, we looked at using Cloud-Native Buildpacks to build a container image directly from source. This is an alternative to using Docker to create a container image in the usual way: first, a thick executable JAR file is created and then packaged into a container image by specifying the instructions in the Dockerfile.
We also looked at optimizing our container by including a layering feature that extracts dependencies into separate layers that are cached on the host and a thin application layer is loaded at scheduling time in the container's execution engines.
You can find all the source code used in the article at .
Command Reference
Here is a summary of the commands we used in this article for a quick reference.
Context clearing:
docker system prune -aBuilding a container image with a Dockerfile:
docker build -f <Docker file name> -t <tag> .Build container image from source (without Dockerfile):
mvn spring-boot:build-imageView dependency layers. Before building the application jar file, make sure the layering feature is enabled in the spring-boot-maven-plugin:
java -Djarmode=layertools -jar application.jar listExtract dependency layers. Before building the application jar file, make sure the layering feature is enabled in the spring-boot-maven-plugin:
java -Djarmode=layertools -jar application.jar extractViewing a List of Container Images
docker imagesView on the left inside the container image (make sure the dive tool is installed):
dive <image ID or image tag>Source: habr.com
