

Let's start with the news. Yesterday, Yandex.Cloud announced the launch of a serverless computing service . This means: you only write the code for your service (for example, a web application or chatbot), and the Cloud creates and manages the virtual machines where it runs, even replicating them when load increases. You don't have to think about it at all, it's very convenient. And the payment is only for the computation time.
However, some people may not have to pay at all. This applies to developers , meaning built-in chatbots. Any developer can write, host, and register such a skill, and starting today, you don’t even need to host the skills – just upload the code to the cloud as .
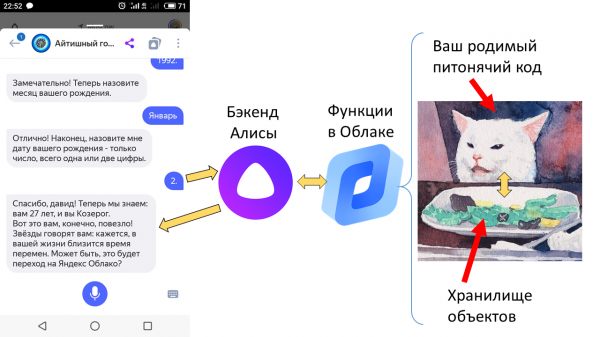
. But there are a couple of nuances. First, your Python code may require certain dependencies, and pulling them into the Cloud is non-trivial. Second, any decent chatbot needs to store the dialog state somewhere (hence stateful); how is this easiest to achieve in a serverless function? Third, how can you quickly and messily write a skill for Alice or any other bot with a non-zero storyline? This article addresses these nuances.
Moral preparation
For the impatient: I collect the necessary dependencies using a makefile before uploading the function to the cloud, store the dialog state in Yandex's Object Storage (which supports S3 API), and use my own library for managing the dialog . The result is demo skill. Now let's break all this down in a bit more detail.
For those slightly less impatient: before diving into my story about the difficulties, I highly recommend starting simple. Specifically, create a single-file echo bot function, register it, and test it in the Dialogs Developer Console; details are in the and . Only then should you proceed.
If you want to immediately feel what we are fighting for, ask Alice ‘‘. The following dialogue should occur:
Alice: Hello! You are in the skill 'IT Horoscope'. Say 'Start' to see what the stars predict for you.
User: Start
A: Please state your name
U: Vasily
A: Now tell me your birth year. Only four digits, nothing extra.
Y: second
A: Please try again. State your birth year — four digits.
Y: 2002
A: Wonderful! Now tell me the month of your birth.
Y: February
A: Great! Finally, tell me the date of your birth — just the number, one or two digits.
Y: 18
A: Thank you, Vasisualiy! Now we know: you are 17 years old, and you are an Aquarius. You're quite lucky! The stars say to you: and what the stars say, you can find out by launching the skill.
The problem is that to maintain even such a simple dialogue, you need to remember the user's name and birth date, which is non-trivial in a serverless environment. Storing context in memory or on disk won't work, as Yandex.Cloud can launch functions on several virtual machines simultaneously and switch between them in an arbitrary manner. You'll need to use some external storage. Object Storage was selected as a fairly cheap and straightforward storage option right in Yandex.Cloud (which should be fast). As a free alternative, you can try a free piece of somewhere far away. Both for Object Storage (which supports the S3 interface) and for Mongo, there are convenient Python wrappers.
Another problem is that to access both Object Storage and MongoDB, and any other database or data storage, some external dependencies are required that need to be uploaded to Yandex Functions along with your function code. And it would be nice to do this conveniently. Unfortunately, it won’t be completely convenient (like on Heroku), but some basic comfort can be created by writing a script to build the environment (a makefile).
How to launch the horoscope skill
- Prepare: log into a machine with Linux. In principle, it should also be possible to work with Windows, but you would need to do some magic to run the makefile. In any case, you'll need Python installed, version 3.6 or higher.
- Clone from GitHub .
- Register in Y. Cloud:
- Create two buckets in , name them whatever you like
{BUCKET NAME}andtgalice-test-cold-storage(this second name is currently hardcoded inmain.pymy example). The first bucket will only be needed for deployment, the second — for storing dialogue states. - Create , assign it the role
editor, and obtain static credentials for it{KEY ID}and{KEY VALUE}— we will use these to record the state of the dialogue. This is necessary so that the function from Y. Cloud can access the storage from Y. Cloud. Someday, I hope authorization will become automatic, but for now — this is the way. - (Optional) install
yc. You can also create the function through the web interface, but the CLI is advantageous in that new features appear there faster. - Now we can actually prepare the dependency build: run in the command line from the folder with the skill example
make all. A bunch of libraries (mostly unnecessary, as usual) will be installed in the folderdist. - Manually upload the resulting archive from the previous step to Object Storage (to the bucket
{BUCKET NAME}) . If you wish, you can also do this from the command line, for example, usingdist.zipAWS CLI . - For the utility, the command would look like this:
ycyc serverless function version create --function-name=horoscope --environment=AWS_ACCESS_KEY_ID={KEY ID},AWS_SECRET_ACCESS_KEY={KEY VALUE} --runtime=python37 --package-bucket-name={BUCKET NAME} --package-object-name=dist.zip --entrypoint=main.alice_handler --memory=128M --execution-timeout=3s
When creating the function manually, all parameters are filled in similarly.Now you can test the function you created through the developer console, and then refine and publish the skill.
What's under the hood

The Makefile actually contains a fairly simple script for installing dependencies and packaging them into an archive
, approximately like this: dist.zipmkdir -p dist/ pip3 install -r requirements.txt --target dist/ cp main.py dist/main.py cp form.yaml dist/form.yaml cd dist && zip --exclude '*.pyc' -r ../dist.zip ./*
The rest consists of several simple tools wrapped in a library. The process of filling in user data is described by the config tgaliceform.yaml form.yaml:
form_name: 'horoscope_form'
start:
  regexp: 'start|begin'
  suggests:
    - Start
fields:
  - name: 'name'
    question: Please state your name.
  - name: 'year'
    question: Now tell me the year of your birth. Only four digits, nothing more.
    validate_regexp: '^[0-9]{4}$'
    validate_message: Please try again. State your birth year - four digits.
  - name: 'month'
    question: Wonderful! Now name the month of your birth.
    options:
      - January
      ...
      - December
    validate_message: What you've stated doesn't look like a month. Please name your birth month, without any other words.
  - name: 'day'
    question: Excellent! Finally, tell me your birth date - just a number, one or two digits.
    validate_regexp: '[0123]?\d$'
    validate_message: Please try again. You need to name your birth number (for example, the twentieth); it should be one or two digits.
The task of parsing this config and calculating the final result is handled by a Python class
class CheckableFormFiller(tgalice.dialog_manager.form_filling.FormFillingDialogManager):
    SIGNS = {
        'January': 'Capricorn',
        ...
    }

    def handle_completed_form(self, form, user_object, ctx):
        response = tgalice.dialog_manager.base.Response(
            text='Thank you, {}! Now we know: you are {} years old, and you are {}. n'
                 'You are indeed lucky! The stars say to you: {}'.format(
                form['fields']['name'],
                2019 - int(form['fields']['year']),
                self.SIGNS[form['fields']['month']],
                random.choice(FORECASTS),
            ),
            user_object=user_object,
        )
        return response
More precisely, the base class FormFillingDialogManager is responsible for filling out the 'form', and the method of the child class handle_completed_form indicates what to do when it is ready.
In addition to this main flow of the user's dialogue, it is also necessary to greet the user, provide help on the 'help' command, and exit the skill on the 'exit' command. For this, there is also a template, so the complete dialog manager is composed of pieces: tgalice dm = tgalice.dialog_manager.CascadeDialogManager( tgalice.dialog_manager.GreetAndHelpDialogManager( greeting_message=DEFAULT_MESSAGE, help_message=DEFAULT_MESSAGE, exit_message='Goodbye, come back to the skill "IT Horoscope" again!' ), CheckableFormFiller(`form.yaml`, default_message=DEFAULT_MESSAGE) )
CascadeDialogManagerworks simply: it attempts to apply all its components in order to the current state of the dialogue and selects the first appropriate one. As a response to each message, the dialog manager returns a Python object
Response Response, which can then be converted into plain text or a message in Alice or Telegram, depending on where the bot is running; it also contains the modified state of the dialogue that needs to be preserved. A separate class handles all of this. DialogConnector, so the direct script to launch the skill on Yandex Functions looks like this:
...
session = boto3.session.Session()
s3 = session.client(
    service_name='s3',
    endpoint_url='https://storage.yandexcloud.net',
    aws_access_key_id=os.environ['AWS_ACCESS_KEY_ID'],
    aws_secret_access_key=os.environ['AWS_SECRET_ACCESS_KEY'],
    region_name='ru-central1',
)
storage = tgalice.session_storage.S3BasedStorage(s3_client=s3, bucket_name='tgalice-test-cold-storage')
connector = tgalice.dialog_connector.DialogConnector(dialog_manager=dm, storage=storage)
alice_handler = connector.serverless_alice_handler
As you can see, most of this code creates a connection to the S3 interface of Object Storage. You can read about how this connection is used .
The last line creates the function alice_handler — the very one we instructed Yandex.Cloud to call when we set the parameter --entrypoint=main.alice_handler.
That's basically it. Makefiles for building, S3-like Object Storage for storing context, and a Python library tgalice. Together with serverless functions and the expressiveness of Python, this is enough to develop a healthy person's skill.
You may wonder why it was necessary to create tgalice? Весь скучный код, перекладывающий JSON’ы из запроса в ответ и из хранилища в память и обратно, лежит в ней. Там же лежит применялка регулярок, функция для понимания того, что «феврарь» похоже на «февраль», и прочее NLU для бедных. По моей задумке, этого уже должно быть достаточно, чтобы можно было набрасывать прототипы навыков в yaml-файлах, не слишком отвлекаясь на технические детали.
If you're looking for more serious NLU, you can attach or , but additional setup will require some extra work, especially on serverless. If you really don't want to code, it's worth using a visual builder like . When creating tgalice, I was thinking of some kind of middle ground. Let's see what comes of it.
Well, nowadays you can join the , read the , and create wonderful !
Source: habr.com
