

For a whole year (or two) I postponed the publication of this article for the main reason - I had already published two articles in which I described the process of creating a router in SOCKS from a very ordinary laptop with Debian.
However, since then the stable version Debian I upgraded to Buster, and quite a few people contacted me privately asking for help with setup, meaning my previous articles aren't exhaustive. Well, I already suspected that the methods described in them don't fully cover all the setup details. Linux for routing in SOCKS. Moreover, they are written for Debian Stretch, and after upgrading to Buster, I noticed some minor changes in how services interact with the systemd init system. I also didn't use systemd-networkd in the articles themselves, even though it's best suited for complex network configurations.
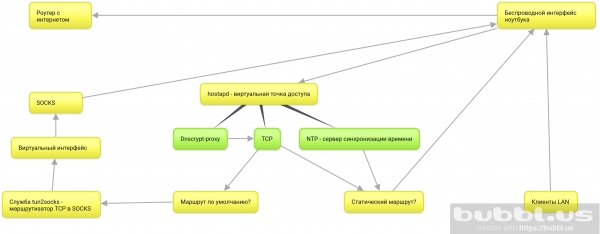
In addition to the above changes, the following services have been added to my configuration: hostapd - service for virtualization of the access point, Ntp to synchronize the time of local network clients, dnscrypt-proxy to encrypt connections via the DNS protocol and disable advertising on local network clients, and also, as I mentioned earlier, systemd-networkd for configuring network interfaces.
Here is the simplest block diagram of the internal structure of such a router.
So, I will remind you what goals the series of these articles pursues:
- Route all OS connections to SOCKS, as well as connections of all devices that are on the same network as the laptop.
- The laptop in my case must remain fully mobile. That is, to give the opportunity to use the desktop environment and not be tied to a physical location.
- The last point implies connection and routing only through the built-in wireless interface.
- Well, of course, the creation of an exhaustive guide, as well as an analysis of the relevant technologies to the best of my modest knowledge.
What will be covered in this article:
- git - download project repositories tun2socksrequired to route TCP traffic to SOCKS, and create_ap - a script to automate the configuration of a virtual access point using hostapd.
- tun2socks - build and install the systemd service on the system.
- systemd-networkd - configure wireless and virtual interfaces, static routing tables and packet forwarding.
- create_ap - install the systemd service into the system, configure and run the virtual access point.
Optional steps:
- Ntp - install and configure the server for time synchronization on virtual access point clients.
- dnscrypt-proxy - encrypt DNS requests, route them to SOCKS and disable advertising domains for the local network.
Why all this?
This is one of the ways to organize the protection of TCP connections on a local network. The main advantage is that all connections go to SOCKS unless a static route is built for them through the original gateway. This means that you do not need to write SOCKS server settings to either individual programs or clients on the local network - they all go to SOCKS by default, since it is the default gateway, until we specify otherwise.
Essentially we add a second encryption router as a laptop in front of the original router and use the original router's internet connection for the laptop's already SOCKS encrypted requests, which in turn routes and encrypts requests from LAN clients.
From the provider's point of view, we are constantly connected to the same server with encrypted traffic.
Accordingly, all devices are connected to the virtual access point of the laptop.
Install tun2socks on your system
As long as you have internet on your machine, download all the necessary tools.
apt updateapt install git make cmakeDownload the badvpn package
git clone https://github.com/ambrop72/badvpn
A folder will appear on your system badvpn. Create a separate build folder
mkdir badvpn-build
Go into it
cd badvpn-build
Collect tun2socks
cmake ../badvpn -DBUILD_NOTHING_BY_DEFAULT=1 -DBUILD_TUN2SOCKS=1
Install in the system
make install
- Parameter
-DBUILD_NOTHING_BY_DEFAULT=1disables the build of all badvpn repository components. -
DBUILD_TUN2SOCKS=1includes a component in the assembly tun2socks. make install- will install the tun2socks binary on your system at/usr/local/bin/badvpn-tun2socks.
Install tun2socks service in systemd
Create a file /etc/systemd/system/tun2socks.service with the following content:
[Unit]
Description=SOCKS TCP Relay

[Service]
ExecStart=/usr/local/bin/badvpn-tun2socks --tundev tun2socks --netif-ipaddr 172.16.1.1 --netif-netmask 255.255.255.0 --socks-server-addr 127.0.0.1:9050

[Install]
WantedBy=multi-user.target
--tundev- takes the name of the virtual interface that we initialize with systemd-networkd.--netif-ipaddr- network address of the "router" tun2socks, to which the virtual interface is connected. It's better to make it separate .--socks-server-addr- accepts a socket (адрес:портSOCKS server).
If your SOCKS server requires authentication, you can specify options --username и --password.
Next, register the service
systemctl daemon-reloadAnd turn on
systemctl enable tun2socksBefore starting the service, we will provide it with a virtual network interface.
Switching to systemd-networkd
Turn on systemd-networkd:
systemctl enable systemd-networkdDisable current network services.
systemctl disable networking NetworkManager NetworkManager-wait-online- NetworkManager-wait-online is a service that waits for a working network connection before systemd continues to start other network dependent services. We are disabling it as we move to the systemd-networkd analogue.
Let's enable it right away:
systemctl enable systemd-networkd-wait-onlineSet up the wireless network interface
Create a systemd-networkd configuration file for the wireless network interface /etc/systemd/network/25-wlp6s0.network.
[Match]
Name=wlp6s0

[Network]
Address=192.168.1.2/24
IPForward=yes
- Name is the name of your wireless interface. Identify it with the command
ip a. - IP Forward is a directive that enables packet forwarding on a network interface.
- Address is responsible for assigning an IP address to the wireless interface. We specify it statically because with the equivalent directive
DHCP=yes, systemd-networkd creates a default gateway on the system. Then all traffic will go through the original gateway, and not through the future virtual interface on a different subnet. You can check the current default gateway with the commandip r
Create a static route for the remote SOCKS server
If your SOCKS server is not local, but remote, then you need to create a static route for it. To do this, add a section Route to the end of the wireless interface configuration file you created with the following content:
[Route]
Gateway=192.168.1.1
Destination=0.0.0.0
Gatewayis the default gateway or the address of your original access point.Destination- SOCKS server address.
Set up wpa_supplicant for systemd-networkd
systemd-networkd uses wpa_supplicant to connect to a secure access point. When trying to "bring up" a wireless interface, systemd-networkd starts a service wpa_supplicant@имяWhere name is the name of the wireless interface. If you haven't used systemd-networkd up to this point, then you probably don't have this service on your system.
So create it with the command:
systemctl enable wpa_supplicant@wlp6s0I used wlp6s0 as the name of your wireless interface. Your name may be different. You can recognize it with the command ip l.
Now created service wpa_supplicant@wlp6s0 will be launched when the wireless interface is “up”, however, it, in turn, will look for the SSID and password settings of the access point in the file /etc/wpa_supplicant/wpa_supplicant-wlp6s0. Therefore, you need to create it using the utility wpa_passphrase.
To do this, run the command:
wpa_passphrase SSID password>/etc/wpa_supplicant/wpa_supplicant-wlp6s0.confwhere SSID is the name of your access point, password is the password, and wlp6s0 is the name of your wireless interface.
Initialize virtual interface for tun2socks
Create a file to initialize a new virtual interface on the system/etc/systemd/network/25-tun2socks.netdev
[NetDev]
Name=tun2socks
Kind=tun
- Name is the name that systemd-networkd will assign to the future virtual interface when it is initialized.
- Kind is the type of virtual interface. From the name of the tun2socks service, you can guess that it uses an interface like
tun. - netdev is the extension of the files that
systemd-networkduses to initialize virtual network interfaces. The address and other network settings for these interfaces are specified in .network-files.
Create such a file /etc/systemd/network/25-tun2socks.network with the following content:
[Match]
Name=tun2socks

[Network]
Address=172.16.1.2/24
Gateway=172.16.1.1
Nameis the name of the virtual interface that you specified in netdev-file.Address— The IP address that will be assigned to the virtual interface. Must be on the same network as the address you provided in the tun2socks serviceGateway- IP address of the "router" tun2socks, which you specified when creating the systemd service.
So the interface tun2socks has an address 172.16.1.2, and the service tun2socks 172.16.1.1, that is, it is the gateway for all connections from the virtual interface.
Set up a virtual hotspot
Install dependencies:
apt install util-linux procps hostapd iw havegedDownload the repository create_ap to your car:
git clone https://github.com/oblique/create_apNavigate to the repository folder on your machine:
cd create_apInstall in the system:
make installconfig will appear on your system /etc/create_ap.conf. Here are the main editing options:
GATEWAY=10.0.0.1- it is better to make a separate reserved subnet.NO_DNS=1- turn off, as this parameter will be controlled by the systemd-networkd virtual interface.NO_DNSMASQ=1- turn off for the same reason.WIFI_IFACE=wlp6s0— laptop wireless interface.INTERNET_IFACE=tun2socksis a virtual interface created for tun2socks.SSID=hostapd— name of the virtual access point.PASSPHRASE=12345678- password.
Don't forget to enable the service:
systemctl enable create_apEnable DHCP server in systemd-networkd
Service create_ap initializes a virtual interface in the system ap0. In theory, dnsmasq “hangs” on this interface, but why install extra services if systemd-networkd contains a built-in DHCP server?
To enable it, let's define the network settings for the virtual point. To do this, create a file /etc/systemd/network/25-ap0.network with the following content:
[Match]
Name=ap0

[Network]
Address=10.0.0.1/24
DHCPServer=yes

[DHCPServer]
EmitDNS=yes
DNS=10.0.0.1
EmitNTP=yes
NTP=10.0.0.1
After the create_ap service initializes the virtual interface ap0, systemd-networkd will automatically assign an IP address to it and enable a DHCP server.
Rows EmitDNS=yes и DNS=10.0.0.1 transmit DNS server settings to devices connected to the access point.
If you do not plan to use a local DNS server - in my case it is dnscrypt-proxy - you can install DNS=10.0.0.1 в DNS=192.168.1.1Where 192.168.1.1 is the address of your original gateway. Then the DNS queries of your host and local network will go unencrypted through the provider's servers.
EmitNTP=yes и NTP=192.168.1.1 pass NTP settings.
The same goes for the line NTP=10.0.0.1.
Install and configure an NTP server
Install in the system:
apt install ntp
Edit the config /etc/ntp.conf. Comment out the addresses of the standard pools:
#pool 0.debian.pool.ntp.org iburst
#pool 1.debian.pool.ntp.org iburst
#pool 2.debian.pool.ntp.org iburst
#pool 3.debian.pool.ntp.org iburst
Add public server addresses, such as Google Public NTP:
server time1.google.com ibrust
server time2.google.com ibrust
server time3.google.com ibrust
server time4.google.com ibrust
Grant access to the server to clients from your network:
restrict 10.0.0.0 mask 255.255.255.0
Enable broadcasting on your network:
broadcast 10.0.0.255
Finally, add the addresses of these servers to the static routing table. To do this, open the wireless interface configuration file /etc/systemd/network/25-wlp6s0.network and add to the end of the section Route.
[Route]
Gateway=192.168.1.1
Destination=216.239.35.0

[Route]
Gateway=192.168.1.1
Destination=216.239.35.4

[Route]
Gateway=192.168.1.1
Destination=216.239.35.8

[Route]
Gateway=192.168.1.1
Destination=216.239.35.12
You can find out the addresses of your NTP servers using the utility host in the following way:
host time1.google.comInstall dnscrypt-proxy, remove ads and hide DNS traffic from ISP
apt install dnscrypt-proxyTo serve DNS queries on the host and local network, edit the socket /lib/systemd/system/dnscrypt-proxy.socket. Change the following lines:
ListenStream=0.0.0.0:53
ListenDatagram=0.0.0.0:53
Restart systemd:
systemctl daemon-reloadEdit the config /etc/dnscrypt-proxy/dnscrypt-proxy.toml:
server_names = ['adguard-dns']
To route dnscrypt-proxy connections through tun2socks add the following:
force_tcp = true
Edit the config /etc/resolv.conf, which tells the DNS server to the host.
nameserver 127.0.0.1
nameserver 192.168.1.1
The first line enables the use of dnscrypt-proxy, the second one uses the original gateway in case the dnscrypt-proxy server is unavailable.
Done!
Reboot or stop running network services:
systemctl stop networking NetworkManager NetworkManager-wait-onlineAnd restart all necessary:
systemctl restart systemd-networkd tun2socks create_ap dnscrypt-proxy ntpAfter a reboot or restart, you will have a second access point that routes the host and LAN devices to SOCKS.
The output looks like this ip a regular laptop:
1: lo: <LOOPBACK,UP,LOWER_UP> mtu 65536 qdisc noqueue state UNKNOWN group default qlen 1000
    link/loopback 00:00:00:00:00:00 brd 00:00:00:00:00:00
    inet 127.0.0.1/8 scope host lo
       valid_lft forever preferred_lft forever
    inet6 ::1/128 scope host
       valid_lft forever preferred_lft forever
2: tun2socks: <POINTOPOINT,MULTICAST,NOARP,UP,LOWER_UP> mtu 1500 qdisc pfifo_fast state UP group default qlen 500
    link/none
    inet 172.16.1.2/24 brd 172.16.1.255 scope global tun2socks
       valid_lft forever preferred_lft forever
    inet6 fe80::122b:260:6590:1b0e/64 scope link stable-privacy
       valid_lft forever preferred_lft forever
3: enp4s0: <NO-CARRIER,BROADCAST,MULTICAST,UP> mtu 1500 qdisc pfifo_fast state DOWN group default qlen 1000
    link/ether e8:11:32:0e:01:50 brd ff:ff:ff:ff:ff:ff
4: wlp6s0: <BROADCAST,MULTICAST,UP,LOWER_UP> mtu 1500 qdisc noqueue state UP group default qlen 1000
    link/ether 4c:ed:de:cb:cf:85 brd ff:ff:ff:ff:ff:ff
    inet 192.168.1.2/24 brd 192.168.1.255 scope global wlp6s0
       valid_lft forever preferred_lft forever
    inet6 fe80::4eed:deff:fecb:cf85/64 scope link
       valid_lft forever preferred_lft forever
5: ap0: <BROADCAST,MULTICAST,UP,LOWER_UP> mtu 1500 qdisc noqueue state UP group default qlen 1000
    link/ether 4c:ed:de:cb:cf:86 brd ff:ff:ff:ff:ff:ff
    inet 10.0.0.1/24 brd 10.0.0.255 scope global ap0
       valid_lft forever preferred_lft forever
    inet6 fe80::4eed:deff:fecb:cf86/64 scope link
       valid_lft forever preferred_lft forever
Eventually
- The provider sees only an encrypted connection to your SOCKS server, which means it sees nothing.
- It still sees your NTP requests, to prevent this, remove static routes for NTP servers. However, it is not certain that your SOCKS server allows the NTP protocol.
Crutch seen on Debain 10
If you try to restart the network service from the console, it will crash with an error. This is due to the fact that its part in the form of a virtual interface is tied to the tun2socks service, which means it is used. To restart the network service, you must first stop the tun2socks service. But, I think, if you have read to the end, this is definitely not a problem for you!
Links
Source: habr.com
