


It only hurts the first time!
Hello everyone! Dear friends, in this article I want to share my experience using TensorRT with RetinaNet based on the repository (this is a fork of the official repo from , which will allow you to start using optimized models in production in the shortest possible time). While scrolling through messages in the community channels , I encounter questions regarding the use of TensorRT, and mostly the questions are repetitive, so I decided to write as complete a guide as possible on using fast inference based on TensorRT, RetinaNet, Unet, and docker.
Task Description
Let's set the task this way: we need to annotate the dataset, train the RetinaNet/Unet network on Pytorch1.3+, convert the obtained weights to ONNX, then convert them to a TensorRT engine, and launch all of this in docker, preferably on Ubuntu 18 and highly preferably on ARM(Jetson)* architecture, thus minimizing manual environment setup. As a result, we will get a container ready not only for export and training of RetinaNet/Unet but also for full-fledged development and training of classification and segmentation with all the necessary bindings.
Step 1. Setting up the environment
It's important to note that lately I have completely moved away from using and deploying any libraries on a desktop machine, as well as on a devbox. The only thing I need to create and install is a python virtual environment and cuda 10.2 (it’s enough to have just the NVIDIA driver) from deb.
Suppose you have a freshly installed Ubuntu 18. Let's install cuda 10.2 (deb), I won’t go into detail about the installation process, the official documentation is quite sufficient.
Now let's install docker, you can easily find the installation guide for docker, here’s an example , the 19+ version is already available — let’s install it. And don’t forget to enable docker usage without sudo, it will be more convenient. After everything is set up, do the following:
distribution=$(. /etc/os-release;echo $ID$VERSION_ID)
curl -s -L https://nvidia.github.io/nvidia-docker/gpgkey | sudo apt-key add -
curl -s -L https://nvidia.github.io/nvidia-docker/$distribution/nvidia-docker.list | sudo tee /etc/apt/sources.list.d/nvidia-docker.list

sudo apt-get update && sudo apt-get install -y nvidia-container-toolkit
sudo systemctl restart docker
And you might not even need to check the official repository .
Now do a git clone .
There's just a little more to do before we can start using Docker with the NVIDIA image. We'll need to register in NGC Cloud and log in. Let's go here , register, and once we get inside NGC Cloud, click SETUP in the upper left corner of the screen or follow this link . Click 'generate key.' I recommend saving it; otherwise, you'll have to generate it again the next time you visit, and consequently, repeat this process when setting up on a new machine.
Let's execute:
docker login nvcr.io
Username: $oauthtoken
Password:  - the generated key
Simply copy the username. Well, that's it, the environment is set up!
Step 2. Building the Docker Container
In the second stage of our work, we will build Docker and familiarize ourselves with its internals.
Let's go to the root folder relative to the retina-examples project and execute
docker build --build-arg USER=$USER --build-arg UID=$UID --build-arg GID=$GID --build-arg PW=alex -t retinanet:latest retinanet/
We are building Docker while passing in the current user — this is very useful if you will be writing something on a mounted VOLUME with the current user's permissions; otherwise, it will default to root, which is inconvenient.
While Docker is being built, let's take a look at the Dockerfile:
FROM nvcr.io/nvidia/pytorch:19.10-py3

ARG USER=alex
ARG UID=1000
ARG GID=1000
ARG PW=alex
RUN useradd -m ${USER} --uid=${UID} && echo "${USER}:${PW}" | chpasswd

RUN apt-get -y update && apt-get -y upgrade && apt-get -y install curl && apt-get -y install wget && apt-get -y install git && apt-get -y install automake && apt-get install -y sudo && adduser ${USER} sudo
RUN pip install git+https://github.com/bonlime/pytorch-tools.git@master

COPY . retinanet/
RUN pip install --no-cache-dir -e retinanet/
RUN pip install /workspace/retinanet/extras/tensorrt-6.0.1.5-cp36-none-linux_x86_64.whl
RUN pip install tensorboardx
RUN pip install albumentations
RUN pip install setproctitle
RUN pip install paramiko
RUN pip install flask
RUN pip install mem_top
RUN pip install arrow
RUN pip install pycuda
RUN pip install torchvision
RUN pip install pretrainedmodels
RUN pip install efficientnet-pytorch
RUN pip install git+https://github.com/qubvel/segmentation_models.pytorch
RUN pip install pytorch_toolbelt

RUN chown -R ${USER}:${USER} retinanet/

RUN cd /workspace/retinanet/extras/cppapi && mkdir build && cd build && cmake -DCMAKE_CUDA_FLAGS="--expt-extended-lambda -std=c++14" .. && make && cd /workspace

RUN apt-get install -y openssh-server && apt install -y tmux && apt-get -y install bison flex && apt-cache search pcre && apt-get -y install net-tools && apt-get -y install nmap
RUN apt-get -y install libpcre3 libpcre3-dev && apt-get -y install iputils-ping

RUN mkdir /var/run/sshd
RUN echo 'root:pass' | chpasswd
RUN sed -i 's/PermitRootLogin prohibit-password/PermitRootLogin yes/' /etc/ssh/sshd_config
RUN sed 's@sessions*requireds*pam_loginuid.so@session optional pam_loginuid.so@g' -i /etc/pam.d/sshd

ENV NOTVISIBLE "in users profile"
RUN echo "export VISIBLE=now" >> /etc/profile
CMD ["/usr/sbin/sshd", "-D"]
As seen from the text, we take all our favorite libs, compile retinanet, add some basic tools for ease of work with Ubuntu, and set up the openssh server. The first line is indeed about inheriting the NVIDIA image, for which we logged into NGC Cloud and which contains Pytorch1.3, TensorRT6.x.x.x, and a bunch of libs that allow us to compile the cpp sources of our detector.
Stage 3. Running and debugging the docker container
Let's move on to the main use case of the container and the development environment; first, we'll run nvidia docker. Execute:
docker run --gpus all --net=host -v /home/:/workspace/mounted_vol -d -P --rm --ipc=host -it retinanet:latestNow the container is available via ssh @localhost. After a successful launch, let's open the project in PyCharm. Next, we open
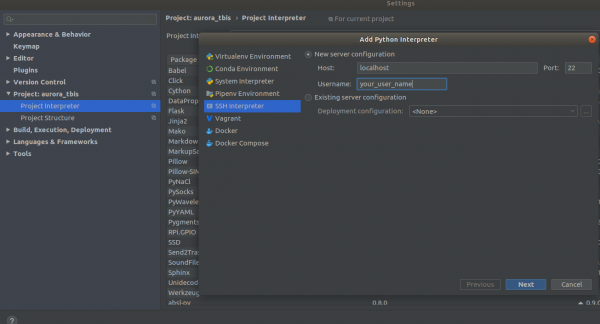
Settings->Project Interpreter->Add->Ssh Interpreter Step 1
Step 2
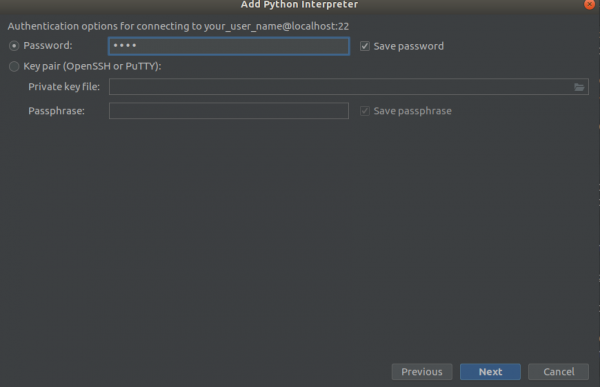
Step 3
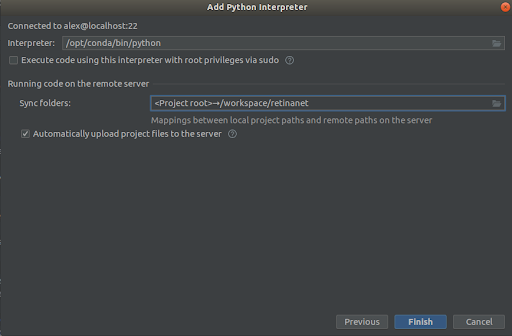
We select everything as shown in the screenshots,
Interpreter -> /opt/conda/bin/python— this will be a link to Python3.6 and
Sync folder -> /workspace/retinanetClick finish, wait for indexing, and that's it; the environment is ready for use!
IMPORTANT!!! Immediately after indexing, pull the compiled files for Retinanet from docker. In the context menu at the root of the project, we will choose the option
Deployment->DownloadOne file and two folders will appear: build, retinanet.egg-info, and _С.so
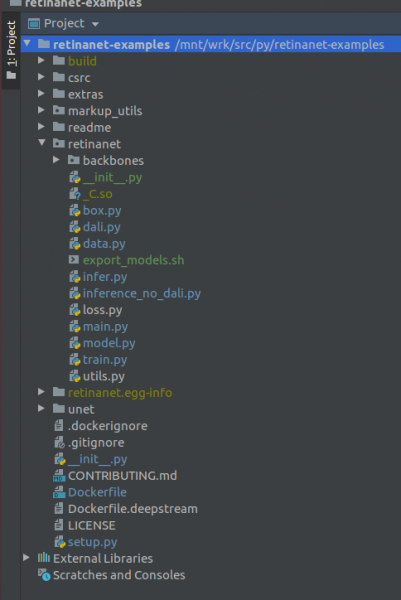
If your project looks like this, then the environment sees all the necessary files and we are ready to train RetinaNet.
Stage 4. Annotating data and training the detector
For annotation, I mainly use — a nice and convenient tool, recently a bunch of bugs were fixed and it started to behave significantly better.
Let's assume you have annotated the dataset and downloaded it, but you can’t just shove it into our RetinaNet, as it’s in its own format and we need to convert it to COCO. The conversion tool is located at:
markup_utils/supervisly_to_coco.pyPlease note that Category in the script is an example, and you need to insert your own (do not add the background category)
categories = [{'id': 1, 'name': '1'},
                  {'id': 2, 'name': '2'},
                  {'id': 3, 'name': '3'},
                  {'id': 4, 'name': '4'}]
The authors of the original repository somehow decided that you wouldn’t be training anything other than COCO/VOC for detection, so I had to edit the source file a bit.
retinanet/dataset.pyBy adding our favorite augmentations here and cut out the hard-coded categories from COCO. There's also an option to crop large detection areas if you're looking for small objects in large images, have a small dataset =), and nothing works, but that's a topic for another time.
Overall, the train loop is also weak; initially, it didn't save checkpoints and used some terrible scheduler, etc. But now you only need to choose a backbone and execute.
/opt/conda/bin/python retinanet/main.pywith parameters:
train retinanet_rn34fpn.pth
--backbone ResNet34FPN
--classes 12
--val-iters 10
--images /workspace/mounted_vol/dataset/train/images
--annotations /workspace/mounted_vol/dataset/train_12_class.json
--val-images /workspace/mounted_vol/dataset/test/images_small
--val-annotations /workspace/mounted_vol/dataset/val_10_class_cropped.json
--jitter 256 512
--max-size 512
--batch 32
You will see in the console:
Initializing model...
     model: RetinaNet
  backbone: ResNet18FPN
   classes: 2, anchors: 9
Selected optimization level O0:  Pure FP32 training.

Defaults for this optimization level are:
enabled                : True
opt_level              : O0
cast_model_type        : torch.float32
patch_torch_functions  : False
keep_batchnorm_fp32    : None
master_weights         : False
loss_scale             : 1.0
Processing user overrides (additional kwargs that are not None)...
After processing overrides, optimization options are:
enabled                : True
opt_level              : O0
cast_model_type        : torch.float32
patch_torch_functions  : False
keep_batchnorm_fp32    : None
master_weights         : False
loss_scale             : 128.0
Preparing dataset...
    loader: pytorch
    resize: [1024, 1280], max: 1280
    device: 4 gpus
    batch: 4, precision: mixed
Training model for 20000 iterations...
[    1/20000] focal loss: 0.95619, box loss: 0.51584, 4.042s/4-batch (fw: 0.698s, bw: 0.459s), 1.0 im/s, lr: 0.0001
[   12/20000] focal loss: 0.76191, box loss: 0.31794, 0.187s/4-batch (fw: 0.055s, bw: 0.133s), 21.4 im/s, lr: 0.0001
[   24/20000] focal loss: 0.65036, box loss: 0.30269, 0.173s/4-batch (fw: 0.045s, bw: 0.128s), 23.1 im/s, lr: 0.0001
[   36/20000] focal loss: 0.46425, box loss: 0.23141, 0.178s/4-batch (fw: 0.047s, bw: 0.131s), 22.4 im/s, lr: 0.0001
[   48/20000] focal loss: 0.45115, box loss: 0.23505, 0.180s/4-batch (fw: 0.047s, bw: 0.133s), 22.2 im/s, lr: 0.0001
[   59/20000] focal loss: 0.38958, box loss: 0.25373, 0.184s/4-batch (fw: 0.049s, bw: 0.134s), 21.8 im/s, lr: 0.0001
[   71/20000] focal loss: 0.37733, box loss: 0.23988, 0.174s/4-batch (fw: 0.049s, bw: 0.125s), 22.9 im/s, lr: 0.0001
[   83/20000] focal loss: 0.39514, box loss: 0.23878, 0.181s/4-batch (fw: 0.048s, bw: 0.133s), 22.1 im/s, lr: 0.0001
[   94/20000] focal loss: 0.39947, box loss: 0.23817, 0.185s/4-batch (fw: 0.050s, bw: 0.134s), 21.6 im/s, lr: 0.0001
[  105/20000] focal loss: 0.37343, box loss: 0.20238, 0.182s/4-batch (fw: 0.048s, bw: 0.134s), 22.0 im/s, lr: 0.0001
[  116/20000] focal loss: 0.19689, box loss: 0.17371, 0.183s/4-batch (fw: 0.050s, bw: 0.132s), 21.8 im/s, lr: 0.0001
[  128/20000] focal loss: 0.20368, box loss: 0.16538, 0.178s/4-batch (fw: 0.046s, bw: 0.131s), 22.5 im/s, lr: 0.0001
[  140/20000] focal loss: 0.22763, box loss: 0.15772, 0.176s/4-batch (fw: 0.050s, bw: 0.126s), 22.7 im/s, lr: 0.0001
[  148/20000] focal loss: 0.21997, box loss: 0.18400, 0.585s/4-batch (fw: 0.047s, bw: 0.144s), 6.8 im/s, lr: 0.0001
 Average Precision  (AP) @[ IoU=0.50:0.95 | area=   all | maxDets=100 ] = 0.52674
 Average Precision  (AP) @[ IoU=0.50      | area=   all | maxDets=100 ] = 0.91450
 Average Precision  (AP) @[ IoU=0.75      | area=   all | maxDets=100 ] = 0.35172
 Average Precision  (AP) @[ IoU=0.50:0.95 | area= small | maxDets=100 ] = 0.61881
 Average Precision  (AP) @[ IoU=0.50:0.95 | area=medium | maxDets=100 ] = -1.00000
 Average Precision  (AP) @[ IoU=0.50:0.95 | area= large | maxDets=100 ] = -1.00000
 Average Recall     (AR) @[ IoU=0.50:0.95 | area=   all | maxDets=  1 ] = 0.58824
 Average Recall     (AR) @[ IoU=0.50:0.95 | area=   all | maxDets= 10 ] = 0.61765
 Average Recall     (AR) @[ IoU=0.50:0.95 | area=   all | maxDets=100 ] = 0.61765
 Average Recall     (AR) @[ IoU=0.50:0.95 | area= small | maxDets=100 ] = 0.61765
 Average Recall     (AR) @[ IoU=0.50:0.95 | area=medium | maxDets=100 ] = -1.00000
 Average Recall     (AR) @[ IoU=0.50:0.95 | area= large | maxDets=100 ] = -1.00000
Saving model: 148
To review the entire parameter set, look at
retinanet/main.pyGenerally, they are standard for detection and have descriptions. Run the training and wait for the results. An example of inference can be viewed at:
retinanet/infer_example.pyor execute the command:
/opt/conda/bin/python retinanet/main.py infer retinanet_rn34fpn.pth
--images /workspace/mounted_vol/dataset/test/images
--annotations /workspace/mounted_vol/dataset/val.json
--output result.json
--resize 256
--max-size 512
--batch 32
The repository already includes Focal Loss and several backbones, and it also allows for easy integration of your own.
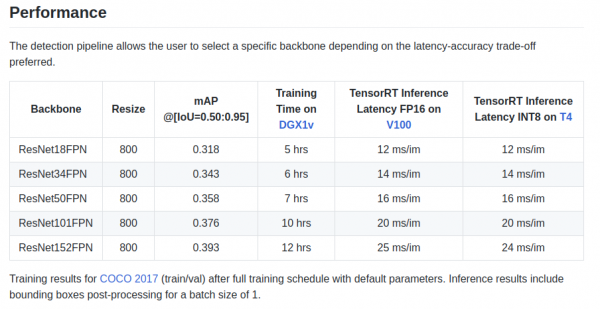
retinanet/backbones/*.pyIn the table, the authors provide some characteristics:
There is also the ResNeXt50_32x4dFPN and ResNeXt101_32x8dFPN backbone taken from torchvision.
I hope you've figured out detection a bit, but it is essential to read the official documentation to understand the export and logging modes..
Stage 5. Export and inference of Unet models with the Resnet encoder.
As you probably noticed, the libraries for segmentation were installed in the Dockerfile, including a wonderful library The Unet package contains examples of inference and exporting PyTorch checkpoints to the TensorRT engine.
The main issue when exporting Unet-like models from ONNX to TensorRT is the necessity to set a fixed size for Upsample or use ConvTranspose2D:
import torch.onnx.symbolic_opset9 as onnx_symbolic
        def upsample_nearest2d(g, input, output_size):
            # Currently, TRT 5.1/6.0 ONNX Parser does not support all ONNX ops
            # needed to support dynamic upsampling ONNX formulation
            # Here we hardcode scale=2 as a temporary workaround
            scales = g.op("Constant", value_t=torch.tensor([1., 1., 2., 2.]))
            return g.op("Upsample", input, scales, mode_s="nearest")

        onnx_symbolic.upsample_nearest2d = upsample_nearest2d
Using this transformation, this can be done automatically when exporting to ONNX, but this problem has already been solved in TensorRT version 7, and we just have to wait a little longer.
Conclusion
When I started using Docker, I had doubts about its performance for my tasks. One of my setups currently generates a fairly large network traffic from several cameras.
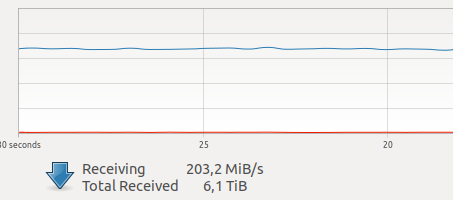
Various tests on the internet mentioned a relatively high overhead for network interaction and writing to VOLUME, plus the unknown and scary GIL, and since capturing a frame, working with the driver, and transmitting a frame over the network are atomic operations in hard real-time mode, hard real-time, latency in the network is very critical for me.
But everything worked out well =)
P.S. Don't forget to add your favorite train loop for segmentation and go to production!
Acknowledgments
Thank you to the community , without which it's impossible to grow! A huge thanks , for encouraging me to get involved in DL, for his invaluable advice and extraordinary professionalism!
Use optimized models in production!
 Aurorai, llc
Source: habr.com
