


My name is Yuri, and I am the head of the systems administration team at Citymobil. Today, I will share my experience working with thin provisioning technology in Linux file systems and how it can be applied in the CI/CD processes of the company. We will examine the situation where, for automated code testing during deployment to production, we quickly need MySQL database copies that are as close as possible to the 'live' version, available for both read and write operations.
Introduction: Why Give Bad Advice?
It's a logical question, as there are established mechanisms for migrating database schemas to test environments. Why even let a primary non-sharded database reach such volumes? Additionally, not all data is needed for testing. I will try to explain.
About a year ago, against the backdrop of our taxi aggregator's active growth (in 2018, completed rides increased approximately 15 times), the volume of data, server loads, and frequency of deployments grew significantly. We found ourselves in the following situation:
- The main MySQL database increased to about 1000 tables with a total size of 2.5 TB and continued to grow.
- There was no way to quickly shard and distribute the database. The old approach of 'writing to the database whatever and however I want' resulted in numerous JOINs and internal table dependencies.
- There was no mechanism for migrating the database schema to test environments.
- There was no automated code testing upon deployment to production.
We wanted to solve the last problem as quickly as possible. Postman tests had already been written to check the main PHP monolith, but we lacked an up-to-date database. At the same time, we could not create a replica overnight, make it the master, and unleash it for use during the day: the large number of deployments and changes, including in data and schema, would render the stand non-functional by mid-day. Limiting deployments to just the working day would also be inefficient.
Nevertheless, the task was completed: we received our first working stand in just two weeks. Over the past year, it has undergone many changes and continues to be used.
Next, I will describe all the steps and stages of the development of our solution in detail. You will see that this method deserves a place.
What is 'thin provisioning'?
This is a hardware or software technology (another name is sparse volumes) that allows allocating more resources than are available. The allocated volume must meet the just-enough (as much as needed) and just-in-time (within the necessary time) criteria. Thin provisioning is mainly used in various storage systems to provide disk space in necessary volumes that exceed the actual availability. The technology is supported by various file systems, such as LVM2, ZFS, BTRFS. It is widely used in virtualization hypervisors. For us, thin provisioning allowed us to quickly create as many copies of the main data partition as we needed from snapshots (data directory of the MySQL DBMS).
The first stand, Thin LVM technology
This chapter can also be called "How to make the fastest snapshots of large data volumes using ", reducing the stability of the file system and MySQL DBMS to unacceptable levels.
Since we had already used LVM to build the main OS partitions, we decided to start with it. First, we needed a separate physical machine—a replica of our main MySQL database—on which we could create a snapshot of the replica on demand and lift it alongside a separate instance of MySQL. During the testing period, we allowed modifying operations on this instance, and upon completion of the tests, we successfully deleted it. The server configuration was as follows:
- 2 x Intel Silver 4114 (10×2.2 GHz HT)
- 8 x 32 GB DDR4
- 8 x 1920 GB Intel SSD in Adaptec RAID controller in RAID-10
The choice between RAID controller and software RAID MD could be the topic of a separate article. I will only say that our choice was influenced by two factors:
- At the time of the task setup, we installed all DBMSs on RAID controllers, so it can be said that this has become historical.
- The difference in performance in synthetic file system tests and tests with various operations in MySQL was minimal.
We divided the resulting RAID-10: created a single Volume Group (VG) for the entire volume (with overheads of about 6.7 GB) and created a logical partition (Logical Volume, LV) for the system of 50 GB. Normally, we allocate the remaining space for the MySQL partition. However, we needed thin provisioning, so first we created what is called a pool within which we created a partition for /var/lib/mysql of 3.5 TB (based on the anticipated database sizes):
lvcreate -l 100%FREE -T vga/thin
lvcreate -V 3.5T -T vga/thin -n mysql
We formatted the partition in ext4, mounted it, wrote a replica, and obtained the initial setup. Then we created an API wrapper that is supposed to create snapshots, launch a MySQL database instance on a specified port, and delete the created instance. Since system calls are used exclusively for this, we chose regular bash as the scripting language, and for the API binding HTTP → bash we deployed an open-source solution , written in Go.
One day we will publish our bash scripts as open source, but for now I will just describe the main algorithm:
Creating the main snapshot snapmain:
- We stop the main replica.
- We place a lock on operations with the snapshot snapmain.
- We create a new snapshot snapmain.
- We start MySQL and remove the lock.
Creating a database on an arbitrary port from snapmain:
- We place a lock on a specific database instance (port).
- We check for an existing lock on the creation of the main snapshot. If it exists, we wait and recheck every 5 seconds.
- We check if there is an old LV partition of the instance.
3.1 If there is, we stop the MySQL instance using kill -9 and remove the LV partition. - We create a new instance from snapmain.
- We prepare and mount directories for this instance.
- We remove slave indicators (files) and start the MySQL instance.
- We make it a master.
- We remove the lock.
Deleting a database on an arbitrary port:
- We place a lock on a specific database instance (port).
- We kill the MySQL instance using kill -9.
- We unmount the directories.
- We remove the LV partition and lift the lock.
Example commands for cloning partitions of the new database instance:
lvcreate -n stage_3307 -s vga/snapmain
lvchange -ay -K vga/stage_3307
mount -o noatime,nodiratime,data=writeback /dev/mapper/vga-stage_3307 /mnt/stage_3307
Now I'll talk about the main issue we encountered when using thin provisioning. We ran into the performance limitations of SSD disks. This happened due to the specifics of Thin LVM: it inherently operates on a low-level device with chunks sized at 4 MB by default. Here’s how it looked:
- We create a snapshot from the main partition /var/lib/mysql.
- We start the replication to catch up with the master.
- Any changes in the replica tables require old, unchanged data chunks to be saved in the snapshot partition.
- Any changes in the running test instance require old, unchanged data chunks to be saved in the cloned snapshot partition for that instance.
- We experience 100% I/O operation load on the device, slowing down any operations and causing the replica to gradually lag behind.
- By the end of the workday, we have a stand that is several hours behind.
Here’s how we dealt with it to achieve a more reasonable outcome (main points):
RAID controller:
- We disabled all types of caching by default.
- We set writeback (when data is buffered, the write is considered complete before the actual saving to disk).
File system:
- In the mount point /var/lib/mysql, we specified noatime,nodiratime,data=writeback
- We disabled ext4 journaling using tune2fs.
MySQL:
- We specified innodb_flush_method = O_DSYNC (this increased write speed, thus reducing reliability).
- We disabled logging; logs are not needed.
- We specified innodb_buffer_pool_size = 4G (the smaller the InnoDB pool size, the faster MySQL will shut down when stopped, and the faster we create a snapshot).
This is far from a complete list, especially regarding MySQL. Other changes are minor and often not applicable or precise. For instance, in an attempt to reduce disk load, we even moved innodb_parallel_doublewrite_path to /dev/shm, which in some cases saved us up to 5 seconds when starting an improperly terminated instance.
Why do we stop MySQL before creating a snapshot? After all, we can create it from a running replica. That’s correct, but the new DB instance from this snapshot will be considered corrupted by default and will require a full scan upon startup. Stopping the replica is definitely faster, even though it's ultimately the longest operation in the entire process.
As a result, we achieved more acceptable timings and a ready-to-work stand. However, as evidenced by the most telling graph of the replication lag of the primary replica, the situation is still far from ideal:
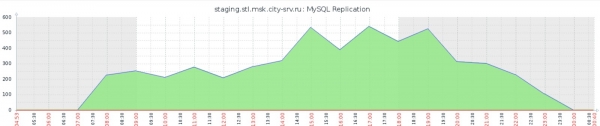
Among other drawbacks, it's worth noting the practical impossibility of monitoring the Thin LVM pool: aside from standard system functions like iostat, it is impossible to determine, for example, which element of the pool is currently putting the most load on the filesystem.
One major drawback related to the optimization mentioned above is that we ended up with a YOLO stand. About once every month or two, ext4 couldn't handle such abuses and would irreversibly crash, requiring reformatting and re-uploading the replica. While we gained in speed, we hopelessly compromised stability.
What metrics should be monitored during the operation of Thin LVM:
- Thin pool data %
- Thin pool metadata %
If our stand survives when the data space runs out (it's enough to clean the disks), the exhaustion of space for metadata will lead to a complete pool crash and the need to recreate it from scratch.
The filesystem within the pool becomes highly fragmented over time. I recommend running the command daily via cron fstrim -v /var/lib/mysql.
Interim results:
- The technology is easy to apply, just like LVM itself, and does not require special qualifications from the engineer.
- It is well-suited for small databases that are not heavily loaded. The smaller the database, the fewer chunks are moved through the filesystem within the pool, resulting in a lower load on the disks.
- For our task, we began searching for alternative solutions, which will be discussed in the next section.
The second stand, ZFS technology
Once upon a time, I dealt with the ZFS file system, but back then ZFS worked reliably on its native Solaris OS family. There was a FreeBSD port with a decent implementation. There was also an unfinished port for Linux that few used. Due to the B-tree data storage structure (which is also used by InnoDB in MySQL), ZFS performed poorly on installations with a very large number of files. All this, combined with the need to learn the technical specifics before using it, has long removed this file system from my practice. Ext4 and XFS emerged, which became the standard. However, given that ZFS fits our needs more than adequately and the Linux version, according to reviews, has become quite a reasonable product (albeit not fully supported, which means setting up a system on ZFS from scratch can only be done with various workarounds), we decided to give it a try.
For obvious reasons, we chose a stand with a similar configuration (except for the RAID controller). We installed eight SSDs, each 1920 GB. There was no desire to write our own network image to install the server on bare ZFS, so we took 50 GB from each disk and created an MD RAID-10 for the system. We merged the remaining 1950 GB on each disk into a ZFS equivalent of RAID-10:
zpool create zpool mirror /dev/sda2 /dev/sdb2 mirror /dev/sdc2 /dev/sdd2 mirror /dev/sde2 /dev/sdf2 mirror /dev/sdg2 /dev/sdh2We created partitions for MySQL:
zfs create zpool/mysql
zfs set compression=gzip zpool/mysql
zfs set recordsize=128k zpool/mysql
zfs set atime=off zpool/mysql
zfs create zpool/mysql/data
zfs set recordsize=16k zpool/mysql/data
zfs set primarycache=metadata zpool/mysql/data
zfs set mountpoint=/var/lib/mysql zpool/mysql/data
Note that we enabled native gzip data compression. We have plenty of CPU resources on the server, and they are not fully utilized. As a result, 3 TB of our database shrunk to 1.6 TB. Since, like last time, the weakest link is the maximum disk performance, the less data we have, the better. We get a great bonus from ZFS from the very beginning! During peak hours, maintaining gzip at full load uses up to 4 cores, but we're okay with that.
The subsequent implementation went faster. We duplicated the MySQL replica settings from the LVM stand. It took some time to rewrite the scripts to ZFS commands, but overall the algorithms remained the same. Here's an example of creating a snapshot:
zfs set snapdir=visible zpool/mysql/data
zfs create zpool/stage_3307
zfs clone zpool/mysql/data@snapmain zpool/stage_3307/data
zfs set mountpoint=/mnt/stage_3307 zpool/stage_3307/data
From additional tuning: we allocated ZFS partitions for metadata and logs in memory for l2arc and zil. For our task, this turned out to be excessive, but for now, we have left this optimization in place; changing it later is not difficult. As a downside, it requires recreating the corresponding memory areas after rebooting the server. Data is not lost in this process. zpool status excerpt:
logs
      /dev/shm/zil_slog.img  ONLINE       0     0     0
cache
      /dev/shm/l2arc.img     ONLINE       0     0     0
In this configuration, we began testing the setup and achieved excellent results: with two database instances running simultaneously (and an active primary replica) on snapshots, we observed disk load at 50-60%.
We eliminated our main issue, which is evident from the replication lag graph (compare with the previous graph in the Thin LVM section):
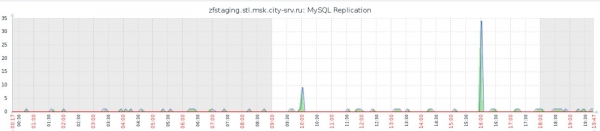
In addition to this, we significantly sped up all operations: creating a complete snapshot with stopping and starting the replica takes up to 40 seconds, and deploying a new MySQL instance from a snapshot takes up to 20 seconds. This is more than satisfactory for both us and our code testing.
Interim results:
- The results fully met our need for obtaining a copy of the production DB for code testing.
- The technology requires an introduction: you need to understand what ZFS is and how to work with it.
- We did not check the current status of ZFS performance with a large number (over 1 million) of small files. However, we suspect that the issue persists, so I would not recommend this file system for any storage solutions.
What's next?
Within the framework of the setup, there is nothing more to do; we are satisfied with the result. In the future, we may add exceptions for tables not needed for testing in the replication settings, which will further reduce the database size. We did not test the BTRFS system and its implementation of thin provisioning. However, that task is no longer relevant, as the main goal has been achieved. Overall, we certainly want to move away from the approach described above—implementing working database migrations to the testing environment, creating a separate test database circuit, and addressing the sharding of the main database. We are already putting much of this into practice and will definitely share more in future articles.
Summary
The initial task was solved, albeit in an unusual way. The intermediate conclusions described the advantages and disadvantages of each technology applied, so let's decide which technology can be used and when:
- Thin LVM — for small databases and when there is no desire or time to study ZFS.
- ZFS — if there is experience working with it or the ability to spend time learning in any situation.
At a higher level of representation, this article is not just a comparison of the technology of two file systems. The main idea I want to convey and reinforce is that we should not be afraid to think outside the box in situations critical to business and to rely solely on ready-made recipes. There was a time when our entire technical department could shake its head and say that creating three-terabyte database backups in less than a minute is impossible, and we don't need risky technologies; let's do it the right way. It was possible, but we would have lost about six months to a year and many customer trips (trips being our main business metric) without tests and during implementation. By acting unconventionally, we did not lose much time on implementation, gained experience in new and previously overlooked technologies, and provided testing exactly when we needed it most. Undoubtedly, this had a positive impact on all our metrics. The choice is always yours, and we will continue to share interesting current and future achievements in our blog.
Source: habr.com
