

Today we will continue our discussion on VLAN and delve into the VTP protocol, as well as the concepts of VTP Pruning and Native VLAN. In one of the previous videos, we talked about VTP, and the first thing that should come to mind when you hear about VTP is that it is not a trunking protocol, despite being referred to as a 'VLAN trunking protocol.'

As you may know, there are two popular trunking protocols – the proprietary Cisco ISL protocol, which is no longer in use, and the 802.1Q protocol, which is used in networking devices from various manufacturers to encapsulate trunking traffic. This protocol is also utilized in Cisco switches. We previously mentioned that VTP is a VLAN synchronization protocol, meaning it is designed to synchronize the VLAN database across all switches in the network.
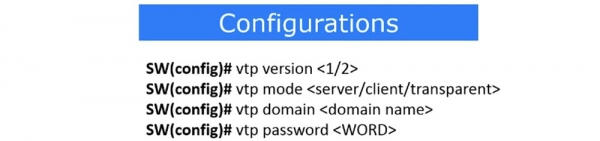
We have mentioned the different VTP modes – server, client, and transparent. If a device operates in server mode, it allows changes to be made, including adding or deleting VLANs. Client mode does not permit changes to switch settings; you can configure the VLAN database only through a VTP server, and it will be replicated across all VTP clients. A switch in transparent mode does not modify its own VLAN database; it simply passes through and forwards changes to the next device in client mode. This mode is similar to disabling the VTP protocol on a specific device, turning it into a transporter of VLAN change information.
Let's return to Packet Tracer and the network topology discussed in the previous lesson. We set up the VLAN10 network for the sales department and the VLAN20 network for the marketing department, connecting them with three switches.
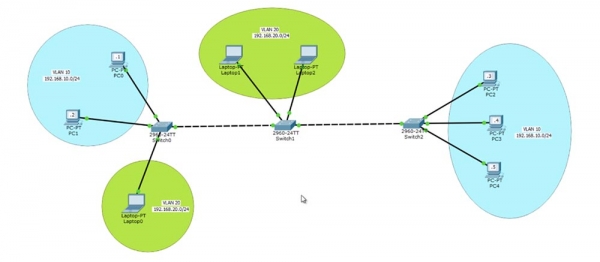
The connection between switches SW0 and SW1 is via the VLAN20 network, while the link between SW0 and SW2 is through the VLAN10 network, since we added VLAN10 to the VLAN database of switch SW1.
To examine the operation of the VTP protocol, let’s use one of the switches as the VTP server, which will be SW0. As you recall, by default all switches operate in VTP server mode. We will access the switch's command-line terminal and enter the command show vtp status. You will see the current version of the VTP protocol – 2 and the configuration revision number 4. If you remember, each time a change is made to the VTP database, the revision number increments by one.
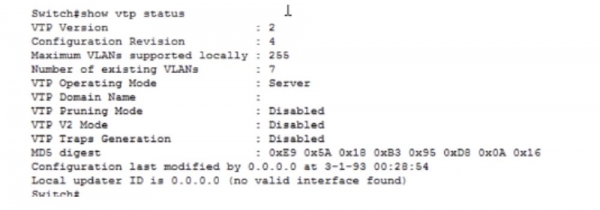
The maximum number of supported VLANs is 255. This number depends on the specific model of the Cisco switch, as different switches can support different numbers of local virtual networks. The number of existing VLANs is 7, and in a minute we will discuss what these networks are. The VTP management mode is set to server, the domain name is not specified, and VTP Pruning mode is disabled; we will return to this later. VTP V2 mode and VTP Traps Generation are also disabled. For the 200-125 CCNA exam, you do not need to know about the last two modes, so you can ignore them.
Let's take a look at the VLAN database using the command show vlan. As we have seen in the previous video, we have 4 unsupported networks: 1002, 1003, 1004, and 1005.
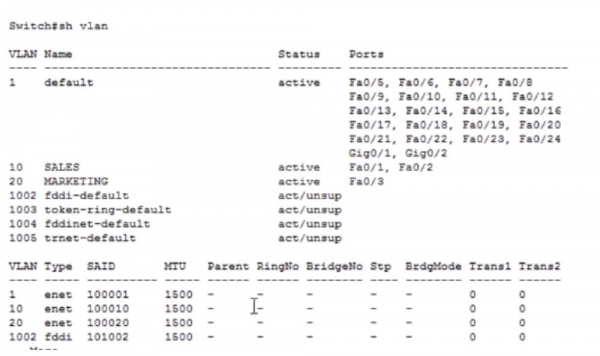
Here, we also list the 2 VLANs we created: VLAN10 and VLAN20, as well as the default network VLAN1. Now, let's move to another switch and enter the same command to check the VTP status. You can see that the revision number for this switch is 3, it is in VTP server mode, and all other information is similar to the first switch. When I enter the command show VLAN, I will see that we made 2 changes to the settings, one less than switch SW0, which is why SW1's revision number is 3. We made 3 changes to the default settings of the first switch, so its revision number increased to 4.
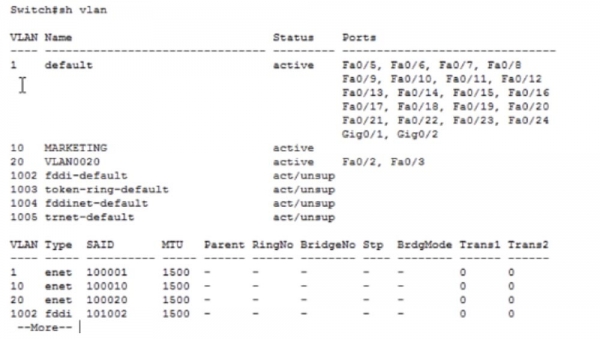
Now let's check the status of SW2. The revision number here is 1, which is strange. We should have a second revision because 1 change was made to the settings. Let's take a look at the VLAN database.
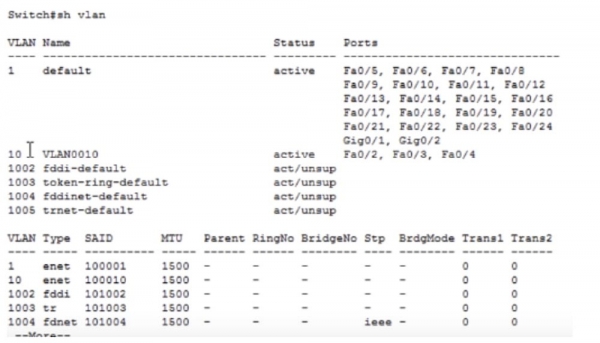
We made one change by creating VLAN10, and I don't know why that information hasn't updated. It might be because we're not working with a real network but with a network simulator, which may have bugs. When you get the chance to work with actual devices during your internship at Cisco, it will benefit you more than the Packet Tracer simulator. Another useful tool in the absence of real devices would be GNS3, or the graphical network simulator Cisco. This is an emulator that uses the actual operating system of the device, such as a router. There is a difference between a simulator and an emulator – the former is a program that resembles a real router but isn't one. The emulator virtually creates the device itself but runs real software to operate it. However, if you don’t have the opportunity to work with real Cisco IOS software, Packet Tracer would be the best option.
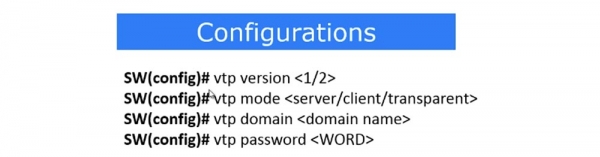
So, we need to set up SW0 as a VTP server; for this, I enter global configuration mode and type the command vtp version 2. As I mentioned, we can set the protocol version we need – either 1 or 2; in this case, we need the second version. Next, with the command vtp mode, we set the VTP mode of the switch – server, client, or transparent. In this case, we need the server mode, and after entering the command vtp mode server, the system indicates that the device is already in server mode. Next, we must configure the VTP domain using the command vtp domain nwking.org. Why is this necessary? If there is another device in the network with a higher revision number, all other devices with a lower number start replicating the VLAN database from that device. However, this occurs only when the devices have the same domain name. For example, if you are working in nwking.org, you specify this domain; if in Cisco, then the domain is cisco.com, and so on. The domain name of your company’s devices distinguishes them from devices of other companies or any other external network devices. If you assign a domain name to a device, you are making it part of that company's network.
The next step is to set the VTP password. This is necessary to prevent a hacker with a high revision number device from copying their VTP settings to your switch. I enter the password cisco using the command vtp password cisco. After this, VTP data replication between switches will only be possible if the passwords match. If the wrong password is used, no VLAN database updates will occur.
Let's try to create a few more VLANs. For this, I use the command config t, create network number 200 with the command vlan 200, assign it the name TEST, and save the changes with the command exit. Then, I create another network vlan 500 and name it TEST1. If I now enter the command show vlan, I can see these two new networks in the switch's virtual networks table, none of which have any ports assigned.
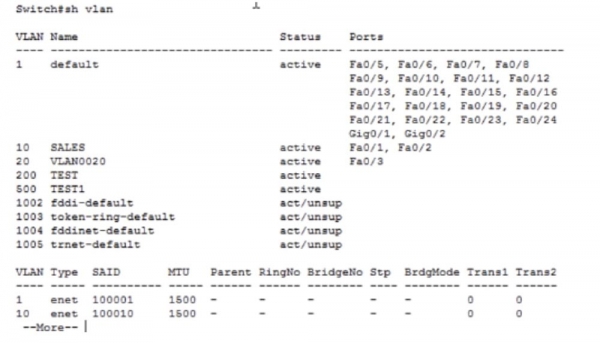
Let's switch to SW1 and check its VTP status. We see that nothing has changed here except for the domain name; the number of VLAN networks remains 7. We do not see the networks we created appearing because the VTP password does not match. Let's set the VTP password on this switch by entering the commands conf t, vtp pass, and vtp password cisco one after another. The system generates a message indicating that the VLAN database of the device now uses the password cisco. Let's take another look at the VTP status to verify if the information replication was successful. As you can see, the number of existing VLANs has automatically increased to 9.
If we look at the VLAN database of this switch, it is clear that the VLAN200 and VLAN500 networks we created have automatically appeared in it.
The same needs to be done for the last switch SW2. Let's enter the command show vlan – you see that there have been no changes. Similarly, there are no changes in the VTP status. For this switch to update its information, the password also needs to be configured, meaning we have to enter the same commands as for SW1. After this, the number of VLANs in the SW2 status will increase to 9.
This is what the VTP protocol is for. It's a great tool that ensures automatic updates of information across all client network devices after changes are made to the server device. You don't need to manually update the VLAN database on all switches — replication happens automatically. If you have 200 network devices, the changes will be saved simultaneously on all two hundred devices. Just in case, we need to ensure that SW2 is also a VTP client, so let's go to the settings with the command config t and enter the command vtp mode client.
Thus, in our network, only the first switch is in VTP Server mode, while the other two operate in VTP Client mode. If I now enter the settings for SW2 and type the command vlan 1000, I will receive a message: "VTP VLAN configuration is not allowed when the device is in client mode." Therefore, I cannot make any changes to the VLAN database while the switch is in VTP client mode. If I want to make any changes, I need to switch to the server switch.
I access the terminal settings of SW0 and enter the commands vlan 999, name IMRAN, and exit. This new network has appeared in the VLAN database of this switch, and if I now check the database of the client switch SW2, I will see that the same information has appeared here, indicating successful replication.
As I mentioned, VTP is a great part of the software, but if misused, this protocol can disrupt the operation of an entire network. Therefore, you need to be very careful with the company's network if the VTP domain name and password are not set. In this case, all a hacker needs to do is plug their switch's cable into the wall outlet, connect to any office switch via DTP, and then, using the created trunk, update all information via the VTP protocol. This way, the hacker can delete all important VLAN networks by taking advantage of the fact that the revision number of their device is higher than the revision numbers of other switches. In doing so, the company switches will automatically replace the entire VLAN database information with data replicated from the malicious switch, and your entire network will collapse.
This is because computers are connected via a network cable to a specific switch port tied to VLAN 10 or VLAN 20. If these networks are removed from the LAN switch's database, it will automatically shut down the port associated with the non-existent network. A company's network can often collapse precisely because switches simply disable ports linked to VLANs that were removed during an update.
To prevent such issues from arising, you need to set a domain name and VTP password or use the Cisco Port Security feature, which allows you to manage MAC addresses of switch ports by imposing various usage restrictions. For instance, if an unauthorized person attempts to change the MAC address, the port will immediately disable itself. Soon, we will delve deeper into this Cisco switch feature, but for now, you need to know that Port Security ensures VTP is protected from intruders.
To summarize what VTP configuration entails: it's about selecting the protocol version – either 1 or 2, assigning the VTP mode – server, client, or transparent. As I mentioned, the last mode does not update the VLAN database of the device itself; it merely transmits all changes to neighboring devices. Below are the commands for setting the domain name and password: vtp domain and vtp password .
Now, let's discuss VTP Pruning settings. If you look at the network topology, you'll see that all three switches have the same VLAN database, meaning VLAN10 and VLAN20 are part of all 3 switches. Technically, SW2 doesn't need VLAN20 because it has no ports related to this network. However, regardless of this, all traffic from Laptop0 going through VLAN20 reaches switch SW1 and is then sent through the trunk to the ports on SW2. Your main task as a network specialist is to minimize unnecessary data transmission over the network. You must ensure the necessary data is transmitted, but how do you restrict the transmission of information that is not needed by this device?
You must ensure that the traffic intended for devices on the VLAN20 network does not reach the SW2 ports via the trunk when not necessary. That is, traffic from Laptop0 should reach SW1 and then the computers on the VLAN20 network, but it should not go beyond the right trunk port of SW1. This can be ensured with VTP Pruning.
For this, we need to access the VTP server settings on SW0, because as I mentioned, VTP settings can only be made through the server. Go to global configuration settings and enter the command vtp pruning. Since Packet Tracer is just a simulation program, there is no such command in its command line hints. However, when I type vtp pruning and press 'Enter', the system will inform me that the vtp pruning mode is unavailable.
By using the show vtp status command, we will see that the VTP Pruning mode is in a disabled state, so we need to make it available by switching it to enable. Doing this will activate VTP Pruning mode on all three switches in our network within the network domain.
Let me remind you what VTP Pruning is. When we enable this mode, the server switch SW0 tells switch SW2 that only the VLAN10 network is configured on its ports. After this, switch SW2 informs switch SW1 that it does not need any traffic other than the traffic destined for the VLAN10 network. Now, thanks to VTP Pruning, switch SW1 has the information that it does not need to send VLAN20 traffic over the SW1-SW2 trunk.
For you as a network administrator, this is very convenient. You do not need to manually enter commands, as the switch is smart enough to send only what is required for a specific network device. If tomorrow you set up another marketing department unit in the neighboring building and connect its VLAN20 network to switch SW2, this switch will immediately inform switch SW1 that it now has VLAN10 and VLAN20 networks and will request traffic for both networks. This information is constantly updated across all devices, making communication more efficient.
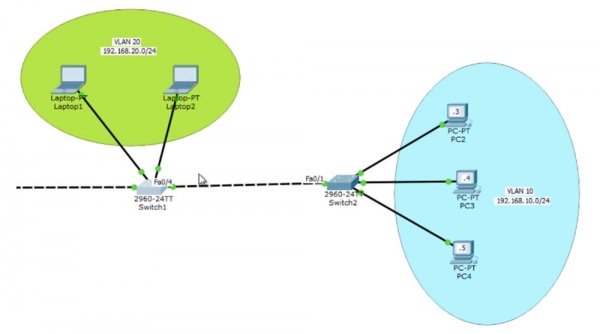
There is another way to specify traffic transmission – by using a command that allows data transfer only for the specified VLAN. I go into the settings of switch SW1, where I am interested in port Fa0/4, and I enter the commands int fa0/4 and switchport trunk allowed vlan. Since I already know that SW2 only has VLAN10, I can instruct switch SW1 to allow its trunk port to pass only traffic for this network by applying the allowed vlan command. Thus, I have configured the trunk port Fa0/4 to transmit traffic only for VLAN10. This means that this port will not pass traffic for VLAN1, VLAN20, or any other network aside from the specified one.
You may wonder what is better to use — VTP Pruning or the allowed vlan command. The answer is subjective, as in some cases it makes sense to use the first method, while in others, the second. As a network administrator, you must choose the optimal solution. In some situations, programming the port to allow traffic for a specific VLAN might be a good choice, whereas in others, it may be detrimental. In our network case, using the allowed vlan command might be justified if we do not intend to change the network topology. However, if someone later wants to add a group of devices using VLAN20 to SW2, it would be more appropriate to apply VTP Pruning mode.
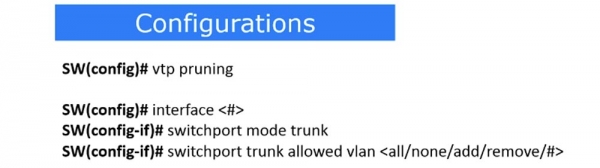
So, configuring VTP Pruning involves using the following commands. The vtp pruning command ensures automatic usage of this mode. If you want to manually set the trunk port for passing traffic for a specific VLAN, use the trunk port number selection command interface , turn on trunk mode with switchport mode trunk, and allow traffic for a specific network with the command switchport trunk allowed vlan .
In the last command, you can use 5 parameters. All means that traffic from all VLAN networks is allowed, none means that traffic for all VLANs is prohibited. If you use the add parameter, you can add allowance for traffic from another network. For example, we allow traffic for VLAN10, and with the add command, we can also enable traffic for VLAN20. The remove command allows you to remove one of the networks; for instance, using the remove 20 parameter means only traffic for VLAN10 will remain.
Now let's consider native VLAN. We have already discussed that the native VLAN is a virtual network for passing untagged traffic through a specific trunk port.

I go into the settings of a specific port, indicated by the command line header SW(config-if)#, and use the command switchport trunk native vlan , for example, VLAN10. Now all VLAN10 network traffic will pass through the trunk untagged.
Let's return to the logical topology of the network in the Packet Tracer window. If I use the command switchport trunk native vlan 20 for the switch port Fa0/4, all VLAN20 network traffic will pass through the Fa0/4 trunk – SW2 untagged. When switch SW2 receives this traffic, it will think: "this is untagged traffic, so I must direct it to the native VLAN network." For this switch, the native VLAN is VLAN1. Networks 1 and 20 are unrelated, but since native VLAN mode is used, we have the ability to direct VLAN20 traffic into a completely different network. However, this traffic will be unencapsulated, and the networks must still match.
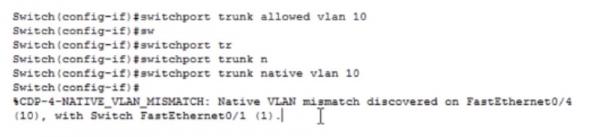
Let's look at this with an example. I will log into the SW1 settings and use the command switchport trunk native vlan 10. Now any VLAN10 traffic will exit the trunk port untagged. When it reaches the trunk port SW2, the switch will understand that it should direct it to VLAN1. As a result of this decision, the traffic will not be able to reach computers PC2, 3, and 4 since they are connected to access ports of the switch intended for VLAN10.
Technically, this will trigger a system message indicating that the native VLAN of port Fa0/4, which is part of VLAN10, does not match the port Fa0/1, which is part of VLAN1. This means that the specified ports will not be able to operate in trunk mode due to the native VLAN mismatch.
Thank you for staying with us. Do you enjoy our articles? Would you like to see more interesting materials? Support us by placing an order or recommending us to your friends. 30% discount for Habr users on a unique entry-level server designed by us for you: (options available with RAID1 and RAID10, up to 24 cores and up to 40GB DDR4).
Dell R730xd for half the price? Only with us in the Netherlands! Dell R420 — 2x E5-2430 2.2GHz 6C 128GB DDR3 2x960GB SSD 1Gbps 100TB — from $99! Read about how
Source: habr.com
