

Today's lesson is an introduction to Cisco routers. Before we dive into the material, I want to congratulate everyone watching my course, as nearly a million people have viewed the "Day 1" video lesson today. I thank all users who contributed to the study of the CCNA video course.
Today we will cover three topics: the router as a physical device, a brief introduction to Cisco routers, and the initial setup of the router. This slide shows what a typical Cisco 1921 model router looks like.
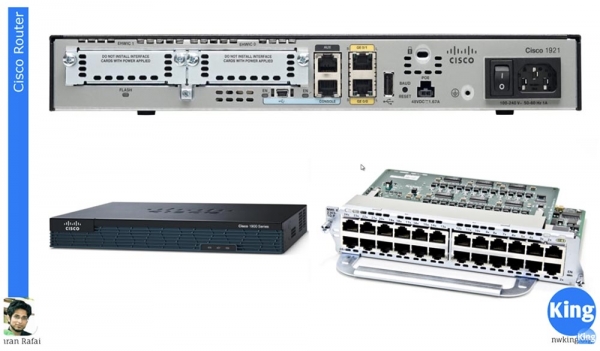
Unlike a switch, which has many ports, a typical router has only 2 ports for connection, in this case, Gigabit Ethernet ports GE0/0 and GE0/1, and a USB port. The router also has slots for expansion modules and 2 console ports, including 1 USB port. A distinctive feature of Cisco routers is the presence of a power switch – Cisco switches do not have switches. Typically, the front of the router looks like what is shown in the lower left corner of the slide. The back of the router features connectors for attaching cables. In this case, the cable from the GE0/0 or GE0/1 port connects to a switch.
In the lower right corner, the NME-X 23-ES-1GP expansion module is shown, which can be inserted into the router by removing the blank panels. By using such modules, one can extend the capabilities of a standard Cisco router to meet specific needs. As you know, Cisco's products are quite expensive due to their complexity and extensive functionality, giving users the option to avoid overpaying for a device with more features than required. After purchasing a simple 2-port router, you can gradually add necessary expansion modules as your network grows. Overall, Cisco devices are capable of performing numerous functions. Cisco did not invent routers, but it is routers that have made Cisco the company we know today. Cisco began mass production of routers of the highest quality, which secured this product's leading position in the networking device market.
Cisco describes itself as a software company, meaning it produces software. Any manufacturer, like those in China, can make hardware similar to Cisco's 'iron' by sourcing the appropriate components. However, it is Cisco IOS software that truly defines the company's devices. Cisco takes great pride in this operating system, which runs on all of its devices—both switches and routers.
One of Cisco's most significant inventions is also the CEF Enhanced technology, or Cisco Express Forwarding. It enables incredibly fast packet transmission, nearly at the maximum speed allowed by the network's technical capabilities. This was made possible by Cisco's application-specific integrated circuits (ASICs), which allow the switch to transmit packets at nearly network speed.
As I mentioned, a router is largely a software device, so routing decisions are made by the Cisco IOS operating system.
You know that there are expensive graphics cards for computer games. If you don't have one, all the heavy calculations, 3D animations, and complex graphics processing are handled by your operating system, putting a strain on your computer's CPU. However, if you have a powerful graphics card with its own GPU and memory, gaming performance increases manifold, as the separate 'hardware' manages the graphical tasks.
A switch operates in a similar manner, as all packet switching decisions are made by dedicated 'hardware,' relieving the router from having to rely on software for those decisions. Cisco employs a semi-software, semi-hardware technology called CEF that compels the router to make expedited routing decisions. This feature is unique to Cisco routers.
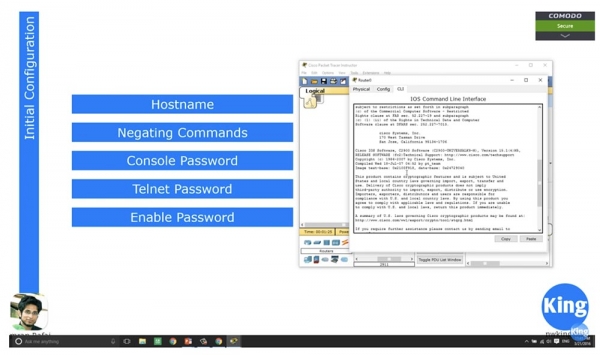
We have already discussed how to perform the initial setup of switch parameters, and since the router configuration is carried out in a similar manner, I will quickly explain it to you. I will open the Cisco Packet Tracer program and select the router model 1921, then I will open the IOS console window, where you can see the loading process of this router's operating system.
You can see that we have loaded version 15.1, which is the latest version of IOS, the memory size is 512 MB, the platform is CISCO 2911, then the other operating system parameters are displayed, the IOS image test, and of course, there is a license agreement and similar items here.
I will do a separate video dedicated exclusively to Cisco IOS, or I will simply talk about various services of this operating system. I will just say that by the version number you can determine what capabilities and functions this OS has. Starting from 15.1, all IOS versions are universal, meaning that depending on the license purchased by the user, they can access various system functions. For example, if you need enhanced network security, you buy a security service license; if you need voice service functions – a voice service license, and so on.
Before version 15.1, routers had OS versions like Basic, Security, Enterprise, Voice Enable, and so on. For example, my friend's router had the Enterprise IOS version, while I had the Basic IOS version, and nothing prevented me from taking my friend's version and installing it on my router because Cisco did not use the concept of OS licenses.
Starting from version 15.1, the company began applying the concept of license variants, and until you purchase the appropriate key, you cannot use any additional operating system services. A little later, when we discuss Cisco's licensing policy, I will tell you about the different IOS versions. For now, you can ignore this and go straight to the loading log.
At the end of the log, you can see the description of the hardware that the system is running on: the brand of the processor, 3 gigabit interfaces, 64-bit DRAM, and 256 KB of non-volatile memory. This amount of memory may seem too small, but for a router making routing decisions, it is quite sufficient. This memory should not be compared to your computer's memory, as they are entirely different things.
The Cisco IOS boot log ends with the question: "Continue with the setup dialog? Yes/No." If you answer "Yes," the system will guide you through a series of questions, and by answering them, you will complete the initial configuration of the device.
During your study of the CCNA course, you should not do this, so always answer "No" to this question. Of course, you can choose the answer "Yes" and skip the configuration setup, but since you don't know how to carry it out, it's better to choose the answer "No."
By selecting "No" and pressing RETURN, we will move to the command line prompts where various commands can be entered. Similar to the switch, we first enter the command Router > enable to enter privileged configuration mode. Then I type config t (configure terminal) to access global configuration mode.
Let’s quickly go through the commands. I want to change the hostname, so I use the command hostname R1, then I will issue some denial commands, so first I will ask to show me the router interfaces by using the command do show ip interface brief. We see that the Gigabit Ethernet 0/0 port is in administratively down mode, so I use the commands int gigabitEthernet 0/0 and no shutdown. After that, the port’s state changes to up. If we take another look at the router interface status, we see that this port now shows as "up." The protocol state remains down because nothing is connected to our router, and in the absence of traffic, it remains in a disabled state. However, as soon as traffic comes to the router port, the protocol will change its status to up.
Next, we need to set a password for the console. To do this, I type the commands line con 0, password console, and do show run to ensure that the console password has been set. The password check will only occur after I enter the command login. Now the router console port is protected by a password.
I have already told you about password encryption. Imagine that someone gained access to the current configuration of this device. Since the installed password is clearly visible, that person can easily steal it to access the router settings at any time and hack the system.
One way to enable password encryption is by using the command service password-encryption. By default, this command is used with the negation command no, which appears as no service password-encryption, so password encryption is not performed. Let’s enter global configuration mode, type the command service password-encryption, and press ‘Enter’. This command means that the system takes the plaintext password I set and encrypts it.
Now, if you check the current configuration with the command do show run and go to the password line, you will see that the type 7 password has turned into a random sequence of numbers. Now, if any of your colleagues were to peek over your shoulder and see this password, it would be very difficult for them to memorize this sequence. Thus, we have created the first line of defense for access security.
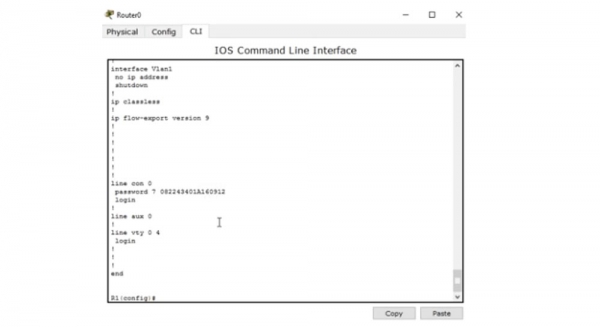
However, even if they manage to copy this password, access to the settings will be denied because this sequence of numbers is not the actual password, but its encrypted value. The correct password is the word console, and when I enter it, I will gain access to the console port. Therefore, even if someone copies these digits, they still won’t be able to access the device.
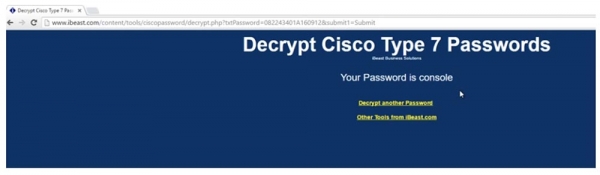
However, we are mistaken because all an attacker needs to do is visit a website that easily decrypts Cisco type 7 passwords. It’s enough to go to the site, input the copied digits, and you will get the decrypted password, which in our case is the word console. Now the hacker just needs to copy this word, return to the IOS settings, and paste it into the password prompt.
In this case, the simple Enable Password function does not provide the necessary security. The best way to ensure protection is to use the command enable secret cisco. If you then check the current configuration, you will see that the password value is now a mix of different characters. In this case, the fifth type of Cisco passwords was used.
Decrypting this type of password online is impossible, so your device's console is now completely secure.
Next, you need to set a password for Telnet. For this, I type the command line vty 0 4, which will allow five people to use this router, and I enter the command password telnet. Now, if someone wants to connect to the router via Telnet, they will need to enter this password – the word telnet.
Then, for the switch, we configured the Management IP address because the switch operates at Layer 2 of the OSI model. However, the router is a Layer 3 device, which means that each port on the router has its own IP address.
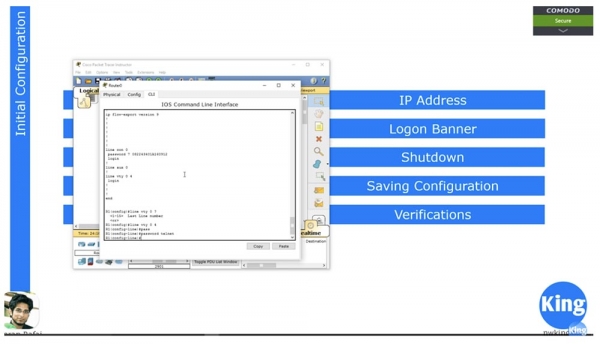
In the switch, we moved on to the settings of VLAN1 or any other network where we needed to specify an IP address. We created virtual interfaces and assigned them IP addresses. But in the case of the router, these addresses need to be assigned to physical ports, so I enter the commands config t and int g0/0. Next, I use the command to assign the IP address just like I did with VLAN, entering the command ip address 10.1.1.1 255.255.255.0 and then typing no shutdown.
Now, if you look at the state of the ports using the command do show int brief, you will see that the address 10.1.1.1 has been assigned to the Gigabit Ethernet 0/0 interface. Thus, we have configured the IP address.
Next, we move on to configuring the Logon Banner. Just like for the switch, I use the command banner motd & and then can enter any text I want, for example, Welcome to NetworKing Router, highlighting the text with "stars" and closing it with an ampersand &.
Next, if you want to disable a port, you use the Shutdown command. To save the settings, the command copy running-config startup-config is used. The current configuration can be viewed with the command show running conf, and to view the startup configuration, the command show startup conf is used. Since we used a new device 'out of the box' and booted with default settings, in response to the request to show the startup configuration, the system indicates that it does not exist yet.
After entering the command copy running-config startup-config, the system prompts to confirm that the file being overwritten is the system's startup-config boot parameters file. After overwriting the startup configuration file, I view it using the command show startup conf and see that it now fully replicates the current device state parameters file. Now, if I turn off the router and turn it back on, it will boot using the saved parameters.
The best way to verify the router's status is to use the command show int brief; you can also use the show int command, which will show the status of all ports. If you want to look at the status of a specific port, you can use the command show interface g0/0, after which the system will display complete statistics for that interface.
As I mentioned, the most important part of the router is the routing table. It can be viewed with the command show ip route.
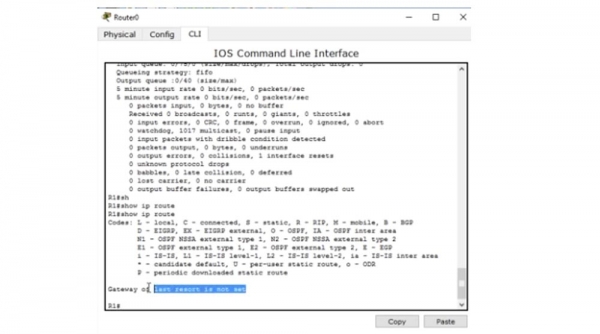
At this moment, the table is empty because no devices are connected to our router. In the next video tutorial, we will look at how the routing table is created using various protocols, how it gets populated when new devices are connected using static routing or dynamic protocols. In the world of routers, the command show ip route is the most popular, as routing issues usually begin with the routing table.
This concludes our video lesson, as I have covered everything that was planned for today. Many users ask about my interest in recording and sharing these video lessons. I do this in my spare time completely for free. Of course, you can send me money if you wish. Many websites utilize my video lessons and charge for them, but I don’t want to do that to my audience and promise that my lessons will never be paid.
Thank you for staying with us. Do you enjoy our articles? Would you like to see more interesting materials? Support us by placing an order or recommending us to your friends. 30% discount for Habr users on a unique entry-level server designed by us for you: (options available with RAID1 and RAID10, up to 24 cores and up to 40GB DDR4).
Dell R730xd for half the price? Only with us in the Netherlands! Dell R420 — 2x E5-2430 2.2GHz 6C 128GB DDR3 2x960GB SSD 1Gbps 100TB — from $99! Read about how
Source: habr.com
