

Today we will discuss password recovery for routers and switches, upgrading, reinstalling, and recovering IOS, as well as Cisco’s licensing system for IOSv15. These are very important topics related to network device management.
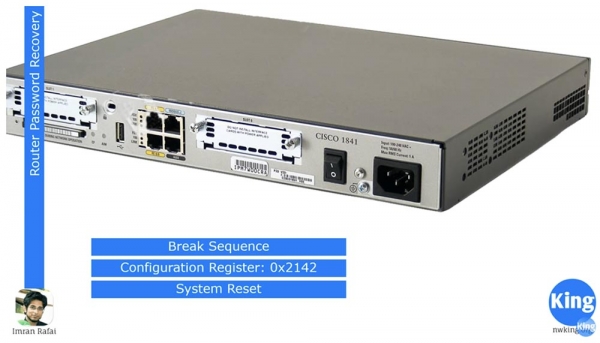
How can you recover a password? You might wonder why this could be necessary. Suppose you have configured a device and set all the required passwords: for VTY, console, privileged mode, Telnet, and SSH connections, and then you forgot those passwords. Perhaps an employee who set them up left the company and didn’t pass the records to you, or you bought a router on eBay and don’t know the passwords set by the previous owner, making it impossible to access the device.
In such situations, you should use 'hacker' techniques. You access the Cisco device and reset the passwords, but this isn’t real hacking if the device belongs to you. You need three things: a Break Sequence, a configuration register, and a system reboot.
You use a switch, power off the router, and immediately turn it back on to initiate a reboot; Cisco users refer to this as 'bouncing'. During the IOS image unpacking, you need to interrupt the boot process, which means connecting to the device via the console port and initiating the Break Sequence. The key combination to start the Break Sequence depends on the terminal emulation program you are using; for Hyperterminal, a certain combination is used, while for SecureCRT, a different one is needed. Below this video, I provide a link , where you can find all the key combinations for different terminal emulators, compatibility variations, and different operating systems.
When using the break sequence, the router will start in ROMmon mode. ROMmon is similar to a computer's BIOS; it is a basic operating system that allows you to execute fundamental service commands. In this mode, you can utilize the configuration register. As you know, during the boot process, the system checks for boot settings, and if they are missing, it will load with the default settings.
Normally, the value of the router's configuration register is 0x2102, which indicates that it will boot using the startup configuration. If this value is changed to 0x2142, then during the Break Sequence, the startup configuration will be ignored, as the system will not consider the contents of the non-volatile memory (NVRAM), and it will boot with the default configuration corresponding to the router's 'out of the box' settings.
Thus, to boot with the default settings, you need to change the configuration register value to 0x2142, which literally tells the device: 'please ignore the startup configuration during any boot!'. Since this configuration contains all the passwords, booting with the default settings gives you unrestricted access to the privileged mode. In this mode, you can reset passwords, save the changes made, reboot the system, and gain complete control over the device.
Now I will launch Packet Tracer and show you what I just described. You can see the network topology consisting of a router, where passwords need to be reset, a switch, and a laptop. In all the video tutorials, I clicked on the device icon in Packet Tracer, went to the CLI console tab, and configured the device. Now I want to do it differently and show how this is done on a real device.
I will connect the laptop's RS-232 serial port to the router's console port with a console cable; in the program, this cable is blue. I do not need to configure any IP addresses because they are not required for communication with the router's console port.
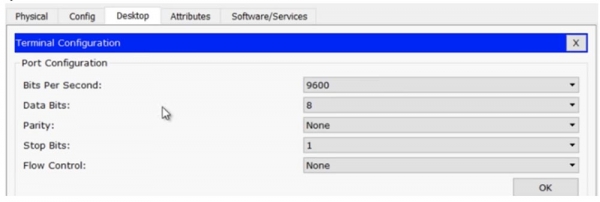
In the laptop, I go to the Terminal tab and check the parameters: transmission speed 9600 bps, data bits – 8, parity none, stop bits – 1, flow control – none, and then I click the OK button, which gives me access to the router's console. If you compare the information in both windows – the CLI of router R0 and on the screen of laptop Laptop0, it will be exactly the same.
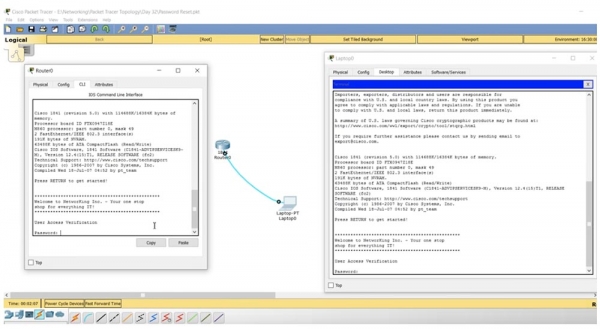
Packet Tracer allows you to do such things, but in practice, we won't use the router's CLI console window; we'll work only through the computer's terminal.
So, we have a router whose password needs to be reset. You access the laptop terminal, check the parameters, go to the router settings panel, and see that access is blocked by a password! How do you get in?
I move to the router, go to the tab where it is shown as a physical device, click the power switch, and immediately turn it back on. You see that a message about the OS image self-extraction appears in the terminal window. At this moment, you need to use the Ctrl+C key combination, which is used to enter rommon mode in Packet Tracer. If you entered through Hyperterminal, you need to press Ctrl+Break.
You see that a line with the title rommon 1 has appeared on the screen, and if you enter a question mark, the system will provide a number of prompts about which commands can be used in this mode.
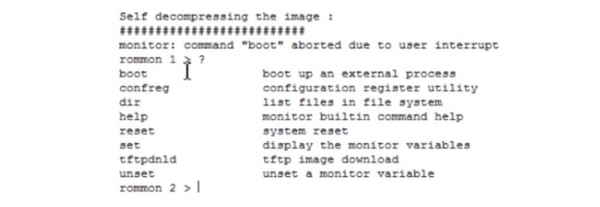
The boot parameter initiates the internal boot process, confreg launches the configuration register utility, and this is the command we are interested in. I type confreg 0x2142 in the terminal line. This means that upon reboot, the information stored in NVRAM flash memory will be ignored, and the router will boot with default settings, like a brand new device. If I had typed the command confreg 0x2102, the router would have used the last saved boot parameters.
Next, I reboot the system with the reset command. As you can see, after its reboot, instead of asking for a password, like last time, the system simply asks if I intend to continue the configuration dialogue. Now we have a router with default settings, without any user configuration.
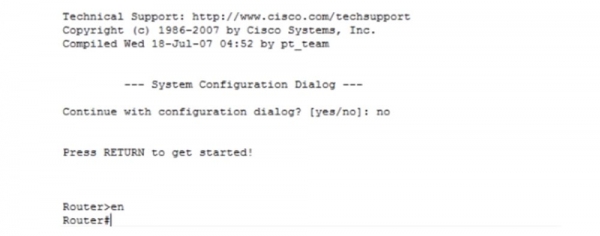
I enter no, then the enter command and switch from user mode to privileged mode. Since I want to view the boot configuration, I use the command show startup-config. You can see the hostname NwKing router, the welcome banner, and the console password 'console'. Now I know this password and can copy it to remember it, or I can change it to something else.
What I need first is to load the startup configuration into the current router configuration. To do this, I use the command copy startup-config running-config. Now our current configuration has become the previous router configuration. You can see that after this, the router name in the command line changed from Router to NwKingRouter. With the command show run, you can view the current configuration of the device, where you can see that the console password is the word 'console', we did not use enable password, and that is correct. You need to remember that recovery 'kills' privileged mode, and you end up back in user mode.
We can still make changes to the registry, and if the password were secret, meaning the enable secret feature were used, you obviously wouldn't be able to decrypt it. So, you can return to global configuration mode using the command config t and set a new password. For this, I type the command enable secret enable or I can use any other word as a password. If you type show run, you will see that the enable secret feature is enabled, and the password now looks like a string of encrypted characters instead of the word 'enable', and you don't have to worry about security because you just set and encrypted the new password yourself.
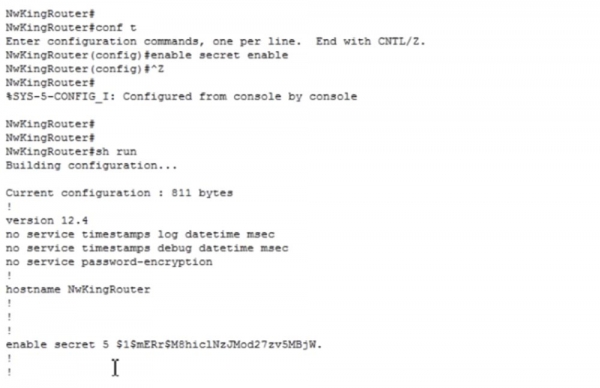
Here is how to perform password recovery on the router. Note one important thing: if you enter the command show version, you will see that the configuration register value is 0x2142. This means that even if I use the command copy running to startup and reload the router, the system will again load the default settings, meaning the router will return to factory settings. We completely do not need this because we reset the password, regained control over the device, and want to use it in operational mode.
Therefore, you need to enter global configuration mode Router(config)# and enter the command config-register 0x2102, and only after that use the command to copy the current configuration to startup copy run start. You can also copy the current settings to the startup configuration using the command write. If you type show version now, you will see that the register value is currently set to 0x2102, and the system reports that the changes will take effect upon the next reboot of the router.
So we initiate the reboot with the command reload, the system reboots, and now we have all configuration files, all settings, and know all the passwords. This is how router password recovery is performed.
Let's look at how to perform the same procedure for a switch. The router has a switch to turn the power off and on again, but the Cisco switch does not have such a switch. We need to connect to the console port with a console cable, then disconnect the power cable from the back of the switch, wait for 10-15 seconds, plug it back in, and immediately press and hold the MODE button for 3 seconds. This will automatically switch the switch to ROMmon mode. In this mode, you need to initialize the file system on the flash and rename the file config.text, for example, to config.text.old. If you simply delete it, the switch will 'forget' not only the passwords but also all previous settings. After that, you reboot the system.
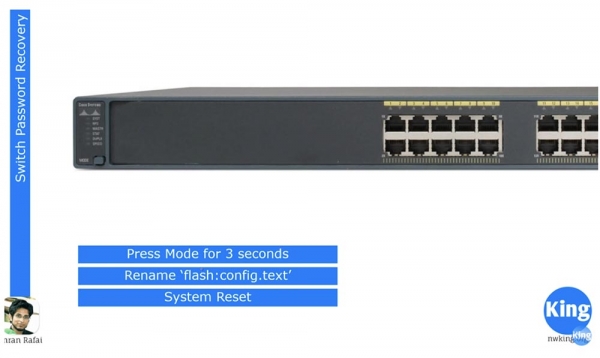
What happens to the switch during this process? Upon reboot, it looks for the configuration file config.text. If it doesn't find this file in the device's flash memory, it loads the IOS with default settings. This is the difference: in the router, you need to change the register setting, while in the switch, it is enough to just change the name of the startup configuration file. Let’s see how this happens in Packet Tracer. This time, I am connecting a laptop with a console cable to the console port of the switch.
We are not using the switch's CLI console but are modeling a situation where the switch settings can only be accessed via a laptop. I am using the same terminal settings on the laptop as in the case with the router, and upon pressing 'Enter,' I connect to the console port of the switch.
In Packet Tracer, I cannot turn the power cable on and off like I can with a physical device. If I had a console password, I would be able to reboot the switch, so I enter the command enable password enable to set a local access password for privileged console mode.
Now, if I go to the settings, I see that the system is prompting for a password that I do not know. Therefore, it is necessary to initiate a reboot of the system. As you can see, the system does not accept the reload command that was sent from the user device in user mode, so I need to use privileged mode. As I mentioned, in real life, I would simply disconnect the power cable from the switch for a few seconds to trigger a reboot, but because it is not possible to do this in the program, I need to remove the password and reboot right from here. You understand why I am doing this, right?
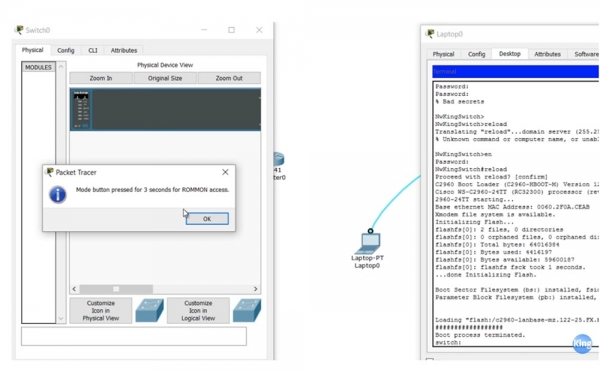
So, I switch from the CLI tab to the "Physical Device" tab, and when the device starts rebooting, I hold the virtual MODE button for 3 seconds and enter ROMmon mode. You can see that the information in the switch's CLI window is the same as in the window on the laptop screen. I go to the laptop screen, which displays the switch's ROMmon mode, and enter the command flash_init. This command initializes the file system on the flash, after which I enter the command dir_flash to view the contents of the flash memory.
Here, there are two files – the IOS operating system file with the .bin extension and the config.text file, which we need to rename. To do this, I use the command rename flash:config.text flash:config.old. If I now use the dir_flash command, I can see that the config.text file has been renamed to config.old.
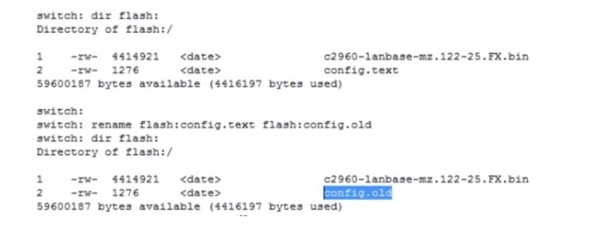
Now I enter the reset command, the switch restarts, and after the system boots, it goes to the default settings. This is indicated by the device name in the command line changing from NwKingSwitch to just Switch. In a real device, there is a rename command, but this cannot be used in Packet Tracer. Therefore, I use the show running conf command; as you can see, the switch is using all default settings, and I enter the command more flash:config.old. Here’s the hack: you just need to copy the current configuration of the device displayed on the screen, go into global configuration mode, and paste the copied information. Ideally, we copy all settings, and you see that the device name has changed and the switch has returned to normal operating mode.
Now we need to copy the current configuration to the startup configuration, meaning we need to create a new file named config.text. The easiest way is to simply rename the old file back to config.text, which means copying the contents of config.old to the current configuration and then saving it as config.text. This is how the password recovery of the switch is done.
Now we will look at how to perform backup and recovery of the Cisco IOS operating system. The backup involves copying the IOS image to a TFTP server. Next, I will explain how to transfer the system image file from this server to your device. The third topic is system recovery in ROMmon mode. This may be necessary if your colleague accidentally deleted the IOS and the system stopped booting.

We will look at how to get the system file from the TFTP server in ROMmon mode. There are two methods to do this; one of them is xmodem. Packet Tracer does not support xmodem, so I will briefly explain what it is, and then I will show how to use the second method – system recovery via TFTP – using Packet Tracer.
The diagram shows the device Router0, which is assigned the IP address 10.1.1.1. This router is connected to a server with the IP address 10.1.1.10. I forgot to assign an address to the router, so I'll quickly do that now. Our router is not connected to the laptop, so the program does not allow me to use the CLI console, and I will need to fix this.
I connect the laptop to the router using a console cable, the system prompts for the console password, and I use the word console. In global configuration mode, I assign the f0/0 interface the required IP address and subnet mask 255.255.255.0 and add the command no shutdown.
Next, I type the command show flash and see that there are 3 files in memory. The file number 3 is the most important, it's the router's IOS file. Now I need to set up the TFTP server, so I click on the Server0 device icon and open the SERVICES tab. We see that the TFTP server is enabled and contains files for many Cisco operating systems, including the IOS for our router c1841 – this is the third file on the list. I need to delete it from the server because I am going to copy another IOS file from our Router0 here. To do this, I select the file and click Remove file, then go to the laptop console tab.
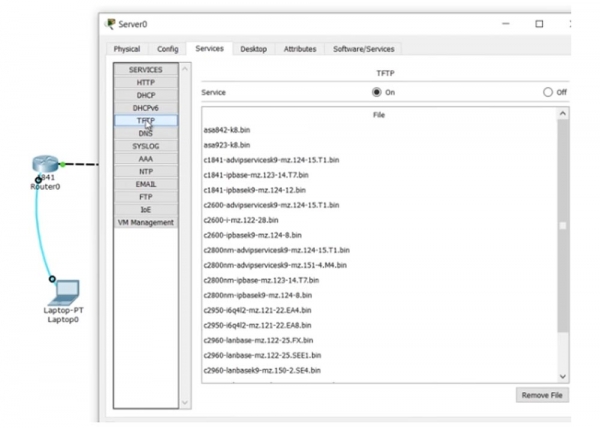
While in the router's console, I enter the command copy flash tftp , then I copy and paste the operating system file name.
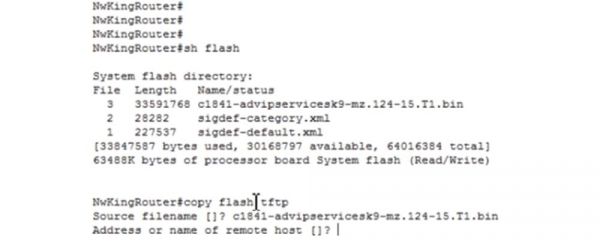
Next, in the command, you need to specify the address or name of the remote host to which this file should be copied. Just like when saving the router's boot configuration, you need to be careful here. If you accidentally copy the wrong configuration to the boot one, instead of the current one, you will lose all the settings after rebooting the device. Likewise, in this case, you should not confuse the source and the destination. So, first, we specify the name of the file that needs to be copied to the server, and then the IP address of that server 10.1.1.10.
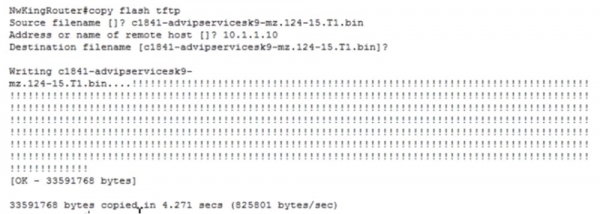
You see that the file transfer has started, and if you look at the TFTP file list, you will see that a new IOS file for our router has appeared instead of the remote file. This is how the IOS is copied to the server.
We are now returning to the router settings window on the laptop and entering the command copy tftp flash, specifying the remote host address 10.1.1.10 and the source filename, which is the IOS that needs to be copied to the router's flash: c1841-ipbase-mz.123-14.T7.bin. Next, we specify the destination filename, which in our case will be exactly the same as the source's name. After that, I press 'Enter', and the new IOS file is copied to the router's flash memory. You can see that we now have two operating system files: the new one numbered 3 and the previous original one numbered 4.
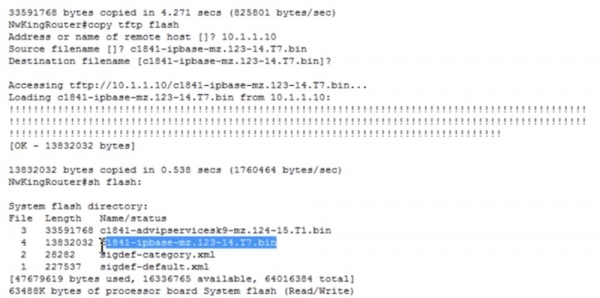
In the IOS designation, the version is important for us – in the first file numbered 3 it is 124, while in the second file numbered 4 it is 123, meaning it is an older version. Additionally, advipservicesk9 indicates that this version of the system is more feature-rich than ipbase, as it allows for MPLS usage and so on.
Another scenario is that you accidentally deleted the flash – I type the command delete flash and specify the name of the IOS file to be deleted.
But before that, I want to mention that now by default during boot, the file numbered 3 will be used, which is c1841-advipservicesk9-mz.124-15.T1.bin. Suppose that for some reason I want the system to use file number 4 on the next boot — c1841-ipbase-mz.123-14.T7.bin. To do this, I enter global configuration mode and type the command boot system flash: c1841-ipbase-mz.123-14.T7.bin.
Now on the next boot, this file will be used as the default OS, even though we have two operating systems stored in the flash.
Let's return to removing the OS and type the command delete flash: c1841-ipbase-mz.123-14.T7.bin. After that, we will delete the second OS with the command delete flash: c1841-advipservicesk9-mz.124-15.T1.bin, so the router will lose both operating systems.
If I now type show flash, I can see that we have no OS at all. What will happen if I issue the reload command? You can see that after entering the reload command, the device immediately goes into ROMmon mode. As I mentioned, during boot, the device searches for the OS file, and in its absence, it switches to the basic OS, which is ROMmon.
In Packet Tracer, there are no xmodem commands that can be used on a real physical device. You enter xmodem and add the necessary options regarding the OS boot. If you are using the SecureCRT terminal, you can click on the file, choose the option that allows for transfer, and then select xmodem. After selecting xmodem, you choose the operating system file. Suppose this file is on your laptop; then you type xmodem, specify this file, and send it. However, xmodem is very slow, and the transfer process can take 1-2 hours depending on the file size.
The TFTP server works much faster. As I mentioned, there are no xmodem commands in Packet Tracer, so we will load via TFTP using the tftpdnld command, after which the system will give prompts on how to restore the system image through the TFTP server. You see various parameters that need to be specified to load the OS file. Why do we need these parameters? They are necessary because in rommon mode, this router lacks the functionality of a device with a full IOS. Therefore, we first have to manually specify the router's IP address using the parameter IP_ADDRESS=10.1.1.1, then the subnet mask IP_SUBNET_MASK=255.255.255.0, the default gateway DEFAULT_GATEWAY=10.1.1.10, the TFTP server TFTP_SERVER=10.1.1.10, and the file TFTP_FILE=c1841-advipservicesk9-mz.124-15.T1.bin.
After I do this, I execute the tftpdnld command, and the system asks for confirmation because all existing data in flash will be lost. If I answer 'Yes', you will see that the color of the ports connecting the router to the server has changed to green, indicating that the process of copying the operating system from the server is underway.
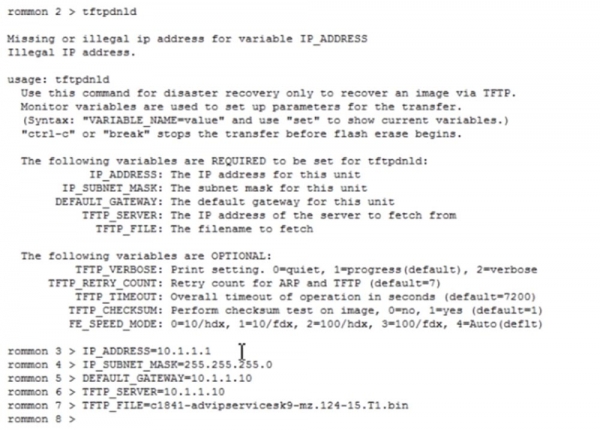
Once the file transfer is complete, I use the boot command, after which the system image starts to unpack. You will see that the router then goes into an operational state, as the operating system has been restored to the device. This is how the functionality of a device that has lost its operating system is restored.
Now let's talk a bit about Cisco IOS licensing.
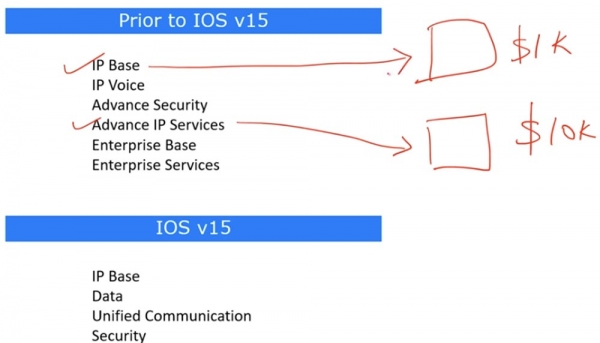
Before version 15, there were previous license versions, such as 12, after which version 15 was released directly. Don't ask where numbers 13 and 14 went. So, when you purchased a Cisco device with the basic IOS IP Base functionality, it cost, let's say, $1000. This was the minimum price for the hardware with the basic configuration operating system installed.
Suppose your friend wanted their device to have the enhanced functionality of Advanced IP Services; then the price was around $10,000. I'm using random figures just so you understand the principle. You both have the same hardware; the only difference is the software installed. Nothing would stop you from asking your friend for a copy of their software, installing it on your hardware, and thus saving $9,000. Even if you don't have such a friend, with the current internet development, you could download and install a pirated copy of the software. This is illegal, and I do not recommend you do it, but people often do. That is why Cisco decided to implement a mechanism to prevent such manipulations and developed version IOS 15, which includes licensing.
In previous IOS versions, such as 12.4, the name of the system indicated its functionalities, so by entering the device settings, you could identify them by the OS file name. In fact, there were several operating systems of the same version, similar to how there are Windows Home, Windows Professional, Windows Enterprise, etc.
In version 15, there is only one universal operating system – Cisco IOSv15, which has several licensing levels. The system image contains all functions, but they are locked and divided into packages.
The Basic IP Base package is enabled by default, has a lifetime duration, and is available to anyone who has purchased a device manufactured by Cisco. The other three packages, Data, Unified Communication, and Security, can only be activated with a license. If you need the Data package, you can visit the company's website, pay a certain amount, and Cisco will send a license file to your email. You copy this file to your device's flash memory using TFTP or another method, after which all features of the Data package become available automatically. If you need advanced security features like encryption, IPSec, VPN, firewall, etc., you need to purchase a license for the Security package.
Now, using Packet Tracer, I will show you how this looks. I go to the CLI settings tab of the router and enter the command show version. You see that we have OS version 15.1 running, which is a universal OS that contains all the functional capabilities. If you scroll down the window, you can see the license information.

Here it says that the ipbase package is permanent and available at each device boot, while the security and data packages are not available because the system currently does not have the corresponding licenses.
To view detailed license information, you can use the command show license all. Additionally, you can view details of the active license using the command show license detail. License features can be viewed using the command show license features. This is a brief overview of Cisco's licensing system. You go to the company’s website, purchase the required license, and insert the license file into the system. This can be done in global configuration mode using the command license install.
Thank you for staying with us. Do you enjoy our articles? Would you like to see more interesting materials? Support us by placing an order or recommending us to your friends. 30% discount for Habr users on a unique entry-level server designed by us for you: (options available with RAID1 and RAID10, up to 24 cores and up to 40GB DDR4).
Dell R730xd for half the price? Only with us in the Netherlands! Dell R420 — 2x E5-2430 2.2GHz 6C 128GB DDR3 2x960GB SSD 1Gbps 100TB — from $99! Read about how
Source: habr.com
