

To fully master Kubernetes, you need to know the various ways to scale cluster resources: , this is one of the main tasks of Kubernetes. We have prepared a high-level overview of the mechanisms for horizontal and vertical autoscaling and cluster resizing, as well as recommendations on how to use them effectively.
Article translated the command that implemented autoscaling into .
Why is it important to think about scaling
is a resource management and orchestration tool. Of course, it's nice to tinker with the cool features of deploying, monitoring and managing pods (a pod is a group of containers that run in response to a request).
However, you should also think about the following questions:
- How to scale modules and applications?
- How to keep containers in working and efficient condition?
- How to respond to constant changes in code and workloads from users?
Tuning Kubernetes clusters to balance resources and performance can be a complex task and requires expert knowledge of the inner workings of Kubernetes. The workload on your application or services can fluctuate over the course of a day or even an hour, so it's best to think of balancing as a continuous process.
Kubernetes autoscaling levels
Effective autoscaling requires coordination between two layers:
- A pod layer that includes horizontal (Horizontal Pod Autoscaler, HPA) and vertical autoscaler (Vertical Pod Autoscaler, VPA). This is the scaling of the available resources for your containers.
- The cluster level, which is managed by the Cluster Autoscaler (CA) system, it increases or decreases the number of nodes within the cluster.
Horizontal Autoscaler (HPA)
As the name suggests, HPA scales the number of pod replicas. Most devops use CPU and memory load as triggers to change the number of replicas. However, it is possible to scale the system based on , & lt; / RTI & gt; or .
High-level scheme of work of HPA:
- HPA continuously checks the metric values specified during installation at a default interval of 30 seconds.
- HPA attempts to increase the number of modules if the specified threshold is reached.
- HPA updates the number of replicas inside the deployment/replication controller.
- The Deployment/Replication Controller then deploys any required additional modules.
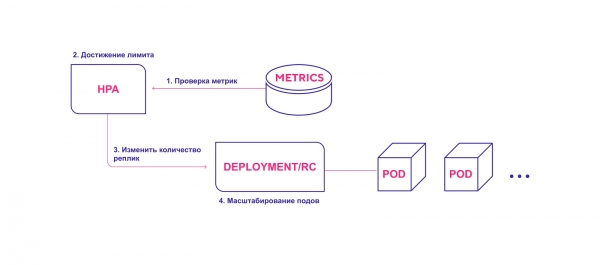
HPA triggers module deployment process when metrics threshold is reached
Keep the following in mind when using HPA:
- The default HPA check interval is 30 seconds. It is set with the flag horizontal-pod-autoscaler-sync-period in the controller manager.
- The default relative error is 10%.
- After the last module increase, HPA waits for metrics to stabilize for three minutes. This interval is set by the flag horizontal-pod-autoscaler-upscale-delay.
- After the last module reduction, the HPA waits for five minutes to stabilize. This interval is set by the flag horizontal-pod-autoscaler-downscale-delay.
- HPA works best with deployment objects, not replication controllers. Horizontal autoscaling is incompatible with rolling update, which directly manipulates replication controllers. With deployment, the number of replicas depends directly on the deployment objects.
Vertical autoscaling of pods
Vertical autoscaling (VPA) allocates more (or less) CPU or memory time to existing pods. Suitable for stateful or stateless pods, but mainly intended for stateful services. However, you can also use VPA for stateless modules if you want to automatically adjust the amount of initially allocated resources.
VPA also responds to OOM (out of memory, out of memory) events. Restarting pods is required to change CPU time and memory. When restarted, VPA respects the allocation budget () to guarantee the minimum required number of modules.
You can set the minimum and maximum resources for each module. So, you can limit the maximum amount of allocated memory to a limit of 8 GB. This is useful if the current nodes definitely can't allocate more than 8 GB of memory per container. Detailed specifications and mechanism of operation are described in .
In addition, VPA has an interesting recommendation feature (VPA Recommender). It monitors resource usage and OOM events of all modules to suggest new memory and CPU time values based on an intelligent algorithm based on historical metrics. There is also an API that accepts a pod handle and returns suggested resource values.
It is worth noting that VPA Recommender does not keep track of the "limit" of resources. This can cause the module to monopolize resources within nodes. It's better to set a limit at the namespace level to avoid huge memory or CPU usage.
High-level VPA workflow:
- VPA continuously checks the metric values specified during installation at a default interval of 10 seconds.
- If the specified threshold is reached, VPA tries to change the allocated amount of resources.
- The VPA updates the resource count inside the deployment/replication controller.
- When pods are restarted, all new resources are applied to the created instances.
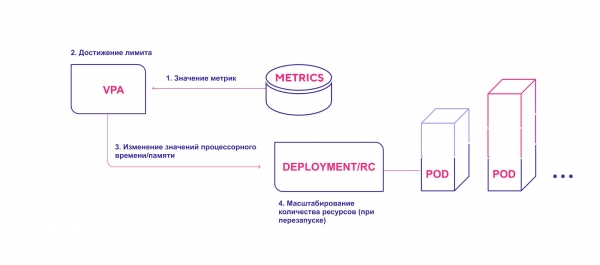
VPA adds the required amount of resources
Keep the following points in mind when using VPA:
- Scaling requires a mandatory restart of the pod. This is necessary to avoid unstable operation after making changes. For reliability, the modules are restarted and distributed among the nodes based on the new allocated resources.
- VPA and HPA are not yet compatible with each other and cannot run on the same pods. If you use both scaling mechanisms in the same cluster, make sure that the settings do not allow them to be activated on the same objects.
- VPA tailors container requests for resources based only on past and current resource usage. It does not set limits on resource usage. There may be problems with incorrect work of applications that will start to take more and more resources, this will cause Kubernetes to turn off this pod.
- VPA is still at an early stage of development. Be prepared that the system may undergo some changes in the near future. You can read about и . So, the plans are to implement the joint work of VPA and HPA, as well as the deployment of modules along with a vertical autoscaling policy for them (for example, a special label 'requires VPA').
Autoscaling a Kubernetes Cluster
Cluster Autoscaler (CA) changes the number of nodes based on the number of pending pods. The system periodically checks for pending modules - and increases the cluster size if more resources are needed and if the cluster does not go beyond the established limits. The CA interacts with the cloud service provider, requests additional nodes from it, or releases idle ones. The first public version of CA was introduced in Kubernetes 1.8.
High-level CA workflow:
- The CA checks for pending modules at a default interval of 10 seconds.
- If one or more pods are in a pending state because the cluster does not have enough available resources to allocate them, it attempts to provision one or more additional nodes.
- When the cloud provider allocates the required node, it joins the cluster and is ready to serve the pods.
- The Kubernetes scheduler allocates pending pods to the new node. If after that some modules still remain in a pending state, the process is repeated - and new nodes are added to the cluster.
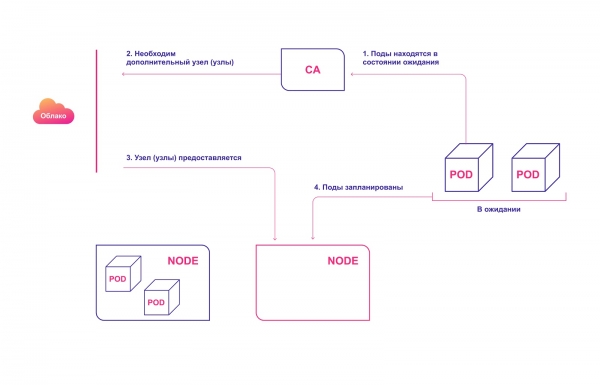
Automatic provisioning of cluster nodes in the cloud
Keep the following in mind when using CA:
- CA ensures that all modules in the cluster have room to run, regardless of CPU load. In addition, it tries to ensure that there are no unnecessary nodes in the cluster.
- CA registers the need for scaling after about 30 seconds.
- After a node becomes redundant, CA waits 10 minutes by default before scaling the system.
- The autoscaling system has the concept of expanders. These are different strategies for choosing a group of nodes to which new ones will be added.
- Use the option responsibly cluster-autoscaler.kubernetes.io/safe-to-evict (true). If you install a lot of pods, or if many of them are scattered across all nodes, you will largely lose the ability to scale down the cluster.
- Use the to prevent deleting pods, which could cause part of your app to crash completely.
How Kubernetes autoscaling systems interact with each other
For perfect harmony, autoscaling should be applied both at the pod level (HPA/VPA) and at the cluster level. They are relatively easy to interact with each other:
- An HPA or VPA updates pod replicas or resources allocated to existing pods.
- If there aren't enough nodes to scale as planned, the CA notices that there are pods in a pending state.
- CA allocates new nodes.
- Modules are distributed to new nodes.
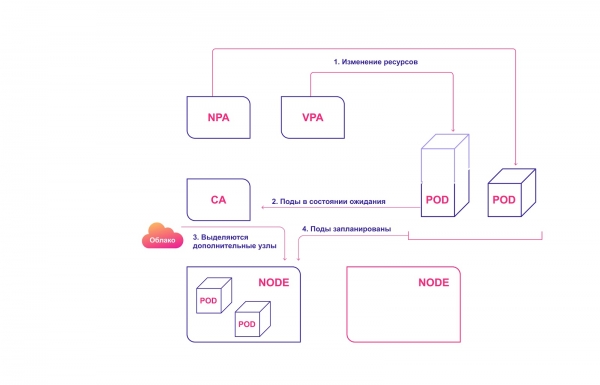
Shared Kubernetes Scaling System
Common Mistakes in Kubernetes Autoscaling
There are a few common problems that devops run into when trying to use autoscaling.
HPA and VPA depend on metrics and some historical data. If insufficient resources are allocated, the modules will be collapsed and will not be able to generate metrics. In this case, autoscaling will never take place.
The scaling operation itself is time sensitive. We want the pods and cluster to scale quickly, before users notice any problems or failures. Therefore, the average pod and cluster scaling time should be taken into account.
Ideal Scenario - 4 minutes:
- 30 seconds. Update target metrics: 30-60 seconds.
- 30 seconds. HPA checks metric values: 30 seconds.
- Less than 2 seconds. Pods have been created and are going into a wait state: 1 second.
- Less than 2 seconds. CA sees pending modules and sends calls to provision nodes: 1 second.
- 3 minutes. The cloud provider allocates nodes. K8s wait until they are ready: up to 10 minutes (depends on several factors).
Worst (more realistic) scenario - 12 minutes:
- 30 seconds. Update target metrics.
- 30 seconds. HPA checks the metric values.
- Less than 2 seconds. The pods have been created and are transitioning to a pending state.
- Less than 2 seconds. The CA sees the pending modules and sends calls to prepare nodes.
- 10 minutes. The cloud provider allocates nodes. K8s are waiting until they are ready. The waiting time depends on several factors such as vendor latency, OS latency, support tool work.
Do not confuse the scaling mechanisms of cloud providers with our CA. The latter operates inside a Kubernetes cluster, while the cloud provider mechanism operates based on the distribution of nodes. It doesn't know what's going on with your pods or app. These systems work in parallel.
How to manage scaling in Kubernetes
- Kubernetes is a resource management and orchestration tool. Operations for managing pods and cluster resources are a key milestone in the development of Kubernetes.
- Learn the logic behind pod scalability with HPA and VPA.
- CA should only be used if you understand the needs of your pods and containers well.
- To optimize your cluster setup, you need to understand how different scaling systems work together.
- When estimating scaling time, keep the worst-case and best-case scenarios in mind.
Source: habr.com
