

Hey Habr! I present to your attention a translation of an article from APC magazine.
This article covers the complete installation of the operating environment. Linux along with the graphical desktop environment on Android-devices.
One of the key technologies that many of the systems use Linux + AndroidIs This is a user-space implementation of the chroot utility, which is very popular on desktop systems and servers. LinuxHowever, the chroot tool requires root user privileges, which are not available by default on Android. pRoot provides this advantage by establishing a directory binding.
terminals Linux
Not in all terminal emulators Linux for Android There is a set of BusyBox utilities, unlike, for example, Termux. This is because the whole point of such systems is to provide a "complete" installation of all OS components, while BusyBox is designed to consolidate the entire set of common utilities into a single binary file. On systems without BusyBox installed, a bootstrap is used to Linux, containing full versions of programs.
 "
"
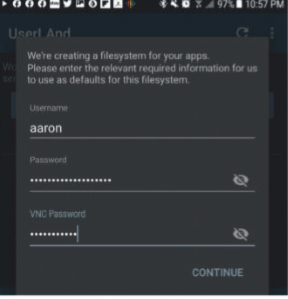
Set the login and password for the distribution and VNC in UserLAnd.
However, these systems include additional technology that doesn't require Termux. This article will cover a full installation of the distribution. Linux, as well as a GUI desktop. But first, you need to choose a graphical system installation method.
Linux + Android
As mentioned earlier, the software packages we will be installing run in user space.
This means that they only have permission for the current user, which in the case of the OS Android is always a standard user, i.e. does not have administrator privileges. However, in order to install the desktop Linux, we'll need to install a graphical server, such as X or Wayland. If we were doing this in an operating system environment, Linux, then it would run with the privileges of a standard user, without having access to the graphical level of the OS Android. Therefore, we should look into installing the server in the "standard" Android way, so that it has access to the hardware and the ability to support the graphical environment.
Smart folks in the developer community have proposed two solutions to this problem. The first is to use custom versions. Linux (usually this is an X server). Once they start working in the background, you will have access to this background process via VNC. If on your device Android If you already have a VNC viewer for remote interaction with other computers, simply use it to gain remote access to your local host. This is a simple solution, but some users report experiencing difficulties with the program.
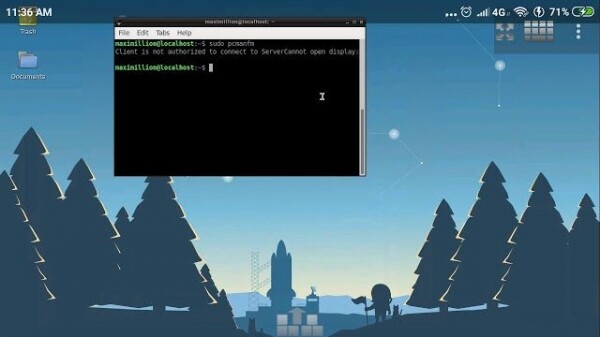
The second option is to install a server designed specifically for devices based on AndroidSome servers are available on the Play Store in both free and paid versions. Before installing, you should check whether the chosen option is supported or at least works with the Linux software package you're using. Android, which you are about to install. We preferred the X-Server system, and therefore used the XServer XSDL software package (). This article will describe the installation process for this server, although it may differ slightly if you have another application installed or if you are using VNC.
System Selection
As with X-Servers, there are several applications in the Play Store for installing system distributions. LinuxHere, as with Termux, we'll focus on options that don't require root privileges, which in turn carries a certain degree of risk. These apps provide all the functionality most users need while keeping your data secure. Below are examples of such apps in the Play Store:
: a very popular choice among users. The application includes a range of common distributions: Debian, Ubuntu, Arch, and Kali. Interestingly, despite the lack of RPM-based options, UserLAnd includes Alpine. Linux for devices with less memory.
: This application helps in installing one or more large distribution lists and may include Ubuntu/Debian, Fedora/ CentOS, openSUSE, and even Kali. There are also low-cost desktop options available: Xfce4, MATE, LXQt, and LXDE. Termux is required for operation, and the operating system Android must be 5.0 or higher.
very similar to AnLinux. It may have a better design than the previous application, but it supports fewer distributions.
: This project started as a variant Linux + Android and was developed for open source software. As the name suggests, it focuses on distributions. Debian, while the 'X' at the end indicates that the app is graphical desktop-oriented. And although the creators stopped developing the project in favor of UserLAnd, GNURoot WheezyX is still available on the Play Store if anyone needs it.
The authors of this article will use the UserLAnd application to install the desktop Linux + Android, and there are several reasons for this. Firstly, the application is open source (although AnLinux also has it). Secondly, it offers a good set of distributions (although it does not include Fedora or CentOS), you can also use it to install distributions with minimal system requirements that won't take up much space on your smartphone. But UserLAnd's main advantage is that it has support tools for installing individual apps instead of entire distributions. We'll explore what this means later. For now, let's install UserLAnd on your device.
Application UserLand
Download the app from Google Play or F-Droid () on OS AndroidIt installs like any other app—nothing special required. Afterward, launch it from the app drawer.
The first thing you will see there is a list of distributions. At the end, you can find a couple of desktop options: LXDE and Xfce4. Rounding it out is the Firefox app, a couple of games, and a few office utilities: GIMP, Inkscape, and LibreOffice. This tab is called Applications. It is designed to install applications.
After you install something, a corresponding entry about it will appear on the "Session" tab. Here you can start or stop the current session, as well as view running processes.
“Filesystems” is the last tab which shows already completed installations. It is worth noting that after you delete any element from Filesystems, information about it will be erased from the Session tab, which, however, does not prove otherwise. This means that you can create a new session based on the current file system. Understanding how this relationship works is much easier if you see it in action, so we'll start by installing the application in the UserLAnd system environment.
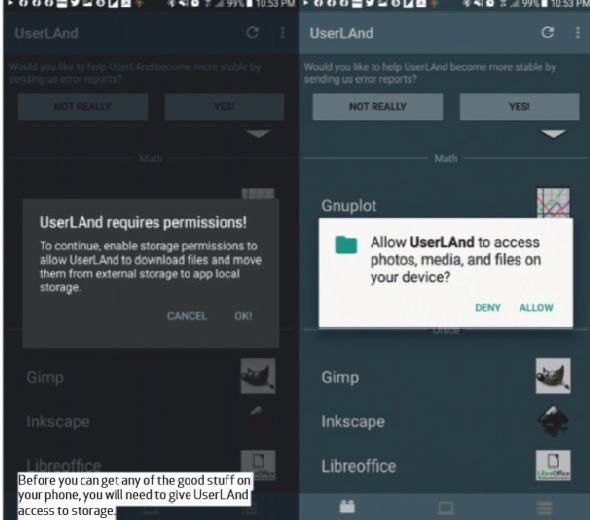
Before you install the distribution kit on your smartphone, you need to give UserLAnd access to the storage.
Distributions in UserLAnd
Select one of the distributions located on the Apps screen to install on your device. For this example, we will use UbuntuClicking the icon will open a dialog box asking for your username, password, and VNC password. Then, select the method you'll use to access the distribution. The download will begin, using the base image of the selected distribution. The file will be unpacked into the UserLAnd directory.
Once the download is complete, return to the xterm terminal emulator. You can enter the service command to find out which version you have. Linux you installed:
uname –aThe next step is to install the desktop using the command line Ubuntu:
sudo apt install lxdeThe last step is to make sure your new desktop environment is ready to run. To do this, you need to edit the file .xinitrcfile, which currently has only one line /usr/bin/twm. It needs to be changed to /usr/bin/startlxdeNow exit the XSDL session (make sure you press the STOP button in the notification area), hold down the "Ubuntu listing" in the Sessions tab, then click "Stop Sessions" and restart the sessions. After a few seconds, the LXDE system environment should appear. You can do the same things in it as on the regular desktop. It may just be a little smaller and a little slower: you'll have to wait longer to press a button on your device than you would with a keyboard and mouse. Let's look at how we can specifically improve the system environment. Linux on your smartphone.
Quick Guide to UserLAnd
A close inspection of the desktop's contents reveals an exact recreation of the desktop version. If you're using UserLAnd on a device with a keyboard and mouse (connected via Bluetooth or otherwise), you'll easily adapt to the system environment. Linux in this format. Except for a slight lag, which occurs due to the fact that the X-cursorWindows synchronizes with the device cursor on Android, everything works smoothly.
Perhaps the first thing you want to do is adjust the default font system, because the desktop font size is too big for the phone screen. Go to the main menu, then select "Settings" → "Customize appearance and widgets" → "Widget". Here you can change the default font size to something more appropriate for your phone.
Next you might want to install your favorite programs into the system environment. LinuxAs mentioned above, utility commands won't work in this case, so feel free to use the truly indispensable tool installed in the UserLAnd system environment, called ASAP:
sudo apt install emacs 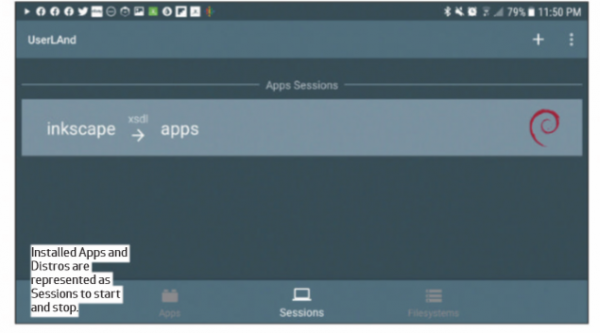
Distributions in the application are presented in the form of sessions. You can start and close them.
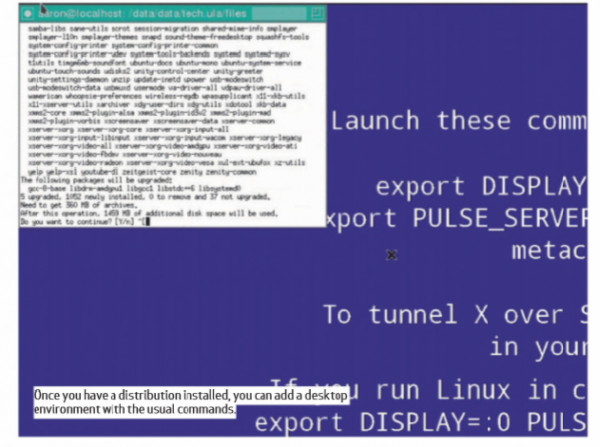
After installing the distribution, you can add a desktop environment with standard commands.
You will probably also need alternative connection methods for your distribution. Just because you initially set XSDL doesn't mean it has to be the same all the time. You can create another account on the Session tab and select a different server. Just be sure to point it to the same file system. UserLAnd will attempt to direct you to the correct application to establish a new connection type: either XSDL, ConnectBot for SSH, or bVNC.
However, the persistence with which the app automatically directs you to the Play Store when you try to reconnect can be annoying. To stop this, it is enough to change the server by installing a special application. To install SSH, select the old trusted VX ConnectBot. Just log in to port 2022 on the workstation with your username and password. To connect to a VNC server, all you need to do is install the commercial, but in many ways advanced Jump Desktop application, and dial the address 127.0.0.1:5951.
We hope you remember the VNC password you set when you created the file system.
You can also access a running UserLAnd session using similar tools on another computer on your network. Simply connect to the running session (using the SSH connection type, of course) via the terminal. Linux, such as Konsole, or connect to a VNC session using KRDC. Simply replace the local addresses on your computer screen with your Android's IP addresses.
Combined with a couple of portable apps, this setup will give you a handy portable system. Linux, which you can connect to using any computer that is currently available to you.
Source: habr.com
