


Cloud computing is becoming increasingly integrated into our lives, and it's likely that there is not a single person who hasn't used some cloud services at least once. However, what exactly is the cloud and how does it work? Few people, even at a conceptual level, can explain it. 5G is already becoming a reality, and telecom infrastructure is beginning to transition from traditional solutions to cloud-based solutions, just as it once transitioned from fully physical solutions to virtualized 'poles'.
Today, we will talk about the inner workings of cloud infrastructure, specifically focusing on the basics of the network component.
What is the cloud? Is it just virtualization viewed from another angle?
That's a very reasonable question. No, it is not virtualization, although it does involve it. Let's consider two definitions:
Cloud computing (hereafter referred to as Cloud) is a model for delivering user-friendly access to distributed computing resources, which should be deployed and launched on demand with minimal latency and minimal costs on the part of the service provider.
Virtualization is the ability to divide one physical entity (for example, a server) into several virtual ones, thereby increasing resource utilization (for instance, if you had 3 servers loaded at 25-30 percent, after virtualization you end up with 1 server loaded at 80-90 percent). Naturally, virtualization consumes some resources—you need to support the hypervisor; however, as practice has shown, the effort is worthwhile. An ideal example of virtualization is VMWare, which expertly manages virtual machines, or KVM, which I personally prefer, but that’s a matter of taste.
We use virtualization without even realizing it. Even hardware routers are using virtualization— for example, in the latest versions of JunOS, the operating system runs as a virtual machine on top of a real-time Linux distribution (Wind River 9). But virtualization is not the cloud; however, the cloud cannot exist without virtualization.
Virtualization is one of the building blocks upon which the cloud is constructed.
Creating a cloud by simply gathering several hypervisors into one L2 domain, adding a few YAML playbooks for automatic VLAN configuration through some Ansible, and slapping on something like an orchestration system for automatic virtual machine creation won't work. More accurately, it might work, but the resulting Frankenstein isn't the cloud we want; although for some, this may be the pinnacle of their dreams. Moreover, if we consider OpenStack — it’s essentially another Frankenstein, but let’s not delve into that for now.
However, I understand that the definition provided above doesn’t quite clarify what can actually be considered a cloud.
Therefore, the document from NIST (National Institute of Standards and Technology) outlines five key characteristics that a cloud infrastructure should possess:
On-demand service provision. Users must be granted unrestricted access to dedicated computing resources (such as networks, virtual disks, memory, processor cores, etc.), and these resources must be automatically provided — that is, without intervention from the service provider.
Broad service availability. Access to resources must be facilitated through standard mechanisms to allow the use of both standard PCs and thin clients as well as mobile devices.
Resource pooling. Resource pools must allow multiple clients to simultaneously obtain resources while ensuring client isolation, preventing interference among them and competition for resources. Pools include networks, indicating the possibility of overlapping addressing. Pools must support scaling on demand. Utilizing pools ensures the necessary level of resource redundancy and abstracts physical and virtual resources — the service recipient is simply provided with the requested set of resources (where these resources are physically located, how many servers and switches are involved — this is irrelevant for the client). However, it is important to consider that the provider must ensure transparent reservation of these resources.
Rapid adaptation to changing conditions. Services must be flexible – rapid resource provision, redistribution, addition, or reduction of resources upon client request, while the client should feel that cloud resources are endless. For simplicity’s sake, for instance, you don’t receive warnings about lost disk space in your Apple iCloud due to a hard drive failure on the server side, and drives do fail. Moreover, from your side, the capabilities of this service are virtually limitless – need 2 TB? No problem, pay and receive it. A similar example can be made with Google Drive or Yandex Disk.
The ability to measure the provided service. Cloud systems must automatically monitor and optimize consumed resources, while these mechanisms should be transparent for both the user and the service provider. This means you should always be able to check how many resources you and your clients are consuming.
It's important to consider that these requirements mostly apply to public clouds, so for private clouds (i.e., clouds running for internal company needs), these requirements might need some adjustments. However, they still must be met; otherwise, we won't gain all the benefits of cloud computing.
Why do we need the cloud?
However, any new or existing technology, any new protocol is created for a reason (except for RIP-ng, of course). A protocol for the sake of a protocol is unnecessary for anyone (except for RIP-ng, of course). Logically, the cloud is created to provide some service to the user/client. We are all familiar with at least a couple of cloud services, such as Dropbox or Google Docs, and I believe most of us successfully use them – for example, this article was written using the Google Docs cloud service. But the cloud services we know are just a part of what the cloud can offer – specifically, they are only SaaS-type services. We can provide a cloud service in three ways: as SaaS, PaaS, or IaaS. Which service you need depends on your desires and capabilities.
Let’s examine each in order:
Software as a Service (SaaS) — this is a service delivery model that provides a complete service to the client, such as a mail service like Yandex.Mail or Gmail. In this service delivery model, you, as a client, do practically nothing but use the service — that is, you don't need to think about configuring the service, its fault tolerance, or backup solutions. The main thing is not to compromise your password; everything else will be taken care of by the service provider. From the service provider's perspective, they are fully responsible for the entire service — from the server hardware and host operating systems to the configuration of databases and software.
Platform as a Service (PaaS) — when using this model, the service provider offers the client a framework for the service, for example, let's take a Web server. The service provider has allocated a virtual server to the client (essentially a set of resources such as RAM/CPU/Storage/Networks, etc.), and even installed the OS and necessary software on this server; however, the client is responsible for configuring everything, and the client is accountable for the service’s functionality. The service provider, like in the previous case, is responsible for the operation of the physical hardware, hypervisors, the virtual machine itself, its network availability, etc., but the service itself is outside their responsibility.
Infrastructure as a Service (IaaS) — this approach is even more interesting. Essentially, the service provider offers the client a complete virtualized infrastructure — that is, some set (pool) of resources, such as CPU Cores, RAM, Networks, etc. Everything else is up to the client — what the client wants to do with these resources within the allocated pool (quota) is not particularly important to the provider. If the client wants to create their own vEPC or even become a mini-operator and offer communication services — no problem — go ahead. In such a scenario, the service provider is responsible for providing resources, their fault tolerance and availability, as well as for the OS that allows these resources to be combined into pools and made available to the client with the ability to scale resources up or down upon the client's request. All virtual machines and other components are configured by the client themselves through the self-service portal and console, including network configuration (except for external networks).
What is OpenStack?
In all three options, the service provider needs an operating system that allows the creation of a cloud infrastructure. In reality, with SaaS, the entire technology stack is managed by more than one unit — there is a unit responsible for the infrastructure, which means providing IaaS to another unit, which in turn offers SaaS to the client. OpenStack is one of the cloud operating systems that allows aggregating multiple switches, servers, and storage systems into a single resource pool, dividing this common pool into sub-pools (tenants), and providing these resources to clients via the network.
OpenStack is a cloud operating system that controls large pools of computing resources, data storage, and network resources, which can be provisioned and managed through an API using standard authentication mechanisms.
In other words, it is a suite of open-source software projects designed to create cloud services, both public and private — a set of tools that enables the integration of server and switching hardware into a unified resource pool, managing these resources while ensuring the necessary level of fault tolerance.
At the time of writing this material, the structure of OpenStack looks like this:
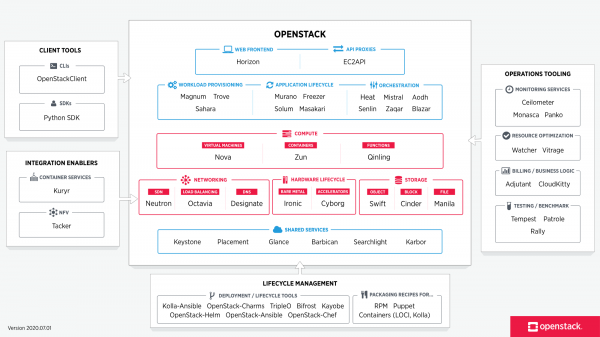
Image sourced from
Each of the components that make up OpenStack performs a specific function. This distributed architecture allows you to include only the set of functional components you need in your solution. However, some components are core components, and removing them will lead to complete or partial dysfunction of the solution as a whole. Such components are generally considered to be:
- Dashboard - A web-based GUI for managing OpenStack services
- Keystone - A centralized identity service that provides authentication and authorization functionality for other services, as well as managing user credentials and their roles.
- Neutron is a networking service that provides connectivity between the interfaces of various OpenStack services (including connectivity between VMs and their access to the outside world)
- Cinder provides access to block storage for virtual machines
- Nova — management of the life cycle of virtual machines
- Glance — a repository for virtual machine images and snapshots
- Swift — provides access to object storage
- Ceilometer — a service that enables telemetry collection and measurement of existing and consuming resources
- Heat — orchestration based on templates for automatic creation and provisioning of resources
You can view the complete list of all projects and their purposes .
Each of the OpenStack components is a service responsible for a specific function and provides an API to manage that function and interact with other services of the cloud operating system to create a unified infrastructure. For example, Nova manages computing resources and provides an API to configure these resources, Glance manages images and provides an API for managing them, Cinder offers block storage and an API for management, and so on. All functions are closely interconnected.
However, when you think about it, all the services running in OpenStack ultimately represent some virtual machine (or container) connected to a network. The question arises — why do we need so many elements?
Let’s walk through the algorithm of creating a virtual machine and connecting it to the network and persistent storage in OpenStack.
- When you create a request to create a machine, whether it is a request through Horizon (Dashboard) or through the CLI, the first thing that happens is the authorization of your request in Keystone — whether you can create a machine, whether you have the right to use this network, whether your project has enough quota, and so on.
- Keystone authenticates your request and generates an auth token in the response message, which will be used later. After receiving the response from Keystone, the request is sent to Nova (nova api).
- Nova-api checks the validity of your request by querying Keystone using the previously generated auth token.
- Keystone authenticates and provides information on permissions and restrictions based on this auth token.
- Nova-api creates an entry for the new VM in the nova-database and forwards the machine creation request to nova-scheduler.
- The Nova scheduler selects a host (compute node) on which the VM will be deployed based on specified parameters, weights, and zones. An entry about this and the VM identifier are recorded in the nova-database.
- Next, the Nova scheduler calls nova-compute with a request to deploy the instance. Nova-compute then queries nova-conductor to obtain information about the machine parameters (nova-conductor acts as a proxy server between nova-database and nova-compute, limiting the number of requests to the nova-database to avoid consistency issues and reduce load).
- Nova-conductor retrieves the requested information from nova-database and passes it to nova-compute.
- Next, nova-compute queries glance to obtain the image ID. Glance validates the request in Keystone and returns the requested information.
- Nova-compute queries neutron for information about the network parameters. Similarly to glance, neutron validates the request in Keystone, creates an entry in the database (port identifier, etc.), creates a request to create a port, and returns the requested information to nova-compute.
- Nova-compute calls cinder to allocate a volume for the virtual machine. Similar to glance, cinder validates the request in Keystone, creates a request to create a volume, and returns the requested information.
- Nova-compute requests libvirt to deploy the virtual machine with the specified parameters.
What seems to be a simple operation to create a basic virtual machine turns into a whirlwind of API calls between the elements of the cloud platform. As you can see, even previously mentioned services consist of smaller components that interact with each other. Creating a machine is just a small part of what the cloud platform allows; there are services responsible for traffic balancing, block storage, DNS, provisioning bare metal servers, and more. The cloud allows you to treat your virtual machines like a flock of sheep (unlike traditional virtualization). In a virtual environment, if something happens to a machine, you recover it from backups, etc. In contrast, cloud applications are designed so that the virtual machine doesn't play such a crucial role; if a virtual machine
It's important to always keep in mind that there is no cloud infrastructure without a network—each element interacts with others through the network. Additionally, the cloud has a completely dynamic network. Naturally, the underlay network is somewhat static; new nodes and switches are not added every day. However, the overlay part can and will inevitably change constantly—new networks will be added or removed, new virtual machines will be created, and old ones will cease to exist. And as you recall from the cloud definition presented at the beginning of the article, resources should be allocated to the user automatically and with minimal (preferably no) intervention from the service provider. Therefore, the resource delivery type currently presented in the form of a frontend, such as your personal account available via HTTP/HTTPS, and the on-call network engineer Vasily as the backend—this is not cloud infrastructure, even if Vasily has eight arms.
Neutron, as a network service, provides an API for managing the network aspect of the cloud infrastructure. The service ensures the operational capability and management of the OpenStack network, providing an abstraction level known as Network-as-a-Service (NaaS). In other words, the network is treated as a virtual measurable unit, just like virtual CPU cores or RAM size.
Before we delve into the architecture of the OpenStack network, let's examine how this network operates within OpenStack and why it is an essential and integral part of the cloud.
So, we have two virtual machines from client RED and two virtual machines from client GREEN. Let’s assume these machines are located on two hypervisors as follows:
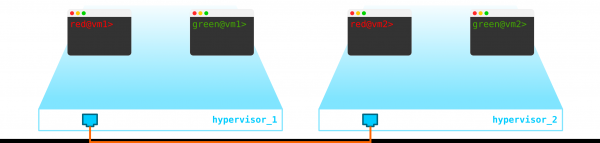
Currently, this is merely the virtualization of 4 servers and nothing more, as all we have done is virtualize 4 servers placed on two physical servers. Moreover, they are not even connected to the network yet.
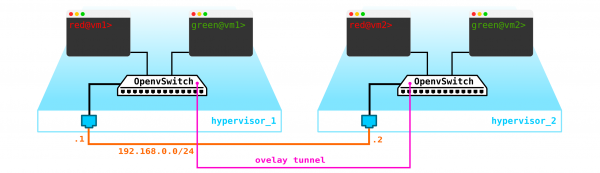
To create a cloud, we need to add several components. First, we virtualize the network part — we need to connect these 4 machines in pairs, and the clients specifically want L2 connectivity. Of course, a switch can be used and configured with a trunk to manage everything with a Linux bridge, or for more advanced users, Open vSwitch (which we will return to later). However, there can be many networks, and constantly pushing L2 through a switch is not the best idea — different departments, service desks, months waiting for request fulfillment, weeks of troubleshooting — in today’s world, such an approach just doesn’t work. The sooner the company realizes this, the easier it will be for them to move forward. Therefore, we will allocate an L3 network between the hypervisors through which our virtual machines will communicate, and on top of this L3 network, we will build virtual overlay L2 networks, where the traffic of our virtual machines will flow. For encapsulation, we can use GRE, Geneve, or VxLAN. For now, we will stick with the latter, although this is not particularly critical.
We need to place the VTEP somewhere (I hope everyone is familiar with the terminology of VxLAN). Since we are coming out of the servers with an L3 network directly, nothing prevents us from placing the VTEP on the servers themselves, and OVS (Open vSwitch) is very good at doing this. Ultimately, we end up with such a structure:
Since the traffic between VMs must be segregated, the ports towards the virtual machines will have different VLAN tag numbers. The tag number only matters within a single virtual switch, as we can seamlessly remove it during encapsulation in VxLAN, given that we will have a VNI.
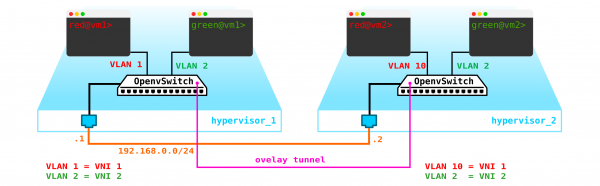
Now we can spawn our machines and virtual networks for them without any issues.
However, what if the client has another machine located in a different network? We need routing between the networks. We'll consider a simple case where centralized routing is used—meaning the traffic is routed through specially designated network nodes (which are usually combined with control nodes, so we'll have the same setup).
It seems straightforward—we create a bridge interface on the control node, direct the traffic to it, and then route it to where we need it. But the problem is that client RED wants to use the 10.0.0.0/24 network, and client GREEN also wants to use the 10.0.0.0/24 network. This means we have a conflict in address spaces. Furthermore, clients do not want other clients to be able to route into their internal networks, which makes sense. To separate the networks and client data traffic, we will assign each client a separate namespace. A namespace is essentially a copy of the Linux network stack, meaning clients in the RED namespace are completely isolated from clients in the GREEN namespace (unless routing between these client networks is allowed through the default namespace or on higher-level transport equipment).
So we come up with the following scheme:
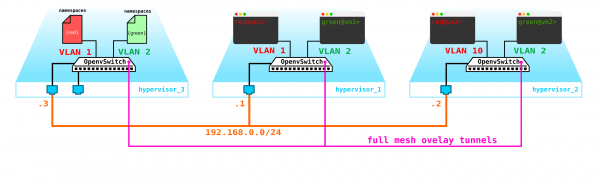
L2 tunnels converge from all compute nodes to the control node, where the L3 interface for these networks is located, each in a dedicated namespace for isolation.
However, we forgot the most important thing. The virtual machine must provide a service to the client, meaning it must have at least one external interface through which it can be accessed. We need to reach the outside world. There are various options available. Let's use the simplest option. We will add one network to each client that will be valid in the provider's network and will not overlap with other networks. The networks can also overlap and point to different VRFs on the provider's network. These networks will also exist in the namespace of each client. However, they will still connect to the outside world through one physical (or bonded, which is more logical) interface. To segregate client traffic, the outgoing traffic will be tagged with a VLAN tag assigned to the client.
As a result, we obtained the following scheme:
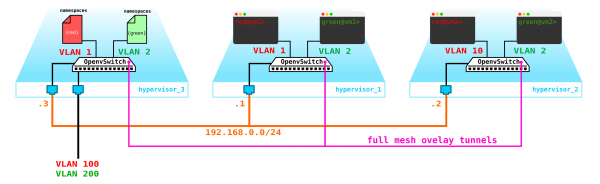
A reasonable question arises — why not create gateways on the compute nodes themselves? There's no major issue with that; in fact, when using a distributed router (DVR), this is how it will work. In this scenario, we consider the simplest option with a centralized gateway, which is used by default in OpenStack. For high-load functions, both a distributed router and acceleration technologies like SR-IOV and Passthrough will be used, but as they say, that's a different story. Let's first address the basic part before diving into details.
Our scheme is already operational, but there are a couple of nuances:
- We somehow need to protect our machines, meaning we need to attach a filter on the client-side switch interface.
- Enable the automatic acquisition of an IP address for the virtual machine, so that it won’t be necessary to access it via console and manually assign an address each time.
Let's start with protecting the machines. This can be done using basic iptables, why not.
So now our topology has become a bit more complex:
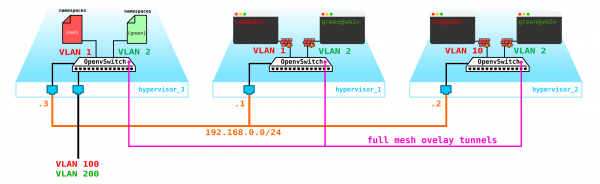
Moving on. We need to add a DHCP server. The ideal location for DHCP servers for each client would be the control node mentioned above, where the namespaces are located:
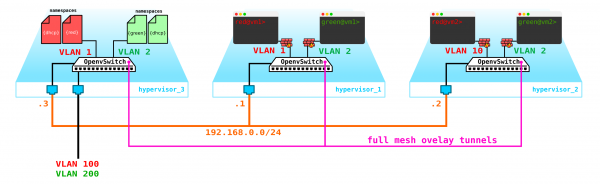
However, there is a small problem. What if everything restarts and all the lease information on DHCP disappears? Logically, new addresses will be assigned to the machines, which is not very convenient. There are two solutions—either use domain names and add a DNS server for each client, so the address won't be particularly important to us (similar to the network part in k8s)—but there is an issue with external networks, as they can also be assigned addresses via DHCP—coordination with the DNS servers in the cloud platform and the external DNS server is necessary, which I think is not very flexible, although quite possible. The second option is to use metadata—so we store information about the assigned machine address so that the DHCP server knows which address to assign if the machine has already received one. The second option is simpler and more flexible, as it allows saving additional information about the machine. Now let's add the metadata agent to the scheme:
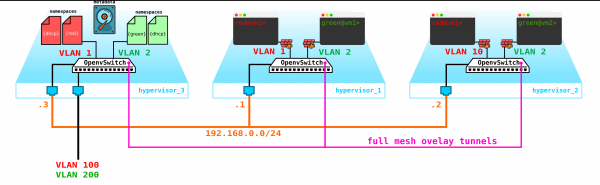
Another question that also needs to be addressed is the possibility of using one external network for all clients, as external networks, if they are to be valid across the entire network, can create difficulties—there's a need to constantly allocate and monitor the allocation of these networks. The ability to use a single, pre-configured external network for all clients would be very useful when creating a public cloud. This would simplify the deployment of machines, as we wouldn't need to cross-check with the address database and select a unique address space for each client's external network. Moreover, we can define the external network in advance, and at the time of deployment, we would only need to associate the external addresses with the client machines.
And here NAT comes to our aid — we will simply enable clients to access the outside world through the default namespace using NAT translation. However, there is a slight issue. This works well if the client server acts as a client rather than a server — meaning it initiates rather than accepts connections. But in our case, it will be the opposite. In that case, we need to implement destination NAT so that when traffic is received, the control node understands that this traffic is intended for Client A's virtual machine, and thus, we need to perform NAT translation from the external address, for example, 100.1.1.1 to the internal address 10.0.0.1. In this way, although all clients will use the same network, internal isolation is completely preserved. Therefore, we need to set up dNAT and sNAT on the control node. The use of a single network with floating addresses or external networks or both simultaneously depends on what you want to pull into the cloud. We will not add floating addresses to the diagram but will keep the previously added external networks — each client has its own external network (marked on the diagram as VLAN 100 and 200 on the external interface).
As a result, we have obtained an interesting and thoughtfully designed solution that possesses certain flexibility but currently lacks fault tolerance mechanisms.
Firstly, we have only one control node — its failure will lead to the collapse of all systems. To resolve this issue, at least a quorum of 3 nodes needs to be established. Let's add this to the diagram:
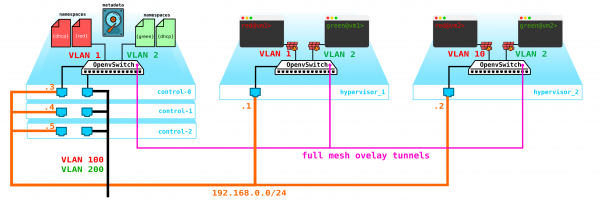
Naturally, all nodes synchronize, and in the event of the active node's failure, another node will take over its responsibilities.
The next issue is the disks of virtual machines. Currently, they are stored on the hypervisors themselves, and in the event of a hypervisor failure, we lose all data—having RAID won't help if we lose not just a disk, but the entire server itself. To address this, we need to create a service that will act as a frontend for some kind of storage. The specific storage solution is not particularly important to us, but it must protect our data from both disk and node failures, and possibly even from a total rack failure. There are several options here—SAN networks with Fiber Channel are available, but let's be honest—FC is already a relic of the past—analogous to E1 in transportation—yes, it's still used, but only in situations where it's absolutely necessary. Therefore, I wouldn't voluntarily deploy an FC network in 2020, given the existence of other, more interesting alternatives. However, to each their own, and there may be those who believe that FC, with all its limitations, is exactly what we need—I won't argue, opinions vary. However, in my view, the most interesting solution is the use of SDS, for example, Ceph.
Ceph allows for the construction of a highly available data storage solution with numerous backup options, ranging from parity-check codes (analogous to RAID 5 or 6) to full data replication across different disks, taking into account the physical location of disks within servers and the servers within cabinets, etc.
To build Ceph, three additional nodes are required. Interaction with the storage will also occur over the network using block, object, and file storage services. Let's add a storage solution to the scheme:
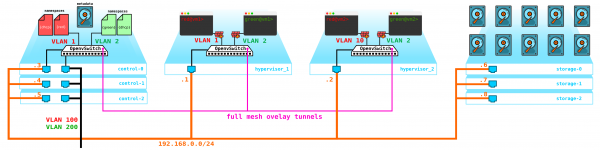
Note: Hyper-converged compute nodes can also be created — this is the concept of combining several functions on one node — for example, storage + compute — without dedicating special nodes for Ceph storage. We will achieve a similarly fault-tolerant scheme as SDS will reserve the data according to the specified level of redundancy. However, hyper-converged nodes always represent a compromise — the storage node does not just sit idle as it seems at first glance (since there are no virtual machines on it) — it consumes CPU resources to service SDS (in fact, it handles all replications, recoveries from node failures, disk issues, etc.). This means you will lose part of the compute node's power if you combine it with storage.
All this needs to be managed somehow — we need something through which we can create machines, networks, virtual routers, etc. For this purpose, we will add a service to the control node that will act as a dashboard — the client will be able to connect to this portal via http/https and do everything they need (well, almost).
As a result, we now have a fault-tolerant system. All elements of this infrastructure need to be managed somehow. It was previously mentioned that OpenStack is a set of projects, each of which provides a specific function. As we can see, there are more than enough elements that need configuration and monitoring. Today we will talk about the networking part.
Neutron Architecture
In OpenStack, Neutron is responsible for connecting virtual machine ports to the common L2 network, ensuring traffic routing between VMs located in different L2 networks, as well as routing externally, providing services such as NAT, Floating IP, DHCP, etc.
The high-level operation of the networking service (basic part) can be described as follows.
When starting a VM, the networking service:
- Creates a port for this VM (or ports) and notifies the DHCP service;
- A new virtual network device is created (via libvirt);
- The VM connects to the port(s) created in step 1;
Strangely enough, the foundation of Neutron's operation lies in standard mechanisms familiar to anyone who has ever delved into Linux — namespaces, iptables, Linux bridges, Open vSwitch, conntrack, etc.
It should be clarified right away that Neutron is not an SDN controller.
Neutron consists of several interrelated components:
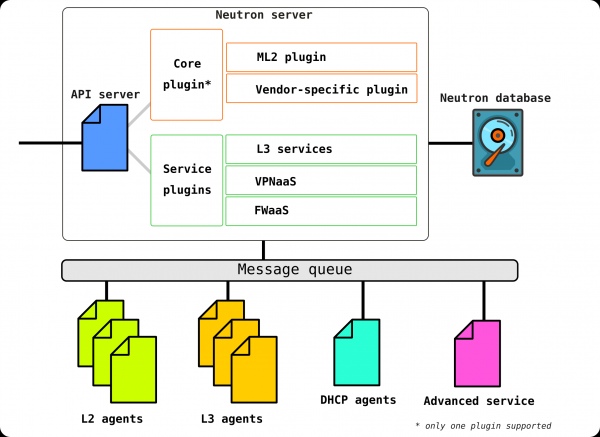
OpenStack Neutron Server — is a daemon that works with user requests through the API. This daemon does not manage any network connections but provides the necessary information to its plugins, which then configure the required network element. Neutron agents on OpenStack nodes register with the Neutron server.
Neutron-server is effectively an application written in Python, consisting of two parts:
- REST service
- Neutron Plugin (core/service)
The REST service is designed to receive API calls from other components (for example, requests to provide some information, etc.).
Plugins are plug-in software components/modules that are invoked during API requests — that is, the provision of a certain service occurs through them. Plugins are divided into two types: service and core. Typically, the core plugin is primarily responsible for managing the address space and L2 connections between VMs, while service plugins provide additional functionality, for example, VPN or FW.
A list of available plugins can be viewed for example
There can be multiple service plugins, but there can only be one core plugin.
Openstack-neutron-ml2 — is the standard core plugin for OpenStack. This plugin has a modular architecture (unlike its predecessor) and configures the network service through its connected drivers. We will discuss the plugin in more detail later, as it provides the flexibility that OpenStack has in the networking aspect. The core plugin can be replaced (for example, Contrail Networking makes such a replacement).
RPC service (rabbitmq-server) — is a service that manages queues and facilitates interaction with other OpenStack services, as well as communication between network service agents.
Network agents — are agents located on each node, through which the configuration of network services is carried out.
There are several types of agents.
The primary agent is the L2 agentThese agents are launched on each hypervisor including the control nodes (to be precise, on all nodes providing any services for tenants) and their main function is to connect virtual machines to a shared L2 network, as well as to generate alerts when any events occur (for example, port disconnection/reconnection).
The next, equally important agent is L3 agent. By default, this agent is launched exclusively on the network node (often the network node is combined with the control node) and provides routing between tenant networks (both between its networks and the networks of other tenants, as well as enabling access to the outside world, providing NAT and DHCP services). However, when using DVR (distributed router), the need for the L3 plugin arises also on compute nodes.
The L3 agent uses Linux namespaces to provide each tenant with a set of their own isolated networks and the functionality of virtual routers that route traffic and provide gateway services for Layer 2 networks.
Database — a database of network, subnet, port, pool identifiers, etc.
In fact, Neutron accepts API requests for creating any network entities, authenticates the request, and through RPC (if addressing a plugin or agent) or REST API (if communicating in SDN) sends agents (through plugins) the instructions necessary to organize the requested service.
Now let's turn to the test installation (we will look at how it is set up and what it consists of later in the practical part) and see where each component is located:
(overcloud) [stack@undercloud ~]$ openstack network agent list
+--------------------------------------+--------------------+-------------------------------------+-------------------+-------+-------+---------------------------+
| ID                                   | Agent Type         | Host                                | Availability Zone | Alive | State | Binary                    |
+--------------------------------------+--------------------+-------------------------------------+-------------------+-------+-------+---------------------------+
| 10495de9-ba4b-41fe-b30a-b90ec3f8728b | Open vSwitch agent | overcloud-novacompute-1.localdomain | None              | :-)   | UP    | neutron-openvswitch-agent |
| 1515ad4a-5972-46c3-af5f-e5446dff7ac7 | L3 agent           | overcloud-controller-0.localdomain  | nova              | :-)   | UP    | neutron-l3-agent          |
| 322e62ca-1e5a-479e-9a96-4f26d09abdd7 | DHCP agent         | overcloud-controller-0.localdomain  | nova              | :-)   | UP    | neutron-dhcp-agent        |
| 9c1de2f9-bac5-400e-998d-4360f04fc533 | Open vSwitch agent | overcloud-novacompute-0.localdomain | None              | :-)   | UP    | neutron-openvswitch-agent |
| d99c5657-851e-4d3c-bef6-f1e3bb1acfb0 | Open vSwitch agent | overcloud-controller-0.localdomain  | None              | :-)   | UP    | neutron-openvswitch-agent |
| ff85fae6-5543-45fb-a301-19c57b62d836 | Metadata agent     | overcloud-controller-0.localdomain  | None              | :-)   | UP    | neutron-metadata-agent    |
+--------------------------------------+--------------------+-------------------------------------+-------------------+-------+-------+---------------------------+
(overcloud) [stack@undercloud ~]$ 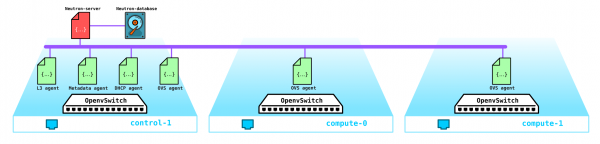
This is the entire structure of Neutron. Now it is worth spending some time on the ML2 plugin.
Modular Layer 2
As mentioned above, the plugin is the standard root plugin of OpenStack and has a modular architecture.
The predecessor of the ML2 plugin had a monolithic structure that did not allow, for example, mixing several technologies in one installation. For instance, you could not use both Open vSwitch and Linux Bridge simultaneously — either one or the other. For this reason, the ML2 plugin with its architecture was created.
ML2 has two components — two types of drivers: Type drivers and Mechanism drivers.
Type drivers define the technologies that will be used to organize network connectivity, such as VxLAN, VLAN, GRE. At the same time, the driver allows the use of different technologies. The standard technology is VxLAN encapsulation for overlay networks and VLAN for external networks.
The following types of networks are considered Type drivers:
Flat — a network without tagging
VLAN — a tagged network
Local — a special type of network for all-in-one installations (such installations are needed either for developers or for training)
GRE — an overlay network using GRE tunnels
VxLAN — an overlay network using VxLAN tunnels
Mechanism drivers define the means that provide the organization of the technologies specified in type driver — for example, openvswitch, sr-iov, opendaylight, OVN, etc.
Depending on the implementation of this driver, either agents managed by Neutron will be used, or connections with an external SDN controller will be utilized, which takes care of all matters related to organizing L2 networks, routing, etc.
For example, if we use ML2 together with OVS, then an L2 agent, which manages OVS, is installed on each compute node. However, if we use OVN or OpenDayLight, the management of OVS falls under their jurisdiction — Neutron, through the root plugin, gives commands to the controller, and it does what it was instructed.
Let's refresh our memory about Open vSwitch.
At the moment, one of the key components of OpenStack is Open vSwitch.
When installing OpenStack without any additional vendor SDN such as Juniper Contrail or Nokia Nuage, OVS is the primary network component of the cloud network and, in conjunction with iptables, conntrack, and namespaces, allows the organization of full-fledged overlay networks with multi-tenancy. Naturally, this component can be replaced, for example, when using third-party proprietary (vendor-specific) SDN solutions.
OVS is an open-source software switch designed for use in virtualized environments as a virtual traffic forwarder.
Currently, OVS has a very decent functionality, which includes technologies such as QoS, LACP, VLAN, VxLAN, GENEVE, OpenFlow, DPDK, etc.
Note: Initially, OVS was not designed as a software switch for high-load telecom functions and was more geared towards less bandwidth-intensive IT functions such as web servers or mail servers. However, OVS has been improved, and current implementations of OVS have significantly enhanced its performance and capabilities, making it suitable for telecom operators with high-load functions; for example, there is an implementation of OVS with DPDK acceleration support.
There are three important components of OVS that one should know about:
- Kernel module — a component located in kernel space, which processes traffic based on the rules received from the control element;
- vSwitch The daemon (ovs-vswitchd) is a user space process responsible for programming the kernel module, essentially implementing the logic of the switch's operation.
- Database server This is a local database located on each host where OVS is running and contains the configuration. SDN controllers can communicate through this module using the OVSDB protocol.
In addition, there is a set of diagnostic and management utilities, such as ovs-vsctl, ovs-appctl, ovs-ofctl, etc.
Currently, Openstack is widely used by telecom operators for migrating network functions such as EPC, SBC, HLR, etc. Some functions can operate smoothly with OVS as is, but for instance, EPC handles subscriber traffic—essentially passing enormous amounts of traffic (currently reaching hundreds of gigabits per second). Naturally, routing such traffic through kernel space (as the default forwarder is located there) is not the best idea. Therefore, OVS is often deployed entirely in user space using DPDK acceleration technology to bypass the kernel for traffic from the NIC into user space.
Note: For a cloud deployed for telecom functions, there is an option to redirect traffic from the compute node directly to switching equipment, bypassing OVS. Mechanisms like SR-IOV and Passthrough are used for this purpose.
How does this work on a real setup?
Now, let's move on to the practical part and see how this all works in practice.
First, we will set up a simple Openstack installation. Since I do not have a set of servers available for experimentation, we will build the setup on a single physical server using virtual machines. Of course, this solution is not suitable for commercial purposes, but it is sufficient to observe how a network operates in Openstack through this installation. Moreover, such an installation is even more interesting for educational purposes—since one can capture traffic, etc.
Since we only need to see the basic part, we can avoid using multiple networks and instead utilize just two networks, with the second network in this setup being used exclusively for access to the undercloud and the DNS server. We will not touch external networks for now—this is a topic for a separate, larger article.
So, let's start from the beginning. First, a little theory. We will install OpenStack using TripleO (OpenStack on OpenStack). The essence of TripleO is that we install OpenStack all-in-one (i.e., on a single node), called undercloud, and then use the capabilities of the deployed OpenStack to install the operational OpenStack, called overcloud. The undercloud will leverage its built-in ability to manage physical servers (bare metal) — the Ironic project — for provisioning hypervisors that will perform the roles of compute, control, and storage nodes. In other words, we do not use any third-party tools to deploy OpenStack — we deploy OpenStack using OpenStack itself. As we proceed with the installation, it will become much clearer, so let’s not dwell on this and move forward.
Note: In this article, for simplicity, I did not use network isolation for the internal OpenStack networks, and everything is deployed using only one network. However, the presence or absence of network isolation does not affect the basic functionality of the solution — everything will work exactly the same as with isolation, but the traffic will be on one network. For commercial installations, it is, of course, necessary to use isolation with different VLANs and interfaces. For example, management traffic for the Ceph storage and data traffic (i.e., machine access to disks, etc.) use different subnets (Storage management and Storage) when isolated, which makes the solution more fault-tolerant by separating this traffic, for instance, across different ports, or by using different QoS profiles for different traffic, so that data traffic does not overwhelm signaling traffic. In our case, they will go on the same network, and this does not limit us in any way.
Note: Since we are going to run virtual machines in a virtual environment based on virtual machines, we first need to enable nested virtualization.
You can check whether nested virtualization is enabled or not like this:
[root@hp-gen9 bormoglotx]# cat /sys/module/kvm_intel/parameters/nested
N
[root@hp-gen9 bormoglotx]#
If you see the letter N, then enable support for nested virtualization using any guide you can find online, for example .
We need to assemble a scheme of virtual machines like this:
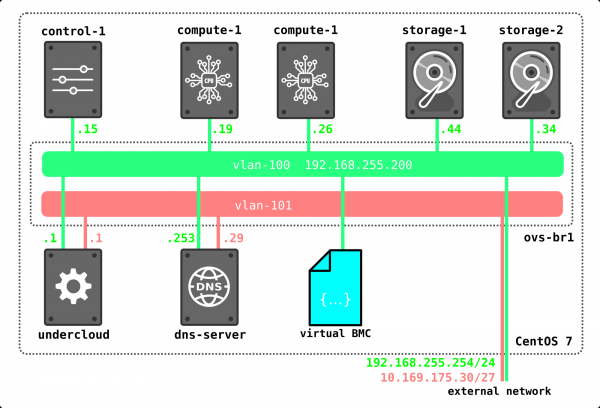
In my case, for the connectivity of the virtual machines that will be part of the upcoming installation (I ended up with 7, but you can manage with 4 if you don't have many resources), I used OpenvSwitch. I created one OVS bridge and connected the virtual machines to it via port groups. To do this, I created an XML file of the following format:
[root@hp-gen9 ~]# virsh net-dumpxml ovs-network-1

  ovs-network-1
  7a2e7de7-fc16-4e00-b1ed-4d190133af67
Here, three port groups are declared — two access and one trunk (the latter was needed for the DNS server, but it can be omitted or set up on the host machine — whichever is more convenient for you). Next, using this template, we declare our network through virsh net-define:
virsh net-define ovs-network-1.xml
virsh net-start ovs-network-1
virsh net-autostart ovs-network-1
Now we edit the hypervisor port configurations:
[root@hp-gen9 ~]# cat /etc/sysconfig/network-scripts/ifcfg-ens1f0
TYPE=Ethernet
NAME=ens1f0
DEVICE=ens1f0
TYPE=OVSPort
DEVICETYPE=ovs
OVS_BRIDGE=ovs-br1
ONBOOT=yes
OVS_OPTIONS="trunk=100,101,102"
[root@hp-gen9 ~]
[root@hp-gen9 ~]# cat /etc/sysconfig/network-scripts/ifcfg-ovs-br1
DEVICE=ovs-br1
DEVICETYPE=ovs
TYPE=OVSBridge
BOOTPROTO=static
ONBOOT=yes
IPADDR=192.168.255.200
PREFIX=24
[root@hp-gen9 ~]#
Note: In this scenario, the address on the OVS bridge will not be available as it doesn't have a VLAN tag. To fix this, you need to run the command sudo ovs-vsctl set port ovs-br1 tag=100. However, this tag will disappear after a reboot (if anyone knows how to make it stay – I would be very grateful). But this is not so important, as we will only need this address during the installation and it won't be required once OpenStack is fully deployed.
Next, we create the undercloud machine:
virt-install -n undercloud --description "undercloud" --os-type=Linux --os-variant=centos7.0 --ram=8192 --vcpus=8 --disk path=/var/lib/libvirt/images/undercloud.qcow2,bus=virtio,size=40,format=qcow2 --network network:ovs-network-1,model=virtio,portgroup=access-100 --network network:ovs-network-1,model=virtio,portgroup=access-101 --graphics none --location /var/lib/libvirt/boot/CentOS-7-x86_64-Minimal-2003.iso --extra-args console=ttyS0During the installation, you set all the necessary parameters such as the machine name, passwords, users, NTP servers, etc. You can also configure the ports right away, but I personally find it easier to access the machine through the console after installation and adjust the necessary files. If you already have a prepared image, you can use it, or do like I did—download the minimal image of CentOS 7 and use it for the VM installation.
After a successful installation, you should have a virtual machine where you can install undercloud.
[root@hp-gen9 bormoglotx]# virsh list
 Id    Name                           State
----------------------------------------------------
 6     dns-server                     running
 62    undercloud                     running
First, we install the necessary tools for the installation process:
sudo yum update -y
sudo yum install -y net-tools
sudo yum install -y wget
sudo yum install -y ipmitool
Installing Undercloud
We create a user named stack, set a password, add it to sudoers, and grant it permission to execute root commands via sudo without needing to enter a password:
useradd stack
passwd stack

echo “stack ALL=(root) NOPASSWD:ALL” > /etc/sudoers.d/stack
chmod 0440 /etc/sudoers.d/stack
Now we specify the full name of undercloud in the hosts file:
vi /etc/hosts

127.0.0.1   undercloud.openstack.rnd localhost localhost.localdomain localhost4 localhost4.localdomain4
::1         localhost localhost.localdomain localhost6 localhost6.localdomain6
Next, we add the repositories and install the software we need:
sudo yum install -y https://trunk.rdoproject.org/centos7/current/python2-tripleo-repos-0.0.1-0.20200409224957.8bac392.el7.noarch.rpm
sudo -E tripleo-repos -b queens current
sudo -E tripleo-repos -b queens current ceph
sudo yum install -y python-tripleoclient
sudo yum install -y ceph-ansible
Note: if you do not plan to install ceph, do not enter the commands related to ceph. I used the Queens release, but you can use any other that you prefer.
Next, we copy the undercloud configuration file to the home directory of the stack user:
cp /usr/share/instack-undercloud/undercloud.conf.sample ~/undercloud.confNow you need to edit this file to adapt it to our installation.
At the beginning of the file, you need to add the following lines:
vi undercloud.conf
[DEFAULT]
undercloud_hostname = undercloud.openstack.rnd
local_ip = 192.168.255.1/24
network_gateway = 192.168.255.1
undercloud_public_host = 192.168.255.2
undercloud_admin_host = 192.168.255.3
undercloud_nameservers = 192.168.255.253
generate_service_certificate = false
local_interface = eth0
local_mtu = 1450
network_cidr = 192.168.255.0/24
masquerade = true
masquerade_network = 192.168.255.0/24
dhcp_start = 192.168.255.11
dhcp_end = 192.168.255.50
inspection_iprange = 192.168.255.51,192.168.255.100
scheduler_max_attempts = 10
So, let's go through the settings:
undercloud_hostname — the full name of the undercloud server, it should match the entry on the DNS server
local_ip — local address of undercloud towards the provisioning network
network_gateway — this same local address will act as the gateway for external access during the overcloud node installation, and it coincides with the local ip
undercloud_public_host — the external API address, any free address from the provisioning network can be assigned
undercloud_admin_host internal API address, any free address from the provisioning network can be assigned
undercloud_nameservers — DNS server
generate_service_certificate — this line is very important in the current example, as if you do not set it to false, you will receive an error during installation, the issue is described in the Red Hat bug tracker
local_interface the interface in the provisioning network. This interface will be reconfigured during the undercloud deployment, so the undercloud must have two interfaces — one for access to it, the other for provisioning
local_mtu — MTU. Since we have a test lab and my MTU is 1500 on the OVS switch ports, it is necessary to set it to 1450 to allow encapsulated VxLAN packets to pass
network_cidr — provisioning network
masquerade — use of NAT for access to the external network
masquerade_network — the network that will be NATed
dhcp_start — the starting address of the address pool from which addresses will be assigned to nodes during the overcloud deployment
dhcp_end — the ending address of the address pool from which addresses will be assigned to nodes during the overcloud deployment
inspection_iprange — the pool of addresses needed for introspection (should not overlap with the above-mentioned pool)
scheduler_max_attempts — the maximum number of attempts to install the overcloud (must be greater than or equal to the number of nodes)
After the file is described, you can issue the command to deploy the undercloud:
openstack undercloud install
The procedure takes 10 to 30 minutes depending on your hardware. Ultimately, you should see the following output:
vi undercloud.conf
2020-08-13 23:13:12,668 INFO:
#############################################################################
Undercloud install complete.

The file containing this installation's passwords is at
/home/stack/undercloud-passwords.conf.

There is also a stackrc file at /home/stack/stackrc.

These files are needed to interact with the OpenStack services, and should be
secured.

#############################################################################
This output indicates that you have successfully installed undercloud and can now check its status and proceed with the installation of overcloud.
If you check the output of ifconfig, you will see that a new bridge interface has appeared
[stack@undercloud ~]$ ifconfig
br-ctlplane: flags=4163  mtu 1450
        inet 192.168.255.1  netmask 255.255.255.0  broadcast 192.168.255.255
        inet6 fe80::5054:ff:fe2c:89e  prefixlen 64  scopeid 0x20
        ether 52:54:00:2c:08:9e  txqueuelen 1000  (Ethernet)
        RX packets 14  bytes 1095 (1.0 KiB)
        RX errors 0  dropped 0  overruns 0  frame 0
        TX packets 20  bytes 1292 (1.2 KiB)
        TX errors 0  dropped 0 overruns 0  carrier 0  collisions 0
This interface will now be used for deploying the overcloud.
From the output below, we can see that all services are on a single node:
(undercloud) [stack@undercloud ~]$ openstack host list
+--------------------------+-----------+----------+
| Host Name                | Service   | Zone     |
+--------------------------+-----------+----------+
| undercloud.openstack.rnd | conductor | internal |
| undercloud.openstack.rnd | scheduler | internal |
| undercloud.openstack.rnd | compute   | nova     |
+--------------------------+-----------+----------+
Below is the network configuration for the undercloud:
(undercloud) [stack@undercloud ~]$ python -m json.tool /etc/os-net-config/config.json
{
    "network_config": [
        {
            "addresses": [
                {
                    "ip_netmask": "192.168.255.1/24"
                }
            ],
            "members": [
                {
                    "dns_servers": [
                        "192.168.255.253"
                    ],
                    "mtu": 1450,
                    "name": "eth0",
                    "primary": "true",
                    "type": "interface"
                }
            ],
            "mtu": 1450,
            "name": "br-ctlplane",
            "ovs_extra": [
                "br-set-external-id br-ctlplane bridge-id br-ctlplane"
            ],
            "routes": [],
            "type": "ovs_bridge"
        }
    ]
}
(undercloud) [stack@undercloud ~]$
Installing the overcloud.
Currently, we only have the undercloud, and we need nodes to build the overcloud. Therefore, the first step is to deploy the required virtual machines. During the undercloud deployment, the OS and necessary software will be installed on the overcloud machines — meaning we don’t need to fully deploy the machine, just create a disk (or disks) for it and define its parameters — effectively we're getting a bare server without an installed OS.
We move to the folder with our virtual machine disks and create disks of the required size:
cd /var/lib/libvirt/images/
qemu-img create -f qcow2 -o preallocation=metadata control-1.qcow2 60G
qemu-img create -f qcow2 -o preallocation=metadata compute-1.qcow2 60G
qemu-img create -f qcow2 -o preallocation=metadata compute-2.qcow2 60G
qemu-img create -f qcow2 -o preallocation=metadata storage-1.qcow2 160G
qemu-img create -f qcow2 -o preallocation=metadata storage-2.qcow2 160G
Since we are acting as root, we need to change the ownership of these disks to avoid permission issues:
[root@hp-gen9 images]# ls -lh
total 5.8G
drwxr-xr-x. 2 qemu qemu 4.0K Aug 13 16:15 backups
-rw-r--r--. 1 root root  61G Aug 14 03:07 compute-1.qcow2
-rw-r--r--. 1 root root  61G Aug 14 03:07 compute-2.qcow2
-rw-r--r--. 1 root root  61G Aug 14 03:07 control-1.qcow2
-rw-------. 1 qemu qemu  41G Aug 14 03:03 dns-server.qcow2
-rw-r--r--. 1 root root 161G Aug 14 03:07 storage-1.qcow2
-rw-r--r--. 1 root root 161G Aug 14 03:07 storage-2.qcow2
-rw-------. 1 qemu qemu  41G Aug 14 03:07 undercloud.qcow2
[root@hp-gen9 images]#
[root@hp-gen9 images]#
[root@hp-gen9 images]# chown qemu:qemu /var/lib/libvirt/images/*qcow2
[root@hp-gen9 images]# ls -lh
total 5.8G
drwxr-xr-x. 2 qemu qemu 4.0K Aug 13 16:15 backups
-rw-r--r--. 1 qemu qemu  61G Aug 14 03:07 compute-1.qcow2
-rw-r--r--. 1 qemu qemu  61G Aug 14 03:07 compute-2.qcow2
-rw-r--r--. 1 qemu qemu  61G Aug 14 03:07 control-1.qcow2
-rw-------. 1 qemu qemu  41G Aug 14 03:03 dns-server.qcow2
-rw-r--r--. 1 qemu qemu 161G Aug 14 03:07 storage-1.qcow2
-rw-r--r--. 1 qemu qemu 161G Aug 14 03:07 storage-2.qcow2
-rw-------. 1 qemu qemu  41G Aug 14 03:08 undercloud.qcow2
[root@hp-gen9 images]#
Note: If you do not plan to install Ceph for learning purposes, do not create at least 3 nodes with at least two disks, and specify in the template that virtual disks vda, vdb, etc. will be used.
Great, now we need to define all these machines:
virt-install --name control-1 --ram 32768 --vcpus 8 --os-variant centos7.0 --disk path=/var/lib/libvirt/images/control-1.qcow2,device=disk,bus=virtio,format=qcow2 --noautoconsole --vnc  --network network:ovs-network-1,model=virtio,portgroup=access-100 --network network:ovs-network-1,model=virtio,portgroup=trunk-1 --dry-run --print-xml > /tmp/control-1.xml

virt-install --name storage-1 --ram 16384 --vcpus 4 --os-variant centos7.0 --disk path=/var/lib/libvirt/images/storage-1.qcow2,device=disk,bus=virtio,format=qcow2 --noautoconsole --vnc  --network network:ovs-network-1,model=virtio,portgroup=access-100 --dry-run --print-xml > /tmp/storage-1.xml

virt-install --name storage-2 --ram 16384 --vcpus 4 --os-variant centos7.0 --disk path=/var/lib/libvirt/images/storage-2.qcow2,device=disk,bus=virtio,format=qcow2 --noautoconsole --vnc  --network network:ovs-network-1,model=virtio,portgroup=access-100 --dry-run --print-xml > /tmp/storage-2.xml

virt-install --name compute-1 --ram 32768 --vcpus 12 --os-variant centos7.0 --disk path=/var/lib/libvirt/images/compute-1.qcow2,device=disk,bus=virtio,format=qcow2 --noautoconsole --vnc  --network network:ovs-network-1,model=virtio,portgroup=access-100 --dry-run --print-xml > /tmp/compute-1.xml

virt-install --name compute-2 --ram 32768 --vcpus 12 --os-variant centos7.0 --disk path=/var/lib/libvirt/images/compute-2.qcow2,device=disk,bus=virtio,format=qcow2 --noautoconsole --vnc  --network network:ovs-network-1,model=virtio,portgroup=access-100 --dry-run --print-xml > /tmp/compute-2.xml
At the end, there are commands —print-xml > /tmp/storage-1.xml, which creates an XML file describing each machine in the /tmp/ folder; if it is not added, you will not be able to define the virtual machines.
Now we need to define all these machines in virsh:
virsh define --file /tmp/control-1.xml
virsh define --file /tmp/compute-1.xml
virsh define --file /tmp/compute-2.xml
virsh define --file /tmp/storage-1.xml
virsh define --file /tmp/storage-2.xml

[root@hp-gen9 ~]# virsh list --all
 Id    Name                           State
----------------------------------------------------
 6     dns-server                     running
 64    undercloud                     running
 -     compute-1                      shut off
 -     compute-2                      shut off
 -     control-1                      shut off
 -     storage-1                      shut off
 -     storage-2                      shut off

[root@hp-gen9 ~]#
Now a small detail — tripleO uses IPMI to manage servers during installation and introspection.
Introspection is the process of inspecting hardware to obtain its parameters necessary for further provisioning of nodes. Introspection is carried out using ironic — a service designed to work with bare metal servers.
But here lies the problem — if physical servers have a separate port for IPMI (or a shared port, but that doesn’t really matter), virtual machines do not have such ports. Here we have a workaround called vbmc — a utility that allows emulating an IPMI port. This detail is especially worth noting for those who want to deploy a lab on the ESXi hypervisor — personally, I don't know if there is an equivalent of vbmc in it, so it’s worth addressing this issue before deploying everything.
Installing vbmc:
yum install python2-virtualbmcIf your OS cannot find the package, add the repository:
yum install -y https://www.rdoproject.org/repos/rdo-release.rpmNow let’s configure the utility. Everything here is straightforward. It currently makes sense that there are no servers in the vbmc list.
[root@hp-gen9 ~]# vbmc list

[root@hp-gen9 ~]#
To make them appear, you need to declare them manually like this:
[root@hp-gen9 ~]# vbmc add control-1 --port 7001 --username admin --password admin
[root@hp-gen9 ~]# vbmc add storage-1 --port 7002 --username admin --password admin
[root@hp-gen9 ~]# vbmc add storage-2 --port 7003 --username admin --password admin
[root@hp-gen9 ~]# vbmc add compute-1 --port 7004 --username admin --password admin
[root@hp-gen9 ~]# vbmc add compute-2 --port 7005 --username admin --password admin
[root@hp-gen9 ~]#
[root@hp-gen9 ~]# vbmc list
+-------------+--------+---------+------+
| Domain name | Status | Address | Port |
+-------------+--------+---------+------+
| compute-1   | down   | ::      | 7004 |
| compute-2   | down   | ::      | 7005 |
| control-1   | down   | ::      | 7001 |
| storage-1   | down   | ::      | 7002 |
| storage-2   | down   | ::      | 7003 |
+-------------+--------+---------+------+
[root@hp-gen9 ~]#
I believe the syntax of the command is clear without explanations. However, currently all our sessions are in the DOWN status. To transition them to UP status, they need to be powered on:
[root@hp-gen9 ~]# vbmc start control-1
2020-08-14 03:15:57,826.826 13149 INFO VirtualBMC [-] Started vBMC instance for domain control-1
[root@hp-gen9 ~]# vbmc start storage-1
2020-08-14 03:15:58,316.316 13149 INFO VirtualBMC [-] Started vBMC instance for domain storage-1
[root@hp-gen9 ~]# vbmc start storage-2
2020-08-14 03:15:58,851.851 13149 INFO VirtualBMC [-] Started vBMC instance for domain storage-2
[root@hp-gen9 ~]# vbmc start compute-1
2020-08-14 03:15:59,307.307 13149 INFO VirtualBMC [-] Started vBMC instance for domain compute-1
[root@hp-gen9 ~]# vbmc start compute-2
2020-08-14 03:15:59,712.712 13149 INFO VirtualBMC [-] Started vBMC instance for domain compute-2
[root@hp-gen9 ~]#
[root@hp-gen9 ~]#
[root@hp-gen9 ~]# vbmc list
+-------------+---------+---------+------+
| Domain name | Status  | Address | Port |
+-------------+---------+---------+------+
| compute-1   | running | ::      | 7004 |
| compute-2   | running | ::      | 7005 |
| control-1   | running | ::      | 7001 |
| storage-1   | running | ::      | 7002 |
| storage-2   | running | ::      | 7003 |
+-------------+---------+---------+------+
[root@hp-gen9 ~]#
And the final touch — we need to adjust the firewall rules (or disable it completely):
firewall-cmd --zone=public --add-port=7001/udp --permanent
firewall-cmd --zone=public --add-port=7002/udp --permanent
firewall-cmd --zone=public --add-port=7003/udp --permanent
firewall-cmd --zone=public --add-port=7004/udp --permanent
firewall-cmd --zone=public --add-port=7005/udp --permanent
firewall-cmd --reload
Now let's log into undercloud and check that everything works. The address of the host machine is 192.168.255.200, on undercloud we added the required ipmitool package during the deployment preparation:
[stack@undercloud ~]$ ipmitool -I lanplus -U admin -P admin -H 192.168.255.200 -p 7001 power status
Chassis Power is off
[stack@undercloud ~]$ ipmitool -I lanplus -U admin -P admin -H 192.168.255.200 -p 7001 power on
Chassis Power Control: Up/On
[stack@undercloud ~]$

[root@hp-gen9 ~]# virsh list
 Id    Name                           State
----------------------------------------------------
 6     dns-server                     running
 64    undercloud                     running
 65    control-1                      running
As you can see, we successfully started the control node via vbmc. Now let's turn it off and move on:
[stack@undercloud ~]$ ipmitool -I lanplus -U admin -P admin -H 192.168.255.200 -p 7001 power off
Chassis Power Control: Down/Off
[stack@undercloud ~]$ ipmitool -I lanplus -U admin -P admin -H 192.168.255.200 -p 7001 power status
Chassis Power is off
[stack@undercloud ~]$

[root@hp-gen9 ~]# virsh list --all
 Id    Name                           State
----------------------------------------------------
 6     dns-server                     running
 64    undercloud                     running
 -     compute-1                      shut off
 -     compute-2                      shut off
 -     control-1                      shut off
 -     storage-1                      shut off
 -     storage-2                      shut off

[root@hp-gen9 ~]#
The next step is the introspection of the nodes that will have overcloud installed on them. For this, we need to prepare a JSON file describing our nodes. Note that unlike the installation on bare servers, the file specifies the port on which vbmc is running for each of the machines.
[root@hp-gen9 ~]# virsh domiflist --domain control-1
Interface  Type       Source     Model       MAC
-------------------------------------------------------
-          network    ovs-network-1 virtio      52:54:00:20:a2:2f
-          network    ovs-network-1 virtio      52:54:00:3f:87:9f

[root@hp-gen9 ~]# virsh domiflist --domain compute-1
Interface  Type       Source     Model       MAC
-------------------------------------------------------
-          network    ovs-network-1 virtio      52:54:00:98:e9:d6

[root@hp-gen9 ~]# virsh domiflist --domain compute-2
Interface  Type       Source     Model       MAC
-------------------------------------------------------
-          network    ovs-network-1 virtio      52:54:00:6a:ea:be

[root@hp-gen9 ~]# virsh domiflist --domain storage-1
Interface  Type       Source     Model       MAC
-------------------------------------------------------
-          network    ovs-network-1 virtio      52:54:00:79:0b:cb

[root@hp-gen9 ~]# virsh domiflist --domain storage-2
Interface  Type       Source     Model       MAC
-------------------------------------------------------
-          network    ovs-network-1 virtio      52:54:00:a7:fe:27
Note: There are two interfaces on the control node, but in this case, it's not important; one will suffice for this installation.
Now let's prepare the JSON file. We need to specify the MAC address of the port through which provisioning will be done, the node parameters, assign names, and provide access details for IPMI:
{
    "nodes":[
        {
            "mac":[
                "52:54:00:20:a2:2f"
            ],
            "cpu":"8",
            "memory":"32768",
            "disk":"60",
            "arch":"x86_64",
            "name":"control-1",
            "pm_type":"pxe_ipmitool",
            "pm_user":"admin",
            "pm_password":"admin",
            "pm_addr":"192.168.255.200",
            "pm_port":"7001"
        },
        {
            "mac":[
                "52:54:00:79:0b:cb"
            ],
            "cpu":"4",
            "memory":"16384",
            "disk":"160",
            "arch":"x86_64",
            "name":"storage-1",
            "pm_type":"pxe_ipmitool",
            "pm_user":"admin",
            "pm_password":"admin",
            "pm_addr":"192.168.255.200",
            "pm_port":"7002"
        },
        {
            "mac":[
                "52:54:00:a7:fe:27"
            ],
            "cpu":"4",
            "memory":"16384",
            "disk":"160",
            "arch":"x86_64",
            "name":"storage-2",
            "pm_type":"pxe_ipmitool",
            "pm_user":"admin",
            "pm_password":"admin",
            "pm_addr":"192.168.255.200",
            "pm_port":"7003"
        },
        {
            "mac":[
                "52:54:00:98:e9:d6"
            ],
            "cpu":"12",
            "memory":"32768",
            "disk":"60",
            "arch":"x86_64",
            "name":"compute-1",
            "pm_type":"pxe_ipmitool",
            "pm_user":"admin",
            "pm_password":"admin",
            "pm_addr":"192.168.255.200",
            "pm_port":"7004"
        },
        {
            "mac":[
                "52:54:00:6a:ea:be"
            ],
            "cpu":"12",
            "memory":"32768",
            "disk":"60",
            "arch":"x86_64",
            "name":"compute-2",
            "pm_type":"pxe_ipmitool",
            "pm_user":"admin",
            "pm_password":"admin",
            "pm_addr":"192.168.255.200",
            "pm_port":"7005"
        }
    ]
}
Next, we need to prepare the images for Ironic. For this, we will download them using wget and install:
(undercloud) [stack@undercloud ~]$ sudo wget https://images.rdoproject.org/queens/delorean/current-tripleo-rdo/overcloud-full.tar --no-check-certificate
(undercloud) [stack@undercloud ~]$ sudo wget https://images.rdoproject.org/queens/delorean/current-tripleo-rdo/ironic-python-agent.tar --no-check-certificate
(undercloud) [stack@undercloud ~]$ ls -lh
total 1.9G
-rw-r--r--. 1 stack stack 447M Aug 14 10:26 ironic-python-agent.tar
-rw-r--r--. 1 stack stack 1.5G Aug 14 10:26 overcloud-full.tar
-rw-------. 1 stack stack  916 Aug 13 23:10 stackrc
-rw-r--r--. 1 stack stack  15K Aug 13 22:50 undercloud.conf
-rw-------. 1 stack stack 2.0K Aug 13 22:50 undercloud-passwords.conf
(undercloud) [stack@undercloud ~]$ mkdir images/
(undercloud) [stack@undercloud ~]$ tar -xpvf ironic-python-agent.tar -C ~/images/
ironic-python-agent.initramfs
ironic-python-agent.kernel
(undercloud) [stack@undercloud ~]$ tar -xpvf overcloud-full.tar -C ~/images/
overcloud-full.qcow2
overcloud-full.initrd
overcloud-full.vmlinuz
(undercloud) [stack@undercloud ~]$
(undercloud) [stack@undercloud ~]$ ls -lh images/
total 1.9G
-rw-rw-r--. 1 stack stack 441M Aug 12 17:24 ironic-python-agent.initramfs
-rwxr-xr-x. 1 stack stack 6.5M Aug 12 17:24 ironic-python-agent.kernel
-rw-r--r--. 1 stack stack  53M Aug 12 17:14 overcloud-full.initrd
-rw-r--r--. 1 stack stack 1.4G Aug 12 17:18 overcloud-full.qcow2
-rwxr-xr-x. 1 stack stack 6.5M Aug 12 17:14 overcloud-full.vmlinuz
(undercloud) [stack@undercloud ~]$
Uploading images to undercloud:
(undercloud) [stack@undercloud ~]$ openstack overcloud image upload --image-path ~/images/
Image "overcloud-full-vmlinuz" was uploaded.
+--------------------------------------+------------------------+-------------+---------+--------+
|                  ID                  |          Name          | Disk Format |   Size  | Status |
+--------------------------------------+------------------------+-------------+---------+--------+
| c2553770-3e0f-4750-b46b-138855b5c385 | overcloud-full-vmlinuz |     aki     | 6761064 | active |
+--------------------------------------+------------------------+-------------+---------+--------+
Image "overcloud-full-initrd" was uploaded.
+--------------------------------------+-----------------------+-------------+----------+--------+
|                  ID                  |          Name         | Disk Format |   Size   | Status |
+--------------------------------------+-----------------------+-------------+----------+--------+
| 949984e0-4932-4e71-af43-d67a38c3dc89 | overcloud-full-initrd |     ari     | 55183045 | active |
+--------------------------------------+-----------------------+-------------+----------+--------+
Image "overcloud-full" was uploaded.
+--------------------------------------+----------------+-------------+------------+--------+
|                  ID                  |      Name      | Disk Format |    Size    | Status |
+--------------------------------------+----------------+-------------+------------+--------+
| a2f2096d-c9d7-429a-b866-c7543c02a380 | overcloud-full |    qcow2    | 1487475712 | active |
+--------------------------------------+----------------+-------------+------------+--------+
Image "bm-deploy-kernel" was uploaded.
+--------------------------------------+------------------+-------------+---------+--------+
|                  ID                  |       Name       | Disk Format |   Size  | Status |
+--------------------------------------+------------------+-------------+---------+--------+
| e413aa78-e38f-404c-bbaf-93e582a8e67f | bm-deploy-kernel |     aki     | 6761064 | active |
+--------------------------------------+------------------+-------------+---------+--------+
Image "bm-deploy-ramdisk" was uploaded.
+--------------------------------------+-------------------+-------------+-----------+--------+
|                  ID                  |        Name       | Disk Format |    Size   | Status |
+--------------------------------------+-------------------+-------------+-----------+--------+
| 5cf3aba4-0e50-45d3-929f-27f025dd6ce3 | bm-deploy-ramdisk |     ari     | 461759376 | active |
+--------------------------------------+-------------------+-------------+-----------+--------+
(undercloud) [stack@undercloud ~]$
Checking that all images have uploaded
(undercloud) [stack@undercloud ~]$ openstack image list
+--------------------------------------+------------------------+--------+
| ID                                   | Name                   | Status |
+--------------------------------------+------------------------+--------+
| e413aa78-e38f-404c-bbaf-93e582a8e67f | bm-deploy-kernel       | active |
| 5cf3aba4-0e50-45d3-929f-27f025dd6ce3 | bm-deploy-ramdisk      | active |
| a2f2096d-c9d7-429a-b866-c7543c02a380 | overcloud-full         | active |
| 949984e0-4932-4e71-af43-d67a38c3dc89 | overcloud-full-initrd  | active |
| c2553770-3e0f-4750-b46b-138855b5c385 | overcloud-full-vmlinuz | active |
+--------------------------------------+------------------------+--------+
(undercloud) [stack@undercloud ~]$
One more step — we need to add the DNS server:
(undercloud) [stack@undercloud ~]$ openstack subnet list
+--------------------------------------+-----------------+--------------------------------------+------------------+
| ID                                   | Name            | Network                              | Subnet           |
+--------------------------------------+-----------------+--------------------------------------+------------------+
| f45dea46-4066-42aa-a3c4-6f84b8120cab | ctlplane-subnet | 6ca013dc-41c2-42d8-9d69-542afad53392 | 192.168.255.0/24 |
+--------------------------------------+-----------------+--------------------------------------+------------------+
(undercloud) [stack@undercloud ~]$ openstack subnet show f45dea46-4066-42aa-a3c4-6f84b8120cab
+-------------------+-----------------------------------------------------------+
| Field             | Value                                                     |
+-------------------+-----------------------------------------------------------+
| allocation_pools  | 192.168.255.11-192.168.255.50                             |
| cidr              | 192.168.255.0/24                                          |
| created_at        | 2020-08-13T20:10:37Z                                      |
| description       |                                                           |
| dns_nameservers   |                                                           |
| enable_dhcp       | True                                                      |
| gateway_ip        | 192.168.255.1                                             |
| host_routes       | destination='169.254.169.254/32', gateway='192.168.255.1' |
| id                | f45dea46-4066-42aa-a3c4-6f84b8120cab                      |
| ip_version        | 4                                                         |
| ipv6_address_mode | None                                                      |
| ipv6_ra_mode      | None                                                      |
| name              | ctlplane-subnet                                           |
| network_id        | 6ca013dc-41c2-42d8-9d69-542afad53392                      |
| prefix_length     | None                                                      |
| project_id        | a844ccfcdb2745b198dde3e1b28c40a3                          |
| revision_number   | 0                                                         |
| segment_id        | None                                                      |
| service_types     |                                                           |
| subnetpool_id     | None                                                      |
| tags              |                                                           |
| updated_at        | 2020-08-13T20:10:37Z                                      |
+-------------------+-----------------------------------------------------------+
(undercloud) [stack@undercloud ~]$
(undercloud) [stack@undercloud ~]$ neutron subnet-update f45dea46-4066-42aa-a3c4-6f84b8120cab --dns-nameserver 192.168.255.253
neutron CLI is deprecated and will be removed in the future. Use openstack CLI instead.
Updated subnet: f45dea46-4066-42aa-a3c4-6f84b8120cab
(undercloud) [stack@undercloud ~]$
Now we can give the command for introspection:
(undercloud) [stack@undercloud ~]$ openstack overcloud node import --introspect --provide inspection.json
Started Mistral Workflow tripleo.baremetal.v1.register_or_update. Execution ID: d57456a3-d8ed-479c-9a90-dff7c752d0ec
Waiting for messages on queue 'tripleo' with no timeout.


5 node(s) successfully moved to the "manageable" state.
Successfully registered node UUID b4b2cf4a-b7ca-4095-af13-cc83be21c4f5
Successfully registered node UUID b89a72a3-6bb7-429a-93bc-48393d225838
Successfully registered node UUID 20a16cc0-e0ce-4d88-8f17-eb0ce7b4d69e
Successfully registered node UUID bfc1eb98-a17a-4a70-b0b6-6c0db0eac8e8
Successfully registered node UUID 766ab623-464c-423d-a529-d9afb69d1167
Waiting for introspection to finish...
Started Mistral Workflow tripleo.baremetal.v1.introspect. Execution ID: 6b4d08ae-94c3-4a10-ab63-7634ec198a79
Waiting for messages on queue 'tripleo' with no timeout.
Introspection of node b89a72a3-6bb7-429a-93bc-48393d225838 completed. Status:SUCCESS. Errors:None
Introspection of node 20a16cc0-e0ce-4d88-8f17-eb0ce7b4d69e completed. Status:SUCCESS. Errors:None
Introspection of node bfc1eb98-a17a-4a70-b0b6-6c0db0eac8e8 completed. Status:SUCCESS. Errors:None
Introspection of node 766ab623-464c-423d-a529-d9afb69d1167 completed. Status:SUCCESS. Errors:None
Introspection of node b4b2cf4a-b7ca-4095-af13-cc83be21c4f5 completed. Status:SUCCESS. Errors:None
Successfully introspected 5 node(s).
Started Mistral Workflow tripleo.baremetal.v1.provide. Execution ID: f5594736-edcf-4927-a8a0-2a7bf806a59a
Waiting for messages on queue 'tripleo' with no timeout.
5 node(s) successfully moved to the "available" state.
(undercloud) [stack@undercloud ~]$
As seen in the output, everything completed without errors. Let's check that all nodes are in the available state:
(undercloud) [stack@undercloud ~]$ openstack baremetal node list
+--------------------------------------+-----------+---------------+-------------+--------------------+-------------+
| UUID                                 | Name      | Instance UUID | Power State | Provisioning State | Maintenance |
+--------------------------------------+-----------+---------------+-------------+--------------------+-------------+
| b4b2cf4a-b7ca-4095-af13-cc83be21c4f5 | control-1 | None          | power off   | available          | False       |
| b89a72a3-6bb7-429a-93bc-48393d225838 | storage-1 | None          | power off   | available          | False       |
| 20a16cc0-e0ce-4d88-8f17-eb0ce7b4d69e | storage-2 | None          | power off   | available          | False       |
| bfc1eb98-a17a-4a70-b0b6-6c0db0eac8e8 | compute-1 | None          | power off   | available          | False       |
| 766ab623-464c-423d-a529-d9afb69d1167 | compute-2 | None          | power off   | available          | False       |
+--------------------------------------+-----------+---------------+-------------+--------------------+-------------+
(undercloud) [stack@undercloud ~]$
If the nodes are in another state, typically manageable, something went wrong and you need to check the log to understand why it happened. Keep in mind that in this scenario we are using virtualization, and there could be bugs related to the use of virtual machines or vbmc.
Next, we need to specify which node will perform which function — that is, specify the profile with which the node will be deployed:
(undercloud) [stack@undercloud ~]$ openstack overcloud profiles list
+--------------------------------------+-----------+-----------------+-----------------+-------------------+
| Node UUID                            | Node Name | Provision State | Current Profile | Possible Profiles |
+--------------------------------------+-----------+-----------------+-----------------+-------------------+
| b4b2cf4a-b7ca-4095-af13-cc83be21c4f5 | control-1 | available       | None            |                   |
| b89a72a3-6bb7-429a-93bc-48393d225838 | storage-1 | available       | None            |                   |
| 20a16cc0-e0ce-4d88-8f17-eb0ce7b4d69e | storage-2 | available       | None            |                   |
| bfc1eb98-a17a-4a70-b0b6-6c0db0eac8e8 | compute-1 | available       | None            |                   |
| 766ab623-464c-423d-a529-d9afb69d1167 | compute-2 | available       | None            |                   |
+--------------------------------------+-----------+-----------------+-----------------+-------------------+
(undercloud) [stack@undercloud ~]$ openstack flavor list
+--------------------------------------+---------------+------+------+-----------+-------+-----------+
| ID                                   | Name          |  RAM | Disk | Ephemeral | VCPUs | Is Public |
+--------------------------------------+---------------+------+------+-----------+-------+-----------+
| 168af640-7f40-42c7-91b2-989abc5c5d8f | swift-storage | 4096 |   40 |         0 |     1 | True      |
| 52148d1b-492e-48b4-b5fc-772849dd1b78 | baremetal     | 4096 |   40 |         0 |     1 | True      |
| 56e66542-ae60-416d-863e-0cb192d01b09 | control       | 4096 |   40 |         0 |     1 | True      |
| af6796e1-d0c4-4bfe-898c-532be194f7ac | block-storage | 4096 |   40 |         0 |     1 | True      |
| e4d50fdd-0034-446b-b72c-9da19b16c2df | compute       | 4096 |   40 |         0 |     1 | True      |
| fc2e3acf-7fca-4901-9eee-4a4d6ef0265d | ceph-storage  | 4096 |   40 |         0 |     1 | True      |
+--------------------------------------+---------------+------+------+-----------+-------+-----------+
(undercloud) [stack@undercloud ~]$
Specify the profile for each node:
openstack baremetal node set --property capabilities='profile:control,boot_option:local' b4b2cf4a-b7ca-4095-af13-cc83be21c4f5
openstack baremetal node set --property capabilities='profile:ceph-storage,boot_option:local' b89a72a3-6bb7-429a-93bc-48393d225838
openstack baremetal node set --property capabilities='profile:ceph-storage,boot_option:local' 20a16cc0-e0ce-4d88-8f17-eb0ce7b4d69e
openstack baremetal node set --property capabilities='profile:compute,boot_option:local' bfc1eb98-a17a-4a70-b0b6-6c0db0eac8e8
openstack baremetal node set --property capabilities='profile:compute,boot_option:local' 766ab623-464c-423d-a529-d9afb69d1167
Check that we have done everything correctly:
(undercloud) [stack@undercloud ~]$ openstack overcloud profiles list
+--------------------------------------+-----------+-----------------+-----------------+-------------------+
| Node UUID                            | Node Name | Provision State | Current Profile | Possible Profiles |
+--------------------------------------+-----------+-----------------+-----------------+-------------------+
| b4b2cf4a-b7ca-4095-af13-cc83be21c4f5 | control-1 | available       | control         |                   |
| b89a72a3-6bb7-429a-93bc-48393d225838 | storage-1 | available       | ceph-storage    |                   |
| 20a16cc0-e0ce-4d88-8f17-eb0ce7b4d69e | storage-2 | available       | ceph-storage    |                   |
| bfc1eb98-a17a-4a70-b0b6-6c0db0eac8e8 | compute-1 | available       | compute         |                   |
| 766ab623-464c-423d-a529-d9afb69d1167 | compute-2 | available       | compute         |                   |
+--------------------------------------+-----------+-----------------+-----------------+-------------------+
(undercloud) [stack@undercloud ~]$
If everything is correct, we issue the command to deploy the overcloud:
openstack overcloud deploy --templates --control-scale 1 --compute-scale 2 --ceph-storage-scale 2 --control-flavor control --compute-flavor compute --ceph-storage-flavor ceph-storage --libvirt-type qemuIn a real installation, customized templates would naturally be used, but in our case, this would complicate the process considerably since we would need to explain every modification in the template. As mentioned earlier, even a simple installation will suffice for us to see how it works.
Note: the variable --libvirt-type qemu is necessary in this case, as we will be using nested virtualization. Otherwise, your virtual machines will not start.
You now have about an hour, maybe more (depending on the hardware capabilities), and you can only hope that at the end of this time you will see the following message:
2020-08-14 08:39:21Z [overcloud]: CREATE_COMPLETE  Stack CREATE completed successfully

 Stack overcloud CREATE_COMPLETE

Host 192.168.255.21 not found in /home/stack/.ssh/known_hosts
Started Mistral Workflow tripleo.deployment.v1.get_horizon_url. Execution ID: fcb996cd-6a19-482b-b755-2ca0c08069a9
Overcloud Endpoint: http://192.168.255.21:5000/
Overcloud Horizon Dashboard URL: http://192.168.255.21:80/dashboard
Overcloud rc file: /home/stack/overcloudrc
Overcloud Deployed
(undercloud) [stack@undercloud ~]$
You now have a nearly full version of OpenStack, where you can learn, experiment, etc.
Let's check that everything is working properly. In the home directory of the user stack, there are two files — one is stackrc (for managing undercloud) and the other is overcloudrc (for managing overcloud). These files need to be sourced because they contain the necessary authentication information.
(undercloud) [stack@undercloud ~]$ openstack server list
+--------------------------------------+-------------------------+--------+-------------------------+----------------+--------------+
| ID                                   | Name                    | Status | Networks                | Image          | Flavor       |
+--------------------------------------+-------------------------+--------+-------------------------+----------------+--------------+
| fd7d36f4-ce87-4b9a-93b0-add2957792de | overcloud-controller-0  | ACTIVE | ctlplane=192.168.255.15 | overcloud-full | control      |
| edc77778-8972-475e-a541-ff40eb944197 | overcloud-novacompute-1 | ACTIVE | ctlplane=192.168.255.26 | overcloud-full | compute      |
| 5448ce01-f05f-47ca-950a-ced14892c0d4 | overcloud-cephstorage-1 | ACTIVE | ctlplane=192.168.255.34 | overcloud-full | ceph-storage |
| ce6d862f-4bdf-4ba3-b711-7217915364d7 | overcloud-novacompute-0 | ACTIVE | ctlplane=192.168.255.19 | overcloud-full | compute      |
| e4507bd5-6f96-4b12-9cc0-6924709da59e | overcloud-cephstorage-0 | ACTIVE | ctlplane=192.168.255.44 | overcloud-full | ceph-storage |
+--------------------------------------+-------------------------+--------+-------------------------+----------------+--------------+
(undercloud) [stack@undercloud ~]$
(undercloud) [stack@undercloud ~]$ source overcloudrc
(overcloud) [stack@undercloud ~]$
(overcloud) [stack@undercloud ~]$ openstack project list
+----------------------------------+---------+
| ID                               | Name    |
+----------------------------------+---------+
| 4eed7d0f06544625857d51cd77c5bd4c | admin   |
| ee1c68758bde41eaa9912c81dc67dad8 | service |
+----------------------------------+---------+
(overcloud) [stack@undercloud ~]$
(overcloud) [stack@undercloud ~]$
(overcloud) [stack@undercloud ~]$ openstack network agent list
+--------------------------------------+--------------------+-------------------------------------+-------------------+-------+-------+---------------------------+
| ID                                   | Agent Type         | Host                                | Availability Zone | Alive | State | Binary                    |
+--------------------------------------+--------------------+-------------------------------------+-------------------+-------+-------+---------------------------+
| 10495de9-ba4b-41fe-b30a-b90ec3f8728b | Open vSwitch agent | overcloud-novacompute-1.localdomain | None              | :-)   | UP    | neutron-openvswitch-agent |
| 1515ad4a-5972-46c3-af5f-e5446dff7ac7 | L3 agent           | overcloud-controller-0.localdomain  | nova              | :-)   | UP    | neutron-l3-agent          |
| 322e62ca-1e5a-479e-9a96-4f26d09abdd7 | DHCP agent         | overcloud-controller-0.localdomain  | nova              | :-)   | UP    | neutron-dhcp-agent        |
| 9c1de2f9-bac5-400e-998d-4360f04fc533 | Open vSwitch agent | overcloud-novacompute-0.localdomain | None              | :-)   | UP    | neutron-openvswitch-agent |
| d99c5657-851e-4d3c-bef6-f1e3bb1acfb0 | Open vSwitch agent | overcloud-controller-0.localdomain  | None              | :-)   | UP    | neutron-openvswitch-agent |
| ff85fae6-5543-45fb-a301-19c57b62d836 | Metadata agent     | overcloud-controller-0.localdomain  | None              | :-)   | UP    | neutron-metadata-agent    |
+--------------------------------------+--------------------+-------------------------------------+-------------------+-------+-------+---------------------------+
(overcloud) [stack@undercloud ~]$
In my installation, one final touch is required — to add a route on the controller, as the machine I am working from is in a different network. For this, we will log into control-1 using the heat-admin account and set up the route.
(undercloud) [stack@undercloud ~]$ ssh heat-admin@192.168.255.15
Last login: Fri Aug 14 09:47:40 2020 from 192.168.255.1
[heat-admin@overcloud-controller-0 ~]$
[heat-admin@overcloud-controller-0 ~]$
[heat-admin@overcloud-controller-0 ~]$ sudo ip route add 10.169.0.0/16 via 192.168.255.254
Now you can access the horizon. All the information — addresses, login, and password — is in the file /home/stack/overcloudrc. The final scheme looks as follows:
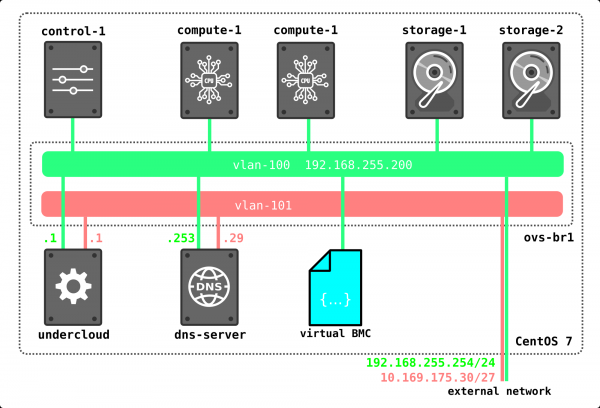
By the way, in our installation, the machine addresses were assigned through DHCP, and as you can see, they are issued 'randomly'. You can hard-code the address assignments for each machine during deployment in the template if necessary.
How does traffic flow between the virtual machines?
In this article, we will consider three options for traffic flow.
- Two machines on the same hypervisor in the same L2 network.
- Two machines on different hypervisors in the same L2 network.
- Two machines in different networks (routing between the networks).
We will review cases with external access through the external network, using floating addresses, as well as distributed routing next time; for now, let's stop at internal traffic.
To check, we will compile the following scheme:
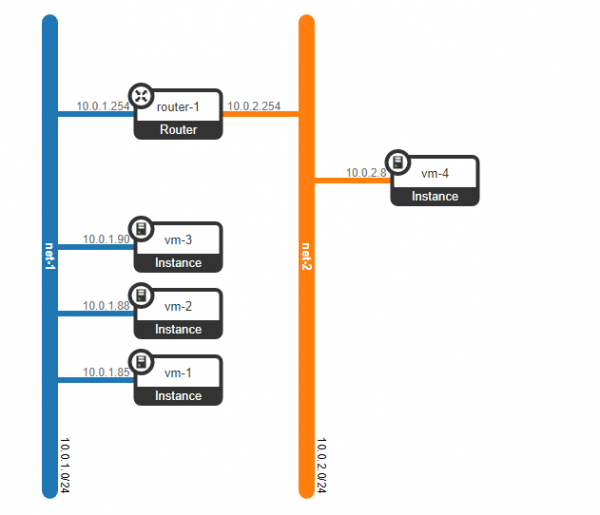
We have created 4 virtual machines — 3 in one L2 network — net-1, and another one in network net-2.
(overcloud) [stack@undercloud ~]$ nova list --tenant 5e18ce8ec9594e00b155485f19895e6c
+--------------------------------------+------+----------------------------------+--------+------------+-------------+-----------------+
| ID                                   | Name | Tenant ID                        | Status | Task State | Power State | Networks        |
+--------------------------------------+------+----------------------------------+--------+------------+-------------+-----------------+
| f53b37b5-2204-46cc-aef0-dba84bf970c0 | vm-1 | 5e18ce8ec9594e00b155485f19895e6c | ACTIVE | -          | Running     | net-1=10.0.1.85 |
| fc8b6722-0231-49b0-b2fa-041115bef34a | vm-2 | 5e18ce8ec9594e00b155485f19895e6c | ACTIVE | -          | Running     | net-1=10.0.1.88 |
| 3cd74455-b9b7-467a-abe3-bd6ff765c83c | vm-3 | 5e18ce8ec9594e00b155485f19895e6c | ACTIVE | -          | Running     | net-1=10.0.1.90 |
| 7e836338-6772-46b0-9950-f7f06dbe91a8 | vm-4 | 5e18ce8ec9594e00b155485f19895e6c | ACTIVE | -          | Running     | net-2=10.0.2.8  |
+--------------------------------------+------+----------------------------------+--------+------------+-------------+-----------------+
(overcloud) [stack@undercloud ~]$
Let's see on which hypervisors the created machines are located:
(overcloud) [stack@undercloud ~]$ nova show f53b37b5-2204-46cc-aef0-dba84bf970c0 | egrep "hypervisor_hostname|instance_name|hostname"
| OS-EXT-SRV-ATTR:hostname             | vm-1                                                     |
| OS-EXT-SRV-ATTR:hypervisor_hostname  | overcloud-novacompute-0.localdomain                      |
| OS-EXT-SRV-ATTR:instance_name        | instance-00000001                                        |
(overcloud) [stack@undercloud ~]$ nova show fc8b6722-0231-49b0-b2fa-041115bef34a | egrep "hypervisor_hostname|instance_name|hostname"
| OS-EXT-SRV-ATTR:hostname | vm-2 |
| OS-EXT-SRV-ATTR:hypervisor_hostname | overcloud-novacompute-1.localdomain |
| OS-EXT-SRV-ATTR:instance_name | instance-00000002 |(overcloud) [stack@undercloud ~]$ nova show 3cd74455-b9b7-467a-abe3-bd6ff765c83c | egrep "hypervisor_hostname|instance_name|hostname"
| OS-EXT-SRV-ATTR:hostname | vm-3 |
| OS-EXT-SRV-ATTR:hypervisor_hostname | overcloud-novacompute-0.localdomain |
| OS-EXT-SRV-ATTR:instance_name | instance-00000003 |(overcloud) [stack@undercloud ~]$ nova show 7e836338-6772-46b0-9950-f7f06dbe91a8 | egrep "hypervisor_hostname|instance_name|hostname"
| OS-EXT-SRV-ATTR:hostname | vm-4 |
| OS-EXT-SRV-ATTR:hypervisor_hostname | overcloud-novacompute-1.localdomain |
| OS-EXT-SRV-ATTR:instance_name | instance-00000004 | (overcloud) [stack@undercloud ~]$
Machines vm-1 and vm-3 are located on compute-0, while machines vm-2 and vm-4 are on node compute-1.
Additionally, a virtual router has been created to enable routing between the specified networks:
(overcloud) [stack@undercloud ~]$ openstack router list  --project 5e18ce8ec9594e00b155485f19895e6c
+--------------------------------------+----------+--------+-------+-------------+-------+----------------------------------+
| ID                                   | Name     | Status | State | Distributed | HA    | Project                          |
+--------------------------------------+----------+--------+-------+-------------+-------+----------------------------------+
| 0a4d2420-4b9c-46bd-aec1-86a1ef299abe | router-1 | ACTIVE | UP    | False       | False | 5e18ce8ec9594e00b155485f19895e6c |
+--------------------------------------+----------+--------+-------+-------------+-------+----------------------------------+
(overcloud) [stack@undercloud ~]$
The router has two virtual ports, which act as gateways for the networks:
(overcloud) [stack@undercloud ~]$ openstack router show 0a4d2420-4b9c-46bd-aec1-86a1ef299abe | grep interface
| interfaces_info         | [{"subnet_id": "2529ad1a-6b97-49cd-8515-cbdcbe5e3daa", "ip_address": "10.0.1.254", "port_id": "0c52b15f-8fcc-4801-bf52-7dacc72a5201"}, {"subnet_id": "335552dd-b35b-456b-9df0-5aac36a3ca13", "ip_address": "10.0.2.254", "port_id": "92fa49b5-5406-499f-ab8d-ddf28cc1a76c"}] |
(overcloud) [stack@undercloud ~]$
But before we examine the traffic flow, let's take a look at what we currently have on the control node (which also serves as the network node) and on the compute node. We'll start with the compute node.
[heat-admin@overcloud-novacompute-0 ~]$ sudo ovs-vsctl show
[heat-admin@overcloud-novacompute-0 ~]$ sudo sudo ovs-appctl dpif/show
system@ovs-system: hit:3 missed:3
  br-ex:
    br-ex 65534/1: (internal)
    phy-br-ex 1/none: (patch: peer=int-br-ex)
  br-int:
    br-int 65534/2: (internal)
    int-br-ex 1/none: (patch: peer=phy-br-ex)
    patch-tun 2/none: (patch: peer=patch-int)
  br-tun:
    br-tun 65534/3: (internal)
    patch-int 1/none: (patch: peer=patch-tun)
    vxlan-c0a8ff0f 3/4: (vxlan: egress_pkt_mark=0, key=flow, local_ip=192.168.255.19, remote_ip=192.168.255.15)
    vxlan-c0a8ff1a 2/4: (vxlan: egress_pkt_mark=0, key=flow, local_ip=192.168.255.19, remote_ip=192.168.255.26)
[heat-admin@overcloud-novacompute-0 ~]$
Currently, there are three OVS bridges on the node — br-int, br-tun, br-ex. Between them, as we can see, there is a set of interfaces. For simplicity, let’s lay out all these interfaces on a diagram and see what we get.
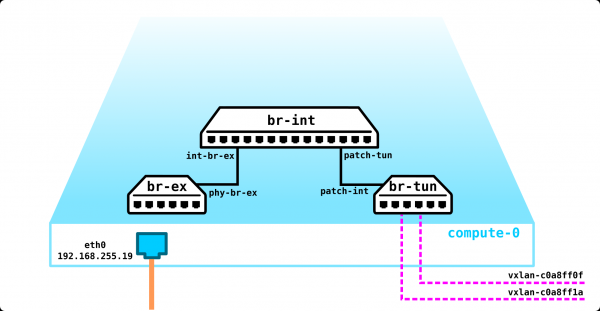
From the addresses where VxLAN tunnels are established, it is clear that one tunnel is up on compute-1 (192.168.255.26), and the second tunnel points to control-1 (192.168.255.15). But what’s most interesting is that br-ex has no physical interfaces, and if you look at what flows are configured, it becomes apparent that this bridge can currently only drop traffic.
[heat-admin@overcloud-novacompute-0 ~]$ ifconfig eth0
eth0: flags=4163  mtu 1450
        inet 192.168.255.19  netmask 255.255.255.0  broadcast 192.168.255.255
        inet6 fe80::5054:ff:fe6a:eabe  prefixlen 64  scopeid 0x20
        ether 52:54:00:6a:ea:be  txqueuelen 1000  (Ethernet)
        RX packets 2909669  bytes 4608201000 (4.2 GiB)
        RX errors 0  dropped 0  overruns 0  frame 0
        TX packets 1821057  bytes 349198520 (333.0 MiB)
        TX errors 0  dropped 0 overruns 0  carrier 0  collisions 0

[heat-admin@overcloud-novacompute-0 ~]$
As can be seen from the output, the address is directly attached to a physical port, not to a virtual bridge interface.
[heat-admin@overcloud-novacompute-0 ~]$  sudo ovs-appctl fdb/show br-ex
 port  VLAN  MAC                Age
[heat-admin@overcloud-novacompute-0 ~]$  sudo ovs-ofctl dump-flows br-ex
 cookie=0x9169eae8f7fe5bb2, duration=216686.864s, table=0, n_packets=303, n_bytes=26035, priority=2,in_port="phy-br-ex" actions=drop
 cookie=0x9169eae8f7fe5bb2, duration=216686.887s, table=0, n_packets=0, n_bytes=0, priority=0 actions=NORMAL
[heat-admin@overcloud-novacompute-0 ~]$
According to the first rule, everything that comes from the phy-br-ex port needs to be dropped.
In fact, at this stage, the only source of traffic for this bridge can be from this interface (connection to br-int), and judging by the drops, BUM traffic has already arrived at the bridge.
This means that traffic can only leave this node through a VxLAN tunnel and not in any other way. However, if DVR is enabled, the situation will change, but we will deal with that another time. When using network isolation, for example with VLANs, you will have more than one L3 interface on VLAN 0, but VxLAN traffic will exit the node in the same way, yet encapsulated in a specific VLAN.
We have dealt with the compute node, now let's move on to the control node.
[heat-admin@overcloud-controller-0 ~]$ sudo ovs-appctl dpif/show
system@ovs-system: hit:930491 missed:825
  br-ex:
    br-ex 65534/1: (internal)
    eth0 1/2: (system)
    phy-br-ex 2/none: (patch: peer=int-br-ex)
  br-int:
    br-int 65534/3: (internal)
    int-br-ex 1/none: (patch: peer=phy-br-ex)
    patch-tun 2/none: (patch: peer=patch-int)
  br-tun:
    br-tun 65534/4: (internal)
    patch-int 1/none: (patch: peer=patch-tun)
    vxlan-c0a8ff13 3/5: (vxlan: egress_pkt_mark=0, key=flow, local_ip=192.168.255.15, remote_ip=192.168.255.19)
    vxlan-c0a8ff1a 2/5: (vxlan: egress_pkt_mark=0, key=flow, local_ip=192.168.255.15, remote_ip=192.168.255.26)
[heat-admin@overcloud-controller-0 ~]$
In fact, we can say that everything is the same, however, the IP address is now on a virtual bridge rather than on a physical interface. This is done because this port is the one through which traffic will exit to the outside world.
[heat-admin@overcloud-controller-0 ~]$ ifconfig br-ex
br-ex: flags=4163  mtu 1450
        inet 192.168.255.15  netmask 255.255.255.0  broadcast 192.168.255.255
        inet6 fe80::5054:ff:fe20:a22f  prefixlen 64  scopeid 0x20
        ether 52:54:00:20:a2:2f  txqueuelen 1000  (Ethernet)
        RX packets 803859  bytes 1732616116 (1.6 GiB)
        RX errors 0  dropped 63  overruns 0  frame 0
        TX packets 808475  bytes 121652156 (116.0 MiB)
        TX errors 0  dropped 0 overruns 0  carrier 0  collisions 0

[heat-admin@overcloud-controller-0 ~]$
[heat-admin@overcloud-controller-0 ~]$ sudo ovs-appctl fdb/show br-ex
 port  VLAN  MAC                Age
    3   100  28:c0:da:00:4d:d3   35
    1     0  28:c0:da:00:4d:d3   35
    1     0  52:54:00:98:e9:d6    0
LOCAL     0  52:54:00:20:a2:2f    0
    1     0  52:54:00:2c:08:9e    0
    3   100  52:54:00:20:a2:2f    0
    1     0  52:54:00:6a:ea:be    0
[heat-admin@overcloud-controller-0 ~]$
This port is connected to the br-ex bridge, and since it has no VLAN tags, it is a trunk port where all VLANs are allowed. Currently, traffic is flowing out without a tag, as indicated by the VLAN ID 0 in the output above.
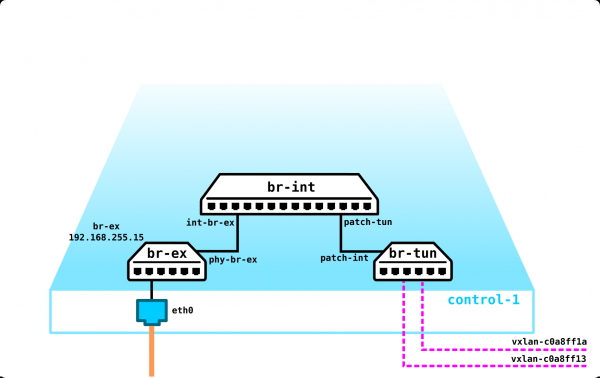
Everything else is currently similar to the compute node — the same bridges, the same tunnels going to two compute nodes.
We will not consider storage nodes in this article, but it is important to mention that the network part of these nodes is remarkably simple. In our case, there is only one physical port (eth0) with an IP address assigned to it, and that's it. There are no VxLAN tunnels, tunnel bridges, etc. — there is no OVS at all, as it serves no purpose. When using network isolation, this node will have two interfaces (physical ports, bonds, or just two VLANs — it doesn't matter — depending on what you want) — one for management and one for traffic (writing to the VM disk, reading from the disk, etc.).
Now that we have figured out what we have on the nodes in the absence of any services, let's launch 4 virtual machines and see how the described scheme changes — we should see ports, virtual routers, etc.
So far, our network looks like this:
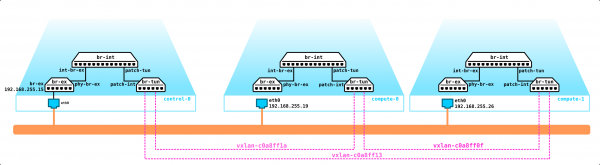
We have two virtual machines on each compute node. Let's take a look at how everything is connected using compute-0 as an example.
[heat-admin@overcloud-novacompute-0 ~]$ sudo virsh list
 Id    Name                           State
----------------------------------------------------
 1     instance-00000001              running
 3     instance-00000003              running

[heat-admin@overcloud-novacompute-0 ~]$
The machine has only one virtual interface — tap95d96a75-a0:
[heat-admin@overcloud-novacompute-0 ~]$ sudo virsh domiflist instance-00000001
Interface  Type       Source     Model       MAC
-------------------------------------------------------
tap95d96a75-a0 bridge     qbr95d96a75-a0 virtio      fa:16:3e:44:98:20

[heat-admin@overcloud-novacompute-0 ~]$
This interface connects to the Linux bridge:
[heat-admin@overcloud-novacompute-0 ~]$ sudo brctl show
bridge name     bridge id               STP enabled     interfaces
docker0         8000.0242904c92a8       no
qbr5bd37136-47          8000.5e4e05841423       no              qvb5bd37136-47
                                                        tap5bd37136-47
qbr95d96a75-a0          8000.de076cb850f6       no              qvb95d96a75-a0
                                                        tap95d96a75-a0
[heat-admin@overcloud-novacompute-0 ~]$
As can be seen from the output, there are only two interfaces in the bridge — tap95d96a75-a0 and qvb95d96a75-a0.
It's worth pausing a bit to discuss the types of virtual network devices in OpenStack:
vtap — a virtual interface attached to an instance (VM)
qbr — Linux bridge
qvb and qvo — vEth pairs connected to Linux bridge and Open vSwitch bridge
br-int, br-tun, br-vlan — Open vSwitch bridges
patch-, int-br-, phy-br- — Open vSwitch patch interfaces connecting bridges
qg, qr, ha, fg, sg — Open vSwitch ports used by virtual devices to connect to OVS
As you may understand, if we have a port in the bridge called qvb95d96a75-a0, there must be its counterpart, which logically should be named qvo95d96a75-a0. Let's check what ports are available on OVS.
[heat-admin@overcloud-novacompute-0 ~]$ sudo sudo ovs-appctl dpif/show
system@ovs-system: hit:526 missed:91
  br-ex:
    br-ex 65534/1: (internal)
    phy-br-ex 1/none: (patch: peer=int-br-ex)
  br-int:
    br-int 65534/2: (internal)
    int-br-ex 1/none: (patch: peer=phy-br-ex)
    patch-tun 2/none: (patch: peer=patch-int)
    qvo5bd37136-47 6/6: (system)
    qvo95d96a75-a0 3/5: (system)
  br-tun:
    br-tun 65534/3: (internal)
    patch-int 1/none: (patch: peer=patch-tun)
    vxlan-c0a8ff0f 3/4: (vxlan: egress_pkt_mark=0, key=flow, local_ip=192.168.255.19, remote_ip=192.168.255.15)
    vxlan-c0a8ff1a 2/4: (vxlan: egress_pkt_mark=0, key=flow, local_ip=192.168.255.19, remote_ip=192.168.255.26)
[heat-admin@overcloud-novacompute-0 ~]$
As we can see, the port is located in br-int. Br-int serves as a switch that terminates virtual machine ports. In addition to qvo95d96a75-a0, the output shows the port qvo5bd37136-47. This port belongs to a second virtual machine. Consequently, our scheme now looks like this:
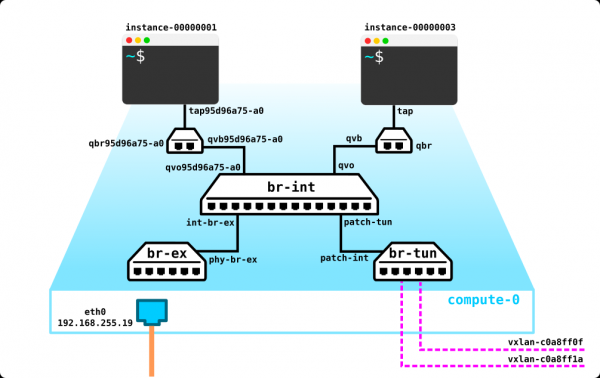
A question that should immediately interest a keen reader is, why is there a Linux bridge between the virtual machine port and the OVS port? The reason is that security groups are used to protect the machine, which are nothing more than iptables. OVS does not work with iptables, so this 'hack' was created. However, it is becoming outdated — conntrack is taking its place in the new releases.
So, ultimately, the scheme looks like this:
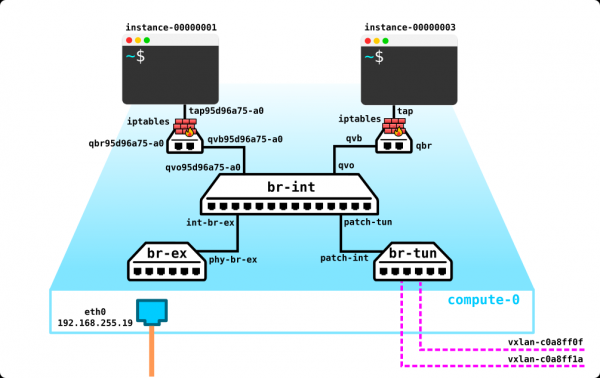
Two machines on the same hypervisor in the same L2 network.
Since both VMs are in the same L2 network and on the same hypervisor, traffic between them will logically flow locally through br-int, as both machines will be in the same VLAN:
[heat-admin@overcloud-novacompute-0 ~]$ sudo virsh domiflist instance-00000001
Interface  Type       Source     Model       MAC
-------------------------------------------------------
tap95d96a75-a0 bridge     qbr95d96a75-a0 virtio      fa:16:3e:44:98:20

[heat-admin@overcloud-novacompute-0 ~]$
[heat-admin@overcloud-novacompute-0 ~]$
[heat-admin@overcloud-novacompute-0 ~]$ sudo virsh domiflist instance-00000003
Interface  Type       Source     Model       MAC
-------------------------------------------------------
tap5bd37136-47 bridge     qbr5bd37136-47 virtio      fa:16:3e:83:ad:a4

[heat-admin@overcloud-novacompute-0 ~]$
[heat-admin@overcloud-novacompute-0 ~]$ sudo ovs-appctl fdb/show br-int
 port  VLAN  MAC                Age
    6     1  fa:16:3e:83:ad:a4    0
    3     1  fa:16:3e:44:98:20    0
[heat-admin@overcloud-novacompute-0 ~]$
Two machines on different hypervisors in the same L2 network.
Now let's see how traffic will flow between two machines in the same L2 network but located on different hypervisors. To be honest, not much will change; the traffic between the hypervisors will just go through a vxlan tunnel. Let’s look at this example.
Addresses of the virtual machines between which we will monitor traffic:
[heat-admin@overcloud-novacompute-0 ~]$ sudo virsh domiflist instance-00000001
Interface  Type       Source     Model       MAC
-------------------------------------------------------
tap95d96a75-a0 bridge     qbr95d96a75-a0 virtio      fa:16:3e:44:98:20

[heat-admin@overcloud-novacompute-0 ~]$
[heat-admin@overcloud-novacompute-1 ~]$ sudo virsh domiflist instance-00000002
Interface  Type       Source     Model       MAC
-------------------------------------------------------
tape7e23f1b-07 bridge     qbre7e23f1b-07 virtio      fa:16:3e:72:ad:53

[heat-admin@overcloud-novacompute-1 ~]$
Checking the forwarding table in br-int on compute-0:
[heat-admin@overcloud-novacompute-0 ~]$  sudo ovs-appctl fdb/show br-int | grep fa:16:3e:72:ad:53
    2     1  fa:16:3e:72:ad:53    1
[heat-admin@overcloud-novacompute-0 ~]
Traffic should go to port 2 — let's see what this port is:
[heat-admin@overcloud-novacompute-0 ~]$ sudo ovs-ofctl show br-int | grep addr
 1(int-br-ex): addr:7e:7f:28:1f:bd:54
 2(patch-tun): addr:0a:bd:07:69:58:d9
 3(qvo95d96a75-a0): addr:ea:50:9a:3d:69:58
 6(qvo5bd37136-47): addr:9a:d1:03:50:3d:96
 LOCAL(br-int): addr:1a:0f:53:97:b1:49
[heat-admin@overcloud-novacompute-0 ~]$
This is patch-tun — that is, the interface in br-tun. Let's see what happens to the packet on br-tun:
[heat-admin@overcloud-novacompute-0 ~]$ sudo ovs-ofctl dump-flows br-tun | grep fa:16:3e:72:ad:53
 cookie=0x8759a56536b67a8e, duration=1387.959s, table=20, n_packets=1460, n_bytes=138880, hard_timeout=300, idle_age=0, hard_age=0, priority=1,vlan_tci=0x0001/0x0fff,dl_dst=fa:16:3e:72:ad:53 actions=load:0->NXM_OF_VLAN_TCI[],load:0x16->NXM_NX_TUN_ID[],output:2
[heat-admin@overcloud-novacompute-0 ~]$
The packet is wrapped in VxLAN and sent to port 2. Let's see where port 2 leads:
[heat-admin@overcloud-novacompute-0 ~]$ sudo ovs-ofctl show br-tun | grep addr
 1(patch-int): addr:b2:d1:f8:21:96:66
 2(vxlan-c0a8ff1a): addr:be:64:1f:75:78:a7
 3(vxlan-c0a8ff0f): addr:76:6f:b9:3c:3f:1c
 LOCAL(br-tun): addr:a2:5b:6d:4f:94:47
[heat-admin@overcloud-novocompute-0 ~]$
This is the vxlan tunnel on compute-1:
[heat-admin@overcloud-novacompute-0 ~]$ sudo ovs-appctl dpif/show | egrep vxlan-c0a8ff1a
    vxlan-c0a8ff1a 2/4: (vxlan: egress_pkt_mark=0, key=flow, local_ip=192.168.255.19, remote_ip=192.168.255.26)
[heat-admin@overcloud-novacompute-0 ~]$
Let's go to compute-1 and see what happens to the packet next:
[heat-admin@overcloud-novacompute-1 ~]$ sudo ovs-appctl fdb/show br-int | egrep fa:16:3e:44:98:20
    2     1  fa:16:3e:44:98:20    1
[heat-admin@overcloud-novacompute-1 ~]$
The MAC is in the forwarding table of br-int on compute-1, and as seen from the output above, it is visible through port 2, which is the port towards br-tun:
[heat-admin@overcloud-novacompute-1 ~]$ sudo ovs-ofctl show br-int | grep addr
 1(int-br-ex): addr:8a:d7:f9:ad:8c:1d
 2(patch-tun): addr:46:cc:40:bd:20:da
 3(qvoe7e23f1b-07): addr:12:78:2e:34:6a:c7
 4(qvo3210e8ec-c0): addr:7a:5f:59:75:40:85
 LOCAL(br-int): addr:e2:27:b2:ed:14:46
And then we see that there is a destination MAC in br-int on compute-1:
[heat-admin@overcloud-novacompute-1 ~]$ sudo ovs-appctl fdb/show br-int | egrep fa:16:3e:72:ad:53
    3     1  fa:16:3e:72:ad:53    0
[heat-admin@overcloud-novacompute-1 ~]$
This means the received packet will go to port 3, behind which is the virtual machine instance-00000003.
The beauty of deploying OpenStack for study on a virtual infrastructure is that we can easily capture traffic between hypervisors and see what is happening with it. That's what we'll do now; we will run tcpdump on the vnet port towards compute-0:
[root@hp-gen9 bormoglotx]# tcpdump -vvv -i vnet3
tcpdump: listening on vnet3, link-type EN10MB (Ethernet), capture size 262144 bytes

*****************omitted*******************

04:39:04.583459 IP (tos 0x0, ttl 64, id 16868, offset 0, flags [DF], proto UDP (17), length 134)
    192.168.255.19.39096 > 192.168.255.26.4789: [no cksum] VXLAN, flags [I] (0x08), vni 22
IP (tos 0x0, ttl 64, id 8012, offset 0, flags [DF], proto ICMP (1), length 84)
    10.0.1.85 > 10.0.1.88: ICMP echo request, id 5634, seq 16, length 64
04:39:04.584449 IP (tos 0x0, ttl 64, id 35181, offset 0, flags [DF], proto UDP (17), length 134)
    192.168.255.26.speedtrace-disc > 192.168.255.19.4789: [no cksum] VXLAN, flags [I] (0x08), vni 22
IP (tos 0x0, ttl 64, id 59124, offset 0, flags [none], proto ICMP (1), length 84)
    10.0.1.88 > 10.0.1.85: ICMP echo reply, id 5634, seq 16, length 64

*****************omitted*******************
The first line shows that the packet from address 10.0.1.85 is going to address 10.0.1.88 (ICMP traffic), and it is encapsulated in a VxLAN packet with vni 22, traveling from host 192.168.255.19 (compute-0) to host 192.168.255.26 (compute-1). We can verify that the VNI corresponds to the one specified in ovs.
Let's return to this line actions=load:0->NXM_OF_VLAN_TCI[],load:0x16->NXM_NX_TUN_ID[],output:2. 0x16 is the vni in hexadecimal format. Let's convert this number to decimal:
16 = 6*16^0+1*16^1 = 6+16 = 22So, the vni corresponds correctly.
The second line shows the reverse traffic, which does not need explanation as everything is clear.
Two machines in different networks (routing between networks)
The last case for today is routing between networks within a single project using a virtual router. We consider the situation without DVR (which we will examine in another article), so routing occurs at the network node. In our case, the network node is not separated into a separate entity and is located on the control node.
First, let's check if the routing is working:
$ ping 10.0.2.8
PING 10.0.2.8 (10.0.2.8): 56 data bytes
64 bytes from 10.0.2.8: seq=0 ttl=63 time=7.727 ms
64 bytes from 10.0.2.8: seq=1 ttl=63 time=3.832 ms
^C
--- 10.0.2.8 ping statistics ---
2 packets transmitted, 2 packets received, 0% packet loss
round-trip min/avg/max = 3.832/5.779/7.727 ms
Since in this case the packet should go to the gateway and be routed there, we need to find out the MAC address of the gateway, for which we will check the ARP table in the instance:
$ arp
host-10-0-1-254.openstacklocal (10.0.1.254) at fa:16:3e:c4:64:70 [ether] on eth0
host-10-0-1-1.openstacklocal (10.0.1.1) at fa:16:3e:e6:2c:5c [ether] on eth0
host-10-0-1-90.openstacklocal (10.0.1.90) at fa:16:3e:83:ad:a4 [ether] on eth0
host-10-0-1-88.openstacklocal (10.0.1.88) at fa:16:3e:72:ad:53 [ether] on eth0
Now let's see where the traffic should be sent with the destination (10.0.1.254) fa:16:3e:c4:64:70:
[heat-admin@overcloud-novacompute-0 ~]$ sudo ovs-appctl fdb/show br-int | egrep fa:16:3e:c4:64:70
    2     1  fa:16:3e:c4:64:70    0
[heat-admin@overcloud-novacompute-0 ~]$
Looking at where port 2 leads:
[heat-admin@overcloud-novacompute-0 ~]$ sudo ovs-ofctl show br-int | grep addr
 1(int-br-ex): addr:7e:7f:28:1f:bd:54
 2(patch-tun): addr:0a:bd:07:69:58:d9
 3(qvo95d96a75-a0): addr:ea:50:9a:3d:69:58
 6(qvo5bd37136-47): addr:9a:d1:03:50:3d:96
 LOCAL(br-int): addr:1a:0f:53:97:b1:49
[heat-admin@overcloud-novacompute-0 ~]$
It all makes sense, the traffic goes to br-tun. Let's see which vxlan tunnel it will be wrapped in:
[heat-admin@overcloud-novacompute-0 ~]$ sudo ovs-ofctl dump-flows br-tun | grep fa:16:3e:c4:64:70
 cookie=0x8759a56536b67a8e, duration=3514.566s, table=20, n_packets=3368, n_bytes=317072, hard_timeout=300, idle_age=0, hard_age=0, priority=1,vlan_tci=0x0001/0x0fff,dl_dst=fa:16:3e:c4:64:70 actions=load:0->NXM_OF_VLAN_TCI[],load:0x16->NXM_NX_TUN_ID[],output:3
[heat-admin@overcloud-novacompute-0 ~]$
The third port is the vxlan tunnel:
[heat-admin@overcloud-controller-0 ~]$ sudo ovs-ofctl show br-tun | grep addr
 1(patch-int): addr:a2:69:00:c5:fa:ba
 2(vxlan-c0a8ff1a): addr:86:f0:ce:d0:e8:ea
 3(vxlan-c0a8ff13): addr:72:aa:73:2c:2e:5b
 LOCAL(br-tun): addr:a6:cb:cd:72:1c:45
[heat-admin@overcloud-controller-0 ~]$
Which looks at the control node:
[heat-admin@overcloud-controller-0 ~]$ sudo sudo ovs-appctl dpif/show | grep vxlan-c0a8ff1a
    vxlan-c0a8ff1a 2/5: (vxlan: egress_pkt_mark=0, key=flow, local_ip=192.168.255.15, remote_ip=192.168.255.26)
[heat-admin@overcloud-controller-0 ~]$
The traffic reached the control node, so we need to switch to it and see how routing will be handled.
As you know, the control node looked exactly the same as the compute node — the same three bridges, except br-ex had a physical port through which the node could send traffic out. Creating instances modified the configuration on compute nodes — added linux bridges, iptables, and interfaces to the nodes. Creating networks and a virtual router also left its mark on the configuration of the control node.
So, it's obvious that the MAC address of the gateway should be in the forwarding table of br-int on the control node. Let's check if it is there and where it points to:
[heat-admin@overcloud-controller-0 ~]$ sudo ovs-appctl fdb/show br-int | grep fa:16:3e:c4:64:70
    5     1  fa:16:3e:c4:64:70    1
[heat-admin@overcloud-controller-0 ~]$
[heat-admin@overcloud-controller-0 ~]$  sudo ovs-ofctl show br-int | grep addr
 1(int-br-ex): addr:2e:58:b6:db:d5:de
 2(patch-tun): addr:06:41:90:f0:9e:56
 3(tapca25a97e-64): addr:fa:16:3e:e6:2c:5c
 4(tap22015e46-0b): addr:fa:16:3e:76:c2:11
 5(qr-0c52b15f-8f): addr:fa:16:3e:c4:64:70
 6(qr-92fa49b5-54): addr:fa:16:3e:80:13:72
 LOCAL(br-int): addr:06:de:5d:ed:44:44
[heat-admin@overcloud-controller-0 ~]$
The MAC is visible from port qr-0c52b15f-8f. Returning to the list of virtual ports in Openstack, this type of port is used to connect various virtual devices to OVS. To be precise, qr is the port towards the virtual router, which is represented as a namespace.
Let's see what namespaces are on the server:
[heat-admin@overcloud-controller-0 ~]$ sudo  ip netns
qrouter-0a4d2420-4b9c-46bd-aec1-86a1ef299abe (id: 2)
qdhcp-7d541e74-1c36-4e1d-a7c4-0968c8dbc638 (id: 1)
qdhcp-67a3798c-32c0-4c18-8502-2531247e3cc2 (id: 0)
[heat-admin@overcloud-controller-0 ~]$
There are three instances in total. But judging by their names, we can guess the purpose of each. We'll return to the instances with IDs 0 and 1 later; for now, we are interested in the namespace qrouter-0a4d2420-4b9c-46bd-aec1-86a1ef299abe:
[heat-admin@overcloud-controller-0 ~]$ sudo  ip netns exec qrouter-0a4d2420-4b9c-46bd-aec1-86a1ef299abe ip route
10.0.1.0/24 dev qr-0c52b15f-8f proto kernel scope link src 10.0.1.254
10.0.2.0/24 dev qr-92fa49b5-54 proto kernel scope link src 10.0.2.254
[heat-admin@overcloud-controller-0 ~]$
In this namespace, there are two internal ports that we created earlier. Both virtual ports have been added to br-int. Let's check the MAC address of the port qr-0c52b15f-8f since the traffic, judging by the destination MAC address, was indeed directed to this interface.
[heat-admin@overcloud-controller-0 ~]$ sudo  ip netns exec qrouter-0a4d2420-4b9c-46bd-aec1-86a1ef299abe ifconfig qr-0c52b15f-8f
qr-0c52b15f-8f: flags=4163  mtu 1450
        inet 10.0.1.254  netmask 255.255.255.0  broadcast 10.0.1.255
        inet6 fe80::f816:3eff:fec4:6470  prefixlen 64  scopeid 0x20
        ether fa:16:3e:c4:64:70  txqueuelen 1000  (Ethernet)
        RX packets 5356  bytes 427305 (417.2 KiB)
        RX errors 0  dropped 0  overruns 0  frame 0
        TX packets 5195  bytes 490603 (479.1 KiB)
        TX errors 0  dropped 0 overruns 0  carrier 0  collisions 0

[heat-admin@overcloud-controller-0 ~]$
This means that everything is functioning according to standard routing principles. Since the traffic is intended for host 10.0.2.8, it should exit through the second interface qr-92fa49b5-54 and travel through the VXLAN tunnel to the compute node:
[heat-admin@overcloud-controller-0 ~]$ sudo  ip netns exec qrouter-0a4d2420-4b9c-46bd-aec1-86a1ef299abe arp
Address                  HWtype  HWaddress           Flags Mask            Iface
10.0.1.88                ether   fa:16:3e:72:ad:53   C                     qr-0c52b15f-8f
10.0.1.90                ether   fa:16:3e:83:ad:a4   C                     qr-0c52b15f-8f
10.0.2.8                 ether   fa:16:3e:6c:ad:9c   C                     qr-92fa49b5-54
10.0.2.42                ether   fa:16:3e:f5:0b:29   C                     qr-92fa49b5-54
10.0.1.85                ether   fa:16:3e:44:98:20   C                     qr-0c52b15f-8f
[heat-admin@overcloud-controller-0 ~]$
Everything makes sense, no surprises. Let's see from where the MAC address of host 10.0.2.8 is visible in br-int:
[heat-admin@overcloud-controller-0 ~]$ sudo ovs-appctl fdb/show br-int | grep fa:16:3e:6c:ad:9c
    2     2  fa:16:3e:6c:ad:9c    1
[heat-admin@overcloud-controller-0 ~]$
[heat-admin@overcloud-controller-0 ~]$ sudo ovs-ofctl show br-int | grep addr
 1(int-br-ex): addr:2e:58:b6:db:d5:de
 2(patch-tun): addr:06:41:90:f0:9e:56
 3(tapca25a97e-64): addr:fa:16:3e:e6:2c:5c
 4(tap22015e46-0b): addr:fa:16:3e:76:c2:11
 5(qr-0c52b15f-8f): addr:fa:16:3e:c4:64:70
 6(qr-92fa49b5-54): addr:fa:16:3e:80:13:72
 LOCAL(br-int): addr:06:de:5d:ed:44:44
[heat-admin@overcloud-controller-0 ~]$
As expected, the traffic is going to br-tun; let's see which tunnel the traffic will follow next:
[heat-admin@overcloud-controller-0 ~]$ sudo ovs-ofctl dump-flows br-tun | grep fa:16:3e:6c:ad:9c
 cookie=0x2ab04bf27114410e, duration=5346.829s, table=20, n_packets=5248, n_bytes=498512, hard_timeout=300, idle_age=0, hard_age=0, priority=1,vlan_tci=0x0002/0x0fff,dl_dst=fa:16:3e:6c:ad:9c actions=load:0->NXM_OF_VLAN_TCI[],load:0x63->NXM_NX_TUN_ID[],output:2
[heat-admin@overcloud-controller-0 ~]$
[heat-admin@overcloud-controller-0 ~]$ sudo ovs-ofctl show br-tun | grep addr
 1(patch-int): addr:a2:69:00:c5:fa:ba
 2(vxlan-c0a8ff1a): addr:86:f0:ce:d0:e8:ea
 3(vxlan-c0a8ff13): addr:72:aa:73:2c:2e:5b
 LOCAL(br-tun): addr:a6:cb:cd:72:1c:45
[heat-admin@overcloud-controller-0 ~]$
[heat-admin@overcloud-controller-0 ~]$ sudo sudo ovs-appctl dpif/show | grep vxlan-c0a8ff1a
    vxlan-c0a8ff1a 2/5: (vxlan: egress_pkt_mark=0, key=flow, local_ip=192.168.255.15, remote_ip=192.168.255.26)
[heat-admin@overcloud-controller-0 ~]$
The traffic goes through the tunnel to compute-1. And on compute-1, it's straightforward — from br-tun, the packet goes to br-int and from there to the virtual machine's interface:
[heat-admin@overcloud-controller-0 ~]$ sudo sudo ovs-appctl dpif/show | grep vxlan-c0a8ff1a
    vxlan-c0a8ff1a 2/5: (vxlan: egress_pkt_mark=0, key=flow, local_ip=192.168.255.15, remote_ip=192.168.255.26)
[heat-admin@overcloud-controller-0 ~]$
[heat-admin@overcloud-novacompute-1 ~]$ sudo ovs-appctl fdb/show br-int | grep fa:16:3e:6c:ad:9c
    4     2  fa:16:3e:6c:ad:9c    1
[heat-admin@overcloud-novacompute-1 ~]$ sudo ovs-ofctl show br-int | grep addr
 1(int-br-ex): addr:8a:d7:f9:ad:8c:1d
 2(patch-tun): addr:46:cc:40:bd:20:da
 3(qvoe7e23f1b-07): addr:12:78:2e:34:6a:c7
 4(qvo3210e8ec-c0): addr:7a:5f:59:75:40:85
 LOCAL(br-int): addr:e2:27:b2:ed:14:46
[heat-admin@overcloud-novacompute-1 ~]$
Let's check that this is indeed the correct interface:
[heat-admin@overcloud-novacompute-1 ~]$ brctl show
bridge name     bridge id               STP enabled     interfaces
docker0         8000.02429c001e1c       no
qbr3210e8ec-c0          8000.ea27f45358be       no              qvb3210e8ec-c0
                                                        tap3210e8ec-c0
qbre7e23f1b-07          8000.b26ac0eded8a       no              qvbe7e23f1b-07
                                                        tape7e23f1b-07
[heat-admin@overcloud-novacompute-1 ~]$
[heat-admin@overcloud-novacompute-1 ~]$ sudo virsh domiflist instance-00000004
Interface  Type       Source     Model       MAC
-------------------------------------------------------
tap3210e8ec-c0 bridge     qbr3210e8ec-c0 virtio      fa:16:3e:6c:ad:9c

[heat-admin@overcloud-novacompute-1 ~]$
We have essentially traced the entire route of the packet. I believe you noticed that the traffic was flowing through different vxlan tunnels and exiting with different VNIs. Let’s look at what those VNIs are, after which we'll gather a dump on the control node port and verify that the traffic is indeed flowing as described above.
So, the tunnel to compute-0 has the following actions=load:0->NXM_OF_VLAN_TCI[],load:0x16->NXM_NX_TUN_ID[],output:3. Let's convert 0x16 to decimal:
0x16 = 6*16^0+1*16^1 = 6+16 = 22The tunnel to compute-1 has the following VNI:actions=load:0->NXM_OF_VLAN_TCI[],load:0x63->NXM_NX_TUN_ID[],output:2. Let’s convert 0x63 to decimal:
0x63 = 3*16^0+6*16^1 = 3+96 = 99And now let's look at the dump:
[root@hp-gen9 bormoglotx]# tcpdump -vvv -i vnet4
tcpdump: listening on vnet4, link-type EN10MB (Ethernet), capture size 262144 bytes

*****************omitted*******************

04:35:18.709949 IP (tos 0x0, ttl 64, id 48650, offset 0, flags [DF], proto UDP (17), length 134)
    192.168.255.19.41591 > 192.168.255.15.4789: [no cksum] VXLAN, flags [I] (0x08), vni 22
IP (tos 0x0, ttl 64, id 49042, offset 0, flags [DF], proto ICMP (1), length 84)
    10.0.1.85 > 10.0.2.8: ICMP echo request, id 5378, seq 9, length 64
04:35:18.710159 IP (tos 0x0, ttl 64, id 23360, offset 0, flags [DF], proto UDP (17), length 134)
    192.168.255.15.38983 > 192.168.255.26.4789: [no cksum] VXLAN, flags [I] (0x08), vni 99
IP (tos 0x0, ttl 63, id 49042, offset 0, flags [DF], proto ICMP (1), length 84)
    10.0.1.85 > 10.0.2.8: ICMP echo request, id 5378, seq 9, length 64
04:35:18.711292 IP (tos 0x0, ttl 64, id 43596, offset 0, flags [DF], proto UDP (17), length 134)
    192.168.255.26.42588 > 192.168.255.15.4789: [no cksum] VXLAN, flags [I] (0x08), vni 99
IP (tos 0x0, ttl 64, id 55103, offset 0, flags [none], proto ICMP (1), length 84)
    10.0.2.8 > 10.0.1.85: ICMP echo reply, id 5378, seq 9, length 64
04:35:18.711531 IP (tos 0x0, ttl 64, id 8555, offset 0, flags [DF], proto UDP (17), length 134)
    192.168.255.15.38983 > 192.168.255.19.4789: [no cksum] VXLAN, flags [I] (0x08), vni 22
IP (tos 0x0, ttl 63, id 55103, offset 0, flags [none], proto ICMP (1), length 84)
    10.0.2.8 > 10.0.1.85: ICMP echo reply, id 5378, seq 9, length 64

*****************omitted*******************
The first packet is a VXLAN packet from host 192.168.255.19 (compute-0) to host 192.168.255.15 (control-1) with vni 22, encapsulating an ICMP packet from host 10.0.1.85 to host 10.0.2.8. As we calculated earlier, the vni corresponds to what we observed in the outputs.
The second packet is a VXLAN packet from host 192.168.255.15 (control-1) to host 192.168.255.26 (compute-1) with vni 99, encapsulating an ICMP packet from host 10.0.1.85 to host 10.0.2.8. As we calculated earlier, the vni corresponds to what we observed in the outputs.
The next two packets are the reverse traffic from 10.0.2.8 to 10.0.1.85.
So in the end, we have this diagram of the control node:
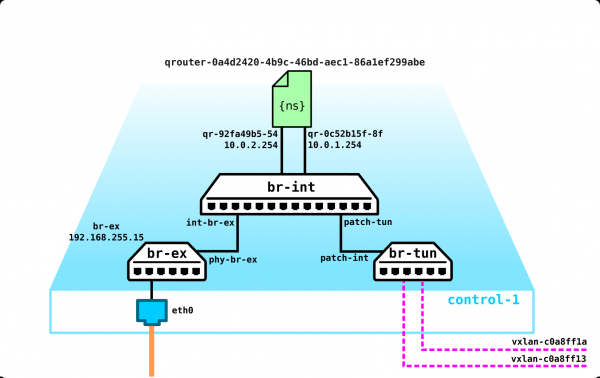
Is that all? We forgot about two namespaces:
[heat-admin@overcloud-controller-0 ~]$ sudo  ip netns
qrouter-0a4d2420-4b9c-46bd-aec1-86a1ef299abe (id: 2)
qdhcp-7d541e74-1c36-4e1d-a7c4-0968c8dbc638 (id: 1)
qdhcp-67a3798c-32c0-4c18-8502-2531247e3cc2 (id: 0)
[heat-admin@overcloud-controller-0 ~]$
As we mentioned about the architecture of the cloud platform — it would be beneficial for machines to automatically obtain addresses from a DHCP server. These are the two DHCP servers for our two networks 10.0.1.0/24 and 10.0.2.0/24.
Let's check if this is the case. In this namespace, there's only one address — 10.0.1.1 — the address of the DHCP server itself, and it is also included in br-int:
[heat-admin@overcloud-controller-0 ~]$ sudo ip netns exec qdhcp-67a3798c-32c0-4c18-8502-2531247e3cc2 ifconfig
lo: flags=73  mtu 65536
        inet 127.0.0.1  netmask 255.0.0.0
        inet6 ::1  prefixlen 128  scopeid 0x10
        loop  txqueuelen 1000  (Local Loopback)
        RX packets 1  bytes 28 (28.0 B)
        RX errors 0  dropped 0  overruns 0  frame 0
        TX packets 1  bytes 28 (28.0 B)
        TX errors 0  dropped 0 overruns 0  carrier 0  collisions 0

tapca25a97e-64: flags=4163  mtu 1450
        inet 10.0.1.1  netmask 255.255.255.0  broadcast 10.0.1.255
        inet6 fe80::f816:3eff:fee6:2c5c  prefixlen 64  scopeid 0x20
        ether fa:16:3e:e6:2c:5c  txqueuelen 1000  (Ethernet)
        RX packets 129  bytes 9372 (9.1 KiB)
        RX errors 0  dropped 0  overruns 0  frame 0
        TX packets 49  bytes 6154 (6.0 KiB)
        TX errors 0  dropped 0 overruns 0  carrier 0  collisions 0
Let's check for processes containing the name qdhcp-67a3798c-32c0-4c18-8502-2531247e3cc2 on the control node:
[heat-admin@overcloud-controller-0 ~]$ ps -aux | egrep qdhcp-7d541e74-1c36-4e1d-a7c4-0968c8dbc638
root      640420  0.0  0.0   4220   348 ?        Ss   11:31   0:00 dumb-init --single-child -- ip netns exec qdhcp-7d541e74-1c36-4e1d-a7c4-0968c8dbc638 /usr/sbin/dnsmasq -k --no-hosts --no-resolv --pid-file=/var/lib/neutron/dhcp/7d541e74-1c36-4e1d-a7c4-0968c8dbc638/pid --dhcp-hostsfile=/var/lib/neutron/dhcp/7d541e74-1c36-4e1d-a7c4-0968c8dbc638/host --addn-hosts=/var/lib/neutron/dhcp/7d541e74-1c36-4e1d-a7c4-0968c8dbc638/addn_hosts --dhcp-optsfile=/var/lib/neutron/dhcp/7d541e74-1c36-4e1d-a7c4-0968c8dbc638/opts --dhcp-leasefile=/var/lib/neutron/dhcp/7d541e74-1c36-4e1d-a7c4-0968c8dbc638/leases --dhcp-match=set:ipxe,175 --local-service --bind-dynamic --dhcp-range=set:subnet-335552dd-b35b-456b-9df0-5aac36a3ca13,10.0.2.0,static,255.255.255.0,86400s --dhcp-option-force=option:mtu,1450 --dhcp-lease-max=256 --conf-file= --domain=openstacklocal
heat-ad+  951620  0.0  0.0 112944   980 pts/0    S+   18:50   0:00 grep -E --color=auto qdhcp-7d541e74-1c36-4e1d-a7c4-0968c8dbc638
[heat-admin@overcloud-controller-0 ~]$
There is such a process and based on the information provided in the output above, we can check what we currently have leased:
[heat-admin@overcloud-controller-0 ~]$ cat /var/lib/neutron/dhcp/7d541e74-1c36-4e1d-a7c4-0968c8dbc638/leases
1597492111 fa:16:3e:6c:ad:9c 10.0.2.8 host-10-0-2-8 01:fa:16:3e:6c:ad:9c
1597491115 fa:16:3e:76:c2:11 10.0.2.1 host-10-0-2-1 *
[heat-admin@overcloud-controller-0 ~]$
As a result, we obtain the following set of services on the control node:
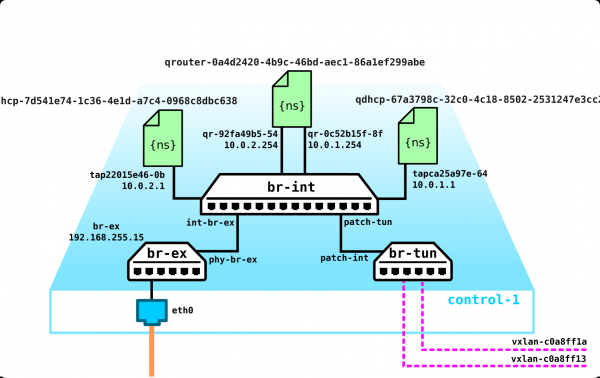
Keep in mind that this is just four machines, two internal networks, and one virtual router... We don’t have any external networks here right now, or a bunch of different projects, each with their own overlapping networks, and our distributed router is off. Finally, in the test environment, there was only one control node (for fault tolerance, there should be a quorum of three nodes). Logically, it is indeed more complex in commercial environments, but in this simple example, we understand how this should work—whether you have three or 300 namespaces is certainly important, but from the perspective of the entire structure, nothing drastically changes... that is, until you plug in some vendor-specific SDN. But that's a whole different story.
I hope you found it interesting. If you have any comments or additions, or if I have outright lied somewhere (I’m human and my opinion will always be subjective)—let me know what needs to be corrected or added—we'll fix/add everything.
In conclusion, I would like to say a few words about comparing OpenStack (both vanilla and vendor-specific) with VMware's cloud solution—I've been asked this question quite a bit over the last couple of years, and frankly, I’m tired of it, but still. In my opinion, these two solutions are very difficult to compare, but it can be said unequivocally that there are downsides to both solutions, and when choosing one, you must weigh all the pros and cons.
While OpenStack is a community-driven solution, VMware is entitled to do only what it wants (read—what benefits it) and that’s logical—because it is a commercial company that is used to making money from its clients. But there is one big catch—you can migrate from OpenStack, for example, managed by Nokia, and smoothly transition to a solution from Juniper (Contrail Cloud), but migrating from VMware is unlikely to be easy. To me, these two solutions look like this—vendor-specific OpenStack is a simple cage that you can exit anytime since you have the key. VMware is a golden cage, and the key from the cage is with the owner, and it will cost you a lot.
I am not advocating for either product — you choose what you need. However, if I had to make such a choice, I would select both solutions — VMWare for IT cloud (for light workloads, easy management), and OpenStack from some vendor (Nokia and Juniper provide quite decent turnkey solutions) — for telecom cloud. I wouldn't use Openstack for pure IT — it's like using a cannon to shoot sparrows, but I see no contraindications for using it, other than its redundancy. However, using VMWare in telecom is like hauling gravel in a Ford Raptor — it looks good, but the driver has to make ten trips instead of one.
In my opinion, the biggest drawback of VMWare is its complete opaqueness — the company won’t provide you with any information on how, for example, vSAN is arranged or what's in the hypervisor core — it’s simply not in their interest — meaning you will never become an expert in VMWare — without vendor support, you’re doomed (I often encounter VMWare experts who are stumped by basic questions). For me, VMWare is like buying a car with a locked hood — yes, maybe you have specialists who can change the timing belt, but only the one who sold you the solution can open the hood. Personally, I don't like solutions I can't tinker with. You might say that you may not need to look under the hood. That might be true, but I’ll watch you when you have to build a large function in the cloud from 20-30 virtual machines, 40-50 networks, half of which want to go outside, and the other half are asking for SR-IOV acceleration; otherwise, you'll need a few dozen more such machines — otherwise, the performance won't suffice.
There are other points of view, so it’s up to you to decide what to choose, and most importantly — you will be responsible for your choice later. This is just my opinion — from someone who has seen and touched at least 4 products — Nokia, Juniper, Red Hat, and VMWare. So I have something to compare against.
Source: habr.com
