


This article will be useful for those who are familiar with technology Check Point file emulation (Threat Emulation) and proactive file cleanup (Threat Extraction) and wants to take a step towards automating these tasks. Check Point has , which works both in the cloud and on local devices, and functionally, it is identical to checking files in web/smtp/ftp/smb/nfs traffic streams. This article is partly the author's interpretation of a set of articles from the official documentation, but built on my own operating experience and on my own examples. Also in the article you will find Postman author's collections for working with the Threat Prevention API.
Basic abbreviations
The Threat Prevention API works with three main components, which are called in the API through the following text values:
av - Anti-Virus component, responsible for signature analysis of known threats.
te - the Threat Emulation component, is responsible for checking files in the sandbox, and issuing a verdict of malicious (malicious) / clean (benign) after emulation.
extraction — the Threat Extraction component, which is responsible for quickly converting office documents into a safe form (in which all potentially malicious content is removed) in order to quickly deliver them to users/systems.
API structure and main restrictions
Threat Prevention API uses only 4 requests − upload, query, download and quota. In the header for all four requests, you need to pass the API key using the parameter Authorization. At first glance, the structure may seem much simpler than in , but the number of fields in the upload and query requests and the structure of these requests are quite complex. They can be functionally compared to Threat Prevention profiles in a gateway/sandbox security policy.
At the moment, the only version of the Threat Prevention API has been released - 1.0, the URL for API calls should indicate v1 in the part where you want to specify the version. Unlike the Management API, specifying the API version in the URL is mandatory, otherwise the request will fail.
The Anti-Virus component, when called without other components (te, extraction), currently only supports query queries with md5 hash sums. Threat Emulation and Threat Extraction also support sha1 and sha256 hash sums.
It is very important not to make mistakes in requests! The request can be executed without error, but not completely. Looking ahead a little, let's look at what can happen with errors / typos in queries.
Misspelled request with the word reports(reportss)
{ "request":  [

		{
			"sha256": {{sha256}},
			"features": ["te"] ,
			"te": {
				"images": [
                    {
                        "id": "10b4a9c6-e414-425c-ae8b-fe4dd7b25244",
                        "revision": 1
                    }
                ],
                reportss: ["tar", "pdf", "xml"]
            }
		}
	]
}
There will be no error in the response, but there will be no information about the reports at all
{
  "response": [
    {
      "status": {
        "code": 1001,
        "label": "FOUND",
        "message": "The request has been fully answered."
      },
      "sha256": "9cc488fa6209caeb201678f8360a6bb806bd2f85b59d108517ddbbf90baec33a",
      "file_type": "pdf",
      "file_name": "",
      "features": [
        "te"
      ],
      "te": {
        "trust": 10,
        "images": [
          {
            "report": {
              "verdict": "malicious"
            },
            "status": "found",
            "id": "10b4a9c6-e414-425c-ae8b-fe4dd7b25244",
            "revision": 1
          }
        ],
        "score": -2147483648,
        "combined_verdict": "malicious",
        "severity": 4,
        "confidence": 3,
        "status": {
          "code": 1001,
          "label": "FOUND",
          "message": "The request has been fully answered."
        }
      }
    }
  ]
}
But for a request without a typo in the reports key
{ "request":  [

		{
			"sha256": {{sha256}},
			"features": ["te"] ,
			"te": {
				"images": [
                    {
                        "id": "10b4a9c6-e414-425c-ae8b-fe4dd7b25244",
                        "revision": 1
                    }
                ],
                reports: ["tar", "pdf", "xml"]
            }
		}
	]
}
We receive a response that already contains the id for loading reports
{
  "response": [
    {
      "status": {
        "code": 1001,
        "label": "FOUND",
        "message": "The request has been fully answered."
      },
      "sha256": "9cc488fa6209caeb201678f8360a6bb806bd2f85b59d108517ddbbf90baec33a",
      "file_type": "pdf",
      "file_name": "",
      "features": [
        "te"
      ],
      "te": {
        "trust": 10,
        "images": [
          {
            "report": {
              "verdict": "malicious",
              "full_report": "b684066e-e41c-481a-a5b4-be43c27d8b65",
              "pdf_report": "e48f14f1-bcc7-4776-b04b-1a0a09335115",
              "xml_report": "d416d4a9-4b7c-4d6d-84b9-62545c588963"
            },
            "status": "found",
            "id": "10b4a9c6-e414-425c-ae8b-fe4dd7b25244",
            "revision": 1
          }
        ],
        "score": -2147483648,
        "combined_verdict": "malicious",
        "severity": 4,
        "confidence": 3,
        "status": {
          "code": 1001,
          "label": "FOUND",
          "message": "The request has been fully answered."
        }
      }
    }
  ]
}
If we send an incorrect/expired API key, we will get a 403 error in response.
SandBlast API: in the cloud and on local devices
API requests can be sent to Check Point devices that have Threat Emulation (blade) enabled. As an address for requests, you need to use the ip / url of the device and port 18194 (for example, https://10.10.57.19:18194/tecloud/api/v1/file/query). You should also make sure that the security policy on the device allows such a connection. Authorization via API key on local devices by default off and the Authorization key in the request headers can be omitted at all.
API requests to the CheckPoint cloud must be sent to the address www.te.checkpoint.com (for example, https://www.te.checkpoint.com/tecloud/api/v1/file/query). The API key can be obtained as a trial license for 60 days by contacting Check Point partners or the company's local office.
On local devices, Threat Extraction is not yet supported in the standard and should be used (we will talk about it in more detail at the end of the article).
Local devices do not support the quota request.
Otherwise, there are no differences between requests to local devices and to the cloud.
Calling the Upload API
The method used is POST
Calling address - https:///tecloud/api/v1/file/upload
The request consists of two parts (form-data): a file intended for emulation / cleaning and a request body with text.
The text request cannot be empty, but it may not contain any configuration. In order for the request to be successful, at least the following text must be sent in the request:
Required minimum for an upload request
HTTP POST
https:///tecloud/api/v1/file/upload
headers:
Authorization:
Bodysuit
{
request: {
}
}
File
File
In this case, the file will be processed according to the default parameters: component - te, OS images - Win XP and Win 7, without generating a report.
Comments on the main fields in the text query:
file_name и file_type can be left blank or not sent at all, as this is not very useful information when uploading a file. In the API response, these fields will be filled in automatically based on the name of the uploaded file, and the information in the cache will still have to be searched for by md5/sha1/sha256 hash sums.
Example request with empty file_name and file_type
{

"request": {

"file_name": "",

"file_type": "",

}

}
Features - a list that indicates the necessary functionality when processing in the sandbox - av (Anti-Virus), te (Threat Emulation), extraction (Threat Extraction). If this parameter is not passed at all, then only the default component will be used - te(Threat Emulation).
To enable validation in the three available components, you need to specify these components in the API request.
Sample request with validation in av, te and extraction
{ "request":  [

		{
			"sha256": {{sha256}},
			"features": ["av", "te", "extraction"]
		}
	]
}
Keys in section te
images — a list containing dictionaries with the id and revision number of the operating systems in which the check will be performed. The ID and revision numbers are the same for all local devices and the cloud.
List of operating systems and revisions
Available OS Image ID
Audit
Image OS and Application
e50e99f3-5963-4573-af9e-e3f4750b55e2
1
ecosystem Windows: XP - 32bit SP3
Office: 2003, 2007
Adobe Acrobat Reader: 9.0
Flash Player 9r115 and ActiveX 10.0
Java Runtime: 1.6.0u22
7e6fe36e-889e-4c25-8704-56378f0830df
1
ecosystem Windows: 7 - 32bit
Office: 2003, 2007
Adobe Acrobat Reader: 9.0
Flash Player: 10.2r152(Plugin& ActiveX)
Java Runtime: 1.6.0u0
8d188031-1010-4466-828b-0cd13d4303ff
1
ecosystem Windows: 7 - 32bit
Office: 2010
Adobe Acrobat Reader: 9.4
Flash Player: 11.0.1.152 (Plugin & ActiveX)
Java Runtime: 1.7.0u0
5e5de275-a103-4f67-b55b-47532918fa59
1
ecosystem Windows: 7 - 32bit
Office: 2013
Adobe Acrobat Reader: 11.0
Flash Player: 15 (Plugin & ActiveX)
Java Runtime: 1.7.0u9
3ff3ddae-e7fd-4969-818c-d5f1a2be336d
1
ecosystem Windows: 7 - 64bit
Office: 2013 (32bit)
Adobe Acrobat Reader: 11.0.01
Flash Player: 13 (Plugin & ActiveX)
Java Runtime: 1.7.0u9
6c453c9b-20f7-471a-956c-3198a868dc92
1
ecosystem Windows: 8.1 - 64bit
Office: 2013 (64bit)
Adobe Acrobat Reader: 11.0.10
Flash Player: 18.0.0.160 (Plugin & ActiveX)
Java Runtime: 1.7.0u9
10b4a9c6-e414-425c-ae8b-fe4dd7b25244
1
ecosystem Windows: 10
Office: Professional Plus 2016 en-us
Adobe Acrobat Reader: DC 2015 MUI
Flash Player: 20 (Plugin & ActiveX)
Java Runtime: 1.7.0u9
If the images key is not specified at all, then emulation will take place in the images recommended by Check Point (currently Win XP and Win 7). These images are recommended for the best balance of performance and catch rate.
reports - a list of reports that we request in case the file turns out to be malicious. The following options are available:
summary - .tar.gz archive containing a report on emulation by all requested images (both the html page and components such as a video from the emulator OS, a network traffic dump, a report in json, and the sample itself in a password-protected archive). In the answer we are looking for the key - summary_report to download the report later.
pdf - document on emulation in one image, which many people are used to getting through the Smart Console. In the answer we are looking for the key - pdf_report to download the report later.
xml - document on emulation in one image, convenient for subsequent parsing of parameters in the report. In the answer we are looking for the key - xml_report to download the report later.
tar - .tar.gz archive containing a report on emulation in one requested images (both the html page and components such as a video from the emulator OS, a network traffic dump, a report in json, and the sample itself in a password-protected archive). In the answer we are looking for the key - full_report to download the report later.
What's inside the summary report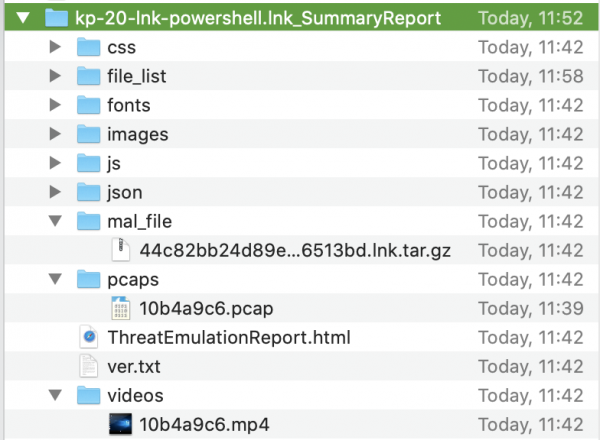
Keys full_report, pdf_report, xml_report are in the dictionary for each OS
{
  "response": [
    {
      "status": {
        "code": 1001,
        "label": "FOUND",
        "message": "The request has been fully answered."
      },
      "sha256": "9e6f07d03b37db0d3902bde4e239687a9e3d650e8c368188c7095750e24ad2d5",
      "file_type": "html",
      "file_name": "",
      "features": [
        "te"
      ],
      "te": {
        "trust": 10,
        "images": [
          {
            "report": {
              "verdict": "malicious",
              "full_report": "8d18067e-b24d-4103-8469-0117cd25eea9",
              "pdf_report": "05848b2a-4cfd-494d-b949-6cfe15d0dc0b",
              "xml_report": "ecb17c9d-8607-4904-af49-0970722dd5c8"
            },
            "status": "found",
            "id": "10b4a9c6-e414-425c-ae8b-fe4dd7b25244",
            "revision": 1
          },
          {
            "report": {
              "verdict": "malicious",
              "full_report": "d7c27012-8e0c-4c7e-8472-46cc895d9185",
              "pdf_report": "488e850c-7c96-4da9-9bc9-7195506afe03",
              "xml_report": "e5a3a78d-c8f0-4044-84c2-39dc80ddaea2"
            },
            "status": "found",
            "id": "6c453c9b-20f7-471a-956c-3198a868dc92",
            "revision": 1
          }
        ],
        "score": -2147483648,
        "combined_verdict": "malicious",
        "severity": 4,
        "confidence": 3,
        "status": {
          "code": 1001,
          "label": "FOUND",
          "message": "The request has been fully answered."
        }
      }
    }
  ]
}
And here is the summary_report key - there is one for emulation in general
{
  "response": [
    {
      "status": {
        "code": 1001,
        "label": "FOUND",
        "message": "The request has been fully answered."
      },
      "sha256": "d57eadb7b2f91eea66ea77a9e098d049c4ecebd5a4c70fb984688df08d1fa833",
      "file_type": "exe",
      "file_name": "",
      "features": [
        "te"
      ],
      "te": {
        "trust": 10,
        "images": [
          {
            "report": {
              "verdict": "malicious",
              "full_report": "c9a1767b-741e-49da-996f-7d632296cf9f",
              "xml_report": "cc4dbea9-518c-4e59-b6a3-4ea463ca384b"
            },
            "status": "found",
            "id": "10b4a9c6-e414-425c-ae8b-fe4dd7b25244",
            "revision": 1
          },
          {
            "report": {
              "verdict": "malicious",
              "full_report": "ba520713-8c0b-4672-a12f-0b4a1575b913",
              "xml_report": "87bdb8ca-dc44-449d-a9ab-2d95e7fe2503"
            },
            "status": "found",
            "id": "6c453c9b-20f7-471a-956c-3198a868dc92",
            "revision": 1
          }
        ],
        "score": -2147483648,
        "combined_verdict": "malicious",
        "severity": 4,
        "confidence": 3,
        "summary_report": "7e7db12d-5df6-4e14-85f3-2c1e29cd3e34",
        "status": {
          "code": 1001,
          "label": "FOUND",
          "message": "The request has been fully answered."
        }
      }
    }
  ]
}
You can request both tar and xml and pdf reports at the same time, you can also request summary and tar and xml reports. It will not work to request a summary report and pdf at the same time.
Keys in the extraction section
Only two keys are used for threat extraction:
method - pdf (convert to pdf, used by default) or clean (clear active content).
extracted_parts_codes - list of codes for deleting active content, applicable only for the clean method
Codes for removing content from files
Code
Description
1025
Linked Objects
1026
macros and codes
1034
Sensitive Hyperlinks
1137
PDF GoToR Actions
1139
PDF Launch Actions
1141
PDF URI Actions
1142
PDF Sound Actions
1143
PDF Movie Actions
1150
PDF JavaScript Actions
1151
PDF Submit Form Actions
1018
Database Queries
1019
Embedded Objects
1021
Fast Save Data
1017
Custom Properties
1036
Statistic Properties
1037
Summary Properties
To download a cleaned copy, you will also need to make a query request (which will be discussed later) after a few seconds, specifying the hash sum of the file and the extraction component in the request text. It will be possible to pick up the cleaned file using the id from the response to the query request - extracted_file_download_id. Once again, looking ahead a little, I give examples of a request and a query response to search for an id to download a cleaned document.
Query to find key extracted_file_download_id
{ "request":  [

		{
			"sha256": "9a346005ee8c9adb489072eb8b5b61699652962c17596de9c326ca68247a8876",
			"features": ["extraction"] ,
			"extraction": {
		        "method": "pdf"
            }
		}
	]
}
Response to a query (find the extracted_file_download_id key)
{
    "response": [
        {
            "status": {
                "code": 1001,
                "label": "FOUND",
                "message": "The request has been fully answered."
            },
            "sha256": "9a346005ee8c9adb489072eb8b5b61699652962c17596de9c326ca68247a8876",
            "file_type": "",
            "file_name": "",
            "features": [
                "extraction"
            ],
            "extraction": {
                "method": "pdf",
                "extract_result": "CP_EXTRACT_RESULT_SUCCESS",
                "extracted_file_download_id": "b5f2b34e-3603-4627-9e0e-54665a531ab2",
                "output_file_name": "kp-20-xls.cleaned.xls.pdf",
                "time": "0.013",
                "extract_content": "Macros and Code",
                "extraction_data": {
                    "input_extension": "xls",
                    "input_real_extension": "xls",
                    "message": "OK",
                    "output_file_name": "kp-20-xls.cleaned.xls.pdf",
                    "protection_name": "Potential malicious content extracted",
                    "protection_type": "Conversion to PDF",
                    "protocol_version": "1.0",
                    "risk": 5.0,
                    "scrub_activity": "Active content was found - XLS file was converted to PDF",
                    "scrub_method": "Convert to PDF",
                    "scrub_result": 0.0,
                    "scrub_time": "0.013",
                    "scrubbed_content": "Macros and Code"
                },
                "tex_product": false,
                "status": {
                    "code": 1001,
                    "label": "FOUND",
                    "message": "The request has been fully answered."
                }
            }
        }
    ]
}
Overview
In one API call, you can submit only one file for review.
The av component does not require an additional section with keys, it is enough to specify it in the dictionary Features.
Calling the Query API
The method used is POST
Calling address - https:///tecloud/api/v1/file/query
Before sending a file for upload (upload request), it is advisable to check the sandbox cache (query request) in order to optimize the load on the API server, since the API server may already have information and a verdict on the file being uploaded. The call consists only of the text part. The required part of the request is the sha1/sha256/md5 hash sum of the file. By the way, you can get it in response to the upload request.
Required minimum for a query
HTTP POST
https:///tecloud/api/v1/file/query
headers:
Authorization:
Bodysuit
{
request: {
"sha256":
}
}
An example response to an upload request showing sha1/md5/sha256 hash sums
{
  "response": {
    "status": {
      "code": 1002,
      "label": "UPLOAD_SUCCESS",
      "message": "The file was uploaded successfully."
    },
    "sha1": "954b5a851993d49ef8b2412b44f213153bfbdb32",
    "md5": "ac29b7c26e7dcf6c6fdb13ac0efe98ec",
    "sha256": "313c0feb009356495b7f4a60e96737120beb30e1912c6d866218cee830aebd90",
    "file_type": "",
    "file_name": "kp-20-doc.doc",
    "features": [
      "te"
    ],
    "te": {
      "trust": 0,
      "images": [
        {
          "report": {
            "verdict": "unknown"
          },
          "status": "not_found",
          "id": "10b4a9c6-e414-425c-ae8b-fe4dd7b25244",
          "revision": 1
        }
      ],
      "score": -2147483648,
      "status": {
        "code": 1002,
        "label": "UPLOAD_SUCCESS",
        "message": "The file was uploaded successfully."
      }
    }
  }
}
The query query, in addition to the hash sum, should ideally be the same as the upload query was (or is planned to be), or even "already" (to contain fewer fields in the query query than in the upload query). In the case where the query request contains more fields than the upload request, you will not receive all the required information in the response.
Here is an example of a response to a query request, where not all the required data was found
{
  "response": [
    {
      "status": {
        "code": 1006,
        "label": "PARTIALLY_FOUND",
        "message": "The request cannot be fully answered at this time."
      },
      "sha256": "313c0feb009356495b7f4a60e96737120beb30e1912c6d866218cee830aebd90",
      "file_type": "doc",
      "file_name": "",
      "features": [
        "te",
        "extraction"
      ],
      "te": {
        "trust": 10,
        "images": [
          {
            "report": {
              "verdict": "malicious",
              "pdf_report": "4e9cddaf-03a4-489f-aa03-3c18f8d57a52",
              "xml_report": "9c18018f-c761-4dea-9372-6a12fcb15170"
            },
            "status": "found",
            "id": "10b4a9c6-e414-425c-ae8b-fe4dd7b25244",
            "revision": 1
          }
        ],
        "score": -2147483648,
        "combined_verdict": "malicious",
        "severity": 4,
        "confidence": 1,
        "status": {
          "code": 1001,
          "label": "FOUND",
          "message": "The request has been fully answered."
        }
      },
      "extraction": {
        "method": "pdf",
        "tex_product": false,
        "status": {
          "code": 1004,
          "label": "NOT_FOUND",
          "message": "Could not find the requested file. Please upload it."
        }
      }
    }
  ]
}
Pay attention to the fields queues и label. These fields occur three times in the status dictionaries. First we see the global key "code": 1006 and "label": "PARTIALLY_FOUND". Further, these keys are found for each individual component that we requested - te and extraction. And if it is clear for te that the data is found, then there is no information for extraction.
This is what the query query looked like for the example above
{ "request":  [

		{
			"sha256": {{sha256}},
			"features": ["te", "extraction"] ,
			"te": {
				"images": [
                    {
                        "id": "10b4a9c6-e414-425c-ae8b-fe4dd7b25244",
                        "revision": 1
                    }
                ],
                "reports": [
                    "xml", "pdf"
                ]
            }
		}
	]
}
If you send a query without the extraction component
{ "request":  [

		{
			"sha256": {{sha256}},
			"features": ["te"] ,
			"te": {
				"images": [
                    {
                        "id": "10b4a9c6-e414-425c-ae8b-fe4dd7b25244",
                        "revision": 1
                    }
                ],
                "reports": [
                    "xml", "pdf"
                ]
            }
		}
	]
}
Then the answer will contain complete information ("code": 1001, "label": "FOUND")
{
  "response": [
    {
      "status": {
        "code": 1001,
        "label": "FOUND",
        "message": "The request has been fully answered."
      },
      "sha256": "313c0feb009356495b7f4a60e96737120beb30e1912c6d866218cee830aebd90",
      "file_type": "doc",
      "file_name": "",
      "features": [
        "te"
      ],
      "te": {
        "trust": 10,
        "images": [
          {
            "report": {
              "verdict": "malicious",
              "pdf_report": "4e9cddaf-03a4-489f-aa03-3c18f8d57a52",
              "xml_report": "9c18018f-c761-4dea-9372-6a12fcb15170"
            },
            "status": "found",
            "id": "10b4a9c6-e414-425c-ae8b-fe4dd7b25244",
            "revision": 1
          }
        ],
        "score": -2147483648,
        "combined_verdict": "malicious",
        "severity": 4,
        "confidence": 1,
        "status": {
          "code": 1001,
          "label": "FOUND",
          "message": "The request has been fully answered."
        }
      }
    }
  ]
}
If there is no information in the cache at all, then the response will be "label": "NOT_FOUND"
{
  "response": [
    {
      "status": {
        "code": 1004,
        "label": "NOT_FOUND",
        "message": "Could not find the requested file. Please upload it."
      },
      "sha256": "313c0feb009356495b7f4a60e96737120beb30e1912c6d866218cee830aebd91",
      "file_type": "",
      "file_name": "",
      "features": [
        "te"
      ],
      "te": {
        "trust": 0,
        "images": [
          {
            "report": {
              "verdict": "unknown"
            },
            "status": "not_found",
            "id": "10b4a9c6-e414-425c-ae8b-fe4dd7b25244",
            "revision": 1
          }
        ],
        "score": -2147483648,
        "status": {
          "code": 1004,
          "label": "NOT_FOUND",
          "message": "Could not find the requested file. Please upload it."
        }
      }
    }
  ]
}
In one API call, you can send several hash sums for verification at once. The response will return the data in the same order as it was sent in the request.
Example query query with multiple sha256 sums
{ "request":  [

		{
			"sha256": "b84531d3829bf6131655773a3863d6b16f6389b7f4036aef9b81c0cb60e7fd81"
        },
        		{
			"sha256": "b84531d3829bf6131655773a3863d6b16f6389b7f4036aef9b81c0cb60e7fd82"
        }
	]
}
Response to a query with multiple sha256 sums
{
  "response": [
    {
      "status": {
        "code": 1001,
        "label": "FOUND",
        "message": "The request has been fully answered."
      },
      "sha256": "b84531d3829bf6131655773a3863d6b16f6389b7f4036aef9b81c0cb60e7fd81",
      "file_type": "dll",
      "file_name": "",
      "features": [
        "te"
      ],
      "te": {
        "trust": 10,
        "images": [
          {
            "report": {
              "verdict": "malicious"
            },
            "status": "found",
            "id": "10b4a9c6-e414-425c-ae8b-fe4dd7b25244",
            "revision": 1
          }
        ],
        "score": -2147483648,
        "combined_verdict": "malicious",
        "severity": 4,
        "confidence": 3,
        "status": {
          "code": 1001,
          "label": "FOUND",
          "message": "The request has been fully answered."
        }
      }
    },
    {
      "status": {
        "code": 1004,
        "label": "NOT_FOUND",
        "message": "Could not find the requested file. Please upload it."
      },
      "sha256": "b84531d3829bf6131655773a3863d6b16f6389b7f4036aef9b81c0cb60e7fd82",
      "file_type": "",
      "file_name": "",
      "features": [
        "te"
      ],
      "te": {
        "trust": 0,
        "images": [
          {
            "report": {
              "verdict": "unknown"
            },
            "status": "not_found",
            "id": "10b4a9c6-e414-425c-ae8b-fe4dd7b25244",
            "revision": 1
          }
        ],
        "score": -2147483648,
        "status": {
          "code": 1004,
          "label": "NOT_FOUND",
          "message": "Could not find the requested file. Please upload it."
        }
      }
    }
  ]
}
Requesting several hash sums at once in a query request will also have a positive effect on the performance of the server API.
Call Download API
The method used is POST (according to documentation), GET also works (and might seem more logical)
Calling address - https:///tecloud/api/v1/file/download?id=
It is required to pass the API key in the header, the request body is empty, the download id is passed in the url address.
In response to a query request, if the emulation is completed and reports were requested when loading the file, the id for loading reports will be visible. If a cleaned copy is requested, then you should look for the id to download the cleaned document.
In total, the keys in the response to the query request containing the id value for loading can be:
summary_report
full_report
pdf_report
xml_report
extracted_file_download_id
Of course, in order for these keys to be received in the response to the query request, they must be specified in the request (for reports) or remember to make a request using the extraction function (for cleaned documents)
Calling Quota API
The method used is POST
Calling address - https:///tecloud/api/v1/file/quota
The quota query is used to check the remaining quota in the cloud. The request body is empty.
Sample response to a quota request
{
  "response": [
    {
      "remain_quota_hour": 1250,
      "remain_quota_month": 10000000,
      "assigned_quota_hour": 1250,
      "assigned_quota_month": 10000000,
      "hourly_quota_next_reset": "1599141600",
      "monthly_quota_next_reset": "1601510400",
      "quota_id": "TEST",
      "cloud_monthly_quota_period_start": "1421712300",
      "cloud_monthly_quota_usage_for_this_gw": 0,
      "cloud_hourly_quota_usage_for_this_gw": 0,
      "cloud_monthly_quota_usage_for_quota_id": 0,
      "cloud_hourly_quota_usage_for_quota_id": 0,
      "monthly_exceeded_quota": 0,
      "hourly_exceeded_quota": 0,
      "cloud_quota_max_allow_to_exceed_percentage": 1000,
      "pod_time_gmt": "1599138715",
      "quota_expiration": "0",
      "action": "ALLOW"
    }
  ]
}
Threat Prevention API for Security Gateway
This API predates the Threat Prevention API and is intended for local devices only. At the moment it can only be useful if you need the Threat Extraction API. For Threat Emulation, it's better to use the regular Threat Prevention API. To turn on TP API for SG and configure the API key you need to follow the steps from . I recommend paying attention to step 6b and checking the availability of the page https://<IPAddressofSecurityGateway>/UserCheck/TPAPI because in the case of a negative result, further configuration does not make sense. All API calls will be sent to this url. The call type (upload/query) is regulated in the key of the call body − request_name. Also required keys are - api_key (you need to remember it during the configuration process) and protocol_version (Currently the current version is 1.1). The official documentation for this API can be found at . The relative advantages include the ability to send several files for emulation at once when they are loaded, since the files are sent as a base64 text string. To encode/decode files to/from base64 you can use for demonstration purposes in Postman an online converter like − . For practical purposes, when writing code, you should use the built-in encode and decode methods.
Now let's take a closer look at the functions. te и extraction in this API.
For component te a dictionary is provided te_options in upload/query requests, and the keys in this request are exactly the same as the te keys in .
Sample request for file emulation in Win10 with reports
{
"request": [{
    "protocol_version": "1.1",
    "api_key": "<api_key>",
    "request_name": "UploadFile",
    "file_enc_data": "<base64_encoded_file>",
    "file_orig_name": "<filename>",
    "te_options": {
        "images": [
                {
                    "id": "10b4a9c6-e414-425c-ae8b-fe4dd7b25244",
                    "revision": 1
                }
            ],
        "reports": ["summary", "xml"]
    }
    }
    ]
}
For component extraction a dictionary is provided scrub_options. This request specifies the cleaning method: convert to PDF, clear active content, or select a mode in accordance with the Threat Prevention profile (specify the profile name). A distinctive feature of answering an API request with extraction for a file is that you get a cleaned copy in the response to this request as a base64 encrypted string (you do not need to make a query request and look up the id to download the document)
File cleanup request example
    {
	"request": [{
		"protocol_version": "1.1",
		"api_key": "<API_KEY>",
		"request_name": "UploadFile",
		"file_enc_data": "<base64_encoded_file>",
		"file_orig_name": "hi.txt",
		"scrub_options": {
			"scrub_method": 2
		}
	}]
}
Response to a request
{
	"response": [{
		"protocol_version": "1.1",
		"src_ip": "<IP_ADDRESS>",
		"scrub": {
			"file_enc_data": "<base64_encoded_converted_to_PDF_file>",
			"input_real_extension": "js",
			"message": "OK",
			"orig_file_url": "",
			"output_file_name": "hi.cleaned.pdf",
			"protection_name": "Extract potentially malicious content",
			"protection_type": "Conversion to PDF",
			"real_extension": "txt",
			"risk": 0,
			"scrub_activity": "TXT file was converted to PDF",
			"scrub_method": "Convert to PDF",
			"scrub_result": 0,
			"scrub_time": "0.011",
			"scrubbed_content": ""
		}
	}]
}
Although fewer API requests are required to get a cleaned copy, I find this option less preferable and convenient than the form-data request used in .
Collections
I created collections in Postman for both the Threat Prevention API and the Threat Prevention API for Security Gateway, which represent the most common API queries. In order for the ip / url of the API server and the key to be automatically substituted in requests, and the hash sum of sha256 to be remembered after the file is loaded, three variables are created inside the collections (you can find them by going to the Edit -> Variables collection settings): te_api (required), api_key (required except when using TP API with local devices), sha256 (leave blank, not used in TP API for SG).
Примеры использования
In the community scripts written in Python are presented that check files from the desired directory both through and a . Through interaction with the Threat Prevention API, your ability to check files is greatly expanded, since now you can check files on several platforms at once (checking in , and then in the Check Point sandbox), and receive files not only from network traffic, but also take them from any network drives and, for example, CRM systems.
Source: habr.com
