


Some examples of organizing corporate WiFi have already been described. Here, I will explain how I implemented a similar solution and the issues I faced when connecting different devices. We will use the existing LDAP with established users, set up FreeRadius, and configure WPA2-Enterprise on the Ubnt controller. It seems straightforward. Let's see…
A bit about EAP methods
Before starting the task, we need to determine which authentication method we will use in our solution.
From Wikipedia:
EAP is an authentication framework commonly used in wireless networks and point-to-point connections. The format was first described in RFC 3748 and updated in RFC 5247.
EAP is used to select the authentication method, transmit keys, and process these keys through modules called EAP methods. There are many EAP methods, both defined together with EAP and released by individual manufacturers. EAP does not specify the link layer; it only defines the message format. Each protocol using EAP has its own EAP message encapsulation protocol.
The methods themselves:
- LEAP is a proprietary protocol developed by CISCO. Vulnerabilities have been found. It is currently not recommended for use.
- EAP-TLS is well supported among wireless connection vendors. It is a secure protocol as it is the successor to SSL standards. Client configuration is quite complex. A client certificate is required in addition to a password. It is supported in many systems.
- EAP-TTLS is widely supported in many systems and offers good security by using PKI certificates only on the authentication server.
- EAP-MD5 is another open standard. It offers minimal security and is vulnerable; it does not support mutual authentication or key generation.
- EAP-IKEv2 is based on the Internet Key Exchange Protocol version 2. It provides mutual authentication and establishes a session key between the client and the server.
- PEAP is a joint solution from CISCO, Microsoft, and RSA Security as an open standard. It is widely available in products and provides very good security. It is similar to EAP-TTLS, requiring only a certificate on the server side.
- PEAPv0/EAP-MSCHAPv2 — after EAP-TLS, this is the second widely used standard in the world. It utilizes client-server interaction in Microsoft, Cisco, Apple, and Linux.
- PEAPv1/EAP-GTC — created by Cisco as an alternative to PEAPv0/EAP-MSCHAPv2. It does not protect authentication data in any case. Not supported in Windows OS.
- EAP-FAST — a method developed by Cisco to address the shortcomings of LEAP. It uses Protected Access Credential (PAC). Fully underdeveloped.
Among all this variety, the choice is still limited. The authentication method required good security, support on all devices (Windows 10, macOS, Linux, Android, iOS), and, essentially, the simpler, the better. Therefore, the choice fell on EAP-TTLS in conjunction with the PAP protocol.
A question may arise — Why use PAP? doesn’t it transmit passwords in clear text?
Yes, that’s right. Communication between FreeRadius and FreeIPA will proceed this way. In debug mode, you can track how the username and password are sent. And let them be sent, only you have access to the FreeRadius server.
You can read more about how EAP-TTLS works.
FreeRADIUS
We will set up FreeRadius on CentOS 7.6. There’s nothing complicated here, we’ll install it in the usual way.
yum install freeradius freeradius-utils freeradius-ldap -yVersion 3.0.13 is installed from the packages. You can get the latest version at
After this, FreeRadius will already be working. You can uncomment the line in /etc/raddb/users:
steve Cleartext-Password := "testing"Run the server in debug mode.
freeradius -XAnd let’s do a test connection from localhost.
radtest steve testing 127.0.0.1 1812 testing123We received the response. Received Access-Accept Id 115 from 127.0.0.1:1812 to 127.0.0.1:56081 length 20., so everything is good. Let's move on.
We connect the module. ldap.
ln -s /etc/raddb/mods-available/ldap /etc/raddb/mods-enabled/ldapAnd we will change it immediately. We need FreeRadius to be able to connect to FreeIPA.
mods-enabled/ldap
ldap {
server="ldap://ldap.server.com"
port=636
start_tls=yes
identity="uid=admin,cn=users,dc=server,dc=com"
password=**********
base_dn="cn=users,dc=server,dc=com"
set_auth_type=yes
...
user {
base_dn="${..base_dn}"
filter="(uid=%{%{Stripped-User-Name}:-%{User-Name}})"
}
...
We restart the radius server and check the synchronization of LDAP users:
radtest user_ldap password_ldap localhost 1812 testing123 We edit eap in mods-enabled/eap
Here we will add two instances of eap. They will differ only in certificates and keys. I will explain further down why it is done this way.
mods-enabled/eap
eap eap-client {                                                                                                                                                                                                                           default_eap_type = ttls                                                                                                                                                                                                                 timer_expire = 60                                                                                                                                                                                                                       ignore_unknown_eap_types = no                                                                                                                                                                                                          cisco_accounting_username_bug = no                                                                                                                                                                                                      max_sessions = ${max_requests}
           tls-config tls-common {
           private_key_file = ${certdir}/fisrt.key
           certificate_file = ${certdir}/first.crt
           dh_file = ${certdir}/dh
           ca_path = ${cadir}
           cipher_list = "HIGH"
           cipher_server_preference = no
           ecdh_curve = "prime256v1"
           check_crl = no
           }

           ttls {
           tls = tls-common
           default_eap_type = md5
           copy_request_to_tunnel = no
           use_tunneled_reply = yes
           virtual_server = "inner-tunnel"
           }
}
eap eap-guest {
default_eap_type = ttls                                                                                                                                                                                                                 timer_expire = 60                                                                                                                                                                                                                       ignore_unknown_eap_types = no                                                                                                                                                                                                          cisco_accounting_username_bug = no                                                                                                                                                                                                      max_sessions = ${max_requests}
           tls-config tls-common {
           private_key_passwotd=blablabla
           private_key_file = ${certdir}/server.key
           certificate_file = ${certdir}/server.crt
           dh_file = ${certdir}/dh
           ca_path = ${cadir}
           cipher_list = "HIGH"
           cipher_server_preference = no
           ecdh_curve = "prime256v1"
           check_crl = no
           }

           ttls {
           tls = tls-common
           default_eap_type = md5
           copy_request_to_tunnel = no
           use_tunneled_reply = yes
           virtual_server = "inner-tunnel"
           }
}
Next, we edit site-enabled/default. We are interested in the authorize and authenticate sections.
site-enabled/default
authorize {
  filter_username
  preprocess
  if (&User-Name == "guest") {
   eap-guest {
       ok = return
   }
  }
  elsif (&User-Name == "client") {
    eap-client {
       ok = return
    }
  }
  else {
    eap-guest {
       ok = return
    }
  }
  ldap
  if ((ok || updated) && User-Password) {
    update {
        control:Auth-Type := ldap
    }
  }
  expiration
  logintime
  pap
  }

authenticate {
  Auth-Type LDAP {
    ldap
  }
  Auth-Type eap-guest {
    eap-guest
  }
  Auth-Type eap-client {
    eap-client
  }
  pap
}
In the authorize section, we remove all unnecessary modules. We keep only ldap. We also add a client check using the username. This is why we added two instances of eap above.
Multi EAPThe thing is, when connecting certain devices, we will use system certificates and specify the domain. We have a certificate and key from a trusted certificate authority. Personally, I believe this connection procedure is easier than deploying self-signed certificates to each device. However, we cannot avoid self-signed certificates altogether. Samsung devices and Android versions <= 6 do not support using system certificates. Therefore, we create a separate instance of eap-guest with self-signed certificates for them. For all other devices, we will use eap-client with a trusted certificate. The User-Name is determined by the Anonymous field when connecting the device. Only 3 values are allowed: Guest, Client, and an empty field. All others are discarded. This is configured in the policies. I will provide an example a bit later.
We will edit the authorize and authenticate sections in site-enabled/inner-tunnel
site-enabled/inner-tunnel
authorize {
  filter_username
  filter_inner_identity
  update control {
   &Proxy-To-Realm := LOCAL
  }
  ldap
  if ((ok || updated) && User-Password) {
    update {
        control:Auth-Type := ldap
    }
  }
  expiration
  digest
  logintime
  pap
  }

authenticate {
  Auth-Type eap-guest {
    eap-guest
  }
  Auth-Type eap-client {
    eap-client
  }
  Auth-Type PAP {
    pap
  }
  ldap
}
Next, we need to specify in the policies which usernames can be used for anonymous login. We edit policy.d/filter.
We need to find lines resembling this:
if (&outer.request:User-Name !~ /^(anon|@)/) {
  update request {
    Module-Failure-Message = "User-Name is not anonymized"
  }
  reject
}
And below, in elsif, add the required values:
elsif (&outer.request:User-Name !~ /^(guest|client|@)/) {
  update request {
    Module-Failure-Message = "User-Name is not anonymized"
  }
  reject
}
Now we need to navigate to the directory certs. Here, we need to place the key and certificate from the trusted certificate authority that we already have, and we need to generate self-signed certificates for eap-guest.
Change parameters in the file ca.cnf.
ca.cnf
...
default_days = 3650
default_md = sha256
...
input_password = blablabla
output_password = blablabla
...
countryName = RU
stateOrProvinceNmae = State
localityNmae = City
organizationName = NONAME
emailAddress = admin@admin.ru
commonName = "CA FreeRadius"
We write the same values in the file server.cnf. We only change
commonName:
server.cnf
...
default_days = 3650
default_md = sha256
...
input_password = blablabla
output_password = blablabla
...
countryName = RU
stateOrProvinceNmae = State
localityNmae = City
organizationName = NONAME
emailAddress = admin@admin.ru
commonName = "Server Certificate FreeRadius"
Create:
makeDone. The obtained server.crt and server.key are already listed above in eap-guest.
And finally, we will add our access points to the file client.conf. I have 7 of them. To avoid adding each point separately, we will only specify the network they are in (my access points are in a separate VLAN).
client APs {
ipaddr = 192.168.100.0/24
password = password_AP
}
Ubiquiti controller
On the controller, we set up a separate network. Let's use 192.168.2.0/24
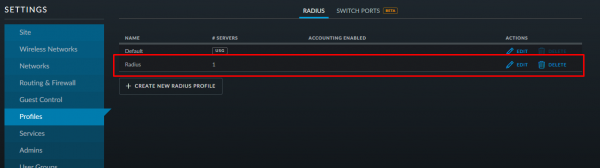
Go to settings -> profile. Create a new one:
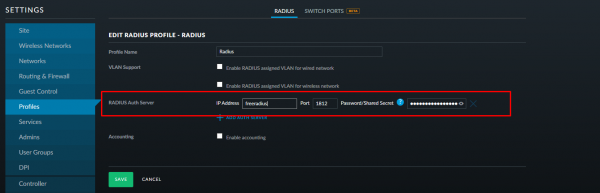
Specify the address and port of the radius server along with the password we set in the file clients.conf:
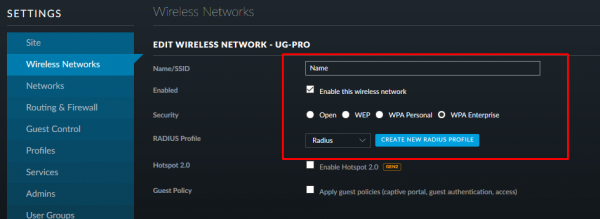
Create a new wireless network name. Select WPA-EAP (Enterprise) as the authentication method and specify the created radius profile:
Save everything, apply, and move on.
Client setup
Let’s start with the most challenging part!
Windows 10
The issue is that Windows still cannot connect to corporate WiFi using domain authentication. Therefore, we need to manually add our certificate to the trusted certificate store. You can use either a self-signed certificate or one from a certification center. I will use the latter.
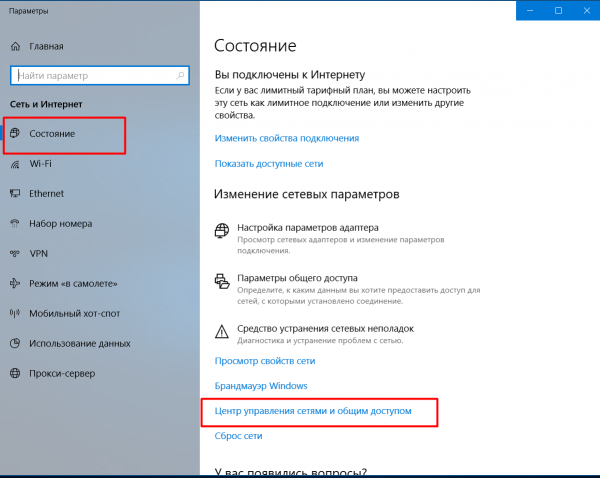
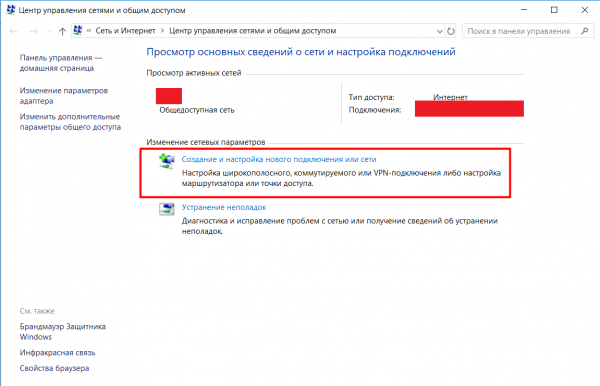
Next, you need to create a new connection. For this, go to Network & Internet settings -> Network and Sharing Center -> Set up a new connection or network:
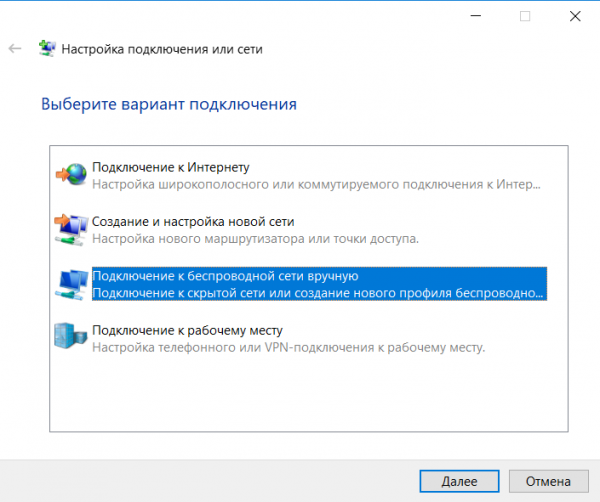
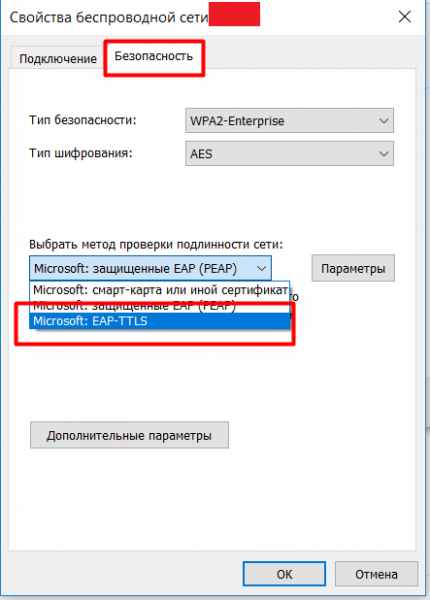
Manually specify the network name and change the security type. Then click on change connection settings and on the Security tab, select network authentication — EAP-TTLS.
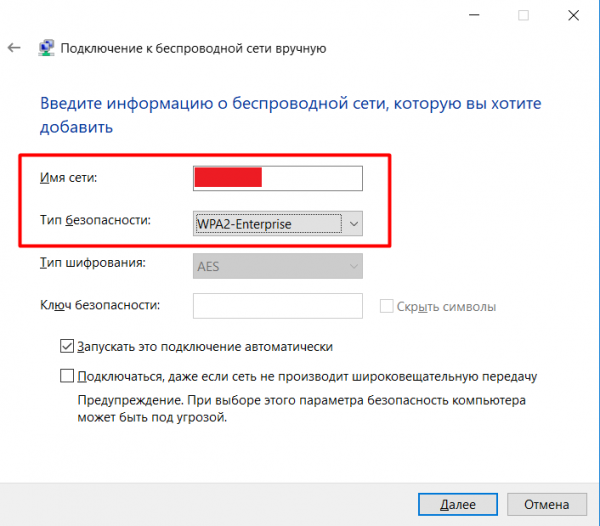
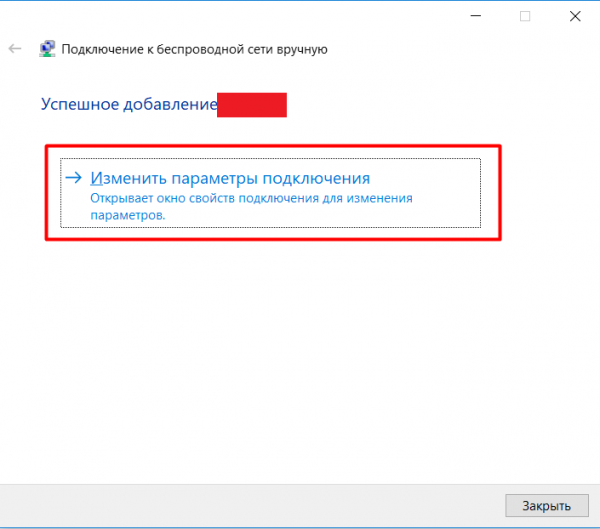
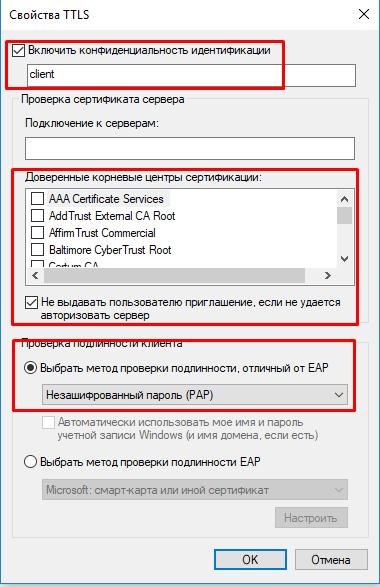
Go to settings, specify authentication privacy — client. Choose the added certificate as the trusted certificate authority, check the box "Do not prompt user if server authorization fails" and select the authentication method — unencrypted password (PAP).
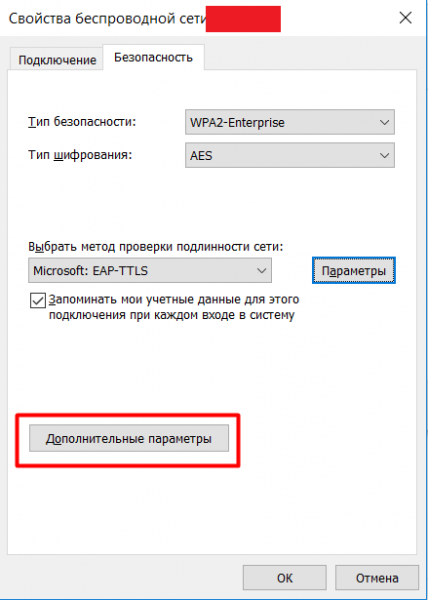
Next, go to the advanced settings, check the box for "Specify authentication mode." Select the option "User authentication" and click on save credentials. Here you will need to enter username_ldap and password_ldap
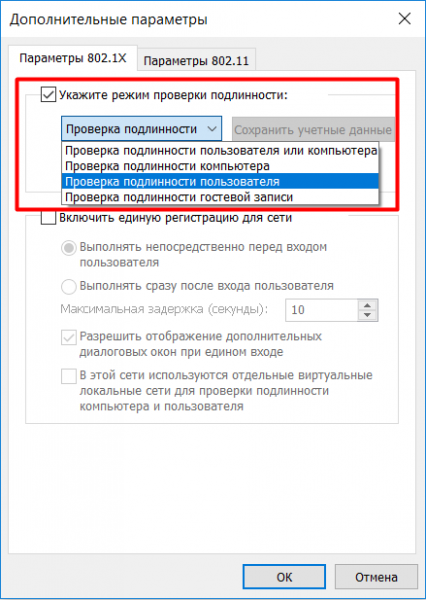
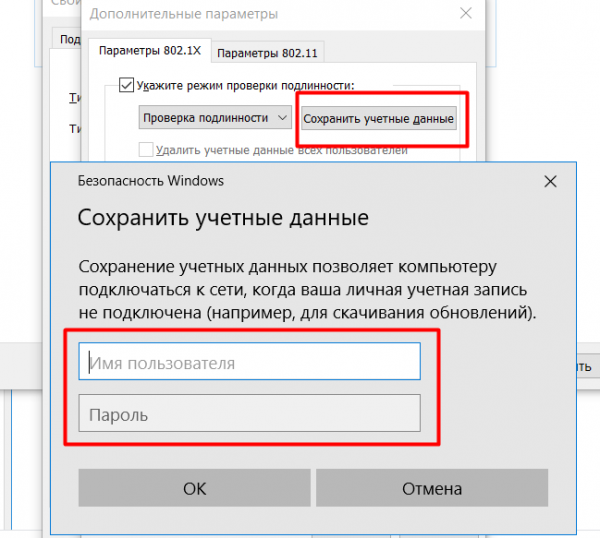
We save everything, apply, and close. You can now connect to the new network.
Linux
I tested it on Ubuntu 18.04, 18.10, Fedora 29, 30.
First, we need to download the certificate. I couldn't find out in Linux if there is an option to use system certificates and if there's even such a store.
We will connect via the domain. Therefore, we need a certificate from the certificate authority where our certificate was purchased.
The entire connection is done in one window. We choose our network:
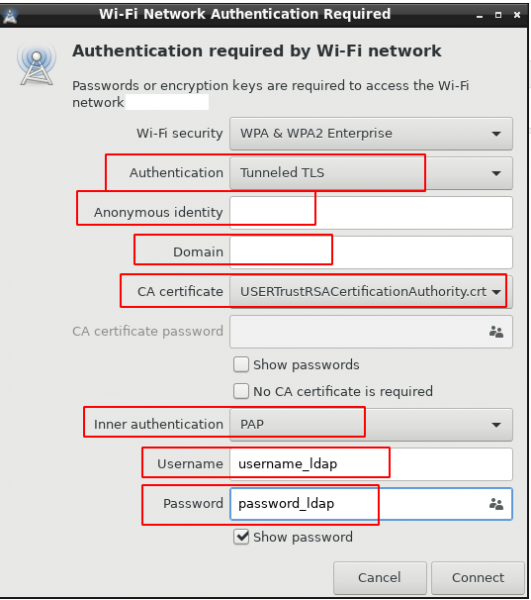
anonymous — client
domain — the domain for which the certificate was issued
Android
non-Samsung
Starting from version 7, when connecting to WiFi, you can use system certificates by specifying only the domain:
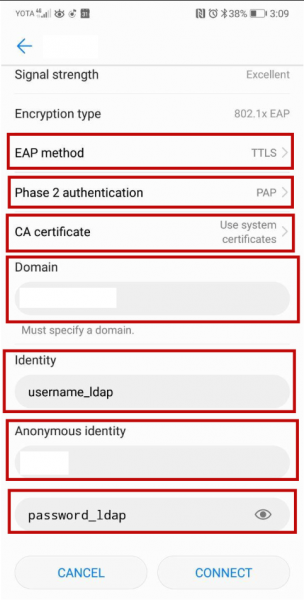
domain — the domain for which the certificate was issued
anonymous — client
Samsung
As mentioned above, Samsung devices cannot use system certificates when connecting to WiFi and do not have the option to connect via domain. Therefore, it is necessary to manually add the root certificate of the certificate authority (ca.pem, obtained from the Radius server). Here we will use a self-signed certificate.
Download the certificate to your device and install it.
Installing the certificate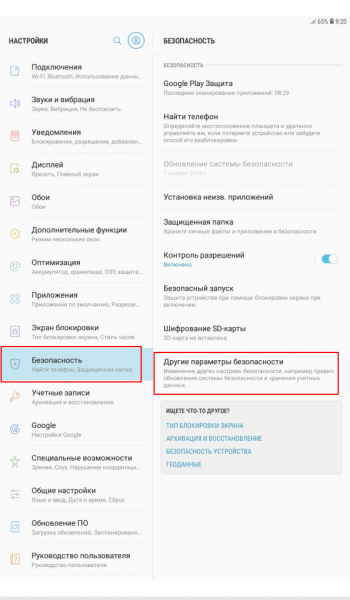
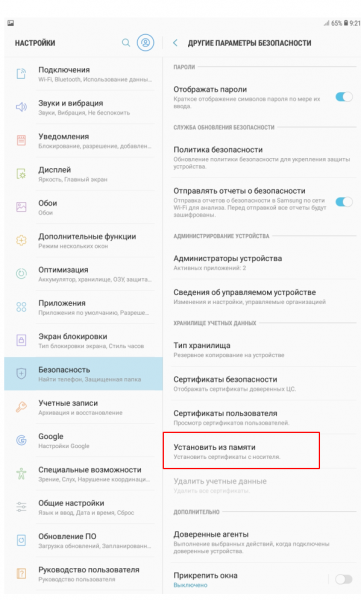
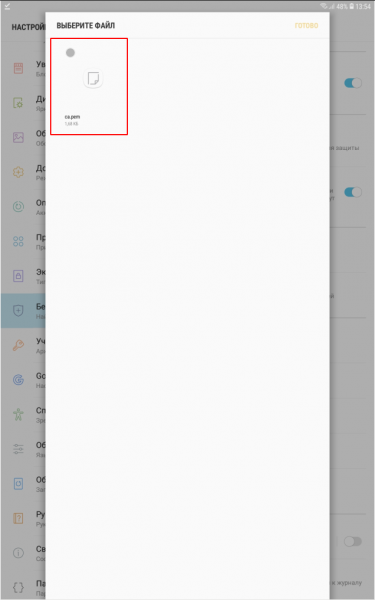
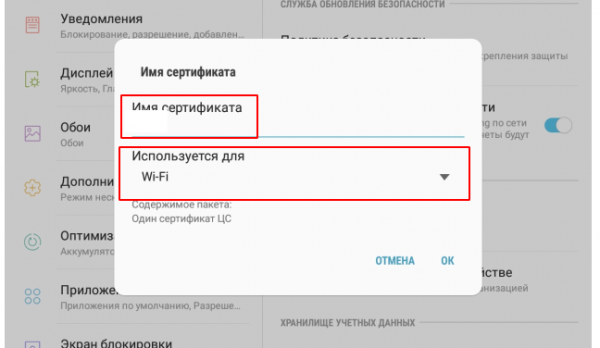
At this point, you will need to set a screen unlock pattern, PIN code, or password if it's not already set:
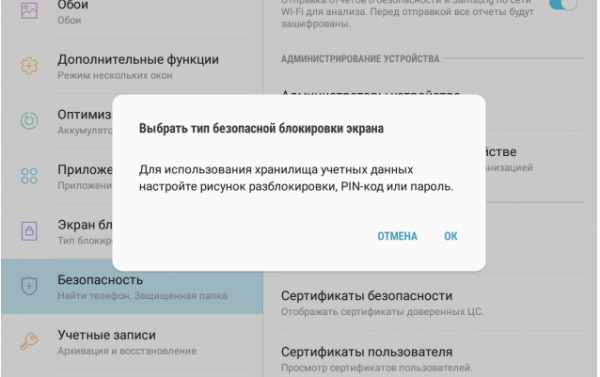

I showed the complex method of installing the certificate. On most devices, it is enough just to click on the downloaded certificate.
Once the certificate is installed, you can proceed to connect:
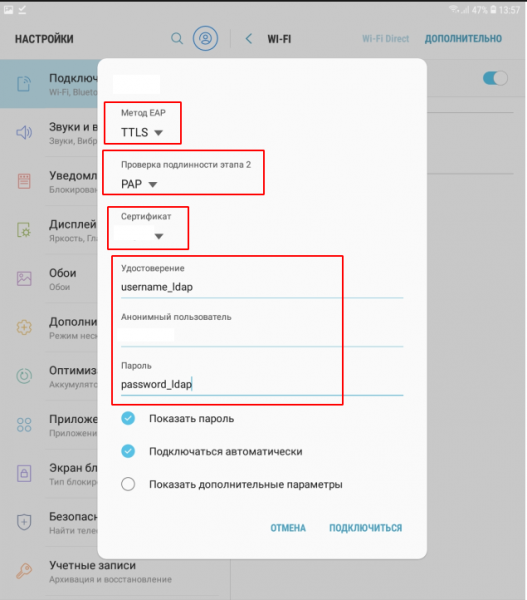
certificate — specify the one you installed
anonymous user — guest
macOS
Apple devices out of the box can only connect to EAP-TLS, but you still need to upload the certificate to them. To specify a different connection method, you need to use Apple Configurator 2. Accordingly, you first need to download it to a Mac, create a new profile, and add all the necessary WiFi settings.
Apple Configurator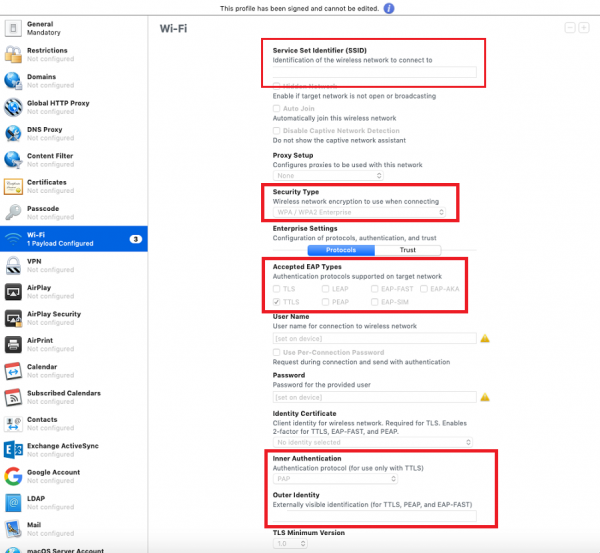
Here, specify your network name
Security Type — WPA2 Enterprise
Accepted EAP Types — TTLS
User Name and Password — leave empty
Inner Authentication — PAP
Outer Identity — client
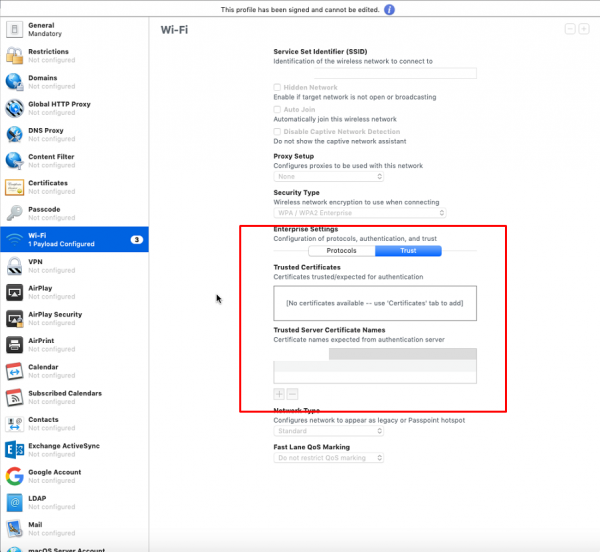
Trust tab. Here, specify our domain
All done. The profile can be saved, signed, and distributed to devices.
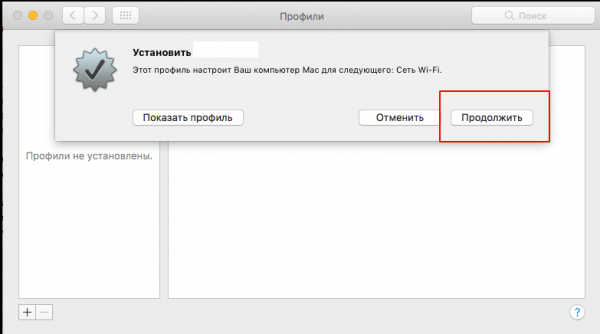
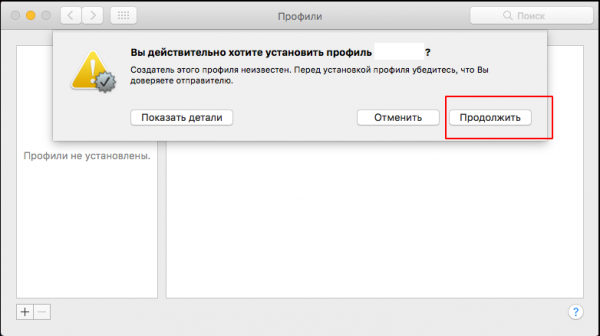
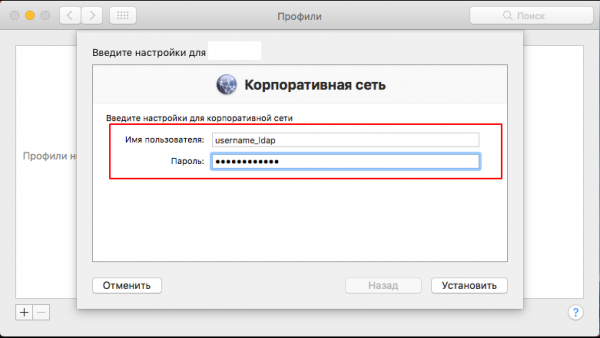
Once the profile is ready, it needs to be downloaded on the Mac and installed. During the installation process, you will need to provide the usernmae_ldap and password_ldap of the user:
iOS
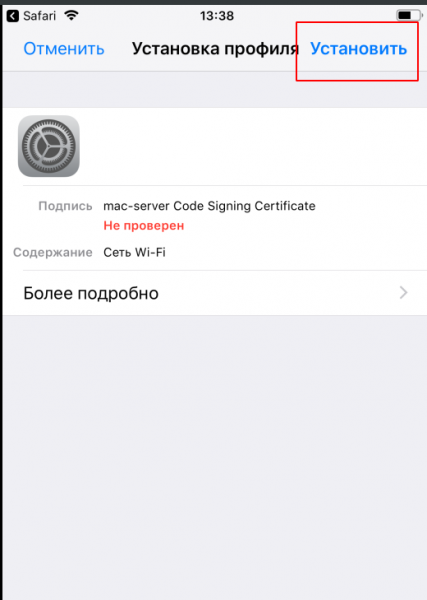
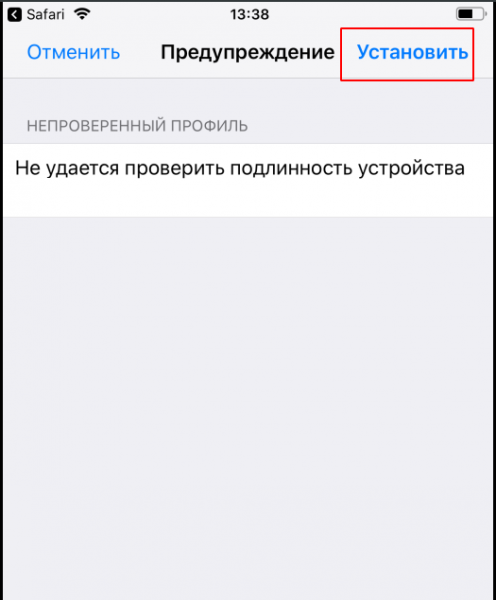
The process is similar to macOS. You need to use the profile (you can use the same one as for macOS. How to create a profile in Apple Configurator is shown above).
Download the profile, install it, enter the credentials, and connect:
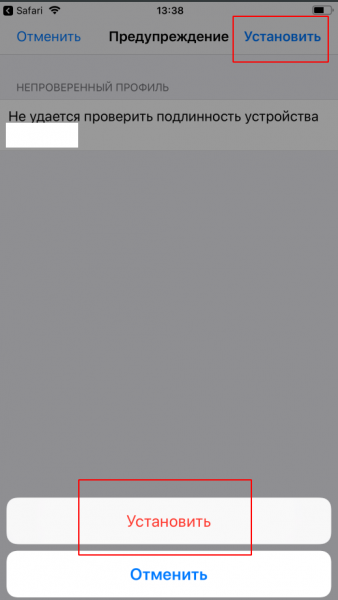
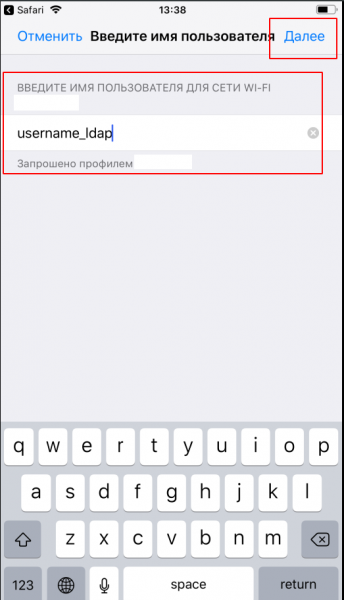
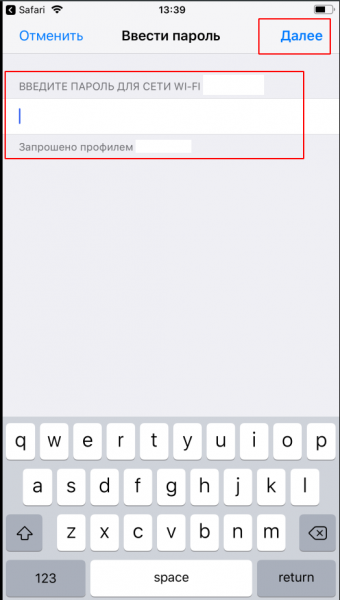
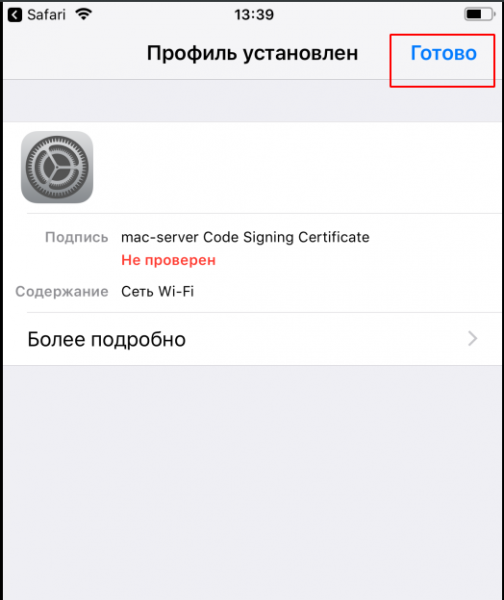
That's it. We have configured the Radius server, synchronized it with FreeIPA, and instructed Ubiquiti access points to use WPA2-EAP.
Possible questions
Q: how to transfer the profile/certificate to the employee?
A: I store all certificates/profiles on FTP accessible via the web. I set up a guest network with speed limits and internet access only, except for FTP.
Authentication lasts for 2 days, after which it resets and the client is left without internet. Thus, when an employee wants to connect to WiFi, they first connect to the guest network, access the FTP, download the necessary certificate or profile, install it, and then can connect to the corporate network.
Q: why not use the MSCHAPv2 scheme? isn't it safer?
A: Firstly, this scheme works well on NPS (Windows Network Policy System), but in our implementation, it requires additional LDAP (FreeIPA) configuration and storing password hashes on the server. Additional settings are undesirable as they can lead to various synchronization issues. Secondly, the hash is MD4, which does not significantly improve security.
Q: is it possible to authorize devices by MAC addresses?
A: NO, it is not secure; an attacker can spoof MAC addresses, and moreover, MAC address authorization is not supported on many devices.
Q: why use all these certificates at all? can one connect without them?
A: Certificates are used to authenticate the server. That is, when a device connects, it verifies whether this is a trustworthy server or not. If it is, the authentication continues; if not, the connection is closed. It is possible to connect without certificates, but if a malicious user or neighbor sets up a radius server and an access point with the same name as ours, they can easily intercept user credentials (remember that they are transmitted in plain text). When a certificate is used, the enemy will only see our fictitious User-Names — guest or client — and an error like — Unknown CA Certificate in their logs.
A bit more about macOSTypically, reinstalling the system on macOS is done via the internet. In recovery mode, you need to connect the Mac to WiFi, and neither our corporate WiFi nor the guest network will work here. Personally, I set up another network, a standard one with WPA2-PSK, hidden, specifically for technical operations. Alternatively, you can create a bootable USB drive with the system in advance. However, if the Mac is from 2015 or later, you will also need to find an adapter for that USB drive.)
Source: habr.com
