

We are considering extending the capabilities of System Center Configuration Manager (a product for managing IT infrastructure) for network booting user PCs using PXE. We create a boot menu based on PXELinux with System Center functionality and add antivirus scanning capabilities, diagnostic and recovery images. At the end of the article, we touch upon the specifics of using System Center 2012 Configuration Manager together with Windows Deployment Services (WDS) for PXE booting.
All actions are performed in a testing environment, which already has System Center 2012 Configuration Manager SP1 installed, a domain controller, and a number of test machines. It is assumed that SCCM is already deploying over the network using PXE.
Introduction
The testing environment consists of several virtual machines. All machines have the guest OS Microsoft Windows Server 2008 R2 (x64), network adapter E1000, SCSI Controller: LSI Logic SAS.
Name (Roles)
IP address / DNS name
Functionality
SCCM (System Center Configuration Manager)
192.168.57.102
sccm2012.test.local
System Center Configuration Manager 2012 SP1 is installed
DC (AD, DHCP, DNS)
192.168.57.10
dc1.test.local
Domain controller, DHCP server, and DNS server role
TEST (Test machine)
192.168.57.103
test.test.local
For testing
GW (Gateway)
192.168.57.1
Routing between networks. Gateway role
1. Add PXELinux to SCCM
Actions are performed on the machine where System Center Configuration Manager is installed
- Let's determine the directory where the WDS files for booting are located; for this, we check the registry for the value of the parameter
RootFolderin the branchHKEY_LOCAL_MACHINE\SYSTEM\CurrentControlSet\services\WDSServer\Providers\WDSTFTP
Default ValueC:\RemoteInstall
Files for booting from the SCCM deployment point are located in directoriessmsbootx86andsmsbootx64depending on the architecture.
First, configure the directory for 32-bit architecture, by defaultC:\RemoteInstall\smsbootx86 - Download the archive with the latest . Copy from syslinux-5.01.zip the
C:\RemoteInstall\smsbootx86following files:
memdisk, chain.c32, ldlinux.c32, libcom32.c32, libutil.c32, pxechn.c32, vesamenu.c32, pxelinux.0
Additional files are necessary to avoid such an error
- In
C:\RemoteInstall\smsbootx86renamepxelinux.0downward API support (simultaneously with this inpxelinux.com
In the folderC:\RemoteInstall\smsbootx86make a copy ofabortpxe.comand rename it toabortpxe.0
If we do not rename to the extension.0, then, for example, the instructionKernel abortpxe.comwill be executed with the error: Booting kernel failed: Bad file number
For PXELINUX, the file boot extension should be set according to the table.none or other Linux kernel image .0 PXE bootstrap program (NBP) [PXELINUX only] .bin "CD boot sector" [ISOLINUX only] .bs Boot sector [SYSLINUX only] .bss Boot sector, DOS superblock will be patched in [SYSLINUX only] .c32 COM32 image (32-bit COMBOOT) .cbt COMBOOT image (not runnable from DOS) .com COMBOOT image (runnable from DOS) .img Disk image [ISOLINUX only]Source: section "Kernel file"
- To avoid pressing the F12 key multiple times when booting SCCM via the menu, rename pxeboot.com to pxeboot.com.f12, and copy pxeboot.n12 to pxeboot.com
If this is not done, we will receive such a message each time we select
Note: Don't forget to rename these files in the x64 folder as well, because when it bootsx86wdsnbp.comfrom the x86 folder, the loader determines the CPU architecture and the next file is loaded from the corresponding architecture folder. Thus, for x64, the subsequent file will not bex86pxeboot.com, andx64pxeboot.com - Download/create , with a resolution of 640x480, copy it to the same folder. Create a folder
ISOwhere we will place the ISO images. Create a folderpxelinux.cfgfor the configs. - In the pxelinux.cfg folder, create a default file, in non-Unicode encoding, with the content
default (Click to display)# используем графическое меню DEFAULT vesamenu.c32 PROMPT 0 timeout 80 TOTALTIMEOUT 9000 MENU TITLE PXE Boot Menu (x86) MENU INCLUDE pxelinux.cfg/graphics.conf MENU AUTOBOOT Starting Local System in 8 seconds # Boot local HDD (default) LABEL bootlocal menu label Boot Local menu default localboot 0x80 # if it doesn't work #kernel chain.c32 #append hd0 # Вход в меню по паролю Qwerty, алгоритм MD5 label av menu label Antivirus and tools menu PASSWD $1$15opgKTx$dP/IaLNiCbfECiC2KPkDC0 kernel vesamenu.c32 append pxelinux.cfgav.conf label sccm menu label Start to SCCM COM32 pxechn.c32 APPEND sccm2012.test.local::smsbootx86wdsnbp.com -W label pxe64 menu label Start to x64 pxelinux COM32 pxechn.c32 APPEND sccm2012.test.local::smsbootx64pxelinux.com LABEL Abort MENU LABEL Exit KERNEL abortpxe.0In the folder
pxelinux.cfgcreate a filegraphics.confwith the content
graphics.conf (Click to display)MENU MARGIN 10 MENU ROWS 16 MENU TABMSGROW 21 MENU TIMEOUTROW 26 MENU COLOR BORDER 30;44 #00000000 #00000000 none MENU COLOR SCROLLBAR 30;44 #00000000 #00000000 none MENU COLOR TITLE 0 #ffffffff #00000000 none MENU COLOR SEL 30;47 #40000000 #20ffffff MENU BACKGROUND background.png NOESCAPE 0 ALLOWOPTIONS 0In the folder
pxelinux.cfgcreate a fileav.confwith the content
av.conf (Click to display)DEFAULT vesamenu.c32 PROMPT 0 MENU TITLE Antivirus and tools MENU INCLUDE pxelinux.cfg/graphics.conf label main menu menu label return to main menu kernel vesamenu.c32 append pxelinux.cfg/default label drweb menu label DrWeb kernel memdisk append iso raw initrd=isodrweb.iso label eset menu label Eset kernel memdisk append iso raw initrd=isoeset_sysrescue.iso label kav menu label KAV Rescue CD KERNEL kav/rescue APPEND initrd=kav/rescue.igz root=live rootfstype=auto vga=791 init=/init kav_lang=ru udev liveimg doscsi nomodeset quiet splash #Load ISO by full path, can load from another TFTP label winpe menu label WinPE from another TFTP kernel sccm2012.test.local::smsbootx86memdisk append iso raw initrd=sccm2012.test.local::smsbootx86isoWinPE_RaSla.iso label clonezilla menu label Clonezilla kernel memdisk append iso raw initrd=isoclonezilla.iso - As a result, the directory c:remoteinstallsmsbootx86 contains the structure
C:\RemoteInstall\smsbootx86
pxelinux.cfgchain.c32
ldlinux.c32
libcom32.c32
libutil.c32
pxechn.c32
vesamenu.c32
pxelinux.com
background.png
pxelinux.cfg
pxelinux.cfg
pxelinux.cfg
ISO
abortpxe.0
wdsnbp.com
bootmgfw.efi
wdsmgfw.efi
bootmgr.exe
pxeboot.n12
pxeboot.com
abortpxe.comdefault
av.conf
graphics.conf
*.iso - For x64 architecture, we similarly copy and create the same structure in the folder
c:remoteinstallsmsbootx64
Supplement
When using the commandmenu PASSWDthe password can be set either as it is or using a hashing algorithm, adding the corresponding signature at the beginning of the parameterAlgorithm
SignatureMD5
$1$SHA-1
$4$SHA-2-256
$5$SHA-2-512
$6$Thus, for the password
Qwertyand the MD5 algorithmmenu PASSWD $1$15opgKTx$dP/IaLNiCbfECiC2KPkDC0You can generate a password, for example, through an online hash generator , string
MD5(Unix)
2. Configuring PXELinux Boot
Now let's specify how to load pxelinux.com and obtain the menu.
Indicating the pxelinux.com bootloader through WDS functionality does not work in SCCM. Commands like
wdsutil /set-server /bootprogram:bootx86pxeboot.com /architecture:x86
are not processed. To ensure that boot images are not set, you can execute the command to display the WDS server configuration
wdsutil /get-server /show:images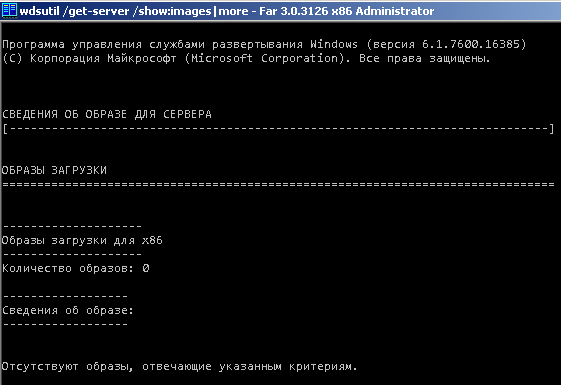
Thus, in SCCM 2012, it is not possible to specify your file for booting via PXE for the SMSPXE provider. Therefore, we will configure the active DHCP scope.
In the parameters of the active DHCP scope, we set the parameters as per the table
DHCP Option
Parameter Name
Value
066
Boot server host name
sccm2012.test.local
067
Bootfile name
smsbootx86pxelinux.com
006
DNS Servers
192.168.57.10
015
DNS Domain Name
test.local
In option 066, we specify the FQDN name of the SCCM server; in option 067, we specify the path to the x86 bootloader pxelinux.com starting from the root of TFTP; in option 006, we specify the IP address of the DNS server. If option 066 uses a short server name, in option 015 we specify the DNS domain suffix.
Supplement
More detailed DHCP configuration is described by . But in theDCoption 150, the IP address of the TFTP server was absent in the DHCP scope settings, and specifying option 150 via netsh did not work.
3. Checking Operation
The main settings are complete, and we can proceed to the check. We specify on the test computer in BIOS to boot from the network and load into the menu
We choose the item "Start to SCCM" and if the computer has been assigned a task sequence, the "Task Sequence Wizard" window will appear after some time asking for a password
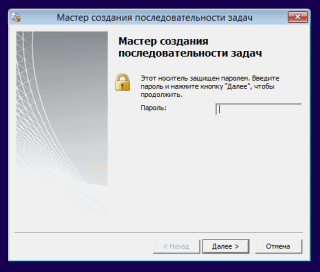
We reboot the machine, go back to the menu, and select in the menu "Antivirus and tools" and enter the password Qwerty
We select an arbitrary item and observe the loading of the ISO image into memory
We wait and observe the result
Check completed

4. Additional Settings and Features
Routing configuration
If the client, DHCP server, and the server containing the network bootloader are all in the same network segment, no additional configuration is necessary. However, if the client and DHCP server or WDS/SCCM server are in different network segments, it is recommended to configure the routers to forward broadcast packets from the client to the active DHCP server and the active WDS/SCCM server. In English-language literature, this process is referred to as 'IP Helper table updates.' In this case, after receiving an IP address, the client contacts the server containing the network bootloader directly using DHCP packets to download the network bootloader.
For Cisco routers, the command used is
ip helper-address {ip address}
where {ip address} the address of the DHCP server or WDS/SCCM server. When using this command, the following broadcast UDP packets are also forwarded
Port
Protocol
69
TFTP
53
Domain Name System (DNS)
37
Time service
137
NetBIOS Name Server
138
NetBIOS Datagram Server
67
Bootstrap Protocol (BOOTP)
49
TACACS
The second method for the client to obtain information about the network bootloader directly from the DHCP server is by specifying options 60, 66, 67 on the DHCP server. Using DHCP parameter 60 with the value "PXEClient" in all scopes of the DHCP, only if the DHCP server is hosted on the same server as the Windows deployment services. In this case, the client connects to the Windows deployment services server directly using the TFTP protocol over UDP port 4011, rather than via DHCP. Microsoft does not recommend this method due to load balancing issues, incorrect handling of DHCP parameters, and the deployment services response parameters on the client side. Additionally, because using only options 66 and 67 DHCP can bypass the parameters set on the network boot server.
It is also necessary to open the following UDP ports on the Windows deployment services server
port 67 (DHCP)
port 69 (TFTP)
port 4011 (PXE)
and port 68, if DHCP authorization is required on the server.
More details on the configuration process and nuances of redirection between different WDS servers are described below in the sources:
Network Boot Program Management
Server Management
Microsoft Product Support Services (PSS) support boundaries for network booting Microsoft Windows Preinstallation Environment (Windows PE) 2.0
How to forward UDP broadcast (BOOTP / DHCP) on Cisco
Features of DHCP operation and configuration on Cisco routers (Part 2)
Additional capabilities for local booting
In the test environment, the command
localboot 0 returns such an error

According to the syslinux documentation, when
localboot 0the boot will proceed from the local disk. When specifying the value 0x00, it will boot from the primary floppy disk, and when specifying 0x80, from the primary hard disk. Changing the command to
localboot 0x80 the local OS has booted.
If there is a need to boot from a specific disk, partition, or command localboot does not work, then you can use the capabilities of the module chain.c32. After it is loaded, use the append command to specify the specific disk or disk partition, with disk numbering starting from 0 and partition numbering starting from 1, as specifying partition 0 will load the MBR. When specifying the disk, the partition can be omitted.
KERNEL chain.c32
APPEND hd0 0
or
KERNEL chain.c32
APPEND hd0
Sources:
The order and description of loading files via PXE
As mentioned at the beginning of the article, the directory where the WDS files for booting are located is contained in the value of the parameter RootFolder in the registry branch HKEY_LOCAL_MACHINE\SYSTEM\CurrentControlSet\services\WDSServer\Providers\WDSTFTP
Default Value C:\RemoteInstall
Here, in the parameter ReadFilter the directories are specified where the TFTP server looks for boot files, starting from the root. When SCCM 2012 SP1 is installed, this parameter is as follows
boot*
tmp*
SMSBoot*
SMSTemp*
SMSImages*
If the parameter value is changed to * all files in the directory will be processed RemoteInstall.
The role of the deployment point in SCCM 2012 is specified in the registry parameter ProvidersOrder, located in the branch HKLMSystemCurrentControlSetWDSServerProvidersWDSPXE
Parameter ProvidersOrder can take the values
SMSPXE
the PXE service point in SCCM
SMS.PXE.Filter
PXE script handler from MDT (Microsoft Deployment Toolkit)
BINLSVC
Standard WDS and RIS handler
When SCCM is installed, the parameter ProvidersOrder has the value SMSPXE. By changing the parameter, the order of provider loading can be modified.
In the directory RemoteInstall the following standard files are located
wdsnbp.com
A network boot program developed for Windows deployment services that performs the following tasks:
1. Architecture detection.
2. Service for waiting computers. When the automatic add policy is enabled, this network boot program is sent to waiting computers to halt network booting and inform the server of the client computer's architecture.
3. Use of network boot references (including using options 66 and 67 of the DHCP protocol)
PXEboot.com
(By default) Requires the user to press the F12 key to continue network booting
PXEboot.n12
Does not require the user to press the F12 key and immediately starts network booting
AbortPXE.com
Boots the computer using the following boot item in the BIOS without waiting
Bootmgr.exe
Windows Boot Manager (Bootmgr.exe or Bootmgr.efi). Boots using firmware to load the Windows loader from a specified disk partition or through a network connection (in the case of network booting)
Bootmgfw.efi
Version EFI of the programs PXEboot.com and PXEboot.n12 (in EFI, the choice to boot or not to boot PXE is made in the EFI shell, not by the network boot program). The Bootmgfw.efi program combines the capabilities of PXEboot.com, PXEboot.n12, abortpxe.com, and bootmgr.exe. Currently, it exists only for x64 and Itanium architectures
Default.bcd
Boot Configuration Data (BCD) store, REGF format, can be loaded in REGEDIT, replaces the Boot.ini text file
Booting occurs in the following order according to the description above
1. wdsnbp.com is loaded.
2. Next, the corresponding architecture's pxeboot.com is loaded
3. PXEBoot.com loads bootmgr.exe and the Boot Configuration Data BCD store
4. Bootmgr.exe reads the operating system entries from the Boot Configuration Data BCD and loads the Boot.sdi file and Windows PE image (boot.wim)
5. Bootmgr.exe begins loading Windows PE, calling Winload.exe in the Windows PE image
If there are folders in RemoteInstall Boot Images Mgmt Templates Tmp WdsClientUnattend
their presence indicates that some configuration action was taken for Windows Deployment Services (WDS) before adding the distribution point role in SCCM 2012 (PXE service points in SCCM 2007), resulting in these folders being automatically created. For the distribution point role (PXE service points in SCCM 2007), only the following folders are necessary
SMSBoot SMSIMAGES SMSTemp Stores
This does not mean that SCCM is installed incorrectly, but it may indicate a potential source of errors.The resolution of various WDS, SCCM, and PXE linkage issues is discussed in detail in the article
Troubleshooting the PXE Service Point and WDS in Configuration Manager 2007
Summary
List of links to ISO images (Click to display)
download.f-secure.com/estore/rescue-cd-3.16-52606.iso
Thank you for your attention!

Source: habr.com
