


Hello, Habr! I present to your attention the translation of the article. author .
Today, we'll discuss how Docker utilizes disk space on the host machine and explore how to free up that space from remnants of unused images and containers.
Total Usage
Docker is an amazing technology, and few would disagree today. Just a few years ago, this product provided us with a completely new way to build, deliver, and run any environment, significantly saving CPU and RAM resources. Additionally (and for some, this may be the most important aspect), Docker has allowed us to incredibly simplify and standardize the management of the lifecycle of utilized workspaces.
However, all of these modern conveniences come at a cost. When we run containers, download or create our own images, or deploy complex ecosystems, we have to pay. And we pay, among other things, with disk space.
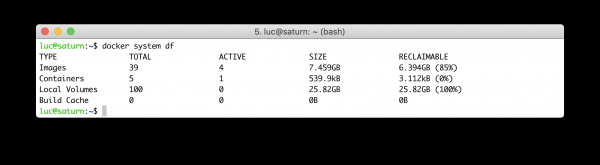
If you've never thought about how much space is actually occupied by Docker on your machine, you might be unpleasantly surprised by the output of this command:
$ docker system df 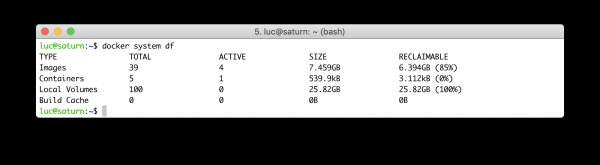
This command displays Docker's disk usage from various perspectives:
- images – the total size of images that have been downloaded from image repositories and built on your system;
- containers – the total disk space used by running containers (referring to the total size of the read-write layers of all containers);
- local volumes – the size of local storage mounted to containers;
- build cache – temporary files generated by the image build process (when using the BuildKit tool available since Docker version 18.09).
I bet that after this simple listing, you'll be eager to clean up your disk from garbage and reclaim those precious gigabytes (note: especially if you're paying rent for those gigabytes every month).
Container Disk Usage
Each time a container is created on the host machine, several files and directories are created in the /var/lib/docker directory, among which the following are worth noting:
- The directory /var/lib/docker/containers/ID_container is where the event logs are saved in JSON format when using the standard logging driver. Excessively detailed logs, as well as logs that no one reads or processes in any other way, often lead to disk overflow.
- The directory /var/lib/docker/overlay2 contains the read-write layers of the containers (overlay2 is the preferred driver in most Linux distributions). If a container saves data in its file system, it will be located in this directory.
Let's imagine a system with a pristine Docker installation that has never been involved in running containers or building images. Its disk usage report would look like this:
$ docker system df
TYPE           TOTAL      ACTIVE     SIZE       RECLAIMABLE
Images         0          0          0B         0B
Containers     0          0          0B         0B
Local Volumes  0          0          0B         0B
Build Cache    0          0          0B         0B
Now let's run a container, for example, NGINX:
$ docker container run --name www -d -p 8000:80 nginx:1.16What happens with the disk:
- images occupy 126 MB, that’s the very NGINX we launched in the container;
- containers take up a mere 2 bytes.
$ docker system df
TYPE           TOTAL      ACTIVE     SIZE       RECLAIMABLE
Images         1          1          126M       0B (0%)
Containers     1          1          2B         0B (0%)
Local Volumes  0          0          0B         0B
Build Cache    0          0          0B         0B
According to the output, we don’t have any space available for reclamation yet. Since 2 bytes is absurdly low, let’s imagine that our NGINX unexpectedly wrote 100 Megabytes of data somewhere and created a file test.img of exactly that size.
$ docker exec -ti www
  dd if=/dev/zero of=test.img bs=1024 count=0 seek=$[1024*100]
Let's investigate the disk space usage on the host again. We will see that the container occupies 100 Megabytes there.
$ docker system df
TYPE           TOTAL      ACTIVE     SIZE       RECLAIMABLE
Images         1          1          126M       0B (0%)
Containers     1          1          104.9MB    0B (0%)
Local Volumes  0          0          0B         0B
Build Cache    0          0          0B         0B
I think your curious mind is already wondering where our file test.img is located. Let's search for it:
$ find /var/lib/docker -type f -name test.img
/var/lib/docker/overlay2/83f177...630078/merged/test.img
/var/lib/docker/overlay2/83f177...630078/diff/test.img
Without going into details, it can be noted that the file test.img is conveniently located at the read-write level managed by the overlay2 driver. If we stop our container, the host will inform us that this space can, in principle, be freed.
# Stopping the www container
$ docker stop www

# Visualizing the impact on the disk usage
$ docker system df
TYPE           TOTAL      ACTIVE     SIZE       RECLAIMABLE
Images         1          1          126M       0B (0%)
Containers     1          0          104.9MB    104.9MB (100%)
Local Volumes  0          0          0B         0B
Build Cache    0          0          0B         0B
How can we do this? By deleting the container, which will lead to the cleanup of the corresponding read-write space.
With the following command, you can delete all installed containers at once and clean your disk of all files they created at the read-write level:
$ docker container prune
WARNING! This will remove all stopped containers.
Are you sure you want to continue? [y/N] y
Deleted Containers:
5e7f8e5097ace9ef5518ebf0c6fc2062ff024efb495f11ccc89df21ec9b4dcc2

Total reclaimed space: 104.9MB
So, we released 104.9 Megabytes by deleting the container. However, since we are no longer using the previously downloaded image, it also becomes a candidate for deletion and freeing up our resources:
$ docker system df
TYPE           TOTAL      ACTIVE     SIZE       RECLAIMABLE
Images         1          0          126M       126M (100%)
Containers     0          0          0B         0B
Local Volumes  0          0          0B         0B
Build Cache    0          0          0B         0B
Note: As long as the image is used by at least one container, you will not be able to use this trick.
The prune subcommand we used above only works on stopped containers. If we want to delete not only stopped but also running containers, we should use one of these commands:
# Historical command
$ docker rm -f $(docker ps –aq)

# More recent command
$ docker container rm -f $(docker container ls -aq)
Footnotes: if the —rm option is used when starting a container, all disk space taken up by it will be freed upon its stop.
Disk usage by images
A few years ago, an image size of several hundred megabytes was quite normal: the Ubuntu image weighed 600 Megabytes, while the Microsoft .Net image was several Gigabytes. In those early days, downloading just one image could severely impact your free disk space, even if you were sharing layers between images. Today, thankfully, images weigh much less, but even so, it is possible to quickly fill available resources if certain precautions are not taken.
There are several types of images that are not directly visible to the end user:
- Intermediate images, based on which other images are built – they cannot be removed if you are using containers based on these "other" images;
- Dangling images are those intermediate images that are not referenced by any running containers – they can be removed.
- With the following command, you can check for dangling images in your system:
$ docker image ls -f dangling=true
REPOSITORY  TAG      IMAGE ID         CREATED             SIZE
none      none   21e658fe5351     12 minutes ago      71.3MB
They can be removed in the following way:
$ docker image rm $(docker image ls -f dangling=true -q)We can also use the prune subcommand:
$ docker image prune
WARNING! This will remove all dangling images.
Are you sure you want to continue? [y/N] y
Deleted Images:
deleted: sha256:143407a3cb7efa6e95761b8cd6cea25e3f41455be6d5e7cda
deleted: sha256:738010bda9dd34896bac9bbc77b2d60addd7738ad1a95e5cc
deleted: sha256:fa4f0194a1eb829523ecf3bad04b4a7bdce089c8361e2c347
deleted: sha256:c5041938bcb46f78bf2f2a7f0a0df0eea74c4555097cc9197
deleted: sha256:5945bb6e12888cf320828e0fd00728947104da82e3eb4452f

Total reclaimed space: 12.9kB
If we suddenly want to remove all images (not just dangling) with one command, we can do it like this:
$ docker image rm $(docker image ls -q)Using disk volumes
Volumes are used to store data outside the container's file system. For example, if we want to save the output of some application for further use. A common example is databases.
Let's run a MongoDB container, mount an external volume to it, and restore a backup of the database from a file we have available (bck.json):
# Running a mongo container
$ docker run --name db -v $PWD:/tmp -p 27017:27017 -d mongo:4.0

# Importing an existing backup (from a huge bck.json file)
$ docker exec -ti db mongoimport
  --db 'test'
  --collection 'demo'
  --file /tmp/bck.json
  --jsonArray
The data will be located on the host machine in the directory /var/lib/docker/volumes. But why not at the read-write level of the container? Because in the Dockerfile of the MongoDB image, the /data/db directory (where MongoDB stores its data by default) is defined as a volume.
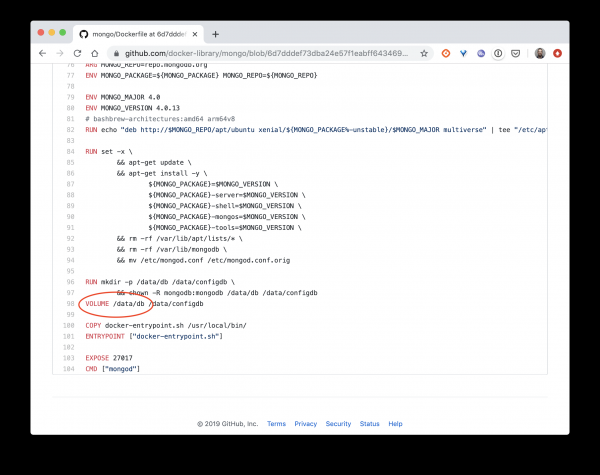
Side notes: many images that are supposed to create data use volumes to save that data.
When we are done playing with MongoDB and stop (or even remove) the container, the volume will not be deleted. It will continue to take up our precious disk space until we explicitly remove it with the following command:
$ docker volume rm $(docker volume ls -q)Or we can use the familiar prune subcommand:
$ docker volume prune
WARNING! This will remove all local volumes not used by at least one container.
Are you sure you want to continue? [y/N] y
Deleted Volumes:
d50b6402eb75d09ec17a5f57df4ed7b520c448429f70725fc5707334e5ded4d5
8f7a16e1cf117cdfddb6a38d1f4f02b18d21a485b49037e2670753fa34d115fc
599c3dd48d529b2e105eec38537cd16dac1ae6f899a123e2a62ffac6168b2f5f
...
732e610e435c24f6acae827cd340a60ce4132387cfc512452994bc0728dd66df
9a3f39cc8bd0f9ce54dea3421193f752bda4b8846841b6d36f8ee24358a85bae
045a9b534259ec6c0318cb162b7b4fca75b553d4e86fc93faafd0e7c77c79799
c6283fe9f8d2ca105d30ecaad31868410e809aba0909b3e60d68a26e92a094da

Total reclaimed space: 25.82GB
luc@saturn:~$
Disk usage for build cache images
In Docker 18.09, the image creation process underwent some changes thanks to BuildKit. This tool enhances the speed of the process, optimizes data storage management, and improves security. Here, we will not cover all the details of this wonderful tool; instead, we will focus on how it impacts disk space usage.
Let’s assume we have a very simple Node.js application:
- The file index.js starts a simple HTTP server that responds with a string to every received request:
- The file package.json defines dependencies, of which only expressjs is used to run the HTTP server:
$ cat index.js
var express = require('express');
var util    = require('util');
var app = express();
app.get('/', function(req, res) {
  res.setHeader('Content-Type', 'text/plain');
  res.end(util.format("%s - %s", new Date(), 'Got Request'));
});
app.listen(process.env.PORT || 80);
$ cat package.json
{
"name": "testnode",
"version": "0.0.1",
"main": "index.js",
"scripts": {
"start": "node index.js"
},
"dependencies": {
"express": "^4.14.0"
}
}The Dockerfile for building the image looks like this:
FROM node:13-alpine
COPY package.json /app/package.json
RUN cd /app && npm install
COPY . /app/
WORKDIR /app
EXPOSE 80
CMD ["npm", "start"]
Let’s build the image in the usual way, without using BuildKit:
$ docker build -t app:1.0 .If we check the disk space usage, we will see that only the base image (node:13-alpine) and the final image (app:1.0) are taking up space:
TYPE           TOTAL      ACTIVE     SIZE       RECLAIMABLE
Images         2          0          109.3MB    109.3MB (100%)
Containers     0          0          0B         0B
Local Volumes  0          0          0B         0B
Build Cache    0          0          0B         0B
Let’s build the second version of our application, now using BuildKit. For this, we just need to set the DOCKER_BUILDKIT variable to 1:
$ DOCKER_BUILDKIT=1 docker build -t app:2.0 .If we now check the disk usage, we will see that the build cache (build-cache) is now included:
$ docker system df
TYPE           TOTAL      ACTIVE     SIZE       RECLAIMABLE
Images         2          0          109.3MB    109.3MB (100%)
Containers     0          0          0B         0B
Local Volumes  0          0          0B         0B
Build Cache    11         0          8.949kB    8.949kB
To clean it up, use the following command:
$ docker builder prune
WARNING! This will remove all dangling build cache.
Are you sure you want to continue? [y/N] y
Deleted build cache objects:
rffq7b06h9t09xe584rn4f91e
ztexgsz949ci8mx8p5tzgdzhe
3z9jeoqbbmj3eftltawvkiayi

Total reclaimed space: 8.949kB
Clean it all!
So, we have covered cleaning up disk space occupied by containers, images, and volumes. This is aided by the prune subcommand. However, it can also be used at the docker system level, and it will clean up everything it can:
$ docker system prune
WARNING! This will remove:
  - all stopped containers
  - all networks not used by at least one container
  - all dangling images
  - all dangling build cache

Are you sure you want to continue? [y/N]
If, for some reason, you're saving disk space on a machine with Docker, it's a good habit to run this command periodically.
Source: habr.com
