


Today, we will discuss how to quickly and relatively easily deploy multiple virtual servers with different operating systems on a single physical server. This allows any systems administrator to centrally manage the entire IT infrastructure of the company and save a significant amount of resources. The use of virtualization helps to maximize abstraction from physical server hardware, protect critical services, and easily restore their operation even in the event of serious failures.
Without a doubt, most systems administrators are familiar with the techniques of working in a virtual environment, and this article will not be a revelation for them. Nevertheless, there are companies that do not utilize the flexibility and speed of virtual solutions due to a lack of precise information about them. We hope that our article will help illustrate that it is much simpler to start using virtualization once than to deal with the inconveniences and shortcomings of physical infrastructure.
Fortunately, trying out how virtualization works is quite simple. We will demonstrate how to create a server in a virtual environment, for example, to migrate a CRM system used in the company. Almost any physical server can be transformed into a virtual one, but first, it is necessary to master the basic working techniques. This is what we will discuss below.
How It Works
When it comes to virtualization, many beginners find it difficult to understand the terminology, so let’s clarify a few basic concepts:
- Hypervisor – specialized software that allows creating and managing virtual machines;
- Virtual machine (hereafter VM) – a system that represents a logical server within a physical one with its own set of characteristics, storage, and operating system;
- Virtualization Host — a physical server with a hypervisor running on it.
For a server to function as a full-fledged virtualization host, its processor must support one of two technologies – either Intel® VT or AMD-V™. Both technologies serve the crucial purpose of providing hardware resources of the server to virtual machines.
A key feature is that any actions of virtual machines are executed directly at the hardware level. They are isolated from each other, which makes it relatively easy to manage them separately. The hypervisor itself acts as a controlling entity, allocating resources, roles, and priorities among them. It also emulates the hardware components necessary for the proper functioning of the operating system.
The implementation of virtualization allows for multiple running copies of the same server. A critical failure or error during changes in such a copy will not affect the operation of the current service or application. This also addresses two main issues - scaling and the ability to maintain a 'zoo' of different operating systems on one piece of hardware. It’s an ideal opportunity to combine various services without the need to purchase separate hardware for each one.
Virtualization enhances the fault tolerance of services and deployed applications. Even if a physical server fails and needs to be replaced, the entire virtual infrastructure will remain fully operational, provided the disk storage is preserved. Additionally, the physical server can be of an entirely different manufacturer. This is particularly relevant for companies using servers that are no longer manufactured, requiring a transition to different models.
Now let's list the most popular hypervisors available today:
- VMware ESXi
- Microsoft Hyper-V
- Open Virtualization Alliance KVM
- Oracle VM VirtualBox
They are all quite versatile; however, each has specific features that should always be considered at the selection stage: the cost of deployment/maintenance and technical specifications. The cost of commercial licenses for VMware and Hyper-V is quite high, and resolving issues with these systems on your own can be very challenging.
KVM, on the other hand, is completely free and quite simple to use, especially as part of a ready-made solution based on Debian Linux called Proxmox Virtual Environment. This system is what we recommend for an initial introduction to the world of virtual infrastructure.
How to quickly deploy the Proxmox VE hypervisor
The installation usually raises no questions. We download the latest version of the image from the official website and write it to any external media using the utility Win32DiskImager (in Linux, the dd command is used), after which we boot the server directly from this media. Our clients renting dedicated servers can take advantage of two even simpler paths—by simply mounting the required image directly from the KVM console, or by using our PXE server..
The installation program has a graphical interface and will ask just a few questions.
- We select the disk where the installation will take place. In the section Options additional partitioning options can also be specified.

- We specify regional settings.

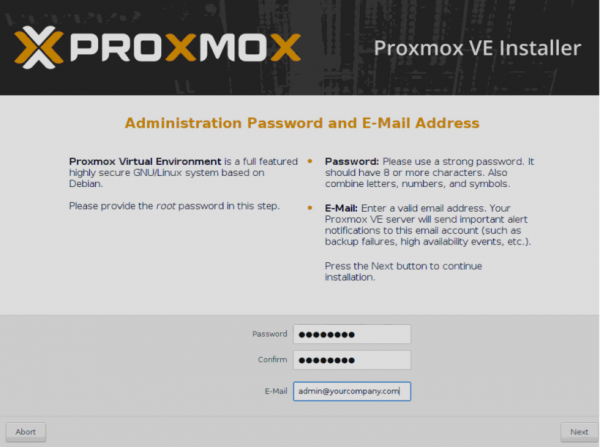
- We set the password that will be used for the root superuser authorization and the administrator's email address.
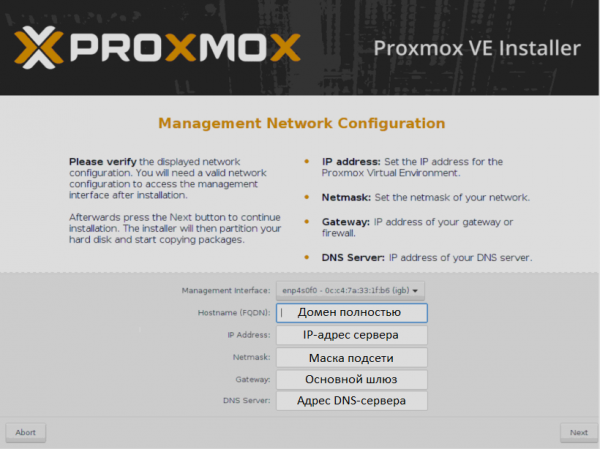
- We specify the network settings. FQDN stands for fully qualified domain name, for example, node01.yourcompany.com..

- After the installation is complete, the server can be rebooted using the Reboot button.
The management web interface will be available at the address
https://IP_address_of_the_server:8006



What to do after installation
There are several important things to do after installing Proxmox. We will discuss each of them in detail.
Update the system to the latest version.
To do this, we will access the console of our server and disable the paid repository (available only to those who purchased paid support). If this is not done, apt will report an error when updating the package sources.
- We open the console and edit the apt configuration file:
nano /etc/apt/sources.list.d/pve-enterprise.list - In this file, there will be only one line. We place the symbol #, before it to disable updates from the paid repository:
#deb https://enterprise.proxmox.com/debian/pve stretch pve-enterprise - By pressing the key combination Ctrl + X we exit the editor, answering Y to the system's question about saving the file.
- We execute the command to update the package sources and update the system:
apt update && apt -y upgrade
Ensure Security
We recommend installing the popular utility Fail2Ban, which protects against password guessing attacks (brute force). Its operation is based on the principle that if a malicious user exceeds a certain number of login attempts within a specified time with an incorrect username/password, their IP address will be blocked. The duration of the block and the number of attempts can be specified in the configuration file.
Based on practical experience, over a week of server operation with an open SSH port 22 and a static external IPv4 address, there were more than 5000 password guessing attempts. And about 1500 addresses were successfully blocked by the utility.
To perform the installation, here’s a brief guide:
- Open the server console through the web interface or SSH.
- Update package sources:
apt update - Install Fail2Ban:
apt install fail2ban - Open the utility's configuration for editing:
nano /etc/fail2ban/jail.conf - Modify the variables bantime (the number of seconds for which the malicious user will be blocked) and maxretry (the number of login/password input attempts) for each individual service.
- By pressing the key combination Ctrl + X we exit the editor, answering Y to the system's question about saving the file.
- Restart the service:
systemctl restart fail2ban
You can check the utility's operational status, for example, to get statistics on the bans of blocked IP addresses from which there were SSH password guessing attempts, with a simple command:
fail2ban-client -v status sshdThe utility's response will look something like this:
root@hypervisor:~# fail2ban-client -v status sshd
INFO   Loading configs for fail2ban under /etc/fail2ban
INFO     Loading files: ['/etc/fail2ban/fail2ban.conf']
INFO     Loading files: ['/etc/fail2ban/fail2ban.conf']
INFO   Using socket file /var/run/fail2ban/fail2ban.sock
Status for the jail: sshd
|- Filter
|  |- Currently failed: 3
|  |- Total failed:     4249
|  `- File list:        /var/log/auth.log
`- Actions
   |- Currently banned: 0
   |- Total banned:     410
   `- Banned IP list:
Similarly, you can protect the web interface from such attacks by creating the appropriate rule. An example of such a rule for Fail2Ban can be found in the official documentation..
Getting Started
It is important to note that Proxmox is ready to create new machines right after installation. However, we recommend making preliminary configurations for easier system management later. Experience shows that it's best to separate the hypervisor and virtual machines onto different physical devices. We will discuss how to do this below.
Configure storage devices.
The next step is to configure storage that can be used for saving virtual machine data and backups.
WARNING! The disk layout example below is for testing purposes only. For real-world use, we strongly recommend utilizing a software or hardware RAID array to prevent data loss in the event of a disk failure. We will explain how to properly prepare a disk array for operation and what to do in case of an emergency in one of the upcoming articles.
Let's assume that the physical server has two disks — /dev/sda, on which the hypervisor is installed, and an empty disk /dev/sdb, which is intended for storing virtual machine data. To allow the system to see the new storage, the easiest and most effective method is to mount it as a regular directory. However, some preparatory actions must be taken beforehand. As an example, let's see how to mount a new disk /dev/sdb, of any size, by formatting it in the file system ext4.
- We partition the disk by creating a new partition:
fdisk /dev/sdb - Press the key o or g (to partition the disk in MBR or GPT).
- Next, press the key n (to create a new partition).
- And finally w (to save the changes).
- We create the ext4 file system:
mkfs.ext4 /dev/sdb1 - We create a directory where we will mount the partition:
mkdir /mnt/storage - Open the configuration file for editing:
nano /etc/fstab - Add a new line there:
/dev/sdb1 /mnt/storage ext4 defaults 0 0 - After making changes, save them using the key combination Ctrl + X, responding Y to the editor's question.
- To check that everything is working, we send the server for a reboot:
shutdown -r now - After rebooting, we check the mounted partitions:
df -H
The command output should show that /dev/sdb1 is mounted in the directory /mnt/storage. This means our storage is ready for use.
Add new storage in Proxmox
Log in to the control panel and navigate to the sections Datacenter ➝ Storage ➝ Add ➝ Directory.
In the opened window, fill in the following fields:
- ID — name of the future storage;
- Directory — /mnt/storage;
- Contents — select all variables (by clicking on each one in turn).

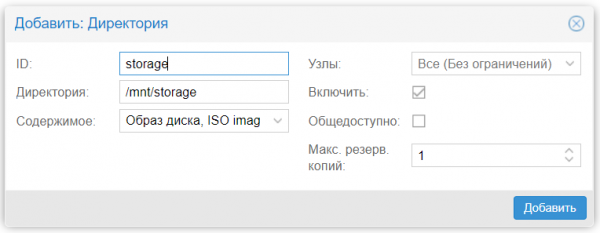
After this, click the button Add. This completes the setup.
Create a virtual machine
To create a virtual machine, we follow the steps below:
- Decide on the version of the operating system.
- Pre-download the ISO image.
- Select in the menu Storage the newly created storage.
- Click Contents ➝ Download.
- Choose the ISO image from the list and confirm the selection by clicking the button Download.
After the operation is completed, the image will be displayed in the list of available ones.
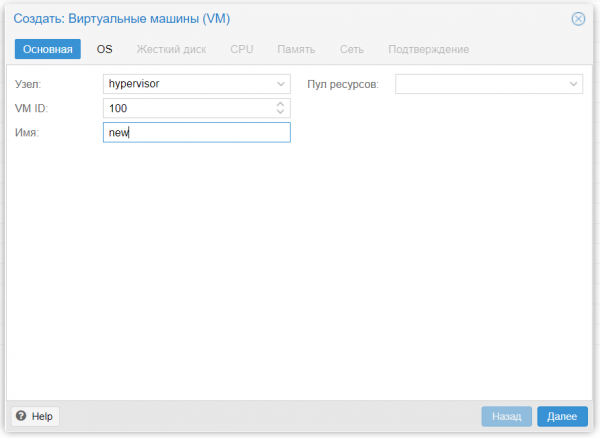
Let's create our first virtual machine:
- Click Create VM.
- Fill in the parameters sequentially: Name ➝ ISO-Image ➝ Size and type of hard disk ➝ Number of processors ➝ Amount of RAM ➝ Network adapter.
- After choosing all the desired parameters, click Finish. The created machine will be displayed in the control panel menu.
- Select it and click Start.
- Go to the section Console and install the operating system in exactly the same way as on a regular physical server.
If you need to create another machine, repeat the above operations. Once they are all ready, they can be operated simultaneously by opening several console windows.
Configure autostart
By default, Proxmox does not automatically start machines, but this can easily be resolved with just two clicks:
- Click on the name of the desired machine.
- Select the tab Options ➝ Start on boot.
- Check the box next to the corresponding label.
Now, in case of a reboot of the physical server, the VM will start automatically.
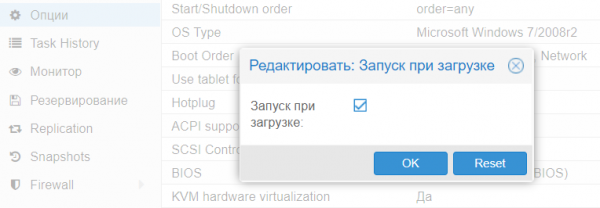
For advanced administrators, there is also the option to specify additional startup parameters in the section Start/Shutdown order. You can explicitly specify the order in which the machines should start. You can also set the time that should lapse before the next VM starts and the time delay for shutdown (if the operating system does not finish, the hypervisor will forcibly shut it down after a certain number of seconds).
Conclusion
This article outlined the basics of how to start working with Proxmox VE, and we hope it helps beginners take their first step and try virtualization in action.
Proxmox VE is indeed a very powerful and convenient tool for any system administrator; the main thing is not to be afraid to experiment and understand how it really works.
If you have any questions, feel free to leave them in the comments.
Source: habr.com
