


Currently, REST API has become the standard for web application development, allowing developers to break down their work into independent parts. For the UI, various popular frameworks such as Angular, React, Vue, and others are used today. Backend developers, on the other hand, can choose from a wide variety of languages and frameworks. Today, I would like to discuss a framework called . We at actively use it for internal projects. Using nest and the package , we will create a simple CRUD application.
Why NestJS
Recently, there have been quite a few backend frameworks in the JavaScript community. While they provide similar functionality to Nest, there is one area where Nest definitely excels — architecture. The following features of NestJS allow us to create industrial applications and scale development across larger teams:
- using TypeScript as the primary development language. Although NestJS supports JavaScript, some functionality may not work, especially when it comes to third-party packages;
- the presence of a DI container, which allows for loosely coupled components;
- the framework’s functionality is broken down into independent interchangeable components. For example, under the hood, the framework can use either and , and for working with databases, Nest provides bindings to , , ;
- NestJS is platform-independent and supports REST, GraphQL, Websockets, gRPC, etc.
The framework itself is inspired by the Angular frontend framework and shares many conceptual similarities with it.
Installing NestJS and deploying a project
Nest includes the package /cli, который позволяет быстро развернуть базовый каркас приложения. Установим глобально данный пакет:
npm install --global @nest/cliAfter installation, we will generate the basic structure of our application named nest-rest. This is done using the command nest new nest-rest.
nest new nest-rest
dmitrii@dmitrii-HP-ZBook-17-G3:~\/projects $ nest new nest-rest
  We will scaffold your app in a few seconds..

CREATE \/nest-rest\/.prettierrc (51 bytes)
CREATE \/nest-rest\/README.md (3370 bytes)
CREATE \/nest-rest\/nest-cli.json (84 bytes)
CREATE \/nest-rest\/nodemon-debug.json (163 bytes)
CREATE \/nest-rest\/nodemon.json (67 bytes)
CREATE \/nest-rest\/package.json (1805 bytes)
CREATE \/nest-rest\/tsconfig.build.json (97 bytes)
CREATE \/nest-rest\/tsconfig.json (325 bytes)
CREATE \/nest-rest\/tslint.json (426 bytes)
CREATE \/nest-rest\/src\/app.controller.spec.ts (617 bytes)
CREATE \/nest-rest\/src\/app.controller.ts (274 bytes)
CREATE \/nest-rest\/src\/app.module.ts (249 bytes)
CREATE \/nest-rest\/src\/app.service.ts (142 bytes)
CREATE \/nest-rest\/src\/main.ts (208 bytes)
CREATE \/nest-rest\/test\/app.e2e-spec.ts (561 bytes)
CREATE \/nest-rest\/test\/jest-e2e.json (183 bytes)

? Which package manager would you like to use? yarn
 Installation in progress...

  Successfully created project nest-rest
  Get started with the following commands:

$ cd nest-rest
$ yarn run start

                          Thanks for installing Nest
                 Please consider donating to our open collective
                        to help us maintain this package.

                 Donate: https:\/\/opencollective.com\/nest
We will choose yarn as the package manager.
At this moment, you can run the server with the command npm start and by navigating to the address you can see the main page. However, we are not here for that, and we will move on.
Setting up database connectivity
For this article, I chose PostgreSQL as the DBMS. There's no arguing about tastes; in my opinion, it's the most mature DBMS with all the necessary features. As mentioned, Nest provides integration with various packages for working with databases. Since I chose PostgreSQL, it makes sense to choose TypeORM as the ORM. Let's install the necessary packages for database integration:
yarn add typeorm @nestjs\/typeorm pg
In order, here's what each package is needed for:
- typeorm — the package with the ORM itself;
- @nestjs\/typeorm — TypeORM package for NestJS. It adds modules for importing into project modules, as well as a set of helper decorators;
- pg — a driver for working with PostgreSQL.
Okay, the packages are installed, now it's necessary to start the database itself. I will use a docker-compose.yml file with the following content for the database setup:
docker-compose.yml
version: '3.1'

services:
  db:
    image: postgres:11.2
    restart: always
    environment:
      POSTGRES_PASSWORD: example
    volumes:
      - ..\/db:\/var\/lib\/postgresql\/data
      - .\/postgresql.conf:\/etc\/postgresql\/postgresql.conf
    ports:
      - 5432:5432
  adminer:
    image: adminer
    restart: always
    ports:
      - 8080:8080
As you can see, this file configures the launch of 2 containers:
- db — this is the container with the database itself. In our case, PostgreSQL version 11.2 is used;
- adminer — a database manager. It provides a web interface for viewing and managing the database.
To work with TCP connections, I added a config with the following content.
postgresql.conf
# -----------------------------
# PostgreSQL configuration file
# -----------------------------
#
# This file consists of lines of the form:
#
# name = value
#
# (The "=" is optional.) Whitespace may be used. Comments are introduced with
# "#" anywhere on a line. The complete list of parameter names and allowed
# values can be found in the PostgreSQL documentation.
#
# The commented-out settings shown in this file represent the default values.
# Re-commenting a setting is NOT sufficient to revert it to the default value;
# you need to reload the server.
#
# This file is read on server startup and when the server receives a SIGHUP
# signal. If you edit the file on a running system, you have to SIGHUP the
# server for the changes to take effect, run "pg_ctl reload", or execute
# "SELECT pg_reload_conf()". Some parameters, which are marked below,
# require a server shutdown and restart to take effect.
#
# Any parameter can also be given as a command-line option to the server, e.g.,
# "postgres -c log_connections=on". Some parameters can be changed at run time
# with the "SET" SQL command.
#
# Memory units: kB = kilobytes Time units: ms = milliseconds
# MB = megabytes s = seconds
# GB = gigabytes min = minutes
# TB = terabytes h = hours
# d = days
#------------------------------------------------------------------------------
# FILE LOCATIONS
#------------------------------------------------------------------------------
# The default values of these variables are driven from the -D command-line
# option or PGDATA environment variable, represented here as ConfigDir.
#data_directory = 'ConfigDir' # use data in another directory
# (change requires restart)
#hba_file = 'ConfigDir/pg_hba.conf' # host-based authentication file
# (change requires restart)
#ident_file = 'ConfigDir/pg_ident.conf' # ident configuration file
# (change requires restart)
# If external_pid_file is not explicitly set, no extra PID file is written.
#external_pid_file = '' # write an extra PID file
# (change requires restart)
#------------------------------------------------------------------------------
# CONNECTIONS AND AUTHENTICATION
#------------------------------------------------------------------------------
# - Connection Settings -
listen_addresses = '*'
#listen_addresses = 'localhost' # what IP address(es) to listen on;
# comma-separated list of addresses;
# defaults to 'localhost'; use '*' for all
# (change requires restart)
#port = 5432 # (change requires restart)
#max_connections = 100 # (change requires restart)
#superuser_reserved_connections = 3 # (change requires restart)
#unix_socket_directories = '/tmp' # comma-separated list of directories
# (change requires restart)
#unix_socket_group = '' # (change requires restart)
#unix_socket_permissions = 0777 # begin with 0 to use octal notation
# (change requires restart)
#bonjour = off # advertise server via Bonjour
# (change requires restart)
#bonjour_name = '' # defaults to the computer name
# (change requires restart)
# - TCP Keepalives -
# see "man 7 tcp" for details
#tcp_keepalives_idle = 0 # TCP_KEEPIDLE, in seconds;
# 0 selects the system default
#tcp_keepalives_interval = 0 # TCP_KEEPINTVL, in seconds;
# 0 selects the system default
#tcp_keepalives_count = 0 # TCP_KEEPCNT;
# 0 selects the system default
# - Authentication -
#authentication_timeout = 1min # 1s-600s
#password_encryption = md5 # md5 or scram-sha-256
#db_user_namespace = off
# GSSAPI using Kerberos
#krb_server_keyfile = ''
#krb_caseins_users = off
# - SSL -
#ssl = off
#ssl_ca_file = ''
#ssl_cert_file = 'server.crt'
#ssl_crl_file = ''
#ssl_key_file = 'server.key'
#ssl_ciphers = 'HIGH:MEDIUM:+3DES:!aNULL' # allowed SSL ciphers
#ssl_prefer_server_ciphers = on
#ssl_ecdh_curve = 'prime256v1'
#ssl_min_protocol_version = 'TLSv1'
#ssl_max_protocol_version = ''
#ssl_dh_params_file = ''
#ssl_passphrase_command = ''
#ssl_passphrase_command_supports_reload = off
#------------------------------------------------------------------------------
# RESOURCE USAGE (except WAL)
#------------------------------------------------------------------------------
# - Memory -
#shared_buffers = 32MB # min 128kB
# (change requires restart)
#huge_pages = try # on, off, or try
# (change requires restart)
#temp_buffers = 8MB # min 800kB
#max_prepared_transactions = 0 # zero disables the feature
# (change requires restart)
# Caution: it is not advisable to set max_prepared_transactions nonzero unless
# you actively intend to use prepared transactions.
#work_mem = 4MB # min 64kB
#maintenance_work_mem = 64MB # min 1MB
#autovacuum_work_mem = -1 # min 1MB, or -1 to use maintenance_work_mem
#max_stack_depth = 2MB # min 100kB
#shared_memory_type = mmap # the default is the first option
# supported by the operating system:
# mmap
# sysv
# windows
# (change requires restart)
#dynamic_shared_memory_type = posix # the default is the first option
# supported by the operating system:
# posix
# sysv
# windows
# mmap
# (change requires restart)
# - Disk -
#temp_file_limit = -1 # limits per-process temp file space
# in kB, or -1 for no limit
# - Kernel Resources -
#max_files_per_process = 1000 # min 25
# (change requires restart)
# - Cost-Based Vacuum Delay -
#vacuum_cost_delay = 0 # 0-100 milliseconds (0 disables)
#vacuum_cost_page_hit = 1 # 0-10000 credits
#vacuum_cost_page_miss = 10 # 0-10000 credits
#vacuum_cost_page_dirty = 20 # 0-10000 credits
#vacuum_cost_limit = 200 # 1-10000 credits
# - Background Writer -
#bgwriter_delay = 200ms # 10-10000ms between rounds
#bgwriter_lru_maxpages = 100 # max buffers written/round, 0 disables
#bgwriter_lru_multiplier = 2.0 # 0-10.0 multiplier on buffers scanned/round
#bgwriter_flush_after = 0 # measured in pages, 0 disables
# - Asynchronous Behavior -
#effective_io_concurrency = 1 # 1-1000; 0 disables prefetching
#max_worker_processes = 8 # (change requires restart)
#max_parallel_maintenance_workers = 2 # taken from max_parallel_workers
#max_parallel_workers_per_gather = 2 # taken from max_parallel_workers
#parallel_leader_participation = on
#max_parallel_workers = 8 # maximum number of max_worker_processes that
# can be used in parallel operations
#old_snapshot_threshold = -1 # 1min-60d; -1 disables; 0 is immediate
# (change requires restart)
#backend_flush_after = 0 # measured in pages, 0 disables
#------------------------------------------------------------------------------
# WRITE-AHEAD LOG
#------------------------------------------------------------------------------
# - Settings -
#wal_level = replica # minimal, replica, or logical
# (change requires restart)
#fsync = on # flush data to disk for crash safety
# (turning this off can cause
# unrecoverable data corruption)
#synchronous_commit = on # synchronization level;
# off, local, remote_write, remote_apply, or on
#wal_sync_method = fsync # the default is the first option
# supported by the operating system:
# open_datasync
# fdatasync (default on Linux)
# fsync
# fsync_writethrough
# open_sync
#full_page_writes = on # recover from partial page writes
#wal_compression = off # enable compression of full-page writes
#wal_log_hints = off # also do full page writes of non-critical updates
# (change requires restart)
#wal_buffers = -1 # min 32kB, -1 sets based on shared_buffers
# (change requires restart)
#wal_writer_delay = 200ms # 1-10000 milliseconds
#wal_writer_flush_after = 1MB # measured in pages, 0 disables
#commit_delay = 0 # range 0-100000, in microseconds
#commit_siblings = 5 # range 1-1000
# - Checkpoints -
#checkpoint_timeout = 5min # range 30s-1d
#max_wal_size = 1GB
#min_wal_size = 80MB
#checkpoint_completion_target = 0.5 # checkpoint target duration, 0.0 - 1.0
#checkpoint_flush_after = 0 # measured in pages, 0 disables
#checkpoint_warning = 30s # 0 disables
# - Archiving -
#archive_mode = off # enables archiving; off, on, or always
# (change requires restart)
#archive_command = '' # command to use to archive a logfile segment
# placeholders: %p = path of file to archive
# %f = file name only
# e.g. 'test ! -f /mnt/server/archivedir/%f && cp %p /mnt/server/archivedir/%f'
#archive_timeout = 0 # force a logfile segment switch after this
# number of seconds; 0 disables
# - Archive Recovery -
# These are only used in recovery mode.
#restore_command = '' # command to use to restore an archived logfile segment
# placeholders: %p = path of file to restore
# %f = file name only
# e.g. 'cp /mnt/server/archivedir/%f %p'
# (change requires restart)
#archive_cleanup_command = '' # command to execute at every restartpoint
#recovery_end_command = '' # command to execute at completion of recovery
# - Recovery Target -
# Set these only when performing a targeted recovery.
#recovery_target = '' # 'immediate' to end recovery as soon as a
# consistent state is reached
# (change requires restart)
#recovery_target_name = '' # the named restore point to which recovery will proceed
# (change requires restart)
#recovery_target_time = '' # the time stamp up to which recovery will proceed
# (change requires restart)
#recovery_target_xid = '' # the transaction ID up to which recovery will proceed
# (change requires restart)
#recovery_target_lsn = '' # the WAL LSN up to which recovery will proceed
# (change requires restart)
#recovery_target_inclusive = on # Specifies whether to stop:
# just after the specified recovery target (on)
# just before the recovery target (off)
# (change requires restart)
#recovery_target_timeline = 'latest' # 'current', 'latest', or timeline ID
# (change requires restart)
#recovery_target_action = 'pause' # 'pause', 'promote', 'shutdown'
# (change requires restart)
#------------------------------------------------------------------------------
# REPLICATION
#------------------------------------------------------------------------------
# - Sending Servers -
# Set these on the master and on any standby that will send replication data.
#max_wal_senders = 10 # max number of walsender processes
# (change requires restart)
#wal_keep_segments = 0 # in logfile segments; 0 disables
#wal_sender_timeout = 60s # in milliseconds; 0 disables
#max_replication_slots = 10 # max number of replication slots
# (change requires restart)
#track_commit_timestamp = off # collect timestamp of transaction commit
# (change requires restart)
# - Master Server -
# These settings are ignored on a standby server.
#synchronous_standby_names = '' # standby servers that provide sync rep
# method to choose sync standbys, number of sync standbys,
# and comma-separated list of application_name
# from standby(s); '*' = all
#vacuum_defer_cleanup_age = 0 # number of xacts by which cleanup is delayed
# - Standby Servers -
# These settings are ignored on a master server.
#primary_conninfo = '' # connection string to sending server
# (change requires restart)
#primary_slot_name = '' # replication slot on sending server
# (change requires restart)
#promote_trigger_file = '' # file name whose presence ends recovery
#hot_standby = on # "off" disallows queries during recovery
# (change requires restart)
#max_standby_archive_delay = 30s # max delay before canceling queries
# when reading WAL from archive;
# -1 allows indefinite delay
#max_standby_streaming_delay = 30s # max delay before canceling queries
# when reading streaming WAL;
# -1 allows indefinite delay
#wal_receiver_status_interval = 10s # send replies at least this often
# 0 disables
#hot_standby_feedback = off # send info from standby to prevent
# query conflicts
#wal_receiver_timeout = 60s # time that receiver waits for
# communication from master
# in milliseconds; 0 disables
#wal_retrieve_retry_interval = 5s # time to wait before retrying to
# retrieve WAL after a failed attempt
#recovery_min_apply_delay = 0 # minimum delay for applying changes during recovery
# - Subscribers -
# These settings are ignored on a publisher.
#max_logical_replication_workers = 4 # taken from max_worker_processes
# (change requires restart)
#max_sync_workers_per_subscription = 2 # taken from max_logical_replication_workers
#------------------------------------------------------------------------------
# QUERY TUNING
#------------------------------------------------------------------------------
# - Planner Method Configuration -
#enable_bitmapscan = on
#enable_hashagg = on
#enable_hashjoin = on
#enable_indexscan = on
#enable_indexonlyscan = on
#enable_material = on
#enable_mergejoin = on
#enable_nestloop = on
#enable_parallel_append = on
#enable_seqscan = on
#enable_sort = on
#enable_tidscan = on
#enable_partitionwise_join = off
#enable_partitionwise_aggregate = off
#enable_parallel_hash = on
#enable_partition_pruning = on
# - Planner Cost Constants -
#seq_page_cost = 1.0 # measured on an arbitrary scale
#random_page_cost = 4.0 # same scale as above
#cpu_tuple_cost = 0.01 # same scale as above
#cpu_index_tuple_cost = 0.005 # same scale as above
#cpu_operator_cost = 0.0025 # same scale as above
#parallel_tuple_cost = 0.1 # same scale as above
#parallel_setup_cost = 1000.0 # same scale as above
#jit_above_cost = 100000 # perform JIT compilation if available
# and query more expensive than this;
# -1 disables
#jit_inline_above_cost = 500000 # inline small functions if query is
# more expensive than this; -1 disables
#jit_optimize_above_cost = 500000 # use expensive JIT optimizations if
# query is more expensive than this;
# -1 disables
#min_parallel_table_scan_size = 8MB
#min_parallel_index_scan_size = 512kB
#effective_cache_size = 4GB
# - Genetic Query Optimizer -
#geqo = on
#geqo_threshold = 12
#geqo_effort = 5 # range 1-10
#geqo_pool_size = 0 # selects default based on effort
#geqo_generations = 0 # selects default based on effort
#geqo_selection_bias = 2.0 # range 1.5-2.0
#geqo_seed = 0.0 # range 0.0-1.0
# - Other Planner Options -
#default_statistics_target = 100 # range 1-10000
#constraint_exclusion = partition # on, off, or partition
#cursor_tuple_fraction = 0.1 # range 0.0-1.0
#from_collapse_limit = 8
#join_collapse_limit = 8 # 1 disables collapsing of explicit
# JOIN clauses
#force_parallel_mode = off
#jit = on # allow JIT compilation
#plan_cache_mode = auto # auto, force_generic_plan or
# force_custom_plan
#------------------------------------------------------------------------------
# REPORTING AND LOGGING
#------------------------------------------------------------------------------
# - Where to Log -
#log_destination = 'stderr' # Valid values are combinations of
# stderr, csvlog, syslog, and eventlog,
# depending on platform. csvlog
# requires logging_collector to be on.
# This is used when logging to stderr:
#logging_collector = off # Enable capturing of stderr and csvlog
# into log files. Required to be on for
# csvlogs.
# (change requires restart)
# These are only used if logging_collector is on:
#log_directory = 'log' # directory where log files are written,
# can be absolute or relative to PGDATA
#log_filename = 'postgresql-%Y-%m-%d_%H%M%S.log' # log file name pattern,
# can include strftime() escapes
#log_file_mode = 0600 # creation mode for log files,
# begin with 0 to use octal notation
#log_truncate_on_rotation = off # If on, an existing log file with the
# same name as the new log file will be
# truncated rather than appended to.
# But such truncation only occurs on
# time-driven rotation, not on restarts
# or size-driven rotation. Default is
# off, meaning append to existing files
# in all cases.
#log_rotation_age = 1d # Automatic rotation of logfiles will
# happen after that time. 0 disables.
#log_rotation_size = 10MB # Automatic rotation of logfiles will
# happen after that much log output.
# 0 disables.
# These are relevant when logging to syslog:
#syslog_facility = 'LOCAL0'
#syslog_ident = 'postgres'
#syslog_sequence_numbers = on
#syslog_split_messages = on
# This is only relevant when logging to eventlog (win32):
# (change requires restart)
#event_source = 'PostgreSQL'
# - When to Log -
#log_min_messages = warning # values in order of decreasing detail:
# debug5
# debug4
# debug3
# debug2
# debug1
# info
# notice
# warning
# error
# log
# fatal
# panic
#log_min_error_statement = error # values in order of decreasing detail:
# debug5
# debug4
# debug3
# debug2
# debug1
# info
# notice
# warning
# error
# log
# fatal
# panic (effectively off)
#log_min_duration_statement = -1 # logs statements and their durations
# according to log_statement_sample_rate. -1 is disabled,
# 0 logs all statement, > 0 logs only statements running at
# least this number of milliseconds.
#log_statement_sample_rate = 1 # Fraction of logged statements over
# log_min_duration_statement. 1.0 logs all statements,
# 0 never logs.
# - What to Log -
#debug_print_parse = off
#debug_print_rewritten = off
#debug_print_plan = off
#debug_pretty_print = on
#log_checkpoints = off
#log_connections = off
#log_disconnections = off
#log_duration = off
#log_error_verbosity = default # terse, default, or verbose messages
#log_hostname = off
#log_line_prefix = '%m [%p] ' # special values:
# %a = application name
# %u = user name
# %d = database name
# %r = remote host and port
# %h = remote host
# %p = process ID
# %t = timestamp without milliseconds
# %m = timestamp with milliseconds
# %n = timestamp with milliseconds (as a Unix epoch)
# %i = command tag
# %e = SQL state
# %c = session ID
# %l = session line number
# %s = session start timestamp
# %v = virtual transaction ID
# %x = transaction ID (0 if none)
# %q = stop here in non-session
# processes
# %% = '%'
# e.g. '<%u%%%d> '
#log_lock_waits = off # log lock waits >= deadlock_timeout
#log_statement = 'none' # none, ddl, mod, all
#log_replication_commands = off
#log_temp_files = -1 # log temporary files equal or larger
# than the specified size in kilobytes;
# -1 disables, 0 logs all temp files
#log_timezone = 'GMT'
#------------------------------------------------------------------------------
# PROCESS TITLE
#------------------------------------------------------------------------------
#cluster_name = '' # added to process titles if nonempty
# (change requires restart)
#update_process_title = on
#------------------------------------------------------------------------------
# STATISTICS
#------------------------------------------------------------------------------
# - Query and Index Statistics Collector -
#track_activities = on
#track_counts = on
#track_io_timing = off
#track_functions = none # none, pl, all
#track_activity_query_size = 1024 # (change requires restart)
#stats_temp_directory = 'pg_stat_tmp'
# - Monitoring -
#log_parser_stats = off
#log_planner_stats = off
#log_executor_stats = off
#log_statement_stats = off
#------------------------------------------------------------------------------
# AUTOVACUUM
#------------------------------------------------------------------------------
#autovacuum = on # Enable autovacuum subprocess? 'on'
# requires track_counts to also be on.
#log_autovacuum_min_duration = -1 # -1 disables, 0 logs all actions and
# their durations, > 0 logs only
# actions running at least this number
# of milliseconds.
#autovacuum_max_workers = 3 # max number of autovacuum subprocesses
# (change requires restart)
#autovacuum_naptime = 1min # time between autovacuum runs
#autovacuum_vacuum_threshold = 50 # min number of row updates before
# vacuum
#autovacuum_analyze_threshold = 50 # min number of row updates before
# analyze
#autovacuum_vacuum_scale_factor = 0.2 # fraction of table size before vacuum
#autovacuum_analyze_scale_factor = 0.1 # fraction of table size before analyze
#autovacuum_freeze_max_age = 200000000 # maximum XID age before forced vacuum
# (change requires restart)
#autovacuum_multixact_freeze_max_age = 400000000 # maximum multixact age
# before forced vacuum
# (change requires restart)
#autovacuum_vacuum_cost_delay = 2ms # default vacuum cost delay for
# autovacuum, in milliseconds;
# -1 means use vacuum_cost_delay
#autovacuum_vacuum_cost_limit = -1 # default vacuum cost limit for
# autovacuum, -1 means use
# vacuum_cost_limit
#------------------------------------------------------------------------------
# CLIENT CONNECTION DEFAULTS
#------------------------------------------------------------------------------
# - Statement Behavior -
#client_min_messages = notice # values in order of decreasing detail:
# debug5
# debug4
# debug3
# debug2
# debug1
# log
# notice
# warning
# error
#search_path = '"$user", public' # schema names
#row_security = on
#default_tablespace = '' # a tablespace name, '' uses the default
#temp_tablespaces = '' # a list of tablespace names, '' uses
# only default tablespace
#check_function_bodies = on
#default_transaction_isolation = 'read committed'
#default_transaction_read_only = off
#default_transaction_deferrable = off
#session_replication_role = 'origin'
#statement_timeout = 0 # in milliseconds, 0 is disabled
#lock_timeout = 0 # in milliseconds, 0 is disabled
#idle_in_transaction_session_timeout = 0 # in milliseconds, 0 is disabled
#vacuum_freeze_min_age = 50000000
#vacuum_freeze_table_age = 150000000
#vacuum_multixact_freeze_min_age = 5000000
#vacuum_multixact_freeze_table_age = 150000000
#vacuum_cleanup_index_scale_factor = 0.1 # fraction of total number of tuples
# before index cleanup, 0 always performs
# index cleanup
#bytea_output = 'hex' # hex, escape
#xmlbinary = 'base64'
#xmloption = 'content'
#gin_fuzzy_search_limit = 0
#gin_pending_list_limit = 4MB
# - Locale and Formatting -
#datestyle = 'iso, mdy'
#intervalstyle = 'postgres'
#timezone = 'GMT'
#timezone_abbreviations = 'Default' # Select the set of available time zone
# abbreviations. Currently, there are
# Default
# Australia (historical usage)
# India
# You can create your own file in
# share/timezonesets/.
#extra_float_digits = 1 # min -15, max 3; any value >0 actually
# selects precise output mode
#client_encoding = sql_ascii # actually, defaults to database
# encoding
# These settings are initialized by initdb, but they can be changed.
#lc_messages = 'C' # locale for system error message
# strings
#lc_monetary = 'C' # locale for monetary formatting
#lc_numeric = 'C' # locale for number formatting
#lc_time = 'C' # locale for time formatting
# default configuration for text search
#default_text_search_config = 'pg_catalog.simple'
# - Shared Library Preloading -
#shared_preload_libraries = '' # (change requires restart)
#local_preload_libraries = ''
#session_preload_libraries = ''
#jit_provider = 'llvmjit' # JIT library to use
# - Other Defaults -
#dynamic_library_path = '$libdir'
#------------------------------------------------------------------------------
# LOCK MANAGEMENT
#------------------------------------------------------------------------------
#deadlock_timeout = 1s
#max_locks_per_transaction = 64 # min 10
# (change requires restart)
#max_pred_locks_per_transaction = 64 # min 10
# (change requires restart)
#max_pred_locks_per_relation = -2 # negative values mean
# (max_pred_locks_per_transaction
# / -max_pred_locks_per_relation) - 1
#max_pred_locks_per_page = 2 # min 0
#------------------------------------------------------------------------------
# VERSION AND PLATFORM COMPATIBILITY
#------------------------------------------------------------------------------
# - Previous PostgreSQL Versions -
#array_nulls = on
#backslash_quote = safe_encoding # on, off, or safe_encoding
#escape_string_warning = on
#lo_compat_privileges = off
#operator_precedence_warning = off
#quote_all_identifiers = off
#standard_conforming_strings = on
#synchronize_seqscans = on
# - Other Platforms and Clients -
#transform_null_equals = off
#------------------------------------------------------------------------------
# ERROR HANDLING
#------------------------------------------------------------------------------
#exit_on_error = off # terminate session on any error?
#restart_after_crash = on # reinitialize after backend crash?
#data_sync_retry = off # retry or panic on failure to fsync
# data?
# (change requires restart)
#------------------------------------------------------------------------------
# CONFIG FILE INCLUDES
#------------------------------------------------------------------------------
# These options allow settings to be loaded from files other than the
# default postgresql.conf.
#include_dir = 'conf.d' # include files ending in '.conf' from
# directory 'conf.d'
#include_if_exists = 'exists.conf' # include file only if it exists
#include = 'special.conf' # include file
#------------------------------------------------------------------------------
# CUSTOMIZED OPTIONS
#------------------------------------------------------------------------------
# Add settings for extensions hereThat's it, you can start the containers with the command docker-compose up -d. Or in a separate console with the command to start the containers. This command will bring up 3 containers:.
So, we've installed the packages and started the database; now we need to connect them. For this, you need to add a file called ormconfig.js at the root of the project with the following content:
ormconfig.js
const process = require('process');

const username = process.env.POSTGRES_USER || "postgres";
const password = process.env.POSTGRES_PASSWORD || "example";

module.exports = {
  "type": "postgres",
  "host": "localhost",
  "port": 5432,
  username,
  password,
  "database": "postgres",
  "synchronize": true,
  "dropSchema": false,
  "logging": true,
  "entities": [__dirname + "\/src\/**\/*.entity.ts", __dirname + "\/dist\/**\/*.entity.js"],
  "migrations": ["migrations\/**\/*.ts"],
  "subscribers": ["subscriber\/**\/*.ts", "dist\/subscriber\/**\/ .js"],
  "cli": {
    "entitiesDir": "src",
    "migrationsDir": "migrations",
    "subscribersDir": "subscriber"
  }
}
This configuration will be used for the TypeORM CLI.
Let's take a closer look at this configuration. In lines 3 and 4, we obtain the username and password from environment variables. This is convenient when you have multiple environments (dev, stage, prod, etc.). The default username is postgres and the password is example. The rest of the config is trivial, so we'll focus only on the most interesting parameters:
- synchronize — indicates whether the database schema should be automatically created when the application starts. Be cautious with this option and do not use it in production; otherwise, you'll lose data. This option is handy during development and debugging. As an alternative to this option, you can use the command
schema:syncfrom the TypeORM CLI. - dropSchema — drops the schema every time a connection is established. Like the previous option, this should only be used during the development and debugging process.
- entities — the paths to search for model definitions. Note that pattern searching is supported.
- cli.entitiesDir — the directory where models created from the TypeORM CLI should be stored by default.
In order to utilize all the capabilities of TypeORM in our Nest application, it is necessary to import the module TypeOrmModule downward API support (simultaneously with this in AppModule. That is, your AppModule will look as follows:
app.module.ts
import { Module } from '@nestjs/common';
import { AppController } from './app.controller';
import { AppService } from './app.service';
import { TypeOrmModule } from '@nestjs/typeorm';
import * as process from "process";

const username = process.env.POSTGRES_USER || 'postgres';
const password = process.env.POSTGRES_PASSWORD || 'example';

@Module({
  imports: [
    TypeOrmModule.forRoot({
      type: 'postgres',
      host: 'localhost',
      port: 5432,
      username,
      password,
      database: 'postgres',
      entities: [__dirname + '/**/*.entity{.ts,.js}'],
      synchronize: true,
    }),
  ],
  controllers: [AppController],
  providers: [AppService],
})
export class AppModule {}
As you may have noticed, the method forRoot is provided with the same configuration for working with the database as in the ormconfig.ts file.
There's just one final touch — add a few tasks to work with TypeORM in package.json. The thing is, the CLI is written in JavaScript and runs in a Node.js environment. However, all our models and migrations will be written in TypeScript. Therefore, we need to transpile our migrations and models before using the CLI. For this, we will need the ts-node package:
yarn add -D ts-node
After that, we will add the necessary commands to package.json:
"typeorm": "ts-node -r tsconfig-paths/register ./node_modules/typeorm/cli.js",
"migration:generate": "yarn run typeorm migration:generate -n",
"migration:create": "yarn run typeorm migration:create -n",
"migration:run": "yarn run typeorm migration:run"
The first command, typeorm, adds a wrapper in the form of ts-node for running the TypeORM CLI. The other commands are handy shortcuts that you, as a developer, will use almost every day:
migration:generate — creating a migration based on changes in your models.
migration:create — creating an empty migration.
migration:run — running migrations.
Now that's definitely everything, we've added the necessary packages, configured the application to work with the database both from the CLI and within the application, and started the DBMS. It's time to add logic to our application.
Installing packages for creating CRUD
Using only Nest, you can create an API that allows you to create, read, update, and delete an entity. This solution will be highly flexible, but for some cases, it can be excessive. For example, if you need to quickly create a prototype, you may often sacrifice flexibility for speed of development. Many frameworks provide CRUD generation functionality based on the data model of a specific entity. And Nest is no exception! This functionality is provided by the package . Its capabilities are quite interesting:
- easy installation and setup;
- independence from the DBMS;
- a powerful query language with filtering, pagination, sorting, relationship loading, nested entity management, caching, etc.;
- a package for building queries on the front end;
- easy overriding of controller methods;
- a small configuration;
- support for Swagger documentation.
Functionality is divided into several packages:
- — a base package that provides the decorator () for generating routes, configuring, and validating;
- — a package providing a builder/parser for requests to be used on the front end;
- — a package for integration with TypeORM, providing a basic TypeOrmCrudService with CRUD methods for working with entities in the database.
In this guide, we will need the packages jsx/crud and jsx/crud-typeorm. To start, let's install them
yarn add @nestjsx/crud class-transformer class-validatorPackages and are required in this application for the declarative description of transformation rules for model instances and for validating incoming requests, respectively. These packages come from the same author, so the interfaces are similar.
Direct implementation of CRUD
As an example, we will take a user list model. Users will have the following fields: id, username, displayName, email. id — an auto-increment field, email and username — unique fields. It's that simple! Now we just need to realize our idea in the form of a Nest application.
To begin, we need to create a module users, which will be responsible for working with users. We will use the CLI from NestJS, and in the root directory of our project, we will run the command nest g module users.
nest g module users
dmitrii@dmitrii-HP-ZBook-17-G3:~/projects/nest-rest git:(master*)$ nest g module users
CREATE /src/users/users.module.ts (82 bytes)
UPDATE /src/app.module.ts (312 bytes)
In this module, we will add a folder named entities, where we will place the models for this module. In particular, we will add the file user.entity.ts with the description of the user model:
user.entity.ts
import { Column, Entity, PrimaryGeneratedColumn } from 'typeorm';

@Entity()
export class User {
  @PrimaryGeneratedColumn()
  id: string;

  @Column({unique: true})
  email: string;

  @Column({unique: true})
  username: string;

  @Column({nullable: true})
  displayName: string;
}
To ensure this model is recognized by our application, we need to import it in the UsersModule users.module.ts TypeOrmModule with the following content:
import { Module } from '@nestjs/common'; import { UsersController } from './controllers/users/users.controller'; import { UsersService } from './services/users/users.service'; import { TypeOrmModule } from '@nestjs/typeorm'; import { User } from './entities/user.entity';@Module({ controllers: [UsersController], providers: [UsersService], imports: [ TypeOrmModule.forFeature([User]) ] }) export class UsersModule {}
import { Module } from '@nestjs/common';
import { UsersController } from './controllers/users/users.controller';
import { UsersService } from './services/users/users.service';
import { TypeOrmModule } from '@nestjs/typeorm';
import { User } from './entities/user.entity';

@Module({
  controllers: [UsersController],
  providers: [UsersService],
  imports: [
    TypeOrmModule.forFeature([User])
  ]
})
export class UsersModule {}
That is, here we import TypeOrmModule, where we specify the list of models related to this module as a parameter of the method forFeature .
Next, we need to create the corresponding entity in the database. For this purpose, we use the migration mechanism. To create a migration based on the changes in the models, we need to run the command npm run migration:generate -- CreateUserTable:
Spoiler Title
$ npm run migration:generate -- CreateUserTable
Migration /home/dmitrii/projects/nest-rest/migrations/1563346135367-CreateUserTable.ts has been generated successfully.
Done in 1.96s.
We didn't have to write the migration manually; everything happened magically. Isn't that wonderful! But that's not all. Let's take a look at the generated migration file:
1563346135367-CreateUserTable.ts
import {MigrationInterface, QueryRunner} from "typeorm";

export class CreateUserTable1563346816726 implements MigrationInterface {

    public async up(queryRunner: QueryRunner): Promise {
        await queryRunner.query(`CREATE TABLE "user" ("id" SERIAL NOT NULL, "email" character varying NOT NULL, "username" character varying NOT NULL, "displayName" character varying, CONSTRAINT "UQ_e12875dfb3b1d92d7d7c5377e22" UNIQUE ("email"), CONSTRAINT "UQ_78a916df40e02a9deb1c4b75edb" UNIQUE ("username"), CONSTRAINT "PK_cace4a159ff9f2512dd42373760" PRIMARY KEY ("id"))`);
    }

    public async down(queryRunner: QueryRunner): Promise {
        await queryRunner.query(`DROP TABLE "user"`);
    }

}
As you can see, not only the method for running the migration was automatically generated, but also the method for rolling it back. Fantastic!
We only need to apply this migration. This is done with the following command:
npm run migration:run.All done, the schema changes have now been applied to the database.
Next, let's create a service that will handle user operations and inherit it from TypeOrmCrudService. In the parent constructor parameter, we need to pass the repository of the interested entity, in our case User the repository.
users.service.ts
import { Injectable } from '@nestjs/common';
import { TypeOrmCrudService } from '@nestjsx/crud-typeorm';
import { User } from '../..//entities/user.entity';
import { InjectRepository } from '@nestjs/typeorm';
import { Repository } from 'typeorm';

@Injectable()
export class UsersService extends TypeOrmCrudService{
  constructor(@InjectRepository(User) usersRepository: Repository){
    super(usersRepository);
  }
}
This service will be needed in the controller users. To create the controller, type in the console nest g controller users/controllers/users
nest g controller users/controllers/users
dmitrii@dmitrii-HP-ZBook-17-G3:~/projects/nest-rest git:(master*)$ nest g controller users/controllers/users
CREATE /src/users/controllers/users/users.controller.spec.ts (486 bytes)
CREATE /src/users/controllers/users/users.controller.ts (99 bytes)
UPDATE /src/users/users.module.ts (188 bytes)
Let's open this controller and edit it to add a bit of magic jsx/crud. To the class UsersController we will add a decorator of the following kind:
@Crud({
  model: {
    type: User
  }
}) — is a decorator that adds the necessary methods to the controller for working with the model. The model type is specified in the field model.type of the decorator's configuration.
The second step is to implement the interface CrudController. The complete code of the controller looks as follows:
import { Controller } from '@nestjs/common';
import { Crud, CrudController } from '@nestjsx/crud';
import { User } from '../../entities/user.entity';
import { UsersService } from '../../services/users/users.service';

@Crud({
  model: {
    type: User
  }
})
@Controller('users')
export class UsersController implements CrudController{
  constructor(public service: UsersService){}
}
And that's it! Now the controller supports the full set of operations with the model! Don't believe it? Let's see our application in action!
Creating Request Scenarios in TestMace
To test our service, we will use an IDE for working with APIs. . Why TestMace? Compared to similar products, it has the following advantages:
- powerful variable handling. Currently, there are several types of variables, each serving a specific role: built-in variables, dynamic variables, environment variables. Each variable belongs to a node with support for an inheritance mechanism;
- easy scenario creation without programming. This will be covered below;
- human-readable format that allows saving the project in version control systems;
- auto-completion, syntax highlighting, variable value highlighting;
- support for API description with the ability to import from Swagger.
Let's start our server with the command npm start and try to access the list of users. The user list can be obtained via the URL localhost:3000/users according to our controller configuration. Let's make a request to this URL.
After starting TestMace, you will see an interface like this:
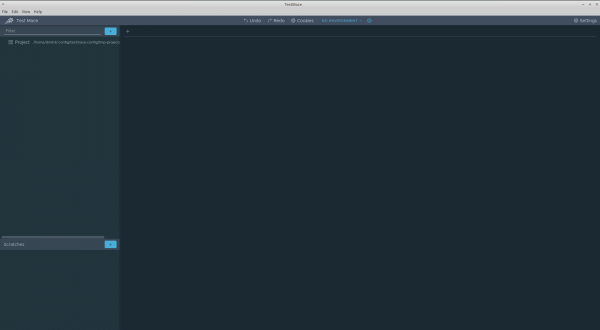
On the top left is the project tree with the root node . Let's try to create our first request to get the list of users. To do this, we will create a node. This is done from the context menu of the Project node Add node -> RequestStep.
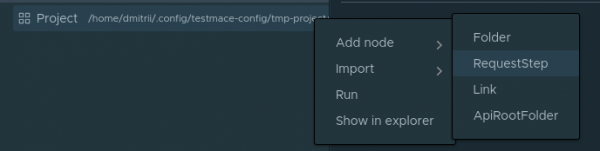
In the URL field, insert localhost:3000/users and execute the request. We will receive a 200 code with an empty array in the response body. This makes sense, as we haven't added anyone yet.
Let's create a scenario that will include the following steps:
- creating a user;
- requesting by id of the just created user;
- deletion by user id created in step 1.
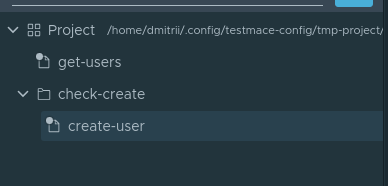
So, let's get started. For convenience, we'll create a node of type . Essentially, this is just a folder where we will save the entire script. To create a Folder node, you need to select Add node -> Folder. We'll name the node check-create. Inside the node, check-create we will create our first request to create a user. We'll name the newly created node create-user. So at this point, the hierarchy of nodes will look like this:
Let's move on to the open create-user node tab. We'll enter the following parameters for the request:
- Request type — POST
- URL — localhost:3000/users
- Body — JSON with the value
{"email": "user@user.com", "displayName": "New user", "username": "user"}
Let's execute this request. Our application indicates that the record has been created.
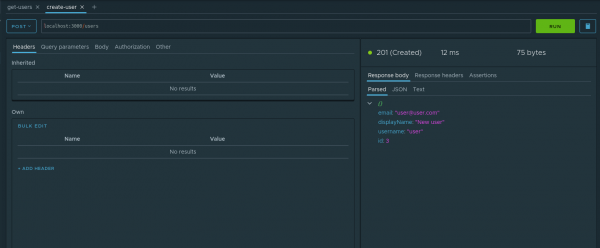
Well, let's verify this fact. To operate with the id of the created user in subsequent steps, we need to save this parameter. The mechanism of is well-suited for this. Let's look at our example to see how it works. In the parsed response tab of the node, select the item in the context menu Assign to variable. In the dialog window, the following parameters should be specified:
- Node — which ancestor to create the dynamic variable in. We'll choose check-create
- Variable name — the name of this variable. We'll call it
userId.
This is how the process of creating a dynamic variable looks:
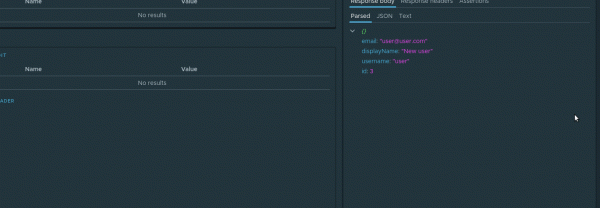
Now, with each execution of this request, the value of the dynamic variable will be updated. Since dynamic variables support a hierarchical inheritance mechanism, the variable userId will be available in descendants check-create of the node at any level of nesting.
In the next request, this variable will come in handy for us. Specifically, we will request the newly created user. As a descendant of the node, check-create we will create the request check-if exists with the parameter url equal to localhost:3000/users/${$dynamicVar.userId}. The structure like ${variable_name} is how to retrieve the value of the variable. Since we have a dynamic variable, to get it we need to refer to the object $dynamicVar, i.e., the full reference to the dynamic variable userId will look as follows ${$dynamicVar.userId}. Let's perform the request and verify that the data is being queried correctly.
The final touch is to make a delete request. We need this not only to check the deletion process but also to clean up in the database since the email and username fields are unique. So, in the check-create node, we'll create a delete-user request with the following parameters.
- Request type — DELETE
- URL —
localhost:3000/users/${$dynamicVar.userId}
We run it. We wait. We enjoy the result)
Now we can run this entire scenario at any time. To run the scenario, you need to select the item check-create from the context menu of the node Run.
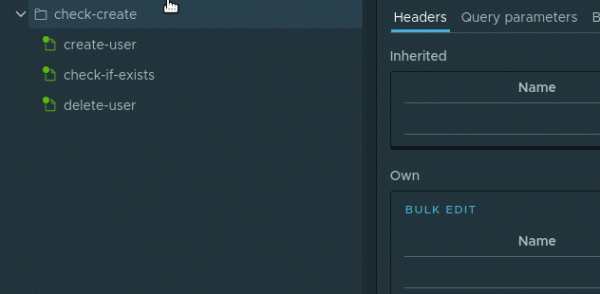
The nodes in the scenario will execute one after the other.
This scenario can be saved in your project by performing File -> Save project.
Conclusion
The format of this article simply couldn't accommodate all the features of the tools used. As for the main culprit — the package jsx/crud — the following topics remain unaddressed:
- custom validation and transformation of models;
- a powerful query language and its convenient use on the front end;
- overriding and adding new methods in CRUD controllers;
- support for Swagger;
- cache management.
However, even what is described in the article is enough to understand that even such an enterprise framework as NestJS has tools for rapid application prototyping up its sleeve. And such a great IDE as allows you to keep the desired pace.
The source code of this article, along with the project , is available in the repository . To open the project, just perform File -> Open project.
Source: habr.com
