

First part:
What? A video codec is a part of the software or hardware that compresses and/or decompresses digital video.
For what? Despite certain limitations in bandwidth and
storage space, the market demands increasingly higher quality video. Remember how in the last post we calculated the necessary minimum for 30 frames per second, 24 bits per pixel, with a resolution of 480×240? We got 82.944 Mbps without compression. Compression is the only way to actually transmit HD/FullHD/4K to television screens and the Internet. How is this achieved? Let's briefly review the main methods.
Translation made with the support of EDISON Software.We specialize in , as well as .
Codec vs Container
A common mistake among beginners is confusing a digital video codec with a digital video container. A container is a format, a wrapper that contains metadata about the video (and possibly audio). Compressed video can be viewed as the payload of the container.
Usually, the video file extension indicates its type of container. For example, the file video.mp4 is likely a container MPEG-4 Part 14, while a file named video.mkv is probably To be completely sure of the codec and container format, one can use or .
A Bit of History
Before we move on to How?, let's delve a bit into history to better understand some older codecs.
Video Codec H.261 was introduced in 1990 (technically in 1988) and was designed to work at a data transfer rate of 64 Kbps. It already used concepts such as color sub-sampling, macroblocks, etc. The video codec standard H.263was published in 1995 and developed until 2001.
The first version of H.264/AVCwas completed in 2003. That same year, the company TrueMotion released its free lossy video codec called VP3.In 2008, Google acquired this company and released VP8 the same year. In December 2012, Google released VP9, which is supported by about ¾ of the browser market (including mobile devices).— is a new free open-source video codec developed
AV1 is a new free video codec with open-source code, developed Alliance for Open Media (AOMedia), which includes prominent companies such as: Google, Mozilla, Microsoft, Amazon, Netflix, AMD, ARM, NVidia, Intel, and Cisco. The first version of the codec 0.1.0 was released on April 7, 2016.
The Birth of AV1
In early 2015, Google was working on VP10, while Xiph (which belongs to Mozilla) was working on Daala, and Cisco developed its free video codec named Thor.
Then MPEG LA initially announced annual caps for HEVC (H.265) and fees, which were 8 times higher than for H.264, but soon they changed the rules again:
no annual caps,
a content fee (0.5% of revenue) and
a unit fee that is about 10 times higher than for H.264.
The Alliance for Open Media was established by companies from various fields: hardware manufacturers (Intel, AMD, ARM, Nvidia, Cisco), content providers (Google, Netflix, Amazon), browser creators (Google, Mozilla), and others.
These companies had a common goal — a video codec without licensing fees. Then came AV1 with a much simpler patent license. Timothy B. Terriberry made a stunning presentation that became the source of the current AV1 concept and its licensing model.
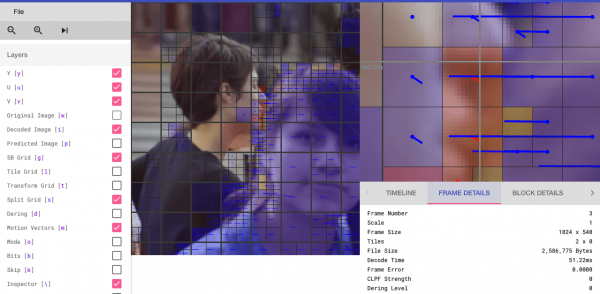
You will be surprised to learn that you can analyze the AV1 codec through a browser (interested parties can visit).
Universal Codec
Let’s break down the core mechanisms underlying the universal video codec. Most of these concepts are useful and used in modern codecs such as VP9, which is supported by about ¾ of the browser market (including mobile devices)., AV1 and HEVC. I warn you that many explained things will be simplified. Sometimes real examples (like in the case of H.264) will be used to demonstrate the technologies.
Step 1 — Image Partitioning
The first step is to divide the frame into several segments, subdivisions, and so forth.
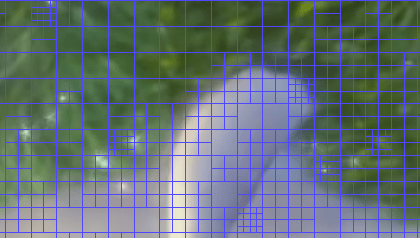
Why? There are many reasons. When we break the image down, we can predict the motion vector more accurately, using small segments for small moving parts. Meanwhile, for the static background, larger segments may suffice.
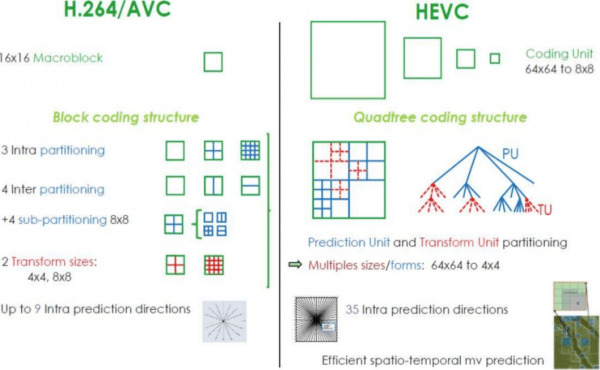
Typically, codecs organize these segments into sections (or fragments), macroblocks (or coding tree blocks), and many subdivisions. The maximum size of these segments varies; HEVC sets it to 64×64, while AVC uses 16×16, and subdivisions can be broken down to sizes of 4×4.
Do you remember the types of frames from the previous article?! This can also be applied to blocks, so we can have I-fragment, B-block, P-macroblock, etc.
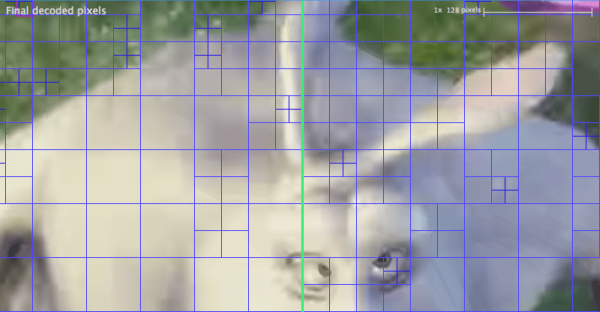
For those who wish to practice — take a look at how the image will break down into sections and subsections. You can use what was mentioned in the previous article. (the paid one, but with a free trial version limited to the first 10 frames). Here, the sections are analyzed. VP9, which is supported by about ¾ of the browser market (including mobile devices).:
Step 2 — Prediction
As soon as we have sections, we can create astrological predictions based on them. For INTER-prediction it is necessary to pass motion vectors and the residual, while for INTRA-prediction, the prediction direction and the residual are transmitted.
Step 3 — Transformation
After obtaining the residual block (predicted section → actual section), it is possible to transform it in such a way as to know which pixels can be discarded while maintaining overall quality. There are some transformations that ensure accurate behavior.
Although other methods exist, let's take a closer look at discrete cosine transformation (DCT — from discrete cosine transform). The main functions of DCT:
- Transforms blocks of pixels into equally sized blocks of frequency coefficients.
- Compresses the energy, helping to eliminate spatial redundancy.
- Ensures reversibility.
On February 2, 2017, Cintra R.J. and Bayer F.M. published an article on DCT-like transformation for image compression requiring only 14 additions.
Don't worry if you didn't understand the advantages of each point. We'll now see their real value through specific examples.
Let's take an 8×8 pixel block:
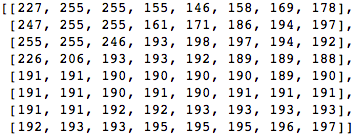
This block is rendered into the following 8 by 8 pixel image:
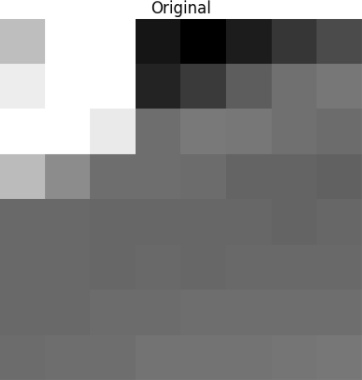
We apply DCT to this pixel block and get a coefficients block sized 8×8:
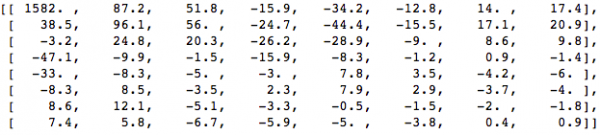
And if we render this coefficients block, we obtain an image like this:
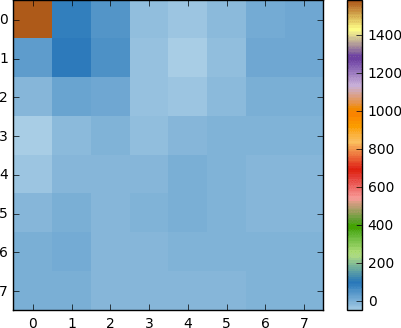
As we can see, this does not resemble the original image. You can notice that the first coefficient significantly differs from all the others. This first coefficient is known as the DC coefficient, representing all samples in the input array, somewhat akin to an average value.
This coefficient block has an interesting property: it separates high-frequency components from low-frequency ones.
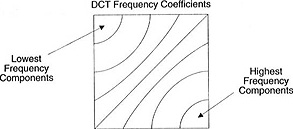
In the image, most of the power is concentrated at lower frequencies, so if we transform the image into its frequency components and discard the higher frequency coefficients, we can reduce the amount of data needed to describe the image without sacrificing too much quality.
Frequency refers to how quickly a signal changes.
Let's apply the knowledge gained from the test example by transforming the original image into its frequency (coefficient block) using the DCT, and then discarding some of the least important coefficients.
First, we convert it into the frequency domain.
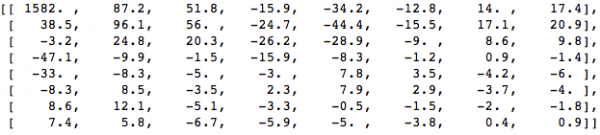
Next, we discard some (67%) of the coefficients, mainly the lower right part.
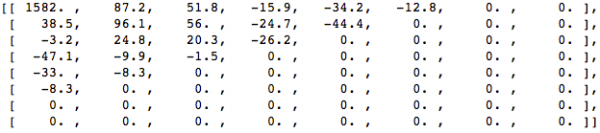
Finally, we reconstruct the image from this discarded coefficient block (remember, it must be reversible) and compare it with the original.
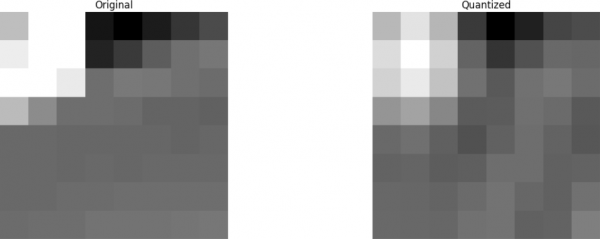
We see that it resembles the original image, but there are many differences from the original. We discarded 67.1875% and still got something reminiscent of the source. The coefficients could have been discarded more thoughtfully to achieve an image of even better quality, but that's a topic for another time.
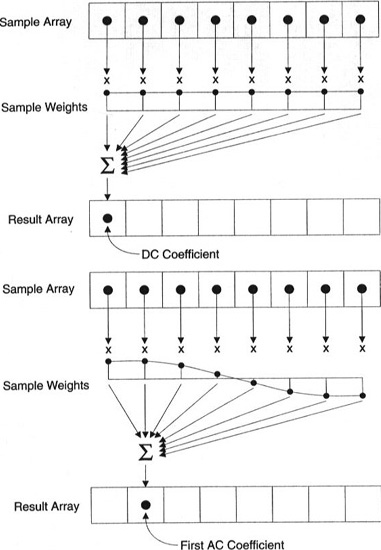
Each coefficient is formed using all pixels.
Important: each coefficient does not directly map to one pixel; rather, it represents a weighted sum of all pixels. This amazing graph shows how the first and second coefficients are calculated using weights unique to each index.
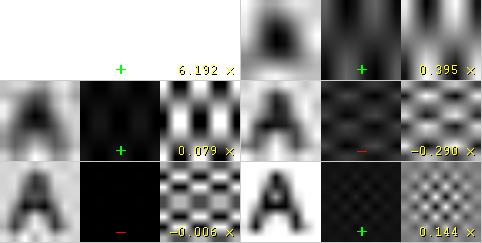
You can also try to visualize the DCT by looking at a simple image formation based on it. For example, here's the letter A formed using each coefficient's weight:
Step 4 - Quantization
After discarding some coefficients in the previous step, in the final step (transformation), we perform a special form of quantization. At this stage, information loss is acceptable. Or, simply put, we will quantize the coefficients to achieve compression.
How can we quantize a block of coefficients? One of the simplest methods is uniform quantization, where we take a block, divide it by a single value (by 10), and round the result.
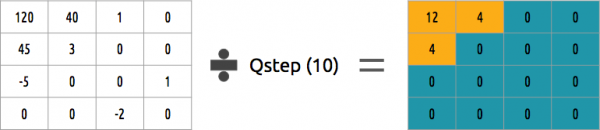
Can we reverse this block of coefficients? Yes, we can, by multiplying by the same value we divided by.
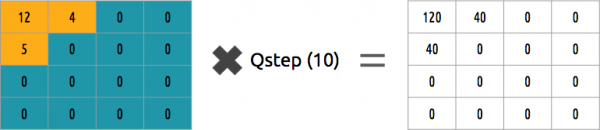
This approach is not the best, as it doesn't take into account the importance of each coefficient. We could use a quantization matrix instead of a single value, and this matrix can utilize the DCT property by quantizing most of the lower right coefficients and fewer of the upper left ones.
Step 5 — entropy coding
After we have quantized the data (image blocks, fragments, frames), we can still compress them without loss. There are many algorithmic ways to compress data. We will briefly introduce some of them; for a more in-depth understanding, you can read the book "Understanding Compression: Data Compression for Modern Developers"»).
Video encoding using VLC
Let's assume we have a stream of symbols: a, e, r and t. The probability (ranging from 0 to 1) of how frequently each symbol appears in the stream is represented in this table.
| a | e | r | t | |
|---|---|---|---|---|
| Probability | 0,3 | 0,3 | 0,2 | 0,2 |
We can assign unique binary codes (preferably small) to the most probable symbols, while larger codes go to less probable ones.
| a | e | r | t | |
|---|---|---|---|---|
| Probability | 0,3 | 0,3 | 0,2 | 0,2 |
| Binary code | 0 | 10 | 110 | 1110 |
We compress the stream, assuming we will spend 8 bits for each symbol in the end. Without compression, 24 bits would be needed per symbol. By replacing each symbol with its code, we save space!
The first step is to code the symbol e, which equals 10, and the second symbol is a, which is added (not mathematically): [10] [0], and finally, the third symbol t, which makes our final compressed bit stream equal to [10] [0] [1110] or 1001110, requiring only 7 bits (3.4 times less space than the original).
Note that each code must be a unique prefix code. will help find these values. Although this method is not without flaws, there are still video codecs that offer this algorithmic method for compression.
Both the encoder and decoder must have access to a character table with their binary codes. Therefore, it is also necessary to send the table in the input data.
Arithmetic coding
Let's assume we have a stream of symbols: a, e, r, tr1 != str2 and t, and their probabilities are represented by this table.
| a | e | r | tr1 != str2 | t | |
|---|---|---|---|---|---|
| Probability | 0,3 | 0,3 | 0,15 | 0,05 | 0,2 |
With this table, we will build ranges that contain all possible characters, sorted by their frequency.

Now let's encode a stream of three characters: eat.
First, we choose the first character e, which is in the sub-range from 0.3 to 0.6 (exclusive). We take this sub-range and divide it again in the same proportions as before, for this new range.

Let's continue encoding our stream eat. Now we take the second character a, which is in the new sub-range from 0.3 to 0.39, and then we take our last character t and, repeating the same process again, we get the final sub-range from 0.354 to 0.372.
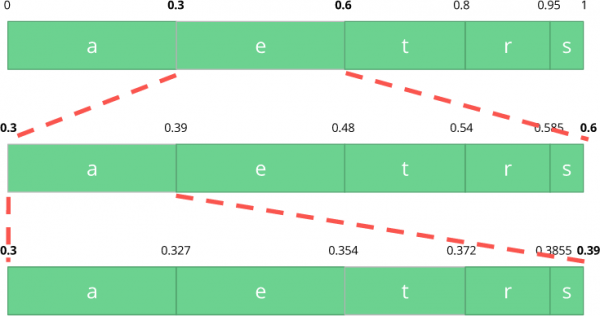
We just need to pick a number in the last sub-range from 0.354 to 0.372. Let's choose 0.36 (but any other number in this sub-range can also be chosen). Only with this number can we recover our original stream. It's like drawing a line within the ranges to encode our stream.
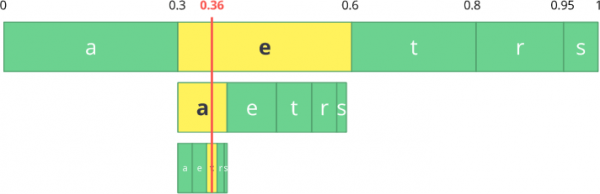
The reverse operation (that is, decoding) is just as simple: with our number 0.36 and our initial range, we can run the same process. But now, using this number, we identify the stream encoded by that number.
With the first range, we notice that our number matches the slice, hence this is our first character. Now we split this sub-range again, performing the same process as before. Here we can see that 0.36 corresponds to the character a, and after repeating the process, we arrive at the last character t (reforming our original encoded stream. eat).
Both the encoder and decoder must have access to the probability table of characters, so it is necessary to include it in the input data.
Quite elegant, isn't it? The person who came up with this solution was incredibly smart. Some video codecs use this technique (or at least offer it as an option).
The idea is to compress the quantized bitstream losslessly. This article might lack tons of details, reasons, compromises, etc. But if you are a developer, you should know more. New codecs are attempting to use different entropy coding algorithms, such as ANS.
Step 6 - Bitstream format
Once you've done all this, the next step is to unpack the compressed frames in the context of the steps taken. The decoder needs to be explicitly informed about the decisions made by the encoder. The decoder must be provided with all the necessary information: bit depth, color space, resolution, prediction information (motion vectors, directional INTER-prediction), profile, level, frame rate, frame type, frame number, and much more.
We'll take a superficial look at the bitstream H.264. Our first step is to create a minimal H.264 bitstream (FFmpeg by default adds all encoding parameters, such as SEI NAL — we'll learn more about this shortly). We can do this using our own repository and FFmpeg.
./s/ffmpeg -i /files/i/minimal.png -pix_fmt yuv420p /files/v/minimal_yuv420.h264
This command will generate a raw bitstream H.264 with a single frame, resolution of 64×64, with color space YUV420. The following image will be used as the frame.

H.264 bitstream
Standard AVC (H.264) specifies that the information will be sent in network macroblocks known as NAL (this is a layer of network abstraction). The main goal of NAL is to provide a 'network-friendly' representation of video. This standard must operate on televisions (stream-based) and over the Internet (packet-based).

There is a synchronization marker to determine the boundaries of NAL elements. Each synchronization marker contains a value 0x00 0x00 0x01, except for the very first one, which is equal to 0x00 0x00 0x00 0x01. If we run hexdump for the generated H.264 bitstream, we will identify at least three NAL patterns at the beginning of the file.
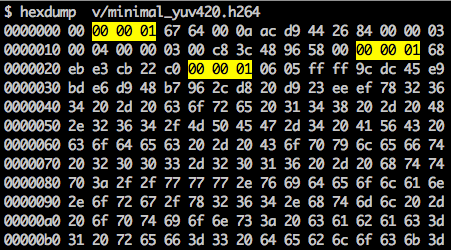
As mentioned, the decoder needs to know not only the image data but also details about the video, frame, colors, parameters used, and much more. The first byte of each NAL defines its category and type.
| NAL type identifier | Description |
|---|---|
| 0 | Unknown type |
| 1 | Encoded image fragment without IDR |
| 2 | Encoded slice data partition A |
| 3 | Encoded slice data partition B |
| 4 | Encoded slice data partition C |
| 5 | Encoded IDR fragment of IDR image |
| 6 | Additional information about SEI extension |
| 7 | Set of SPS sequence parameters |
| 8 | Set of PPS picture parameters |
| 9 | Access unit delimiter |
| 10 | End of sequence |
| 11 | End of stream |
| … | … |
Usually, the first NAL of the bitstream is SPS. This type of NAL is responsible for informing about general encoding variables, such as profile, level, resolution, and more.
If we skip the first synchronization marker, we can decode the first byte to find out what type of NAL is first.
For example, the first byte after the synchronization marker is equal to 01100111, where the first bit (0) is in the f fieldorbidden_zero_bit. The next 2 bits (11) tell us the nal_ref_idc, which indicates whether this NAL is a reference field or not. And the remaining 5 bits (00111) tell us the nal_unit_type, in this case, this is an SPS block (7) NAL.
The second byte (binary=01100100, hex=0x64, dec=100) in SPS NAL is the profile_idc, which indicates the profile used by the encoder. In this case, a constrained high profile was used (i.e., high profile without support for bidirectional B-slice).

If we look at the bitstream specification H.264 for SPS NAL, we will find many values for the parameter name, category, and description. For example, let us examine the fields pic_width_in_mbs_minus_1 and pic_height_in_map_units_minus_1.
| Parameter name | Category | Description |
|---|---|---|
| pic_width_in_mbs_minus_1 | 0 | ue(v) |
| pic_height_in_map_units_minus_1 | 0 | ue(v) |
If we perform some mathematical operations with the values of these fields, we get the resolution. We can represent 1920 x 1080 using pic_width_in_mbs_minus_1 with the value of 119 ((119 + 1) * macroblock_size = 120 * 16 = 1920). Again, saving space, instead of encoding 1920, we did it with 119.
If we continue checking our created video in binary form (for example: xxd -b -c 11 v/minimal_yuv420.h264), we can move to the last NAL, which is the frame itself.

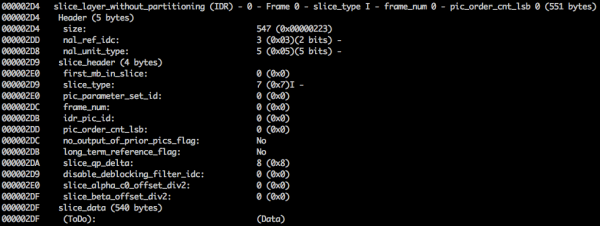
Here we see its first 6 byte values: 01100101 10001000 10000100 00000000 00100001 11111111. Since it is known that the first byte indicates the NAL type, in this case (00101) this is an IDR fragment (5), and then we can further investigate it:
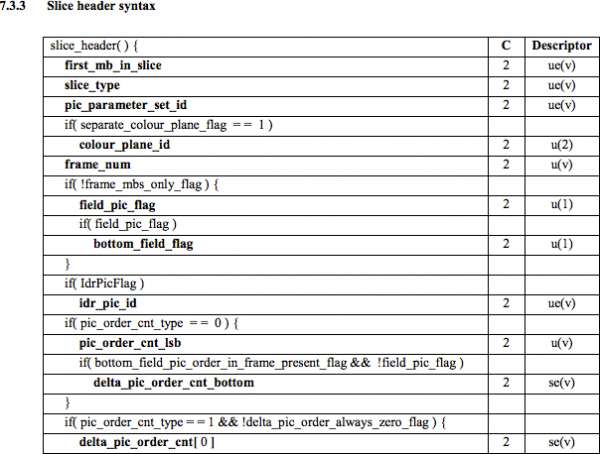
Using specification information, we can decode the fragment type (slice_type) and frame number (frame_num) among other important fields.
To get the values of some fields (ue(v), me(v), se(v) or te(v), we need to decode the fragment using a special decoder based on . This method is very effective for encoding variable values, especially when there are many default values.
Values slice_type and frame_num of this video are equal to 7 (I-frame) and 0 (first frame).
A bitstream can be seen as a protocol. If you want to know more about bitstreams, you should refer to the specification ITU H.264. Here is a block diagram showing where the image data is located (YUV in compressed form).
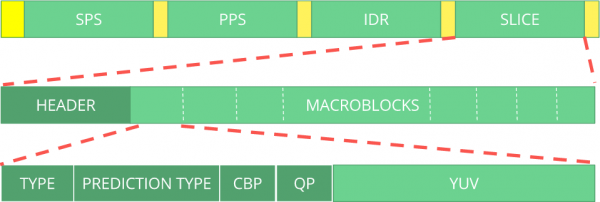
You can also explore other bitstreams, such as VP9, which is supported by about ¾ of the browser market (including mobile devices)., H.265 (HEVC) or even our new best bitstream AV1. Are they all similar? No, but once you understand at least one, it becomes much easier to grasp the others.
Want to practice? Explore the H.264 bitstream
You can generate a single-frame video and use MediaInfo to analyze the bitstream H.264. In fact, nothing prevents you from even looking at the source code that analyzes the bitstream H.264 (AVC).
For practice, you can use Intel Video Pro Analyzer (I think I've mentioned that this program is paid, but there is a free trial version with a limit of 10 frames?).
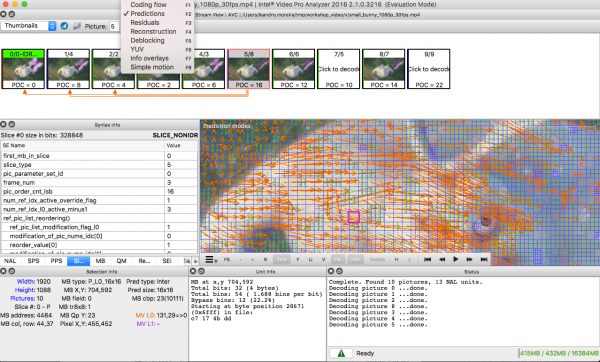
Overview
It’s worth noting that many modern codecs use the same model we just studied. Now, let's take a look at the flowchart of the video codec Thor. It contains all the steps we have covered. The essence of this note is to help you at least better understand the innovations and documentation in this field.
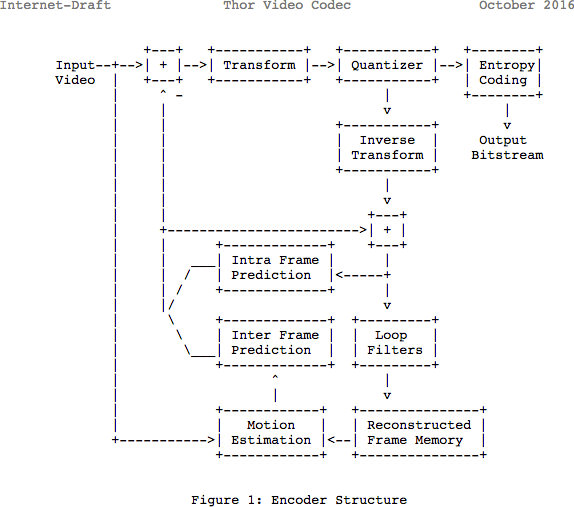
Earlier, it was estimated that 139 GB of disk space is required to store a one-hour video file at 720p quality and 30 fps. By using the techniques discussed in this article (inter-frame and intra-frame predictions, transformation, quantization, entropy coding, etc.), it is possible to achieve a video of quite acceptable quality, only occupying 367.82 MB instead of 139 GB.
How does H.265 achieve better compression than H.264?
Now that we know more about how codecs work, it’s easier to understand how new codecs can provide higher resolutions with fewer bits.
When comparing AVC and HEVC, it’s important to remember that it's almost always a trade-off between higher CPU load and degree of compression.
HEVC has more partition (and subpartition) options than AVC, more internal forecasting directions, improved entropy coding, and much more. All these enhancements have made H.265 capable of compressing 50% more than H.264.
First part:
Source: habr.com
