

For over a year, I worked on the book “Creating Solidity Smart Contracts for the Ethereum Blockchain: A Practical Guide,” and now this work is complete, and the book .
I hope my book will assist in quickly getting started with Solidity smart contracts and DApp development for the Ethereum blockchain. It consists of 12 lessons with practical tasks. By completing them, readers will be able to set up their own local Ethereum nodes, deploy smart contracts, call their methods, and exchange data between the real world and smart contracts using oracles, while also working with the Rinkeby test debugging network.
The book is aimed at everyone interested in advanced blockchain technologies who wants to quickly acquire the knowledge necessary for engaging in exciting and promising work.
Below you will find the table of contents and the first chapter of the book (also on fragments of the book are available). I hope to receive feedback, comments, and suggestions. I will consider all of this while preparing the next edition of the book.
Table of ContentsIntroductionOur book is intended for those who want not only to understand the principles of the Ethereum blockchain but also to gain practical skills in developing DApps using the Solidity programming language for this network.
It's better to work with this book rather than just read it, completing the practical tasks described in the lessons. You will need a local computer, a virtual or cloud server with Debian or Ubuntu OS installed. Many tasks can also be performed on a Raspberry Pi.
In the first lesson we will explore the principles of the Ethereum blockchain and the main terminology, as well as discuss where this blockchain can be used.
The goal the second lesson is to create a node of a private Ethereum blockchain for further work in this course on an Ubuntu and Debian server. We will examine the features of installing essential utilities, such as geth, which enables the operation of our blockchain node, as well as the decentralized data storage daemon swarm.
The third lesson will teach you how to experiment with Ethereum on a low-cost Raspberry Pi microcomputer. You will install the Rasberian operating system (OS) on your Raspberry Pi, the Geth utility that allows for blockchain node operation, and the Swarm decentralized storage daemon.
Lesson Four is dedicated to accounts and cryptocurrency units on the Ethereum network, as well as methods for transferring funds from one account to another using the Geth console. You will learn how to create accounts, initiate fund transfer transactions, check the state of transactions, and obtain their receipts.
In Lesson Five you will get acquainted with smart contracts on the Ethereum network and learn how they are executed by the Ethereum virtual machine.
You will create and publish your first smart contract in a private Ethereum network and learn how to call its functions. For this, you will use the Remix Solidity IDE development environment. Additionally, you will learn how to install and use the solc batch compiler.
We will also discuss the so-called Application Binary Interface (ABI) and teach you how to use it.
Lesson Six is dedicated to creating JavaScript scripts that run under Node.js and perform operations with Solidity smart contracts.
You will install Node.js on Ubuntu, Debian, and Rasberian, write scripts to publish smart contracts on a local Ethereum network and call their functions.
Moreover, you will learn how to transfer funds between regular accounts and deposit them into smart contract accounts using scripts.
In Lesson Seven you will learn how to install and use the popular Truffle Integrated Development Environment (IDE) among smart contract developers. You will create JavaScript scripts that call contract functions using the truffle-contract module and test your smart contract with Truffle tools.
Lesson Eight is dedicated to Solidity data types. You will write smart contracts that work with data types such as signed and unsigned integers, signed numbers, strings, addresses, complex type variables, arrays, enumerations, structures, and dictionaries.
In Lesson Nine You will take another step toward creating smart contracts for the Ethereum mainnet. You will learn to deploy contracts using Truffle in a private Geth network, as well as in the Rinkeby test network. Debugging a smart contract in the Rinkeby network is very useful before its deployment to the mainnet—everything there is almost real, but for free.
In this lesson, you will create a Rinkeby test network node, fund it, and deploy a smart contract.
Lesson 10 is dedicated to distributed data storage in Ethereum Swarm. By using distributed storage, you save on storing large volumes of data in the Ethereum blockchain.
In this lesson, you will create a local Swarm storage, perform read and write operations for files and directories. Next, you will learn to work with the public Swarm gateway, write scripts to access Swarm from Node.js, and use the Perl module Net::Ethereum::Swarm.
The goal of Lesson 11 is to master working with Solidity smart contracts using the popular programming language Python and the Web3.py framework. You will install this framework, write scripts for compiling and deploying a smart contract, as well as for calling its functions. During this, Web3.py will be used both independently and in conjunction with the integrated development environment Truffle.
In Lesson 12 you will learn to pass data between smart contracts and the real world using oracles. This will be useful for retrieving data from websites, IoT devices, various instruments and sensors, and for sending data from smart contracts to these devices. In the practical part of the lesson, you will create an oracle and a smart contract that obtains the current exchange rate of USD to rubles from the Central Bank of Russia's website.
Lesson 1. A Brief Overview of Blockchain and the Ethereum NetworkThe goal of the lesson: to familiarize yourself with the principles of how the Ethereum blockchain works, its areas of application, and key terminology.
Practical tasks: none are provided in this lesson.
Today, it is hard to find a software developer who has not heard of blockchain technology, cryptocurrencies, Bitcoin, initial coin offerings (ICO), smart contracts, and other concepts and terms related to blockchain.
Blockchain technology opens up new markets and creates job opportunities for programmers. If you master all the intricacies of cryptocurrency technologies and smart contracts, you should have no trouble applying this knowledge in practice.
It should be noted that there are many speculations surrounding cryptocurrencies and blockchains. We will set aside discussions about the fluctuations in cryptocurrency prices, pyramid schemes, the nuances of cryptocurrency legislation, etc. In our course, we will mainly focus on the technical aspects of applying smart contracts on the Ethereum blockchain and developing so-called decentralized applications (DApps).
What is Blockchain
Blockchain is a chain of data blocks that are interconnected in a specific way. At the beginning of the chain is the first block, known as the genesis block.
All these data blocks are automatically replicated across numerous nodes in the blockchain network. This ensures decentralized storage of blockchain data.
You can think of a blockchain system as a large number of nodes (physical or virtual servers) connected in a network, replicating every change in the chain of data blocks. It's like a giant multi-server computer, where the nodes of such a computer (servers) can be scattered all over the world. And you can also add your computer to the blockchain network.
Distributed Database
Blockchain can be seen as a distributed database replicated across all nodes in the blockchain network. In theory, the blockchain will continue to function as long as at least one node is operational, storing all blockchain blocks.
Distributed Ledger of Data
Blockchain can be viewed as a distributed ledger of data and transactions. Another name for such a ledger is a ledger book.
In a distributed ledger, data can be added but cannot be modified or deleted. This impossibility is achieved, in particular, through the use of cryptographic algorithms, special algorithms for adding blocks to the chain, and decentralized data storage.
When adding blocks and performing operations (transactions), private and public keys are used. They restrict blockchain users, providing them access only to their data blocks.
Transactions
Blockchain stores information about operations (transactions) in blocks. Old, completed transactions cannot be rolled back or changed. New transactions are stored in newly added blocks.
Thus, the entire transaction history can be recorded in an immutable form on the blockchain. Therefore, blockchain can be used, for example, for secure storage of banking operations, copyright information, and the history of property ownership changes.
The Ethereum blockchain contains so-called system states. As transactions are executed, the state changes from initial to current. Transactions are recorded in blocks.
Public and private blockchains
It should be noted that all that has been said applies only to so-called public blockchain networks, which cannot be controlled by any individual or legal entities, government bodies, or authorities.
So-called private blockchain networks are under the complete control of their creators, and everything is possible there, such as completely replacing all blocks in the chain.
Practical applications of blockchain
What can blockchain be useful for?
In short, blockchain allows secure transactions (deals) to be conducted between parties or companies that do not trust each other. Data recorded on the blockchain (transactions, personal data, documents, certificates, contracts, invoices, etc.) cannot be forged or replaced after being recorded. Therefore, trusted distributed ledgers of various types of documents can be created based on blockchain.
Of course, you know that cryptocurrency systems are built on blockchain technology, aiming to replace conventional paper money. Paper money is also referred to as fiat (from Fiat Money).
Blockchain ensures the storage and immutability of transactions recorded in blocks, which is why it can be used to create cryptocurrency systems. It contains the entire history of cryptocurrency transfers between various users (accounts), and any operation can be traced.
Although transactions within cryptocurrency systems can be anonymous, converting cryptocurrency to fiat money usually results in the disclosure of the cryptocurrency asset owner's identity.
So-called smart contracts, which are software running on the Ethereum network, allow the automation of deal-making processes and the monitoring of their execution. This is especially effective when payment for a transaction is made using the Ether cryptocurrency.
The Ethereum blockchain and Ethereum smart contracts, written in the Solidity programming language, can be used, for example, in the following areas:
- an alternative to notarizing documents;
- maintaining a registry of real estate properties and information about transactions involving those properties;
- storing copyright information for intellectual property (books, images, musical works, etc.);
- creating independent voting systems;
- finance and banking activities;
- logistics on an international scale, tracking cargo movements;
- storing personal data as an alternative to identity verification systems;
- secure transactions in the commercial domain;
- storing medical examination results as well as a history of assigned procedures.
Blockchain Issues
But, of course, it's not so simple as it might seem!
There are issues with verifying data before adding it to the blockchain (for example, are they fake?), problems with the security of the system and application software used to work with the blockchain, and challenges with the potential use of social engineering methods to hijack access to cryptocurrency wallets, etc.
Again, if we're talking about a public blockchain with nodes dispersed around the world, as opposed to a private blockchain owned by an individual or organization, the level of trust here will not exceed the trust in that individual or organization.
It is also important to consider that data recorded to the blockchain becomes accessible to everyone. In this sense, blockchain (especially public) is not suitable for storing confidential information. However, the fact that information on the blockchain cannot be altered can help prevent or investigate various types of fraudulent activities.
Decentralized applications on Ethereum will be convenient if users pay for their use with cryptocurrency. The more people who own cryptocurrency or are willing to acquire it, the more popular DApp applications and smart contracts will become.
Among the general blockchain issues that complicate its practical application, we can mention the limited speed of adding new blocks and the relatively high cost of transactions. However, technologies in this field are actively developing, and there is hope that technical problems will be resolved over time.
Another issue is that smart contracts on the Ethereum blockchain operate in an isolated environment of virtual machines and do not have access to real-world data. Specifically, a smart contract program cannot read data from websites or any physical devices (sensors, contacts, etc.), nor can it output data to any external devices. We will discuss this problem and its solutions in the lesson dedicated to so-called Oracles — information intermediaries for smart contracts.
There are also legal restrictions. In some countries, for example, using cryptocurrency as a payment method is prohibited, but it can be owned as a digital asset, similar to securities. Such assets can be bought and sold on the exchange. In any case, when creating a project that works with cryptocurrencies, it is necessary to familiarize yourself with the legislation of the country under whose jurisdiction your project falls.
How the blockchain chain is formed
As we have already mentioned, blockchain is simply a chain of data blocks. The first block in this chain is created, followed by the addition of the second, and so on. It is assumed that transaction data is stored in blocks, and added to the most recent block.
In Figure 1.1, we have illustrated a basic sequence of blocks, where the first block refers to the next one.
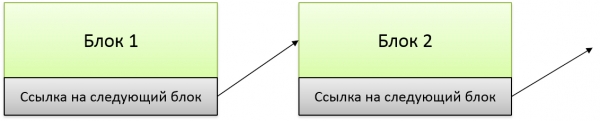
Figure 1.1. Simple sequence of blocks
In this scenario, however, it is very easy to alter the contents of any block in the chain since the blocks contain no information to prevent modifications. Given that blockchain is intended for use by people and companies that do not trust one another, it can be concluded that such a method of data storage is unsuitable for blockchain.
Let's work on protecting the blocks from tampering. In the first stage, we will attempt to secure each block with a checksum (Figure 1.2).
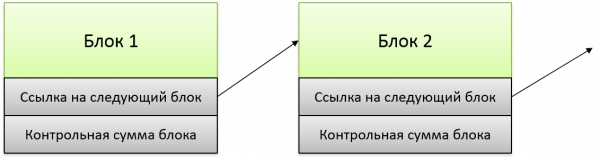
Figure 1.2. Adding data protection to blocks with a checksum
Now, an attacker cannot simply change a block, as it contains the checksum of the block's data. Checking the checksum will show that the data has been altered.
To compute the checksum, one can use one of the hashing functions, such as MD-5, SHA-1, SHA-256, etc. Hash functions calculate a certain value (for example, a string of fixed length) as a result of irreversible operations performed on the data block. The operations depend on the type of hash function.
Even a minor change in the content of the data block will result in a different hash value. Analyzing the hash value does not allow for the reconstruction of the data block for which it was computed.
Will such protection be sufficient? Unfortunately, no.
In this scheme, the checksum (hash function) only protects individual blocks, not the entire chain of blocks. Knowing the algorithm for computing the hash function, an attacker could easily substitute the contents of a block. There is also nothing to prevent them from removing blocks from the chain or adding new ones.
To protect the entire chain as a whole, one can store the hash of the previous block's data in each block along with its own data (Figure 1.3).
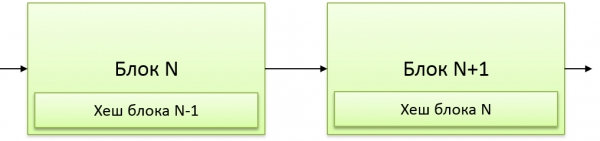
Figure 1.3. Adding the hash of the previous block to the data block
In this scheme, to change any block, it is necessary to recalculate the hash functions of all subsequent blocks. It seems, what’s the problem?
In real blockchains, additional artificial difficulties are created for adding new blocks — algorithms are used that require a lot of computational resources. Given that, to make changes to a block, it is necessary to recalculate not just this block but all subsequent ones, this makes it extremely difficult.
Let’s also remember that the blockchain data is stored (duplicated) on numerous network nodes, i.e., decentralized storage is used. This significantly complicates the forgery of a block, as changes need to be made on all network nodes.
Since blocks store information about the previous block, it is possible to check the contents of all blocks in the chain.
Ethereum Blockchain
The Ethereum blockchain is a platform on which distributed applications (DApps) can be created. Unlike other platforms, Ethereum allows the use of so-called smart contracts, written in the Solidity programming language.
This platform was created in 2013 by Vitalik Buterin, the founder of Bitcoin Magazine, and launched in 2015. Everything we will study or do in our course relates specifically to the Ethereum blockchain and Solidity smart contracts.
Mining or how blocks are created
Mining is a rather complex and resource-intensive process of adding new blocks to the blockchain, rather than 'mining cryptocurrencies'. Mining ensures the operability of the blockchain, as this process is responsible for adding transactions to the Ethereum blockchain.
Individuals and organizations engaged in adding blocks are called miners.
The software (SW) operating on the miners' nodes attempts to find a hashing parameter for the last block called Nonce, to achieve a specific value for the hash function defined by the network. The Ethash hashing algorithm used in Ethereum allows obtaining the Nonce value only through sequential trial and error.
If a miner's node finds the correct Nonce value, it serves as what is known as proof of work (PoW, Proof-of-work). In this case, if the block is added to the Ethereum network, the miner receives a certain reward in the network's currency — Ether. At the time of writing our book, the reward is 5 Ether, but it will decrease over time.
Thus, Ethereum miners ensure the network's operation by adding blocks and earn cryptocurrency for it. You will find a wealth of information about miners and mining online, while we will focus on creating Solidity contracts and decentralized applications (DApps) on the Ethereum network.
Lesson Summary
In the first lesson, you learned about the blockchain and recognized it as a uniquely structured sequence of blocks. The contents of previously recorded blocks cannot be altered, as doing so would require recalculating all subsequent blocks across many network nodes, which demands a significant amount of resources and time.
Blockchain can be used to preserve the results of transaction executions. Its primary purpose is to facilitate secure transactions between parties (individuals and organizations) that do not trust each other. You learned in which specific business areas and fields blockchain Ethereum and Solidity smart contracts can be used. These include the banking sector, registration of property rights, documents, etc.
You also discovered that various issues may arise when using blockchain. These include problems with verifying information added to the blockchain, the speed of blockchain operations, the cost of transactions, the challenge of exchanging data between smart contracts and the real world, as well as potential attacks from malicious actors aimed at stealing cryptocurrency from user accounts.
We also briefly discussed mining as the process of adding new blocks to the blockchain. Mining is necessary for transaction execution. Those who engage in mining ensure the blockchain operates effectively and earn rewards in cryptocurrency for their efforts.
Lesson 2. Setting Up the Working Environment in Ubuntu and DebianChoosing the Operating System
Installing the Required Utilities
Installing Geth and Swarm on Ubuntu
Installing Geth and Swarm on Debian
Preliminary Preparation
Downloading the Go distribution
Setting Environment Variables
Checking the Go version
Installing Geth and Swarm
Creating a private blockchain
Готовим файл genesis.json
Creating a working directory
Creating an account
Starting node initialization
Node launch parameters
Connecting to our node
Managing mining and checking balance
Exiting the Geth console
Lesson Summary
Lesson 3: Setting up the working environment on Raspberry Pi 3Preparing Raspberry Pi 3 for operation
Installing Raspbian
Installing updates
Enabling SSH access
Setting a static IP address
Installing the Required Utilities
Installing Go
Downloading the Go distribution
Setting Environment Variables
Checking the Go version
Installing Geth and Swarm
Creating a private blockchain
Checking account and balance
Lesson Summary
Lesson 4: Accounts and transferring funds between accountsViewing and adding accounts
Viewing the list of accounts
Adding an account
geth account command parameters
Account passwords
Cryptocurrency in Ethereum
Currency units in Ethereum
Determining the current balance of our accounts
Transferring funds from one account to another
Method eth.sendTransaction
Viewing transaction status
Transaction receipt
Lesson Summary
Lesson 5: Publishing the first contractSmart contracts in Ethereum
Executing a smart contract
Ethereum virtual machine
Integrated development environment Remix Solidity IDE
Starting compilation
Calling contract functions
Publishing the contract in a private network
Getting ABI definition and contract bytecode
Publishing the contract
Checking the status of the contract publication transaction
Calling contract functions
Batch compiler solc
Installing solc on Ubuntu
Installing solc on Debian
Compiling the HelloSol contract
Publishing the contract
Installing solc on Raspbian
Lesson Summary
Урок 6. Смарт-контракты и Node.jsУстановка Node.js
Installing on Ubuntu
Installing on Debian
Installing and running Ganache-cli
Installing Web3
Installing solc
Installing Node.js on Raspbian
Script for retrieving the list of accounts in the console
Script for publishing the smart contract
Starting and retrieving parameters
Getting launch parameters
Compiling the contract
Unlocking the account
Loading the ABI and binary code of the contract
Estimating the required amount of gas
Creating an object and launching contract publication
Running the contract publication script
Calling smart contract functions
Is it possible to update the published smart contract?
Working with Web3 version 1.0.x
Retrieving the list of accounts
Publishing the contract
Calling contract functions
Transferring funds from one account to another
Transferring funds to the contract account
Updating the HelloSol smart contract
Creating a script to view the account balance
Добавляем вызов функции getBalance в скрипт call_contract_get_promise.js
Funding the smart contract account
Lesson Summary
Lesson 7: Introduction to TruffleInstalling Truffle
Creating the HelloSol project
Creating the project directory and files
Contracts Catalog
Migrations Catalog
Test Catalog
Файл truffle-config.js
Compiling the HelloSol contract
Launching Contract Publication
Calling HelloSol Contract Functions in Truffle Invitation
Вызов функций контракта HelloSol из скрипта JavaScript под управлением Node.js
Installing truffle-contract Module
Calling getValue and getString Contract Functions
Calling setValue and setString Contract Functions
Modifying Contract and Republishing
Working with Web3 version 1.0.x
Making Changes to HelloSol Smart Contract
Scripts for Calling Contract Methods
Testing in Truffle
Solidity Test
JavaScript Test
Lesson Summary
Lesson 8. Solidity Data TypesContract for Learning Data Types
Boolean Data Types
Unsigned Integers and Signed Integers
Fixed-Point Numbers
Address
Complex Type Variables
Fixed-Size Arrays
Dynamic Arrays
Listing
Structures
Mapping Dictionaries
Lesson Summary
Lesson 9. Migration of Contracts to Private Network and Rinkeby NetworkPublishing Contract from Truffle to Private Geth Network
Preparing Private Network Node
Preparing Contract for Operation
Compiling and Migrating Contract to Truffle Network
Starting Migration to Local Geth Network
Fetching Truffle Artifacts
Publishing Contract from Truffle to Rinkeby Test Network
Preparing Geth Node for Rinkeby Operation
Node Synchronization
Adding Accounts
Funding Rinkeby Account with Ether
Starting Contract Migration to Rinkeby Network
Viewing Contract Information in Rinkeby Network
Truffle Console for Rinkeby Network
A Simpler Way to Call Contract Functions
Вызов методов контракта при помощи Node.js
Transferring Funds Between Accounts in Truffle Console for Rinkeby
Lesson Summary
Lesson 10. Decentralized Data Storage with Ethereum SwarmHow Ethereum Swarm Works
Installing and Starting Swarm
File and Directory Operations
Uploading Files to Ethereum Swarm
Reading Files from Ethereum Swarm
Viewing Manifest of Uploaded File
Uploading Directories with Subdirectories
Reading File from Uploaded Directory
Using Public Swarm Gateway
Обращение к Swarm из скриптов Node.js
Perl Module Net::Ethereum::Swarm
Installing Net::Ethereum::Swarm Module
Writing and Reading Data
Lesson Summary
Lesson 11. Web3.py Framework for Working with Ethereum in PythonInstalling Web3.py
Updating and Installing Required Packages
Installing easysolc Module
Publishing Contract with Web3.py
Compiling the contract
Connecting to Provider
Executing Contract Publication
Saving Contract Address and ABI to File
Running the contract publication script
Calling Contract Methods
Reading Contract Address and ABI from JSON File
Connecting to Provider
Creating Contract Object
Calling Contract Methods
Truffle and Web3.py
Lesson Summary
Lesson 12. OraclesCan a Smart Contract Trust Data from the Outside World?
Oracles as Information Intermediaries in Blockchain
Data Source
Code to Represent Data from the Source
Oracle for Recording Exchange Rates in Blockchain
Contract USDRateOracle
Updating Exchange Rate in Smart Contract
Using Web Socket Provider
Waiting for RateUpdate Event
Processing RateUpdate Event
Initiating Data Update in Smart Contract
Lesson Summary
Source: habr.com
