


Product localization is crucial for international companies entering new countries and regions. Similarly, localization is necessary for mobile applications. When a developer starts international expansion, it's important to allow users from different countries to interact with the interface in their native language. In this article, we will create a React Native app using the .
Skillbox recommends: Online educational course .
Reminder: for all readers of 'Habr' - a discount of 10,000 rubles when enrolling in any Skillbox course with the promo code 'Habr'.
Tools and Skills
Basic skills in working with React Native are required to understand this article. To familiarize yourself with the setup of your work machine, you can .
We will need the following versions of software tools:
- Node v10.15.0
- npm 6.4.1
- yarn 1.16.0
- react-native 0.59.9
- react-native-localize 1.1.3
- i18n-js 3.3.0
Getting Started
We will create an application that supports English, French, and Arabic languages. First, we create a new project using react-native-cli. To do this, type the following in the terminal:
$ react-native init multiLanguage
$ cd multiLanguage
Adding Required Libraries
First, we need to install react-native-localize by typing the following:
$ yarn add react-native-localize
If there are issues during installation, .
The react-native-localize library provides the developer access to multilingual functions. However, it requires another library - i18n.
This article describes the use of to facilitate translation in JavaScript.
$ yarn add i18n-js
Since i18n-js does not provide caching or memoization, I recommend using lodash.memoize for this purpose:
$ yarn add lodash.memoize
Working with Translations
To enable the application to work with other languages, we first need to create a translations directory inside src, then create three JSON files, one for each language.
1. en.json for English;
2. fr.json for French;
3. ar.json for Arabic.
These files contain JSON objects with keys and values. The key will be the same for each language. It is used by the application to display textual information.
The value is the text that needs to be shown to the user.
English:
{ "hello": "Hello World!"}
French
{ «hello»: «Hello, World!»}
Arabic
{ «hello»: «Hello, World!»}
Similarly, other languages can be added.
Main Code
At this stage, open the App.js file and add the import:
import React from "react";
import * as RNLocalize from "react-native-localize";
import i18n from "i18n-js";
import memoize from "lodash.memoize"; // Use for caching/memoize for better performance

import {
  I18nManager,
  SafeAreaView,
  ScrollView,
  StyleSheet,
  Text,
  View
} from "react-native";
After that, auxiliary functions and constants are added for later use.
const translationGetters = {
  // lazy requires (metro bundler does not support symlinks)
  ar: () => require("./src/translations/ar.json"),
  en: () => require("./src/translations/en.json"),
  fr: () => require("./src/translations/fr.json")
};

const translate = memoize(
  (key, config) => i18n.t(key, config),
  (key, config) => (config ? key + JSON.stringify(config) : key)
);

const setI18nConfig = () => {
  // fallback if no available language fits
  const fallback = { languageTag: "en", isRTL: false };

  const { languageTag, isRTL } =
    RNLocalize.findBestAvailableLanguage(Object.keys(translationGetters)) ||
    fallback;

  // clear translation cache
  translate.cache.clear();
  // update layout direction
  I18nManager.forceRTL(isRTL);
  // set i18n-js config
  i18n.translations = { [languageTag]: translationGetters[languageTag]() };
  i18n.locale = languageTag;
};
Now let's create the App class component:
export default class App extends React.Component {
  constructor(props) {
    super(props);
    setI18nConfig(); // set initial config
  }

  componentDidMount() {
    RNLocalize.addEventListener("change", this.handleLocalizationChange);
  }

  componentWillUnmount() {
    RNLocalize.removeEventListener("change", this.handleLocalizationChange);
  }

  handleLocalizationChange = () => {
    setI18nConfig();
    this.forceUpdate();
  };

  render() {
    return (

        {translate("hello")}

    );
  }
}

const styles = StyleSheet.create({
  safeArea: {
    backgroundColor: "white",
    flex: 1,
    alignItems: "center",
    justifyContent: "center"
  },
  value: {
    fontSize: 18
  }
});
The first element — setI18nConfig() — sets the initial configuration.
Then, in componentDidMount(), you need to add event listening; this element will track updates and call handleLocalizationChange() when they occur.
The handleLocalizationChange() method triggers setI18nConfig() and forceUpdate(). This is necessary for Android devices, as the component must be rendered for the changes to be noticeable.
Then, you need to remove the listener in componentWillUnmount().
Finally, in render(), hello is returned by using translate() with the key parameter. After these actions, the application will be able to 'understand' which language is needed and show messages in that language.
Running the Application
Now it's time to check how the translation works.
First, we run the application in the simulator or emulator by typing
$ react-native run-ios
$ react-native run-android
It will look something like this:

Now you can try changing the language to French, and then run the application.

We do the same with the Arabic language; there is no difference.
So far, everything is going well.
But what happens if you choose a random language that is not available in the application?
It turns out that the task of findBestLanguage is to provide the best translation available. As a result, the default language will be displayed.
This relates to the phone's settings. For example, in the iOS emulator, you can see the order of languages.
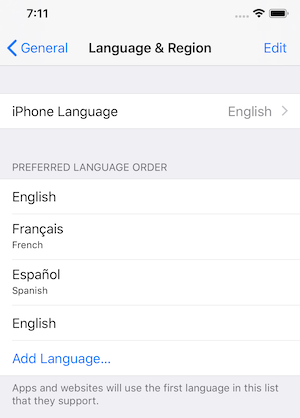
If the selected language is not preferred, findBestAvailableLanguage returns undefined, so the default language is displayed.
Bonus
The react-native-localize package has an API that provides access to a large number of language elements. Before you start working, .
Conclusions
You can make the application multilingual without much trouble. React-native-localize is a great option that allows you to expand the user base of the application.
The source code of the project .
Skillbox recommends:
- Two-Year Practical Course .
- Online Course .
- Practical Year Course .
Source: habr.com
