

Hello everyone, dear friends!
Today we will talk about how to turn an ordinary router into one that will provide all your connected devices with an anonymous internet connection.
Let's go!
You will find out how to access the internet via DNS, how to set up a constantly encrypted connection, how to protect your home router, and a few more useful tips in our article.
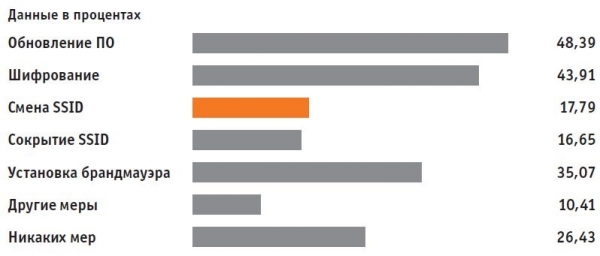
To prevent tracking of your identity through the router configuration, you need to disable as many web services on your device as possible and change the default SSID identifier. We will demonstrate this using a Zyxel router, but the principle is similar for other routers.
Open your router's configuration page in a browser. For Zyxel router users, you need to enter "my.keenetic.net" in the address bar.
Now you need to enable the display of advanced features. To do this, click on the three dots in the upper right corner of the web interface and toggle the switch for the "Advanced View" option.
Go to the "Wireless | Radio Network" menu and in the "Radio Network" section enter a new name for your network. Along with the name for the 2.4 GHz frequency, don’t forget to change the name for the 5 GHz frequency as well. For the SSID, choose any sequence of characters.
Next, go to the "Internet | Permit Access" menu. Uncheck the options "Internet access via HTTPS enabled" and "Internet access to your storage media via FTP/FTPS enabled". Confirm the changes you made.
Setting Up DNS Protection
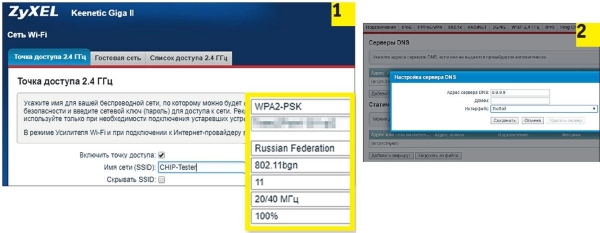
First, change your router's SSID.
(1). Then in the DNS settings, specify the Quad9 server.
(2). Now all connected clients are secure.
Your router should also use an alternative DNS server, such as Quad9. The advantage is that if this service is set up directly on the router, all clients connected to it will automatically access the internet through this server. We will explain the configuration again using Zyxel as an example.
Following the method described in the previous section on "Changing the Router Name and SSID Identifier", go to the Zyxel configuration page and navigate to the "Wi-Fi Network" section on the "Access Point" tab. Here, check the box for "Hide SSID".
Go to the "DNS Servers" tab and enable the "Address" option. server In the parameter line, enter the IP address "9.9.9.9".
Setting up a permanent redirect through VPN
You can achieve even more anonymity with a permanent connection via VPN. In this case, you won't have to worry about setting up such a connection on each individual device anymore — every client connected to the router will automatically access the Internet through a secured VPN connection. However, for this purpose, you will need an alternative firmware, DD-WRT, which must be installed on the router instead of the manufacturer's firmware. This software is compatible with most routers.
For example, the premium-grade Netgear Nighthawk X10 router supports DD-WRT. However, you can also use an inexpensive router like the TP-Link TL-WR940N as a Wi-Fi access point. After choosing the router, you should decide which VPN service you prefer. In our case, we opted for the free version of ProtonVPN.
Installing alternative firmware
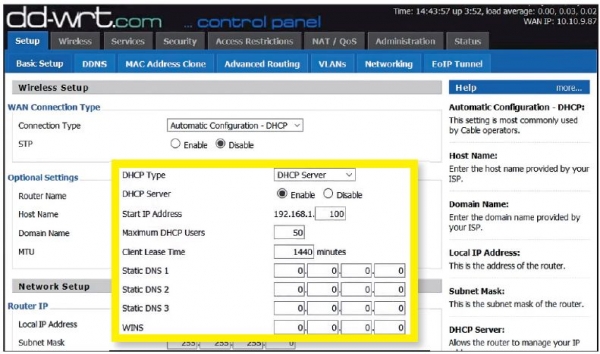
After installing DD-WRT, change the DNS server of the device before configuring the VPN connection.
We will explain the installation using the Netgear router as an example, but the process is similar for other models. Download the DD-WRT firmware and install it using the update feature. After rebooting, you will find yourself in the DD-WRT interface. You can translate the program into Russian by selecting "Administration | Management | Language" and choosing the "Russian" option.
Go to "Setup | Basic setup" and enter the value "9.9.9.9" for the "Static DNS 1" parameter.
Also check the boxes for the following options: "Use DNSMasq for DHCP", "Use DNSMasq for DNS", and "DHCP-Authoritative". Save the changes by clicking the "Save" button.
In the "Setup | IPV6" section, disable "IPV6 Support". This will prevent de-anonymization through IPV6 leaks.
Compatible devices can be found across various price categories, such as the TP-Link TL-WR940N (around 1300 RUB)
or the Netgear R9000 (around 28,000 RUB)
Configuration of the Virtual Private Network (VPN)
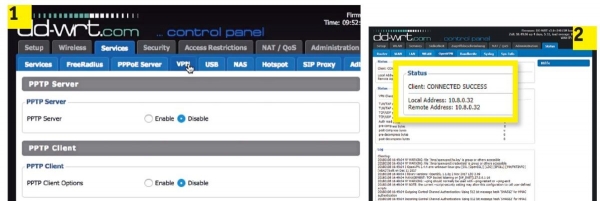
Launch the OpenVPN Client (1) in DD-WRT. After entering the access data, you can check in the "Status" menu whether the tunnel has been established to protect data (2)
To set up the VPN, you need to modify the settings of ProtonVPN. The configuration is not trivial, so please follow the instructions closely. After registering on the ProtonVPN website, download the Ovpn file with the nodes you want to use from your account settings. This file contains all the necessary information for access. In the case of other service providers, you will find this information elsewhere, but most often in your account.
Open the Ovpn file in a text editor. Then, on the router configuration page, click on 'Services | VPN' and on this tab, activate the 'OpenVPN Client' option using the toggle switch. For the available options, enter the information from the Ovpn file. For a free server in the Netherlands, for example, use 'nlfree-02.protonvpn.com' in the 'Server IP/Name' line, and set the port to '1194'.
Set 'Tunnel Device' to 'TUN', and 'Encryption Cipher' to 'AES-256 CBC'.
For 'Hash Algorithm', set it to 'SHA512', enable 'User Pass Authentication', and enter your Proton login details in the 'User' and 'Password' fields.
Now it's time to deal with the 'Advanced Options' section. Set 'TLS Cypher' to 'None', and 'LZO Compression' to 'Yes'. Activate 'NAT' and 'Firewall Protection', and specify '1500' for 'Tunnel MTU settings'. 'TCP-MSS' should be disabled.
In the 'TLS Auth Key' field, copy the values from the Ovpn file that you find under the line 'BEGIN OpenVPN Static key V1'.
In the 'Additional Configuration' field, enter the lines you find under 'Server Name'.
Finally, for 'CA Cert', paste the text you see in the line 'BEGIN Certificate'. Save the settings by clicking the 'Save' button and start the installation by pressing 'Apply Settings'. After rebooting, your router will be connected to the VPN. For reliability, check the connection through 'Status | OpenVPN'.
Tips for Your Router
With a few simple tricks, you can transform your home router into a secure node. Before you start the setup, you should change the default configuration of the device.
Changing the SSID Do not leave the router's name as default. Attackers can infer information about your device from it and launch targeted attacks on relevant vulnerabilities.
DNS Protection Set the Quad9 DNS server as the default on the configuration page. After this, all connected clients will access the network through secure DNS. This also eliminates the need for manual device configuration.
Using a VPN Through alternative DD-WRT firmware, available for most router models, you can build a VPN connection for all clients associated with this device. There's no need to configure clients individually. All information is sent to the network in an encrypted form. Web services will no longer be able to determine your actual IP address and location.
By following all the recommendations outlined in this article, even data protection specialists won't be able to fault your configurations, as you will achieve the utmost anonymity (as much as possible).
Thank you for reading my article, more manuals, articles on cybersecurity, the dark web, and much more can be found on our [Telegram channel](https://t.me/dark3idercartel).
Thanks to everyone who read my article and engaged with it. I hope you enjoyed it, and please share your thoughts in the comments!
Source: habr.com
