

Messages about environmental protection and the development of alternative energy sources often pop up online. Sometimes there are even reports about how a solar power plant was set up in an abandoned village so that local residents can enjoy the benefits of civilization not just 2-3 hours a day while the generator runs, but constantly. However, this seems somewhat distant from our lives, so I decided to share my experience to show how a solar power plant for a private house is structured and how it works. I will cover all stages: from the initial idea to turning on all the devices, and I will share my operational experiences. The article will be quite lengthy, so those who don't enjoy reading can check out the video. I tried to explain the same things there, but you'll see how I put it all together myself.
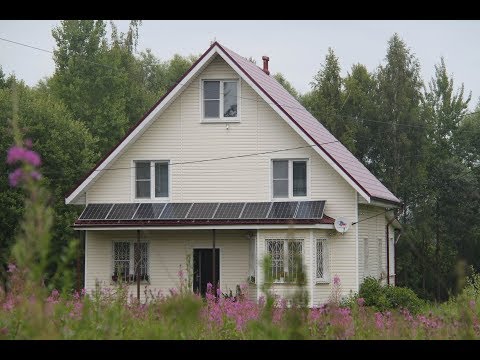
Initial data: a private house of about 200 m2 connected to the power grid. Three-phase input with a total capacity of 15 kW. The house has a standard set of electrical appliances: refrigerator, televisions, computers, washing machines, dishwashers, and so on. The power supply is not very stable: the longest recorded outage lasted 6 consecutive days, ranging from 2 to 8 hours.
What I want to achieve: to forget about power outages and use electricity regardless of the circumstances.
Possible bonuses: Maximize the use of solar energy so that the house primarily runs on solar power, while any shortfall is supplemented from the grid. As a bonus, after the law allowing individuals to sell electricity back to the grid is passed, I can start compensating part of my expenses by selling excess production back to the general power grid.
Where to start?
There are always at least two ways to solve any problem: learn it yourself or delegate the task to someone else. The first option involves studying theoretical materials, reading forums, talking to solar power station owners, overcoming internal hesitations, and finally purchasing equipment and installing it afterward. The second option is to call a specialized company, where they will ask many questions, help select and sell the necessary equipment, and possibly install it for a separate fee. I decided to combine these two methods, partly because I find it interesting and partly to avoid getting caught by sellers who are just out to make a quick profit by selling me something I don't need. Now it’s time for some theory to understand how I made my choices.
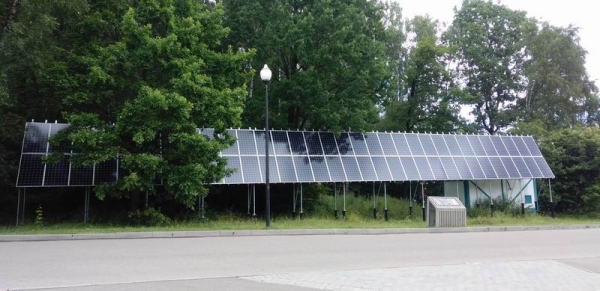
The photo shows an example of 'mismanaged' funds in the construction of a solar power station. Note that the solar panels are installed BEHIND the tree – thus, they do not get sunlight, and they simply do not work.
Types of Solar Power Stations
Let me clarify that I will not be discussing industrial solutions or super-powerful systems, but rather a typical consumer solar power station for a small house. I am not an oligarch to throw money around, yet I adhere to the principle of sufficient reason. So, I do not want to heat a pool with 'solar' electricity or charge an electric car that I don't even own, but I want all my devices at home to work continuously without relying on the grid.
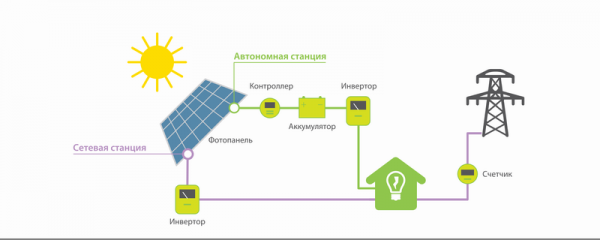
Now I will talk about the types of solar power stations for private homes. In general, there are three main types, but there can be variations. I will list them in order of increasing cost of each system.
Grid-Tied Solar Power Station This type of power station combines low cost with maximum ease of use. It consists of just two elements: solar panels and a grid inverter. Electricity from the solar panels is directly converted to 220V/380V in the home and is consumed by domestic energy systems. However, there is a significant drawback: a grid connection is necessary for the operation of the grid inverter. In the event of a power outage, the solar panels will turn into a "pumpkin" and cease to produce electricity, as the inverter requires a power grid to function, meaning there must be electricity present. Moreover, with the existing electricity grid infrastructure, the operation of the grid inverter is not very profitable. For example, if you have a 3 kW solar power station and your home consumes 1 kW, the excess will "flow" into the grid, and regular meters measure energy "modularly," meaning that the energy sent to the grid will be counted as consumed energy for which you will still have to pay. This raises a logical question: what to do with the excess energy and how to avoid this? Let’s move on to the second type of solar power stations.
Hybrid Solar Power Station This type of power station combines the advantages of both grid and autonomous power stations. It consists of four elements: solar panels, a solar controller, batteries, and a hybrid inverter. The key component is the hybrid inverter, which is capable of mixing energy consumed from the external grid with the energy generated by the solar panels. Moreover, good inverters have the ability to prioritize the consumed energy. Ideally, the home should consume energy from the solar panels first and only draw from the external grid when that is insufficient. In the case of the external grid disappearing, the inverter switches to autonomous operation, using energy from the solar panels and energy stored in the batteries. This way, even if the electricity is cut off for an extended period and it’s a cloudy day (or the power goes off at night), everything will continue to function in the house. But what should you do if there is no electricity at all and you need to survive? Here I move on to the third type of power station.
Autonomous Solar Power Station This type of power station allows for complete independence from external electricity networks. It can include more than 4 standard components: solar panels, a solar controller, a battery, and an inverter.
Additionally, instead of solar panels, a small hydroelectric power station, a wind power station, or a generator (diesel, gas, or gasoline) may be installed. Generally, such setups include a generator because there may not be sun or wind, and the battery energy supply is not infinite—in this case, the generator starts and provides energy to the entire facility while also recharging the battery. This power station can easily be transformed into a hybrid by connecting to an external electricity network if the inverter has this capability. The main difference between an off-grid inverter and a hybrid one is that the former cannot mix energy from solar panels with energy from the external grid. On the other hand, a hybrid inverter can work as an off-grid inverter if the external network is turned off. Typically, hybrid inverters are priced similarly to fully off-grid ones, and if there are differences, they are insignificant.
What is a solar controller?
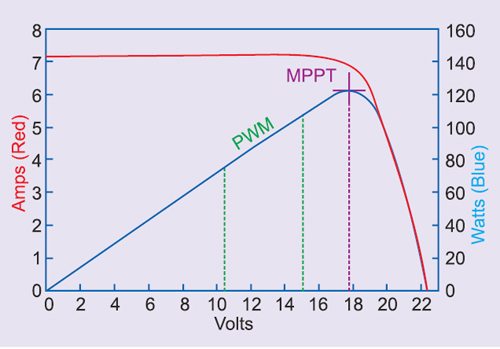
All types of solar power stations have a solar controller. Even in grid-tied solar power stations, it is present, as it is part of the grid inverter. Many hybrid inverters are also produced with solar controllers built in. So what is it, and what is it needed for? I will talk about hybrid and off-grid solar power stations since that is my case, and I can provide more details about the grid inverter design in the comments if there are requests.
A solar controller is a device that converts energy received from solar panels into energy that can be processed by an inverter. For example, solar panels are typically made with a voltage of multiples of 12V. And batteries are also manufactured in multiples of 12V, as has been the practice. Simple systems with a power of 1-2 kW operate at 12V. More powerful systems in the range of 2-3 kW work at 24V, while heavy systems of 4-5 kW and more operate at 48V. I will only consider 'home' systems now because I know there are inverters that work at voltages of several hundred volts, but that poses a danger for home use.
So, let's assume we have a 48V system and solar panels rated at 36V (the panel is built as multiples of 3x12V). How do we achieve the required 48V for the inverter to operate? Naturally, we connect a 48V battery to the inverter, and to this battery, we connect a solar controller on one side and the solar panels on the other. Solar panels are designed to operate at a higher voltage to be able to charge the battery. The solar controller, receiving this higher voltage from the solar panels, transforms it to the required level and supplies it to the battery. This is a simplified explanation. There are controllers capable of reducing the voltage from 150-200V from the solar panels down to 12V for batteries, but this involves very high currents and the controller operates at a lower efficiency. The ideal case occurs when the voltage from the solar panels is double that of the battery.
There are two types of solar controllers: PWM (Pulse Width Modulation) and MPPT (Maximum Power Point Tracking). The fundamental difference between them is that a PWM controller can only work with panel assemblies that do not exceed the battery voltage. An MPPT controller can operate with a significant voltage over the battery. Additionally, MPPT controllers have a notably higher efficiency but are more expensive.
How to choose solar panels?
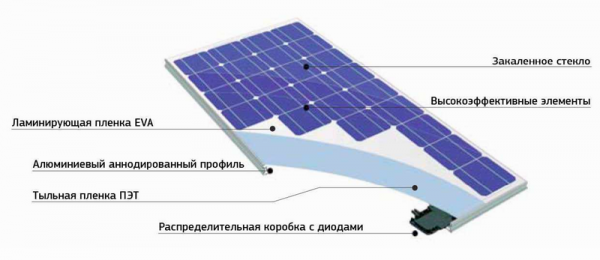
At first glance, all solar panels look the same: solar cell units are connected by busbars, and there are two wires at the back: positive and negative. However, there are many nuances to consider. Solar panels come from different types of elements: amorphous, polycrystalline, and monocrystalline. I won't advocate for one type over another. I'll simply say that I personally prefer monocrystalline solar panels. But that's not all. Every solar battery is a four-layered structure: glass, transparent EVA film, solar cell, and sealing film. Each of these steps is extremely important. Not just any glass will do; it needs to have a special texture that reduces light reflection and refracts incoming light at an angle to ensure the elements are maximally illuminated, as the amount of light directly affects the energy produced. The transparency of the EVA film determines how much energy reaches the element and how much energy the panel generates. If the film is defective and becomes cloudy over time, then energy output will noticeably decrease.
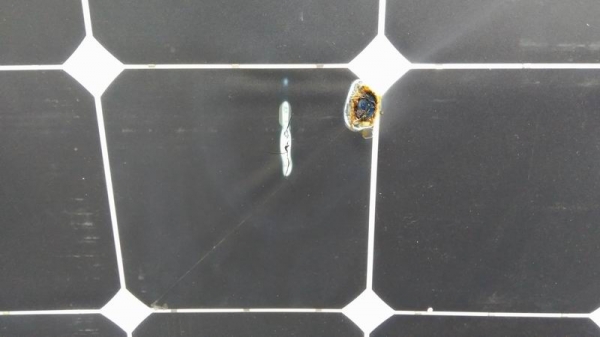
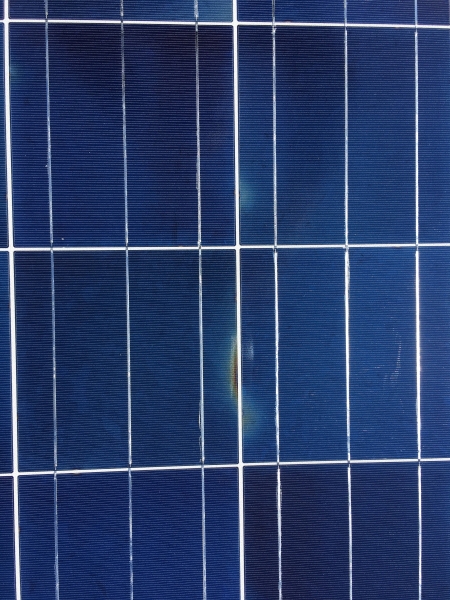
Next come the elements themselves, and they are categorized by quality: Grade A, B, C, D, and so on. Of course, it's better to have Grade A elements and good soldering, because with poor contact, the element will overheat and fail faster. Additionally, the finishing film must also be of good quality to ensure effective sealing. In case of panel de-sealing, moisture will quickly reach the elements, leading to corrosion, and the panel will also fail.
How to properly choose a solar panel? The main manufacturer for our country is China, although there are also Russian manufacturers in the market. There are many OEM factories that will affix any ordered label and send the panels to the customer. However, there are factories that provide a complete production cycle and are capable of controlling the quality of products at all stages of production. How can you find out about such factories and brands? There are a couple of authoritative laboratories that conduct independent tests of solar panels and publicly publish the results of these tests. Before making a purchase, you can type in the name and model of the solar panel and find out how closely it matches the stated characteristics. The first laboratory is , and the second . If the manufacturer of the panels is not on these lists, it’s worth considering the quality. This doesn't mean that the panel is bad. It just means the brand may be OEM, and the manufacturing factory produces other panels as well. In any case, presence in the lists of these laboratories indicates that you are buying solar batteries not from a fly-by-night manufacturer.
My choice of solar power station
Before purchasing, it's important to outline the tasks that the solar power station must accomplish, to avoid paying for unnecessary features and overpaying for unused options. Now, I'll move on to practical considerations based on my own experience. Initially, the goal and context: in the village, there are periodic power outages lasting from half an hour to 8 hours. Outages can happen once a month or several days in a row. The task: to ensure continuous power supply to the house with some consumption limitations during external grid outages. During this time, essential safety and life-support systems must function, i.e.: the pumping station, surveillance and alarm systems, router, server, and the entire network infrastructure, lighting, computers, and refrigerator. Secondarily: televisions, entertainment systems, power tools (lawnmower, trimmer, irrigation pump). Devices that can be turned off include: boiler, electric kettle, iron, and other heating and high-consumption appliances whose operation is not immediately essential. The kettle can be boiled on a gas stove, and ironing can be done later.
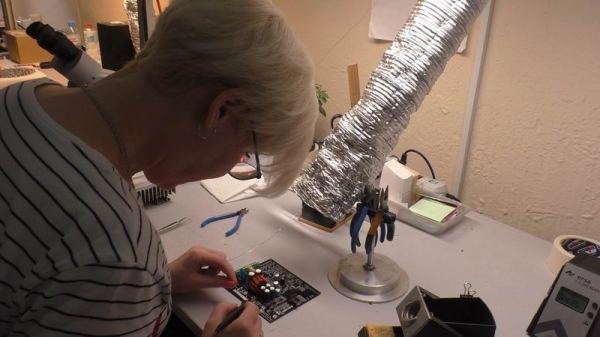
Typically, a solar power station can be purchased in one place. Sellers of solar panels also provide all the necessary equipment, so I began my search focusing on solar batteries. One reputable brand is TopRay Solar. They have good reviews and real operational experience in Russia, particularly in Krasnodar Krai, where they know a lot about sunshine. In Russia, there is an official distributor and regional dealers; on the aforementioned websites with laboratories for testing solar panels, this brand ranks quite well, meaning it is a reliable choice. Moreover, the company selling TopRay solar panels also specializes in manufacturing controllers and electronics for road infrastructure: traffic management systems, LED traffic lights, flashing signs, solar controllers, and more. Out of curiosity, I even managed to visit their manufacturing facility – it was quite high-tech, and there were even women who knew how to handle a soldering iron properly. It’s impressive!
With my wishlist, I approached them and asked to assemble a couple of configurations: a more expensive one and a cheaper one for my home. They asked me a series of clarifying questions regarding the reserved power, the presence of consumers, and the maximum and constant power consumption. The latter was quite unexpected for me: the house, in energy-saving mode, when only the security and surveillance systems, internet connectivity, and network infrastructure are operational, consumes 300-350 W. This means that even if no one is using electricity at home, internal needs consume up to 215 kWh per month. Here is where you start thinking about conducting an energy audit. You begin to unplug chargers, TVs, and set-top boxes from the sockets, which each consume a little in standby mode, but it adds up significantly.
I won't keep you in suspense; I settled on the cheaper system, as often the cost of batteries can take up to half the amount for the power station. The list of equipment turned out to be the following:
- - 9 pcs
- Single-Phase Hybrid Inverter 5 kW - 1 pc
- Battery - 4 pcs
Additionally, I was offered to purchase a professional mounting system for solar panels on the roof, but after looking at the photos, I decided to use homemade mounts and save some money as well. But I decided to assemble the system myself and didn't regret the effort and time, while the installers work with these systems constantly and guarantee a quick and quality result. So it's up to you: working with factory mounts is much more pleasant and easier, while my solution is simply cheaper.
What does the solar power station provide?
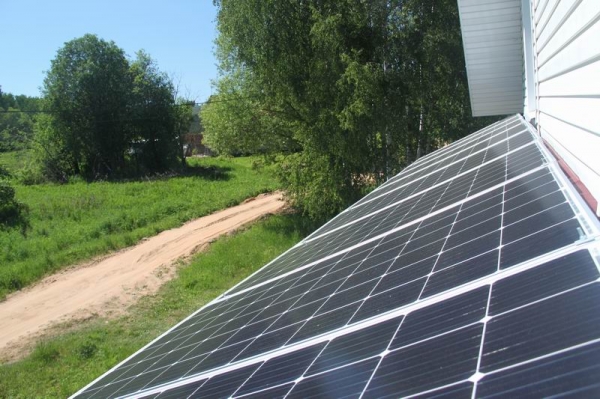
This kit can produce up to 5 kW of power in autonomous mode – this is the power I chose for the single-phase inverter. If I buy a similar inverter and a connection module for it, I can increase the power to 5 kW + 5 kW = 10 kW per phase. Alternatively, a three-phase system can be created, but for now, I'm satisfied with this. The inverter is high-frequency and therefore quite light (around 15 kg) and takes up little space – it can be easily mounted on the wall. It already has 2 MPPT controllers with a capacity of 2.5 kW each built in, meaning I can add as many more panels without purchasing additional equipment.
I have solar panels rated at 2520 W, but due to the suboptimal installation angle, they generate less – the maximum I’ve seen is 2400 W. The optimal angle is perpendicular to the sun, which in our latitudes is about 45 degrees to the horizon. My panels are installed at a 30-degree angle.
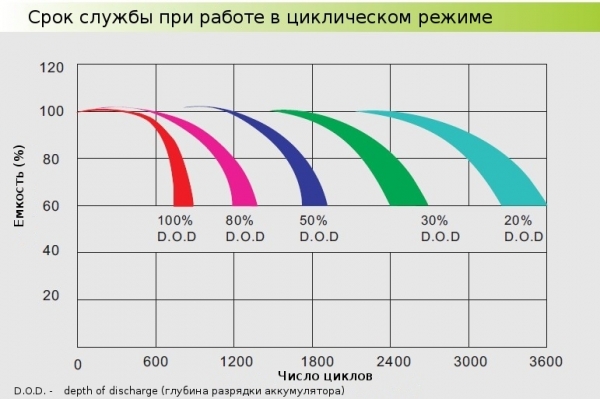
The battery bank has a capacity of 100 Ah at 48 V, meaning it stores 4.8 kWh, but fully depleting them is highly undesirable as it significantly reduces their lifespan. It's advisable to discharge such batteries no more than 50%. Lithium iron phosphate or lithium titanate batteries can be charged and discharged deeply with high currents, whereas lead-acid batteries, whether liquid, gel, or AGM, should not be pushed to their limits. So, I have half the capacity, which is 2.4 kWh, enough for about 8 hours of fully autonomous operation without sunlight. This will be enough for a night of running all systems, and there will still be half the battery capacity left for emergency mode. In the morning, the sun will rise and start charging the batteries while also supplying energy to the house. This means the house can function autonomously in this mode if energy consumption is reduced and the weather is good. For complete autonomy, more batteries and a generator could be added, as winter offers little sunlight and a generator will be necessary.
I am starting to assemble
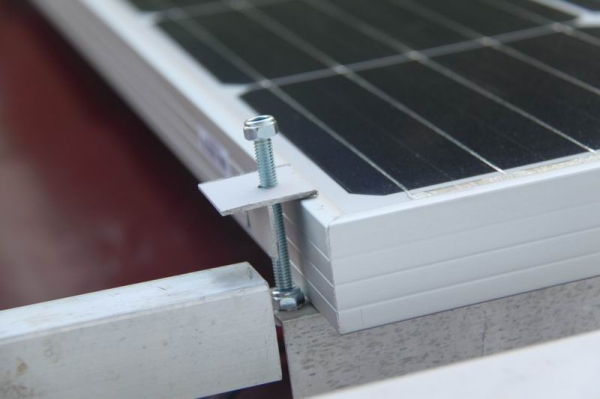
Before purchasing and assembling, it is necessary to calculate the entire system to avoid mistakes with the placement of all systems and cable routing. There is about 25-30 meters from the solar panels to the inverter, and I have previously laid two flexible wires with a cross-section of 6 mm², as they will carry voltage up to 100 V and current of 25-30 A. This cross-sectional reserve was chosen to minimize losses in the wire and maximize energy delivery to the devices. I mounted the solar panels on homemade brackets made from aluminum angles and secured them with makeshift fasteners. To prevent the panel from sliding down, there are pairs of 30 mm bolts pointing upwards on the aluminum angle opposite each panel, serving as makeshift
The solar panels were assembled into three blocks, with three panels in each. In the blocks, the panels are connected in series, which allows the voltage to be raised to 115V without load and reduce current, meaning smaller gauge wires can be selected. The blocks are connected in parallel using special connectors, ensuring good contact and watertightness – these are called MC4. I used the same connectors to connect the wires to the solar controller since they provide reliable contact and quick circuit closure for maintenance.
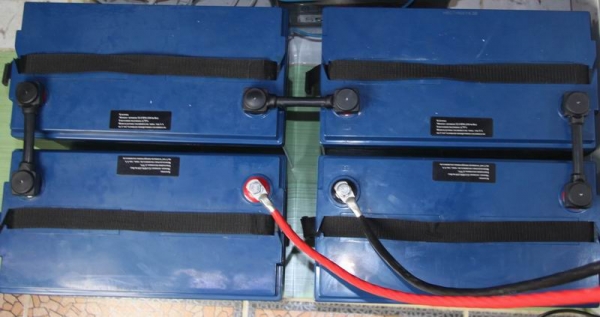
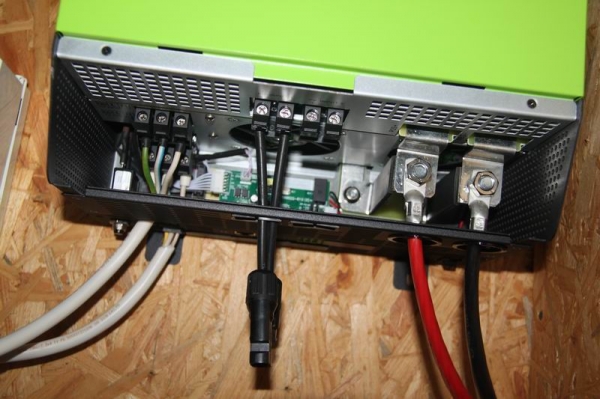
Next, we move on to the installation in the house. The batteries are pre-charged with a "smart" car charger to balance the voltage and are connected in series to provide 48V. They are then connected to the inverter with a cable of 25 mm². By the way, during the first connection of the batteries to the inverter, there will be a noticeable spark at the contacts. If you did not reverse the polarity, everything is fine – the inverter has quite large capacitors that start charging upon connection to the batteries. The maximum power of the inverter is 5000W, meaning the current flowing from the battery will be 100-110A. The selected cable is sufficient for safe operation. After connecting the batteries, you can connect the external power supply and the load of the house. The wires are connected to the terminal blocks: phase, neutral, and ground. It's simple and straightforward, but if repairing a socket is unsafe for you, it's better to trust this system's connection to experienced electricians. Finally, I connect the solar panels: here too, you must be careful not to reverse the polarity. With a power of 2.5 kW, improper connection can instantly burn out the solar controller. Not to mention, at such power levels, you could weld directly from the solar panels without an inverter. This won't do any favors for the solar panels, but the power of the sun is truly immense. Since I additionally use MC4 connectors, it’s virtually impossible to reverse the polarity when everything is initially installed correctly.
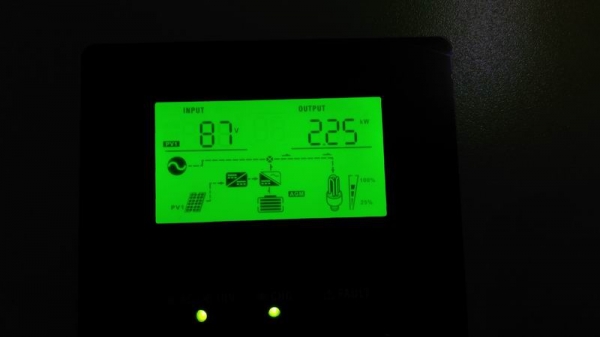
Everything is connected; with a single switch, the inverter switches to setup mode: here you need to set the type of battery, operating mode, charging currents, and more. There is a clear instruction manual for this, and if you can manage the router setup, the inverter setup shouldn’t be overly complicated either. You just need to know the battery parameters and configure them correctly to ensure they last as long as possible. After that, hmm… That’s when the most interesting part begins.
Operating a Hybrid Solar Power Plant
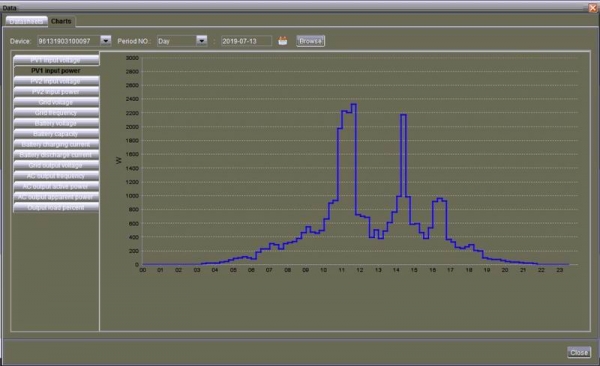
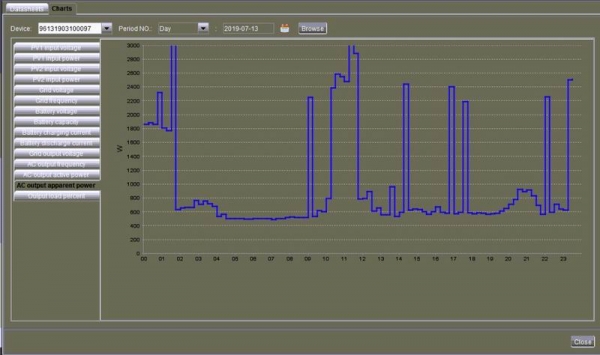
After the solar power plant was launched, my family and I reassessed many of our habits. For instance, previously, the washing machine or dishwasher would run after 11 PM when the night rate applied in the electricity grid, but now these energy-intensive tasks have been moved to the daytime. This is because the washing machine consumes 500-2100 watts during operation, while the dishwasher consumes 400-2100 watts. Why is there such a variation? Because the pumps and motors consume a little, but water heaters are extremely power-hungry. Ironing has also turned out to be more 'profitable' and pleasant to do during the day: the room is much brighter, and the energy from the sun completely covers the iron's consumption. The screenshot demonstrates the energy production graph from the solar power plant, showing the morning peak when the washing machine was running and consuming a lot of energy — this energy was generated by the solar panels.
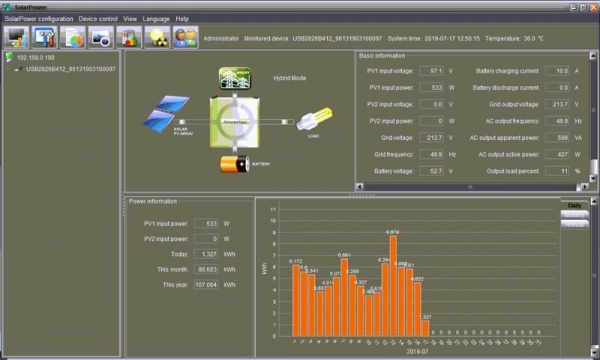
In the first few days, I approached the inverter several times to check the power generation and consumption readings on the screen. After that, I installed a utility on my home server that displays the inverter's operating mode and all the parameters of the power supply in real time. For example, in the screenshot, it can be seen that the house consumes more than 2 kW of energy (the AC output active power point) and all this energy is sourced from solar panels (the PV1 input power point). This means the inverter, operating in hybrid mode with a priority on solar power, fully covers the energy consumption of appliances from the sun. Isn't that great? Each day a new column of energy generation appeared in the table, which was quite pleasing. And when the entire village lost electricity, I only found out about it from the beep of the inverter, which alerted me to its operation in standalone mode. For the entire house, this only meant one thing: we continue living as before while the neighbors fetch water with buckets.
But there are also nuances to having a solar power station at home:
- I started noticing that birds love solar panels and, flying over them, can't help but feel joyous about having such technological equipment in the village. This means that sometimes the solar panels need to be cleaned from streaks and dust. I think that if they were installed at a 45-degree angle, all the marks would simply be washed away in the rain. The output isn’t significantly affected by a few bird tracks, but if part of the panel is shaded, the drop in output becomes noticeable. I noticed this when the sun began to set and the shadow from the roof started to cover the panels one by one. So it's better to place the panels away from any structures that can cast shadows on them. Even in the evening, with diffuse light, the panels produced several hundred watts.
- With a large power output from solar panels and a boost of 700 watts or more, the inverter activates the fans more vigorously, and they become audible if the door to the technical room is open. Here, you either close the door or mount the inverter on the wall using damping pads. In principle, nothing unexpected: any electronics heat up during operation. Just keep in mind that the inverter shouldn’t be placed where its operational noise could be a nuisance.
- The branded application can send notifications via email or SMS when certain events occur, such as enabling/disabling the external network, battery discharge, and similar situations. However, the application uses the unprotected SMTP port 25, while all modern email services, like gmail.com or mail.ru, operate on the secure port 465. This means that, as it stands, email notifications are not received, which would be desirable.
It can't be said that these points are disappointing, as we should always strive for perfection, but the current energy independence is definitely worth it.
Conclusion
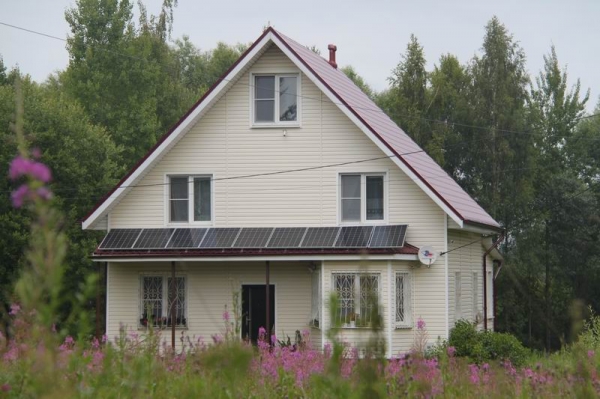
I believe this won't be my last account of my own solar power system. The operational experience in various modes and at different times of the year will undoubtedly vary, but I know for sure that even if the electricity goes out on New Year's, my house will be illuminated. Based on the operation of the installed solar power system, I can say that it was worth it. Several outages of the external network went unnoticed. I only learned about a few due to neighbor calls asking, 'Do you also have no power?'. The running numbers showcasing electricity generation are immensely satisfying, and the ability to unplug the UPS from the computer knowing that everything will keep running even during a power outage is reassuring. When legislation allowing private individuals to sell electricity back to the grid is finally adopted, I will be the first to apply for this feature, because in the inverter, it’s enough to change just one setting, and all the generated but unused energy will be sold to the grid, earning me money. Overall, this has proven to be quite straightforward, effective, and convenient. I am ready to answer your questions and withstand the pressure from critics who insist that solar power systems are just a gimmick in our latitudes.
Source: habr.com
