


Article we successfully installed a hypervisor on the server, connected storage to it, took care of elementary security, and even created the first virtual machine. Now let's look at how to implement the most basic tasks that have to be performed in order to always be able to restore the operation of services in the event of a failure.
Regular Proxmox tools allow you not only to back up data, but also create sets of pre-configured images of operating systems for quick deployment. This not only helps to create a new server for any service in a few seconds if necessary, but also reduces downtime to a minimum.
We will not talk about the need to create backups, since this is obvious and has long been an axiom. Let's dwell on some non-obvious things and features.
First, let's look at how data is stored during the backup procedure.
Backup Algorithms
Let's start with the fact that Proxmox has a good standard toolkit for creating backup copies of virtual machines. It allows you to easily save all the data of a virtual machine and supports two compression mechanisms, as well as three methods for creating these copies.
Let's first analyze the compression mechanisms:
- LZO compression. A lossless data compression algorithm invented back in the mid-90s. The code has been written (implemented in Proxmox by the lzop utility). The main feature of this algorithm is a very fast unpacking. Therefore, any backup created using this algorithm can, if necessary, be deployed in a minimum amount of time.
- .gzip compression. Using this algorithm, the backup will be compressed on the fly by the GNU Zip utility, which uses the powerful Deflate algorithm created by . The main focus is on maximum data compression, which allows you to reduce the disk space occupied by backups. The main difference from LZO is that the compression / decompression procedures take a fairly large amount of time.
Archiving Modes
Proxmox offers the system administrator three backup methods to choose from. Using them, you can solve the required task by prioritizing the need for downtime and the reliability of the backup made:
- Snapshot mode. This mode can also be called Live backup, since it does not require shutting down the virtual machine to use it. Using this mechanism does not interrupt the VM, but it has two very serious drawbacks - problems may arise due to file locks by the operating system and the slowest creation speed. Backups created by this method should always be tested in a test environment. Otherwise, there is a risk that if an emergency recovery is necessary, they may fail.
- Suspend Mode. The virtual machine temporarily "freezes" its state until the end of the backup process. The contents of the RAM are not erased, which allows you to continue working exactly from the point at which the work was suspended. Of course, this causes a server downtime while copying information, but there is no need to turn off / on the virtual machine, which is quite critical for some services. Especially if the start of some services is not automatic. However, such backups should also be deployed to a test environment for testing.
- Stop mode. The most reliable backup method, but requires a complete shutdown of the virtual machine. A command is sent for a normal shutdown, after a stop, a backup is performed, and then a command is given to turn on the virtual machine. The number of errors in this approach is minimal and most often reduced to zero. Backups created this way almost always deploy correctly.
Performing a Reservation Procedure
To create a backup:
- We pass to the necessary virtual machine.
- Select item Reservation.
- Push the button Book Now. A window will open in which you can select the options for the future backup.
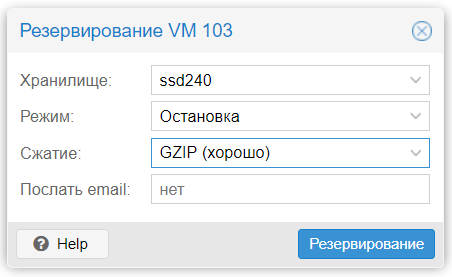
- As storage, we indicate the one that we connected .
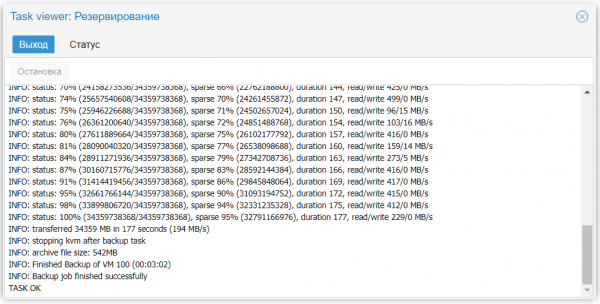
- After selecting the parameters, press the button Reservation and wait for the backup to be created. This will be indicated by the inscription TASK OK.
Now the created archives with backup copies of virtual machines will be available for download from the server. The simplest and most common way to copy is SFTP. To do this, use the popular cross-platform FTP client FileZilla, which can work over the SFTP protocol.
- In the Host enter the IP address of our virtualization server in the field Username enter root, in the field Password - the one that was selected during installation, and in the field Port specify "22" (or any other port that was set for SSH connections).
- Push the button Quick connection and, if all the data was entered correctly, then in the active panel you will see all the files located on the server.
- Go to the directory /mnt/storage. All created backups will be in the "dump" subdirectory. They will look like:
- vzdump-qemu-machine-date-time.vma.gz in case of choosing the GZIP method;
- vzdump-qemu-machine-date-time.vma.lzo in case of choosing the LZO method.
Backups are recommended to be downloaded immediately from the server and stored in a safe place, for example, in our cloud storage. If you unpack a file with vma permission, the utility of the same name that comes with Proxmox, then inside there will be files with extensions raw, conf и fw. These files contain the following:
- raw - disk image;
- conf - VM configuration;
- fw - firewall settings.
Restoring from a backup
Let's consider a situation where a virtual machine was accidentally deleted and it needs to be urgently restored from a backup:
- Open the repository containing the backup.
- Go to the tab Content.
- Select the desired copy and click the button Recuperation.
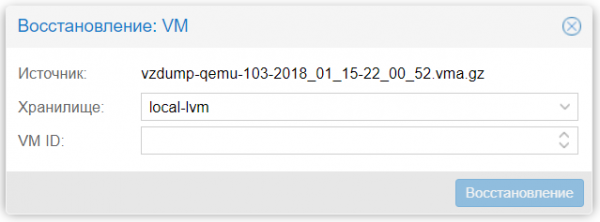
- Specify the target storage and the ID that will be assigned to the machine after the process is completed.
- Push the button Recuperation.
As soon as the restoration is completed, the VM will appear in the list of available ones.
Cloning a virtual machine
For example, suppose a company needs to make changes to a critical service. Such a change is implemented through the introduction of many edits to the configuration files. The result is unpredictable, and any error can cause a service failure. To prevent such an experiment from affecting a running server, it is recommended to clone the virtual machine.
The cloning mechanism will create an exact copy of the virtual server, from which it is permissible to make any changes without affecting the operation of the main service. Then, if the changes are successfully applied, the new VM starts up and the old one shuts down. In this process, there is a feature that should always be remembered. On the cloned machine, the IP address will be exactly the same as the original VM, which means that there will be an address conflict when it starts up.
Let's see how to avoid this situation. Just before cloning, you should make changes to the network configuration. To do this, you must temporarily change the IP address, but do not restart the network service. After cloning on the main machine, you should return the settings back, and set any other IP address on the cloned machine. Thus, we will get two copies of the same server at different addresses. This will allow you to quickly introduce a new service into operation.
If this service is a web server, then you only need to change the A-record with your DNS provider, after which client requests for this domain name will be sent to the address of the cloned virtual machine.
By the way, Selectel provides all its customers with the service of hosting any number of domains on NS servers for free. Recordings are managed both using our control panel and using a special API. Read more about it .
Cloning a VM in Proxmox is a very simple task. To perform it, you must perform the following steps:
- Go to the car we need.
- Select from the menu More item Clone.
- In the window that opens, fill in the Name parameter.
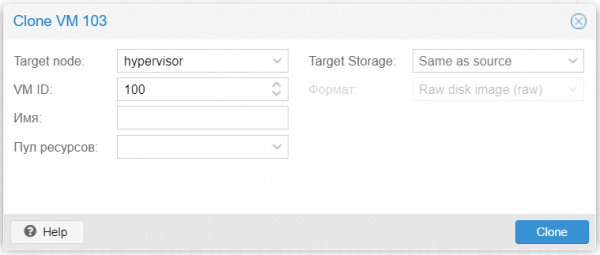
- Perform cloning at the push of a button Clone.
This tool allows you to make a copy of the virtual machine not only on the local server. If several virtualization servers are combined into a cluster, then using this tool you can immediately move the created copy to the desired physical server. A useful feature is the choice of disk storage (option Target Storage), which is very useful when moving a virtual machine from one physical media to another.
Virtual Drive Formats
Let's talk more about the storage formats used in Proxmox:
- RAW. The most understandable and simple format. This is a byte-for-byte hard drive data file with no compression or optimization. This is a very convenient format because it is easy to mount it with the standard mount command on any linux system. Moreover, this is the fastest "type" of storage, since the hypervisor does not need to process it in any way.
A serious disadvantage of this format is that how much space you have allocated for a virtual machine, exactly as much space on the hard disk will be occupied by a file in RAW format (regardless of the actual space used inside the virtual machine).
- QEMU image format (qcow2). Perhaps the most versatile format for any task. Its advantage is that the data file will contain only the real occupied space inside the virtual machine. For example, if 40 GB of space was allocated, but only 2 GB was actually used, then the rest of the space will be available for other VMs. This is very important in terms of saving disk space.
A small disadvantage of working with this format is the following: in order to mount such an image on any other system, you will first need to download and also use the utility qemu-nbd, which will allow the operating system to access the file as if it were a normal block device. After that, the image will become available for mounting, partitioning, checking the file system, and other operations.
It should be remembered that all I / O operations when using this format are processed programmatically, which entails a slowdown when actively working with the disk subsystem. If the task is to deploy a database on the server, then it is better to choose the RAW format.
- VMware image format (vmdk). This format is native to the VMware vSphere hypervisor and was included in Proxmox for compatibility. It allows you to migrate a VMware virtual machine to a Proxmox infrastructure.
Using vmdk on a permanent basis is not recommended, this format is the slowest in Proxmox, so it is only suitable for performing migrations, nothing more. Probably in the foreseeable future this shortcoming will be eliminated.
Working with disk images
Proxmox comes with a very handy utility called qemu-img. One of its functions is to convert virtual disk images. To use it, just open the hypervisor console and run a command in the format:
qemu-img convert -f vmdk test.vmdk -O qcow2 test.qcow2In the example above, the VMware virtual storage vmdk image named test will be converted to the format qcow2. This is a very useful command when you want to fix an error in the original format selection.
Thanks to the same command, you can force the creation of the desired image using the argument create:
qemu-img create -f raw test.raw 40GThis command will create a test image in the format RAW, 40 GB in size. Now it is suitable for connecting to any of the virtual machines.
Resizing a virtual disk
And in conclusion, we will show how to increase the size of a disk image if, for some reason, there is no longer enough space on it. To do this, we use the resize argument:
qemu-img resize -f raw test.raw 80GNow our image has become 80 GB in size. You can view detailed information about the image using the argument info:
qemu-img info test.rawDo not forget that the extension of the image itself will not increase the size of the partition automatically - it will simply add the available free space. To enlarge a partition, use the command:
resize2fs /dev/sda1where / Dev / sda1 - desired section.
Backup automation
Using the manual method of creating backups is a very laborious and time consuming task. Therefore, Proxmox VE includes a tool for automatic scheduled backups. Let's see how to do it:
- Using the web interface of the hypervisor, open the item Data center.
- Select item Reservation.
- Push the button Add.
- Set parameters for the scheduler.
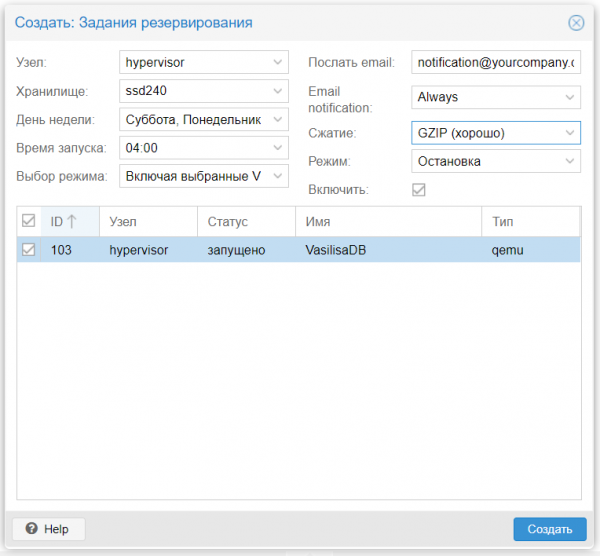
- Check the box Insert.
- Save changes using the button Create.
Now the scheduler will automatically run the backup program at exactly the specified time, based on the specified schedule.
Conclusion
We have considered regular methods of backup and recovery of virtual machines. Their use allows you to save all data without any problems and urgently restore them in case of an emergency.
Of course, this is not the only possible way to save important data. There are many tools such as , with the help of which you can create full and incremental copies of the contents of virtual servers based on Linux.
When performing backup procedures, you should always take into account that they actively load the disk subsystem. As such, it is recommended that these procedures be performed during off-load times to avoid delays in I/O operations within machines. You can monitor the status of disk operations delays directly from the hypervisor web interface (IO delay parameter).
Source: habr.com
