


Praegu on REST API muutunud veebirakenduste arendamise standardiks, võimaldades arendust jagada sõltumatuteks osadeks. UI jaoks kasutatakse praegu erinevaid populaarseid raamistikke nagu Angular, React, Vue ja teised. Backend arendajad saavad valida laia valiku keeltest ja raamistikest. Täna tahaksin rääkida sellisest raamistikust nagu . Me TestMace'is kasutame seda aktiivselt sisemiste projektide jaoks. Kasutades nest ja paketti , loome lihtsa CRUD rakenduse.
Miks valita NestJS
Viimastel aastatel on JavaScripti kogukonnas ilmunud palju backend raamistikku. Ja kuigi nende funktsionaalsus on sarnane Nestiga, on ühes asjas see kindlasti ülekaalus — arhitektuur. Järgmised omadused NestJS'is võimaldavad luua tööstuslikke rakendusi ja skaleerida arendust suurte meeskondade jaoks:
- TypeScripti kasutamine peamise arendamise keele jaotuna. Kuigi NestJS toetab ka JavaScripti, võib osa funktsionaalsusest mitte töötada, eriti kui on tegemist kolmandate osapoolte pakettidega;
- DI konteineri olemasolu, mis võimaldab luua nõrgalt seotud komponente;
- raamistiku funktsionaalsus on jagatud sõltumatuteks vahetatavateks komponentideks. Näiteks, raamistiku all võib kasutada nii , kui ka , andmebaasiga töötamiseks pakub nest välja kohesed sidumised , , ;
- NestJS ei sõltu platvormist ja toetab REST, GraphQL, Websockets, gRPC jne.
Ise raamistik on inspireeritud frontend raamistikust Angular ja omab konceptuaalselt palju ühist sellega.
NestJS-i installimine ja projekti seadistamine
Nest sisaldab paketti /cli, который позволяет быстро развернуть базовый каркас приложения. Установим глобально данный пакет:
npm install --global @nest/cliPärast installimist genereerime meie rakenduse põhiraami nimega nest-rest. Seda teeme kasutades käsku nest new nest-rest.
nest new nest-rest
dmitrii@dmitrii-HP-ZBook-17-G3:~\/projects $ nest new nest-rest
  Meie rakendus luuakse mõne sekundi pärast..

LOO \/nest-rest\/.prettierrc (51 bait)
LOO \/nest-rest\/README.md (3370 bait)
LOO \/nest-rest\/nest-cli.json (84 bait)
LOO \/nest-rest\/nodemon-debug.json (163 bait)
LOO \/nest-rest\/nodemon.json (67 bait)
LOO \/nest-rest\/package.json (1805 bait)
LOO \/nest-rest\/tsconfig.build.json (97 bait)
LOO \/nest-rest\/tsconfig.json (325 bait)
LOO \/nest-rest\/tslint.json (426 bait)
LOO \/nest-rest\/src\/app.controller.spec.ts (617 bait)
LOO \/nest-rest\/src\/app.controller.ts (274 bait)
LOO \/nest-rest\/src\/app.module.ts (249 bait)
LOO \/nest-rest\/src\/app.service.ts (142 bait)
LOO \/nest-rest\/src\/main.ts (208 bait)
LOO \/nest-rest\/test\/app.e2e-spec.ts (561 bait)
LOO \/nest-rest\/test\/jest-e2e.json (183 bait)

? Millist pakettide haldurit soovite kasutada? yarn
 Paigaldamine käib...

  Projekt nest-rest on edukalt loodud
  Alusta järgmiste käskudega:

$ cd nest-rest
$ yarn run start

                          Aitäh, et installisite Nest
                 Palun arvestage annetamisega meie avatud kollektiivile
                        et aidata meil seda paketti hallata.

                 Annetage: https:\/\/opencollective.com\/nest
Pakettide halduriks valime yarn.
Praegu saate serverit käivitada käsuga npm start ja minnes aadressile saate nautida avalehte. Kuid me ei ole siin selleks ja liigume edasi.
Seadistame töö andmebaasiga
Selle artikli andmebaasihalduse süsteemina valisin PostgreSQL. Maitse üle ei vaielda, minu arvates on see kõige küpsem andmebaas, millel on kõik vajalikud võimalused. Nagu juba mainitud, pakub Nest andmebaasidega töötamiseks integreerimist erinevate pakettidega. Kuna minu valik langes PostgreSQL-ile, on loogiline valida TypeORM ORM-ina. Paigaldame vajalikud paketid andmebaasi integreerimiseks:
yarn add typeorm @nestjs\/typeorm pg
Korralikult, iga paketi eesmärk:
- typeorm — pakett, mis sisaldab otseselt ORM-i;
- @nestjs\/typeorm — TypeORM pakett NestJS jaoks. Lisab mooduleid projekti moodulite importimiseks ning komplekti abidekoraatoreid;
- pg — draiver PostgreSQL-iga töötamiseks.
Okei, paketid on paigaldatud, nüüd on vaja andmebaas käivitada. Andmebaasi käivitamiseks kasutan docker-compose.yml järgmise sisuga:
docker-compose.yml
version: '3.1'

services:
  db:
    image: postgres:11.2
    restart: alati
    environment:
      POSTGRES_PASSWORD: example
    volumes:
      - ..\/db:\/var\/lib\/postgresql\/data
      - .\/postgresql.conf:\/etc\/postgresql\/postgresql.conf
    ports:
      - 5432:5432
  adminer:
    image: adminer
    restart: alati
    ports:
      - 8080:8080
Kuidas näha, see fail konfigureerib 2 konteineri käivitamist:
- db — see on konteiner, mis sisaldab andmebaasi. Meie juhul kasutatakse PostgreSQL versiooni 11.2;
- adminer — andmebaasi haldamise tööriist. Pakub veebiliidest andmebaasi vaatamiseks ja haldamiseks.
TCP-ühenduste töötlemiseks lisasin järgmise sisu sisaldava konfiguratsiooni.
postgresql.conf
# -----------------------------
# PostgreSQL configuration file
# -----------------------------
#
# This file consists of lines of the form:
#
# name = value
#
# (The "=" is optional.) Whitespace may be used. Comments are introduced with
# "#" anywhere on a line. The complete list of parameter names and allowed
# values can be found in the PostgreSQL documentation.
#
# The commented-out settings shown in this file represent the default values.
# Re-commenting a setting is NOT sufficient to revert it to the default value;
# you need to reload the server.
#
# This file is read on server startup and when the server receives a SIGHUP
# signal. If you edit the file on a running system, you have to SIGHUP the
# server for the changes to take effect, run "pg_ctl reload", or execute
# "SELECT pg_reload_conf()". Some parameters, which are marked below,
# require a server shutdown and restart to take effect.
#
# Any parameter can also be given as a command-line option to the server, e.g.,
# "postgres -c log_connections=on". Some parameters can be changed at run time
# with the "SET" SQL command.
#
# Memory units: kB = kilobytes Time units: ms = milliseconds
# MB = megabytes s = seconds
# GB = gigabytes min = minutes
# TB = terabytes h = hours
# d = days
#------------------------------------------------------------------------------
# FILE LOCATIONS
#------------------------------------------------------------------------------
# The default values of these variables are driven from the -D command-line
# option or PGDATA environment variable, represented here as ConfigDir.
#data_directory = 'ConfigDir' # use data in another directory
# (change requires restart)
#hba_file = 'ConfigDir/pg_hba.conf' # host-based authentication file
# (change requires restart)
#ident_file = 'ConfigDir/pg_ident.conf' # ident configuration file
# (change requires restart)
# If external_pid_file is not explicitly set, no extra PID file is written.
#external_pid_file = '' # write an extra PID file
# (change requires restart)
#------------------------------------------------------------------------------
# CONNECTIONS AND AUTHENTICATION
#------------------------------------------------------------------------------
# - Connection Settings -
listen_addresses = '*'
#listen_addresses = 'localhost' # what IP address(es) to listen on;
# comma-separated list of addresses;
# defaults to 'localhost'; use '*' for all
# (change requires restart)
#port = 5432 # (change requires restart)
#max_connections = 100 # (change requires restart)
#superuser_reserved_connections = 3 # (change requires restart)
#unix_socket_directories = '/tmp' # comma-separated list of directories
# (change requires restart)
#unix_socket_group = '' # (change requires restart)
#unix_socket_permissions = 0777 # begin with 0 to use octal notation
# (change requires restart)
#bonjour = off # advertise server via Bonjour
# (change requires restart)
#bonjour_name = '' # defaults to the computer name
# (change requires restart)
# - TCP Keepalives -
# see "man 7 tcp" for details
#tcp_keepalives_idle = 0 # TCP_KEEPIDLE, in seconds;
# 0 selects the system default
#tcp_keepalives_interval = 0 # TCP_KEEPINTVL, in seconds;
# 0 selects the system default
#tcp_keepalives_count = 0 # TCP_KEEPCNT;
# 0 selects the system default
# - Authentication -
#authentication_timeout = 1min # 1s-600s
#password_encryption = md5 # md5 or scram-sha-256
#db_user_namespace = off
# GSSAPI using Kerberos
#krb_server_keyfile = ''
#krb_caseins_users = off
# - SSL -
#ssl = off
#ssl_ca_file = ''
#ssl_cert_file = 'server.crt'
#ssl_crl_file = ''
#ssl_key_file = 'server.key'
#ssl_ciphers = 'HIGH:MEDIUM:+3DES:!aNULL' # allowed SSL ciphers
#ssl_prefer_server_ciphers = on
#ssl_ecdh_curve = 'prime256v1'
#ssl_min_protocol_version = 'TLSv1'
#ssl_max_protocol_version = ''
#ssl_dh_params_file = ''
#ssl_passphrase_command = ''
#ssl_passphrase_command_supports_reload = off
#------------------------------------------------------------------------------
# RESOURCE USAGE (except WAL)
#------------------------------------------------------------------------------
# - Memory -
#shared_buffers = 32MB # min 128kB
# (change requires restart)
#huge_pages = try # on, off, or try
# (change requires restart)
#temp_buffers = 8MB # min 800kB
#max_prepared_transactions = 0 # zero disables the feature
# (change requires restart)
# Caution: it is not advisable to set max_prepared_transactions nonzero unless
# you actively intend to use prepared transactions.
#work_mem = 4MB # min 64kB
#maintenance_work_mem = 64MB # min 1MB
#autovacuum_work_mem = -1 # min 1MB, or -1 to use maintenance_work_mem
#max_stack_depth = 2MB # min 100kB
#shared_memory_type = mmap # the default is the first option
# supported by the operating system:
# mmap
# sysv
# windows
# (change requires restart)
#dynamic_shared_memory_type = posix # the default is the first option
# supported by the operating system:
# posix
# sysv
# windows
# mmap
# (change requires restart)
# - Disk -
#temp_file_limit = -1 # limits per-process temp file space
# in kB, or -1 for no limit
# - Kernel Resources -
#max_files_per_process = 1000 # min 25
# (change requires restart)
# - Cost-Based Vacuum Delay -
#vacuum_cost_delay = 0 # 0-100 milliseconds (0 disables)
#vacuum_cost_page_hit = 1 # 0-10000 credits
#vacuum_cost_page_miss = 10 # 0-10000 credits
#vacuum_cost_page_dirty = 20 # 0-10000 credits
#vacuum_cost_limit = 200 # 1-10000 credits
# - Background Writer -
#bgwriter_delay = 200ms # 10-10000ms between rounds
#bgwriter_lru_maxpages = 100 # max buffers written/round, 0 disables
#bgwriter_lru_multiplier = 2.0 # 0-10.0 multiplier on buffers scanned/round
#bgwriter_flush_after = 0 # measured in pages, 0 disables
# - Asynchronous Behavior -
#effective_io_concurrency = 1 # 1-1000; 0 disables prefetching
#max_worker_processes = 8 # (change requires restart)
#max_parallel_maintenance_workers = 2 # taken from max_parallel_workers
#max_parallel_workers_per_gather = 2 # taken from max_parallel_workers
#parallel_leader_participation = on
#max_parallel_workers = 8 # maximum number of max_worker_processes that
# can be used in parallel operations
#old_snapshot_threshold = -1 # 1min-60d; -1 disables; 0 is immediate
# (change requires restart)
#backend_flush_after = 0 # measured in pages, 0 disables
#------------------------------------------------------------------------------
# WRITE-AHEAD LOG
#------------------------------------------------------------------------------
# - Settings -
#wal_level = replica # minimal, replica, or logical
# (change requires restart)
#fsync = on # flush data to disk for crash safety
# (turning this off can cause
# unrecoverable data corruption)
#synchronous_commit = on # synchronization level;
# off, local, remote_write, remote_apply, or on
#wal_sync_method = fsync # the default is the first option
# supported by the operating system:
# open_datasync
# fdatasync (default on Linux)
# fsync
# fsync_writethrough
# open_sync
#full_page_writes = on # recover from partial page writes
#wal_compression = off # enable compression of full-page writes
#wal_log_hints = off # also do full page writes of non-critical updates
# (change requires restart)
#wal_buffers = -1 # min 32kB, -1 sets based on shared_buffers
# (change requires restart)
#wal_writer_delay = 200ms # 1-10000 milliseconds
#wal_writer_flush_after = 1MB # measured in pages, 0 disables
#commit_delay = 0 # range 0-100000, in microseconds
#commit_siblings = 5 # range 1-1000
# - Checkpoints -
#checkpoint_timeout = 5min # range 30s-1d
#max_wal_size = 1GB
#min_wal_size = 80MB
#checkpoint_completion_target = 0.5 # checkpoint target duration, 0.0 - 1.0
#checkpoint_flush_after = 0 # measured in pages, 0 disables
#checkpoint_warning = 30s # 0 disables
# - Archiving -
#archive_mode = off # enables archiving; off, on, or always
# (change requires restart)
#archive_command = '' # command to use to archive a logfile segment
# placeholders: %p = path of file to archive
# %f = file name only
# e.g. 'test ! -f /mnt/server/archivedir/%f && cp %p /mnt/server/archivedir/%f'
#archive_timeout = 0 # force a logfile segment switch after this
# number of seconds; 0 disables
# - Archive Recovery -
# These are only used in recovery mode.
#restore_command = '' # command to use to restore an archived logfile segment
# placeholders: %p = path of file to restore
# %f = file name only
# e.g. 'cp /mnt/server/archivedir/%f %p'
# (change requires restart)
#archive_cleanup_command = '' # command to execute at every restartpoint
#recovery_end_command = '' # command to execute at completion of recovery
# - Recovery Target -
# Set these only when performing a targeted recovery.
#recovery_target = '' # 'immediate' to end recovery as soon as a
# consistent state is reached
# (change requires restart)
#recovery_target_name = '' # the named restore point to which recovery will proceed
# (change requires restart)
#recovery_target_time = '' # the time stamp up to which recovery will proceed
# (change requires restart)
#recovery_target_xid = '' # the transaction ID up to which recovery will proceed
# (change requires restart)
#recovery_target_lsn = '' # the WAL LSN up to which recovery will proceed
# (change requires restart)
#recovery_target_inclusive = on # Specifies whether to stop:
# just after the specified recovery target (on)
# just before the recovery target (off)
# (change requires restart)
#recovery_target_timeline = 'latest' # 'current', 'latest', or timeline ID
# (change requires restart)
#recovery_target_action = 'pause' # 'pause', 'promote', 'shutdown'
# (change requires restart)
#------------------------------------------------------------------------------
# REPLICATION
#------------------------------------------------------------------------------
# - Sending Servers -
# Set these on the master and on any standby that will send replication data.
#max_wal_senders = 10 # max number of walsender processes
# (change requires restart)
#wal_keep_segments = 0 # in logfile segments; 0 disables
#wal_sender_timeout = 60s # in milliseconds; 0 disables
#max_replication_slots = 10 # max number of replication slots
# (change requires restart)
#track_commit_timestamp = off # collect timestamp of transaction commit
# (change requires restart)
# - Master Server -
# These settings are ignored on a standby server.
#synchronous_standby_names = '' # standby servers that provide sync rep
# method to choose sync standbys, number of sync standbys,
# and comma-separated list of application_name
# from standby(s); '*' = all
#vacuum_defer_cleanup_age = 0 # number of xacts by which cleanup is delayed
# - Standby Servers -
# These settings are ignored on a master server.
#primary_conninfo = '' # connection string to sending server
# (change requires restart)
#primary_slot_name = '' # replication slot on sending server
# (change requires restart)
#promote_trigger_file = '' # file name whose presence ends recovery
#hot_standby = on # "off" disallows queries during recovery
# (change requires restart)
#max_standby_archive_delay = 30s # max delay before canceling queries
# when reading WAL from archive;
# -1 allows indefinite delay
#max_standby_streaming_delay = 30s # max delay before canceling queries
# when reading streaming WAL;
# -1 allows indefinite delay
#wal_receiver_status_interval = 10s # send replies at least this often
# 0 disables
#hot_standby_feedback = off # send info from standby to prevent
# query conflicts
#wal_receiver_timeout = 60s # time that receiver waits for
# communication from master
# in milliseconds; 0 disables
#wal_retrieve_retry_interval = 5s # time to wait before retrying to
# retrieve WAL after a failed attempt
#recovery_min_apply_delay = 0 # minimum delay for applying changes during recovery
# - Subscribers -
# These settings are ignored on a publisher.
#max_logical_replication_workers = 4 # taken from max_worker_processes
# (change requires restart)
#max_sync_workers_per_subscription = 2 # taken from max_logical_replication_workers
#------------------------------------------------------------------------------
# QUERY TUNING
#------------------------------------------------------------------------------
# - Planner Method Configuration -
#enable_bitmapscan = on
#enable_hashagg = on
#enable_hashjoin = on
#enable_indexscan = on
#enable_indexonlyscan = on
#enable_material = on
#enable_mergejoin = on
#enable_nestloop = on
#enable_parallel_append = on
#enable_seqscan = on
#enable_sort = on
#enable_tidscan = on
#enable_partitionwise_join = off
#enable_partitionwise_aggregate = off
#enable_parallel_hash = on
#enable_partition_pruning = on
# - Planner Cost Constants -
#seq_page_cost = 1.0 # measured on an arbitrary scale
#random_page_cost = 4.0 # same scale as above
#cpu_tuple_cost = 0.01 # same scale as above
#cpu_index_tuple_cost = 0.005 # same scale as above
#cpu_operator_cost = 0.0025 # same scale as above
#parallel_tuple_cost = 0.1 # same scale as above
#parallel_setup_cost = 1000.0 # same scale as above
#jit_above_cost = 100000 # perform JIT compilation if available
# and query more expensive than this;
# -1 disables
#jit_inline_above_cost = 500000 # inline small functions if query is
# more expensive than this; -1 disables
#jit_optimize_above_cost = 500000 # use expensive JIT optimizations if
# query is more expensive than this;
# -1 disables
#min_parallel_table_scan_size = 8MB
#min_parallel_index_scan_size = 512kB
#effective_cache_size = 4GB
# - Genetic Query Optimizer -
#geqo = on
#geqo_threshold = 12
#geqo_effort = 5 # range 1-10
#geqo_pool_size = 0 # selects default based on effort
#geqo_generations = 0 # selects default based on effort
#geqo_selection_bias = 2.0 # range 1.5-2.0
#geqo_seed = 0.0 # range 0.0-1.0
# - Other Planner Options -
#default_statistics_target = 100 # range 1-10000
#constraint_exclusion = partition # on, off, or partition
#cursor_tuple_fraction = 0.1 # range 0.0-1.0
#from_collapse_limit = 8
#join_collapse_limit = 8 # 1 disables collapsing of explicit
# JOIN clauses
#force_parallel_mode = off
#jit = on # allow JIT compilation
#plan_cache_mode = auto # auto, force_generic_plan or
# force_custom_plan
#------------------------------------------------------------------------------
# REPORTING AND LOGGING
#------------------------------------------------------------------------------
# - Where to Log -
#log_destination = 'stderr' # Valid values are combinations of
# stderr, csvlog, syslog, and eventlog,
# depending on platform. csvlog
# requires logging_collector to be on.
# This is used when logging to stderr:
#logging_collector = off # Enable capturing of stderr and csvlog
# into log files. Required to be on for
# csvlogs.
# (change requires restart)
# These are only used if logging_collector is on:
#log_directory = 'log' # directory where log files are written,
# can be absolute or relative to PGDATA
#log_filename = 'postgresql-%Y-%m-%d_%H%M%S.log' # log file name pattern,
# can include strftime() escapes
#log_file_mode = 0600 # creation mode for log files,
# begin with 0 to use octal notation
#log_truncate_on_rotation = off # If on, an existing log file with the
# same name as the new log file will be
# truncated rather than appended to.
# But such truncation only occurs on
# time-driven rotation, not on restarts
# or size-driven rotation. Default is
# off, meaning append to existing files
# in all cases.
#log_rotation_age = 1d # Automatic rotation of logfiles will
# happen after that time. 0 disables.
#log_rotation_size = 10MB # Automatic rotation of logfiles will
# happen after that much log output.
# 0 disables.
# These are relevant when logging to syslog:
#syslog_facility = 'LOCAL0'
#syslog_ident = 'postgres'
#syslog_sequence_numbers = on
#syslog_split_messages = on
# This is only relevant when logging to eventlog (win32):
# (change requires restart)
#event_source = 'PostgreSQL'
# - When to Log -
#log_min_messages = warning # values in order of decreasing detail:
# debug5
# debug4
# debug3
# debug2
# debug1
# info
# notice
# warning
# error
# log
# fatal
# panic
#log_min_error_statement = error # values in order of decreasing detail:
# debug5
# debug4
# debug3
# debug2
# debug1
# info
# notice
# warning
# error
# log
# fatal
# panic (effectively off)
#log_min_duration_statement = -1 # logs statements and their durations
# according to log_statement_sample_rate. -1 is disabled,
# 0 logs all statement, > 0 logs only statements running at
# least this number of milliseconds.
#log_statement_sample_rate = 1 # Fraction of logged statements over
# log_min_duration_statement. 1.0 logs all statements,
# 0 never logs.
# - What to Log -
#debug_print_parse = off
#debug_print_rewritten = off
#debug_print_plan = off
#debug_pretty_print = on
#log_checkpoints = off
#log_connections = off
#log_disconnections = off
#log_duration = off
#log_error_verbosity = default # terse, default, or verbose messages
#log_hostname = off
#log_line_prefix = '%m [%p] ' # special values:
# %a = application name
# %u = user name
# %d = database name
# %r = remote host and port
# %h = remote host
# %p = process ID
# %t = timestamp without milliseconds
# %m = timestamp with milliseconds
# %n = timestamp with milliseconds (as a Unix epoch)
# %i = command tag
# %e = SQL state
# %c = session ID
# %l = session line number
# %s = session start timestamp
# %v = virtual transaction ID
# %x = transaction ID (0 if none)
# %q = stop here in non-session
# processes
# %% = '%'
# e.g. '<%u%%%d> '
#log_lock_waits = off # log lock waits >= deadlock_timeout
#log_statement = 'none' # none, ddl, mod, all
#log_replication_commands = off
#log_temp_files = -1 # log temporary files equal or larger
# than the specified size in kilobytes;
# -1 disables, 0 logs all temp files
#log_timezone = 'GMT'
#------------------------------------------------------------------------------
# PROCESS TITLE
#------------------------------------------------------------------------------
#cluster_name = '' # added to process titles if nonempty
# (change requires restart)
#update_process_title = on
#------------------------------------------------------------------------------
# STATISTICS
#------------------------------------------------------------------------------
# - Query and Index Statistics Collector -
#track_activities = on
#track_counts = on
#track_io_timing = off
#track_functions = none # none, pl, all
#track_activity_query_size = 1024 # (change requires restart)
#stats_temp_directory = 'pg_stat_tmp'
# - Monitoring -
#log_parser_stats = off
#log_planner_stats = off
#log_executor_stats = off
#log_statement_stats = off
#------------------------------------------------------------------------------
# AUTOVACUUM
#------------------------------------------------------------------------------
#autovacuum = on # Enable autovacuum subprocess? 'on'
# requires track_counts to also be on.
#log_autovacuum_min_duration = -1 # -1 disables, 0 logs all actions and
# their durations, > 0 logs only
# actions running at least this number
# of milliseconds.
#autovacuum_max_workers = 3 # max number of autovacuum subprocesses
# (change requires restart)
#autovacuum_naptime = 1min # time between autovacuum runs
#autovacuum_vacuum_threshold = 50 # min number of row updates before
# vacuum
#autovacuum_analyze_threshold = 50 # min number of row updates before
# analyze
#autovacuum_vacuum_scale_factor = 0.2 # fraction of table size before vacuum
#autovacuum_analyze_scale_factor = 0.1 # fraction of table size before analyze
#autovacuum_freeze_max_age = 200000000 # maximum XID age before forced vacuum
# (change requires restart)
#autovacuum_multixact_freeze_max_age = 400000000 # maximum multixact age
# before forced vacuum
# (change requires restart)
#autovacuum_vacuum_cost_delay = 2ms # default vacuum cost delay for
# autovacuum, in milliseconds;
# -1 means use vacuum_cost_delay
#autovacuum_vacuum_cost_limit = -1 # default vacuum cost limit for
# autovacuum, -1 means use
# vacuum_cost_limit
#------------------------------------------------------------------------------
# CLIENT CONNECTION DEFAULTS
#------------------------------------------------------------------------------
# - Statement Behavior -
#client_min_messages = notice # values in order of decreasing detail:
# debug5
# debug4
# debug3
# debug2
# debug1
# log
# notice
# warning
# error
#search_path = '"$user", public' # schema names
#row_security = on
#default_tablespace = '' # a tablespace name, '' uses the default
#temp_tablespaces = '' # a list of tablespace names, '' uses
# only default tablespace
#check_function_bodies = on
#default_transaction_isolation = 'read committed'
#default_transaction_read_only = off
#default_transaction_deferrable = off
#session_replication_role = 'origin'
#statement_timeout = 0 # in milliseconds, 0 is disabled
#lock_timeout = 0 # in milliseconds, 0 is disabled
#idle_in_transaction_session_timeout = 0 # in milliseconds, 0 is disabled
#vacuum_freeze_min_age = 50000000
#vacuum_freeze_table_age = 150000000
#vacuum_multixact_freeze_min_age = 5000000
#vacuum_multixact_freeze_table_age = 150000000
#vacuum_cleanup_index_scale_factor = 0.1 # fraction of total number of tuples
# before index cleanup, 0 always performs
# index cleanup
#bytea_output = 'hex' # hex, escape
#xmlbinary = 'base64'
#xmloption = 'content'
#gin_fuzzy_search_limit = 0
#gin_pending_list_limit = 4MB
# - Locale and Formatting -
#datestyle = 'iso, mdy'
#intervalstyle = 'postgres'
#timezone = 'GMT'
#timezone_abbreviations = 'Default' # Select the set of available time zone
# abbreviations. Currently, there are
# Default
# Australia (historical usage)
# India
# You can create your own file in
# share/timezonesets/.
#extra_float_digits = 1 # min -15, max 3; any value >0 actually
# selects precise output mode
#client_encoding = sql_ascii # actually, defaults to database
# encoding
# These settings are initialized by initdb, but they can be changed.
#lc_messages = 'C' # locale for system error message
# strings
#lc_monetary = 'C' # locale for monetary formatting
#lc_numeric = 'C' # locale for number formatting
#lc_time = 'C' # locale for time formatting
# default configuration for text search
#default_text_search_config = 'pg_catalog.simple'
# - Shared Library Preloading -
#shared_preload_libraries = '' # (change requires restart)
#local_preload_libraries = ''
#session_preload_libraries = ''
#jit_provider = 'llvmjit' # JIT library to use
# - Other Defaults -
#dynamic_library_path = '$libdir'
#------------------------------------------------------------------------------
# LOCK MANAGEMENT
#------------------------------------------------------------------------------
#deadlock_timeout = 1s
#max_locks_per_transaction = 64 # min 10
# (change requires restart)
#max_pred_locks_per_transaction = 64 # min 10
# (change requires restart)
#max_pred_locks_per_relation = -2 # negative values mean
# (max_pred_locks_per_transaction
# / -max_pred_locks_per_relation) - 1
#max_pred_locks_per_page = 2 # min 0
#------------------------------------------------------------------------------
# VERSION AND PLATFORM COMPATIBILITY
#------------------------------------------------------------------------------
# - Previous PostgreSQL Versions -
#array_nulls = on
#backslash_quote = safe_encoding # on, off, or safe_encoding
#escape_string_warning = on
#lo_compat_privileges = off
#operator_precedence_warning = off
#quote_all_identifiers = off
#standard_conforming_strings = on
#synchronize_seqscans = on
# - Other Platforms and Clients -
#transform_null_equals = off
#------------------------------------------------------------------------------
# ERROR HANDLING
#------------------------------------------------------------------------------
#exit_on_error = off # terminate session on any error?
#restart_after_crash = on # reinitialize after backend crash?
#data_sync_retry = off # retry or panic on failure to fsync
# data?
# (change requires restart)
#------------------------------------------------------------------------------
# CONFIG FILE INCLUDES
#------------------------------------------------------------------------------
# These options allow settings to be loaded from files other than the
# default postgresql.conf.
#include_dir = 'conf.d' # include files ending in '.conf' from
# directory 'conf.d'
#include_if_exists = 'exists.conf' # include file only if it exists
#include = 'special.conf' # include file
#------------------------------------------------------------------------------
# CUSTOMIZED OPTIONS
#------------------------------------------------------------------------------
# Add settings for extensions hereSellega on kõik, konteinerite käivitamiseks saab kasutada käsku Vaatame lihtsat näidet.. Või eraldi konsoolis käsku docker-compose up.
Nii et paketid on installitud, andmebaas on käivitatud, tuleb need omavahel siduda. Selleks tuleb projekti juurkausta lisada fail ormconfig.js, mille sisu on järgmine:
ormconfig.js
const process = require('process');

const username = process.env.POSTGRES_USER || "postgres";
const password = process.env.POSTGRES_PASSWORD || "example";

module.exports = {
  "type": "postgres",
  "host": "localhost",
  "port": 5432,
  username,
  password,
  "database": "postgres",
  "synchronize": true,
  "dropSchema": false,
  "logging": true,
  "entities": [__dirname + "\/src\/**\/*.entity.ts", __dirname + "\/dist\/**\/*.entity.js"],
  "migrations": ["migrations\/**\/*.ts"],
  "subscribers": ["subscriber\/**\/*.ts", "dist\/subscriber\/**\/*.js"],
  "cli": {
    "entitiesDir": "src",
    "migrationsDir": "migrations",
    "subscribersDir": "subscriber"
  }
}
Käesolev konfiguratsioon kasutatakse CLI typeorm jaoks.
Vaatame seda konfiguratsiooni pisut põhjalikumalt. Ridades 3 ja 4 saame kasutajanime ja parooli keskkonnamuutujatest. See on mugav, kui teil on mitu keskkonda (dev, stage, prod jne). Vaikimisi on kasutajanimi postgres, parool on example. Ülejäänud konfiguratsioon on triviaalne, seega peatume vaid kõige huvitavamate parameetrite juures:
- synchronize — näitab, kas andmebaasi skeem tuleks automaatselt luua rakenduse käivitamisel. Olge selle valikuga ettevaatlik ja ärge kasutage seda tootmises, muidu võite andmed kaotada. Seda valikut on mugav kasutada rakenduse arendamisel ja silumisel. Alternatiivina sellele valikule saate kasutada käsku
schema:syncCLI TypeORM-ist. - dropSchema — taastab skeemi iga kord, kui ühendus luuakse. Nagu eelmistki, tuleks seda valikut kasutada vaid rakenduse arendamise ja silumise ajal.
- entities — missuguste teede kaudu otsitakse mudelite kirjeldusi. Pange tähele, et toetatakse mustri järgi otsimist.
- cli.entitiesDir — kaust, kuhu loomulikult peavad CLI typeorm-i kaudu loodud mudelid jääma.
Kuna soovime kasutada kõiki TypeORM-i võimalusi meie Nest rakenduses, tuleb importida moodul TypeOrmModule ja AppModule. See tähendab, et teie AppModule näeb välja järgmiselt:
app.module.ts
import { Module } from '@nestjs/common';
import { AppController } from './app.controller';
import { AppService } from './app.service';
import { TypeOrmModule } from '@nestjs/typeorm';
import * as process from "process";

const username = process.env.POSTGRES_USER || 'postgres';
const password = process.env.POSTGRES_PASSWORD || 'example';

@Module({
  imports: [
    TypeOrmModule.forRoot({
      type: 'postgres',
      host: 'localhost',
      port: 5432,
      username,
      password,
      database: 'postgres',
      entities: [__dirname + '/**/*.entity{.ts,.js}'],
      synchronize: true,
    }),
  ],
  controllers: [AppController],
  providers: [AppService],
})
export class AppModule {}
Nagu tähele panite, edastatakse meetodisse forRoot sama konfiguratsioon, mis tööks andmebaasi, nagu ormconfig.ts failis
Viimane puudutus on lisada mõned ülesanded TypeORMi jaoks package.json faili. Probleem on selles, et CLI on kirjutatud Javascriptis ja käivitatakse Node.js keskkonnas. Siiski on kõik meie mudelid ja migratsioonid kirjutatud Typescriptis. Seetõttu on meie migratsioonide ja mudelite transpileerimine vajalik enne CLI kasutamist. Selleks vajame ts-node paketti:
yarn add -D ts-node
Pärast seda lisame package.json faili vajalikud käsud:
"typeorm": "ts-node -r tsconfig-paths/register ./node_modules/typeorm/cli.js",
"migration:generate": "yarn run typeorm migration:generate -n",
"migration:create": "yarn run typeorm migration:create -n",
"migration:run": "yarn run typeorm migration:run"
Esimene käsk, typeorm, lisab ts-node'i paketi TypeORM CLI käivitamiseks. Ülejäänud käsud on mugavad lühendid, mida arendajana kasutate praktiliselt iga päev:
migration:generate — migratsiooni loomine teie mudelite põhjal toimunud muudatuste alusel.
migration:create — tühi migratsioon.
migration:run — migratsioonide käivitamine.
Nüüd on kõik, oleme lisanud vajalikud paketid, konfigureerinud rakenduse koostöös andmebaasi, nii CLI kui ka rakendusena, ning käivitanud andmebaasi. On aeg lisada loogikat meie rakendusse.
Pakettide installimine CRUDi loomiseks
Kasutades ainult Nest'i, saab luua API, mis võimaldab luua, lugeda, uuendada ja kustutada üksust. Selline lahendus on maksimaalselt paindlik, kuid mõningatel juhtudel liiga palju. Näiteks, kui peate kiiresti prototüüpi looma, võib sageli paindlikkusest loobumine kiire arenduse nimel olla vajalik. Paljud raamistikud pakuvad funktsionaalsust CRUDi genereerimiseks vastavalt teatud andmemudeli kirjeldusele. Nest ei ole erand! See funktsionaalsus on saadaval paketis . Selle võimalused on väga huvitavad:
- lihtne installimine ja seadistamine;
- andmebaasist sõltumatus;
- võimas päringu keel filtreerimise, lehe vahetamise, sortimise, sidumiste ja sisemise üksuste laadimise, vahemällu salvestamise jne. võimalustega;
- pakett päringute vormimiseks front-endis;
- lihtne kontrolleri meetodite üledefineerimine;
- väike konfig;
- swaggeri dokumentatsiooni tugi.
Funktsionaalsus on jagatud mitmeks paketiks:
- — põhipakett, mis pakub dekoraatoreid () marsruutide genereerimiseks, konfigureerimiseks ja valideerimiseks;
- — pakett, mis pakub ehitajat/parsitöötlejat päringute jaoks frontendi poolel kasutamiseks;
- — pakett, mis integreerib TypeORM-i, pakkudes põhiteenust TypeOrmCrudService CRUD meetoditega andmebaasi üksustega töötamiseks.
Käesolevas juhendis vajame pakette jsx/crud ja jsx/crud-typeorm. Alustamiseks paigaldame need
yarn add @nestjsx/crud class-transformer class-validatorPakettide ja on käesolevas rakenduses vajalik deklaratiivsete reeglite määratlemiseks mudelihalduse ja sisendpäringute valideerimise jaoks. Need paketid on ühe autori omad, seega on liidesed sarnased.
Otsene CRUD rakendamine
Mudeli näitena võtame kasutajate nimekirja. Kasutajatel on järgmised väljad: id, username, displayName, email. id — auto-inkrementeeritav väli, email ja username — unikaalsed väljad. Kõik on lihtne! Jäänud on meie idee ellu viia Nest rakendusena.
Alustamiseks tuleb luua moodul users, mis vastutab kasutajatega töötamise eest. Kasutame NestJS-cli-d ja määrame meie projekti juurkataloogis käsu nest g module users.
nest g module users
dmitrii@dmitrii-HP-ZBook-17-G3:~/projects/nest-rest git:(master*)$ nest g module users
CREATE /src/users/users.module.ts (82 bytes)
UPDATE /src/app.module.ts (312 bytes)
Selles moodulis lisame katalooge entities, kuhu paigutame selle mooduli mudelid. Eelkõige lisame siia faili user.entity.ts, mis kirjeldab kasutajate mudelit:
user.entity.ts
import { Column, Entity, PrimaryGeneratedColumn } from 'typeorm';

@Entity()
export class User {
  @PrimaryGeneratedColumn()
  id: string;

  @Column({unique: true})
  email: string;

  @Column({unique: true})
  username: string;

  @Column({nullable: true})
  displayName: string;
}
Kuna meie rakendus peab selle mudeli "nägema", peame moodulisse UsersModule importima TypeOrmModule järgneva sisu:
users.module.ts
import { Module } from '@nestjs/common';
import { UsersController } from './controllers/users/users.controller';
import { UsersService } from './services/users/users.service';
import { TypeOrmModule } from '@nestjs/typeorm';
import { User } from './entities/user.entity';

@Module({
  controllers: [UsersController],
  providers: [UsersService],
  imports: [
    TypeOrmModule.forFeature([User])
  ]
})
export class UsersModule {}
See, we are importing here TypeOrmModule, where as the method parameter forFeature we specify the list of models related to this module.
We need to create the corresponding entity in the database. For this purpose, the migration mechanism serves. To create a migration based on changes in the models, you need to execute the command npm run migration:generate -- CreateUserTable:
Spoileri pealkiri
$ npm run migration:generate -- CreateUserTable
Migration /home/dmitrii/projects/nest-rest/migrations/1563346135367-CreateUserTable.ts has been generated successfully.
Done in 1.96s.
We didn't have to write the migration manually; it all happened magically. Isn't it a miracle! However, that's not all. Let's take a look at the created migration file:
1563346135367-CreateUserTable.ts
import {MigrationInterface, QueryRunner} from "typeorm";

export class CreateUserTable1563346816726 implements MigrationInterface {

    public async up(queryRunner: QueryRunner): Promise {
        await queryRunner.query(`CREATE TABLE "user" ("id" SERIAL NOT NULL, "email" character varying NOT NULL, "username" character varying NOT NULL, "displayName" character varying, CONSTRAINT "UQ_e12875dfb3b1d92d7d7c5377e22" UNIQUE ("email"), CONSTRAINT "UQ_78a916df40e02a9deb1c4b75edb" UNIQUE ("username"), CONSTRAINT "PK_cace4a159ff9f2512dd42373760" PRIMARY KEY ("id"))`);
    }

    public async down(queryRunner: QueryRunner): Promise {
        await queryRunner.query(`DROP TABLE "user"`);
    }

}
As you can notice, not only the method to run the migration has been automatically generated, but also the method to roll it back. Fantastic!
We just need to apply this migration. This is done with the following command:
npm run migration:run.That's it, now the schema changes have been transferred to the database.
Next, we will create a service that will be responsible for working with users and we'll inherit it from TypeOrmCrudService. In the parent constructor parameter, you need to pass the repository of the entity of interest, which in our case is the User repository.
users.service.ts
import { Injectable } from '@nestjs/common';
import { TypeOrmCrudService } from '@nestjsx/crud-typeorm';
import { User } from '../../entities/user.entity';
import { InjectRepository } from '@nestjs/typeorm';
import { Repository } from 'typeorm';

@Injectable()
export class UsersService extends TypeOrmCrudService{
  constructor(@InjectRepository(User) usersRepository: Repository){
    super(usersRepository);
  }
}
We will need this service in the controller users. To create a controller, type in the console nest g controller users/controllers/users
nest g controller users/controllers/users
dmitrii@dmitrii-HP-ZBook-17-G3:~\/projects\/nest-rest git:(master*)$ nest g controller users\/controllers\/users
CREATE \/src\/users\/controllers\/users\/users.controller.spec.ts (486 bytes)
CREATE \/src\/users\/controllers\/users\/users.controller.ts (99 bytes)
UPDATE \/src\/users\/users.module.ts (188 bytes)
Avame see kontrollija ja redigeerime seda, et lisada veidi maagiat jsx\/crud. Klass UsersController lisame dekoraatori järgmise kujuga:
@Crud({
  model: {
    type: User
  }
}) — see on dekoraator, mis lisab kontrollijale vajalikud meetodid mudeliga töötamiseks. Mudeli tüüp määratakse model.type dekoraatori konfiguratsiooni.
Teine samm — tuleb rakendada liidest CrudController<User>. Kogu kontrollija kood näeb välja järgmine:
import { Controller } from '@nestjs\/common';
import { Crud, CrudController } from '@nestjsx\/crud';
import { User } from '..\/..\/entities\/user.entity';
import { UsersService } from '..\/..\/services\/users\/users.service';

@Crud({
  model: {
    type: User
  }
})
@Controller('users')
export class UsersController implements CrudController<User>{
  constructor(public service: UsersService){}
}
Ja see on kõik! Nüüd toetab kontrollija kogu mudeliga töötamiseks vajalikke toimingute komplekti! Ei usu? Proovime meie rakendust praktikas!
TestMace'is päringute stsenaariumide loomine
Kuna meie teenuse testimiseks kasutame API töö IDE-d . Miks TestMace? Võrreldes sarnaste toodetega, on tal järgmised eelised:
- võimas töötamine muutujatega. Hetkel on olemas mitu tüüpi muutujaid, millest igaühel on oma roll: sisseehitatud muutujad, dünaamilised muutujad, keskkonnamuutujad. Iga muutuja kuulub mingisse sõlme, toetades pärimismehhanismi;
- stsenaariumide lihtne loomine ilma programmeerimise vajaduseta. Sellest räägime allpool;
- inimesele arusaadav formaat, mis võimaldab projekti säilitamist versioonihaldussüsteemides;
- autotäiendamine, süntaksi esiletõstmine, muutuja väärtuste esiletõstmine;
- API kirjelduse tugi, importimise võimalusega Swagger'ist.
Käivitame meie serveri käsuga npm start ja proovime pöörduda kasutajate nimekirja poole. Kasutajate nimekirja, lähtudes meie kontrollija konfiguratsioonist, saab kätte url localhost:3000\/users. Teeme päringu sellele url-ile.
Pärast TestMace'i käivitamist näete sellist liidest:
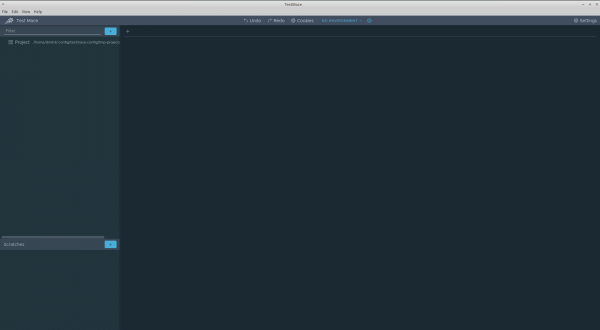
Vasakul üleval asub projektide puu, mille juureks on . Proovime luua esimese päringu kasutajate nimekirja saamiseks. Selleks loome sõlme. See tehakse Projekt sõlme kontekstimenüüs Lisa sõlm -> RequestStep.
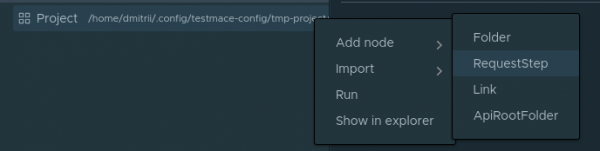
Sisestage URL väljale localhost:3000/users ja tehke päring. Saame 200 koodi tühja massiiviga vastuse kehas. See on arusaadav, kuna me ei ole veel kedagi lisanud.
Lähme edasi ja loome skripti, mis sisaldab järgmisi samme:
- kasutaja loomine;
- just loodud kasutaja ID päring;
- kasutaja kustutamine ID järgi, mis loodi 1. sammus.
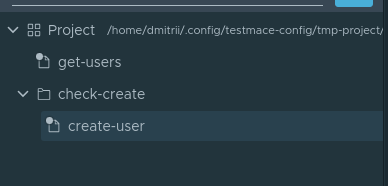
Nii et, alul. Mugavuse huvides loome sõlme tüübil . Sisuliselt on see lihtsalt kaust, kuhu salvestame kogu skripti. Folderi tüüpi sõlme loomiseks tuleb Project sõlme kontekstimenüüst valida Add node -> Folder. Nimeks saab sõlm check-create. Sõlme sees check-create loome oma esimese päringu kasutaja loomiseks. Uus loodud sõlm kannab nime create-user. Seega, praeguseks on sõlmede hierarhia järgmine:
Lähme avatud create-user sõlme vahekaardile. Sisestame järgmised parameetrid päringu jaoks:
- Päringu tüüp — POST
- URL — localhost:3000/users
- Body — JSON väärtusega
{"email": "user@user.com", "displayName": "New user", "username": "user"}
Teeme selle päringu. Meie rakendus ütleb, et kirje on loodud.
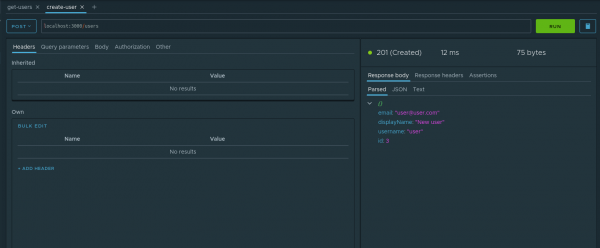
Lähme vaatama, kas see on tõsi. Et tulevastes etappides töötada loodud kasutaja ID-ga, peame selle parameetri salvestama. Selleks sobib suurepäraselt mehhanism . Vaadakem meie näites, kuidas nende kasutamine toimub. Vastuse parsed vahekaardil tuleb sõlme ID kontekstimenüüst valida valik Assign to variable. Dialoogiboksis peab määrama järgmised parameetrid:
- Node — mille ülemuses luua dünaamiline muutuja. Valime check-create
- Variable name — selle muutuja nimi. Nimeks saavad
userId.
Nii näeb välja dünaamilise muutuja loomise protsess:
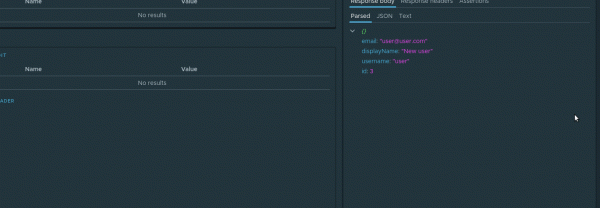
Nüüd iga kord, kui seda päringut tehakse, värskendatakse dünaamilise muutuja väärtust. Kuna dünaamilised muutujad toetavad hierarhilist pärimist, on muutuja userId saadaval missuguseski tasemes sõlme all. check-create Järgmises päringus on see muutuja meile kasulik. Nimelt, küsime just loodud kasutajat. Sõlme all
loome päringu check-create check-if exists mis on parameetriga url võrdne localhost:3000/users/${$dynamicVar.userId}. Konstruktsioon, mis näeb välja nagu ${variable_name} on muutuja väärtuse saamine. Kuna meil on dünaamiline muutuja, tuleb selle saamiseks pöörduda objekti poole $dynamicVar, st. see completely addressing a dynamic variable userId will look like this ${$dynamicVar.userId}. Let's make a request and ensure that the data is being requested correctly.
One last touch — to make a delete request. We need this not only to check the deletion's functionality but also to clean up in the database, as the email and username fields are unique. So, in the check-create node, we will create a delete-user request with the following parameters
- Request type — DELETE
- URL —
localhost:3000/users/${$dynamicVar.userId}
We initiate. We wait. We enjoy the result)
Now we can launch this entire scenario at any moment. To launch the scenario, you need to select the item check-create in the context menu of the node Käita.
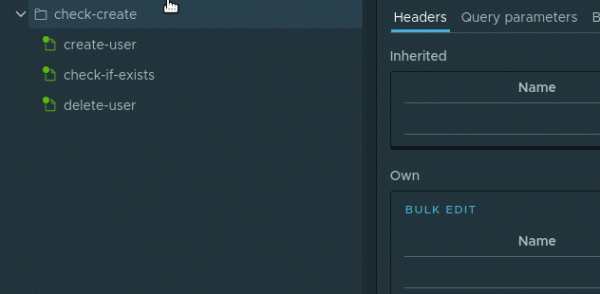
The nodes in the scenario will execute one after the other
You can save this scenario to your project by executing File -> Save project.
Kokkuvõte
The format of this article simply could not fit all the tricks of the tools used. As for the main culprit — the package jsx/crud — the following topics remain unexplored:
- custom validation and transformation of models;
- a powerful query language and its convenient use on the front end;
- overriding and adding new methods in crud controllers;
- swagger support;
- cache management.
However, even what is described in the article is enough to understand that even an enterprise framework like NestJS has tools for quickly prototyping applications. And such a great IDE as allows you to maintain the given pace.
The source code of this article, along with the project , is available in the repository . To open the project simply perform in the application File -> Open project.
Allikas: habr.com
